For about 100 dollars more than the TUF BE3600 (at the moment of writing), you can get the ASUS RT-BE88U which is a sort of mid-range WiFi 7 router that also doesn’t support the 6GHz radio band, but it does have some features that may or may not compensate for this major deficiency.
There is support for MLO where you can aggregate the two existing radio bands for a potentially better throughput and range, but perhaps the most interesting new additions are the the 10GbE Ethernet port and the 10GbE SFP+ slot.
Don’t get me wrong, it makes perfect sense considering the price tag of the device, but we finally managed to get above 2.5GbE since this was a major bottleneck for the WiFi 7 true potential. Whether the ASUS RT-BE88U is capable to actually cross this limit is another story. But we will find out very soon, in the testing section. Other features that are worth mentioning are the powerful chipset, the 2GB of RAM, the AiProtection Pro and there has also been some improvements towards how the AiMesh functions.
Now, we get the AI-powered smart AiMesh which can apparently leverage MLO to switch between bands to find the most suitable one for data transmission. All this would be interesting in practice, so let’s get a closer look at the router.
Design and Build Quality
Design-wise, the ASUS RT-BE88U is very similar to the RT-AX88U Pro with the only notable difference being the golden piece around the logo. The RT-AX88U Pro is also identical to the RT-AX88U which also closely resembles the RT-AC88U, so it’s a long line of devices with very little changes in terms of looks and design.
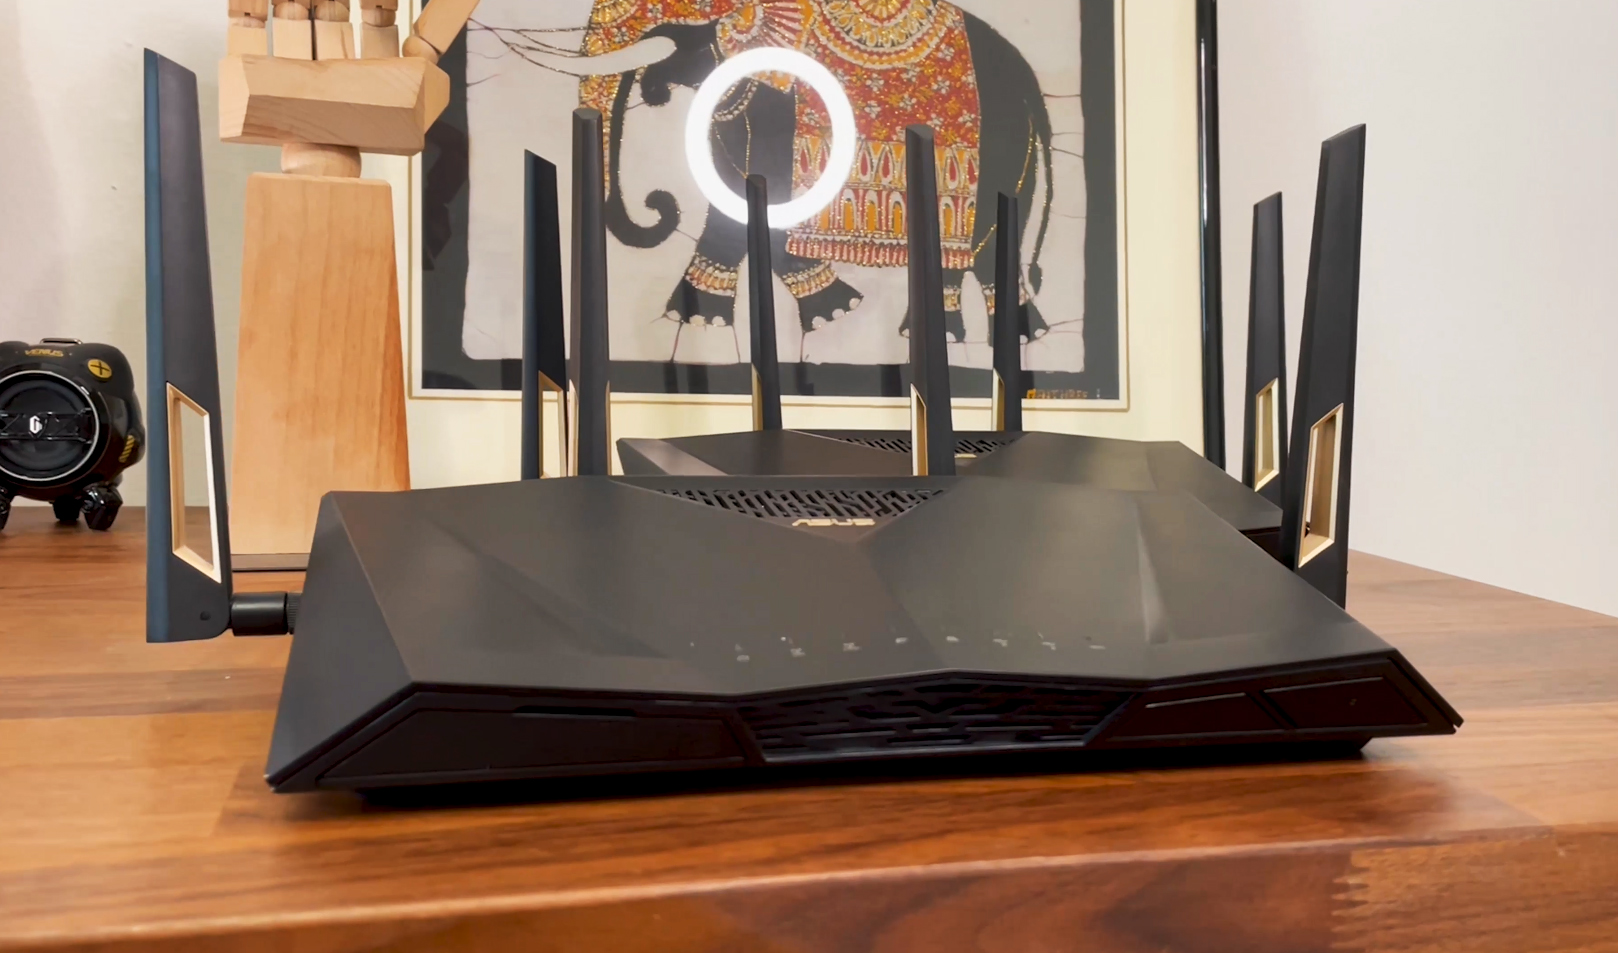
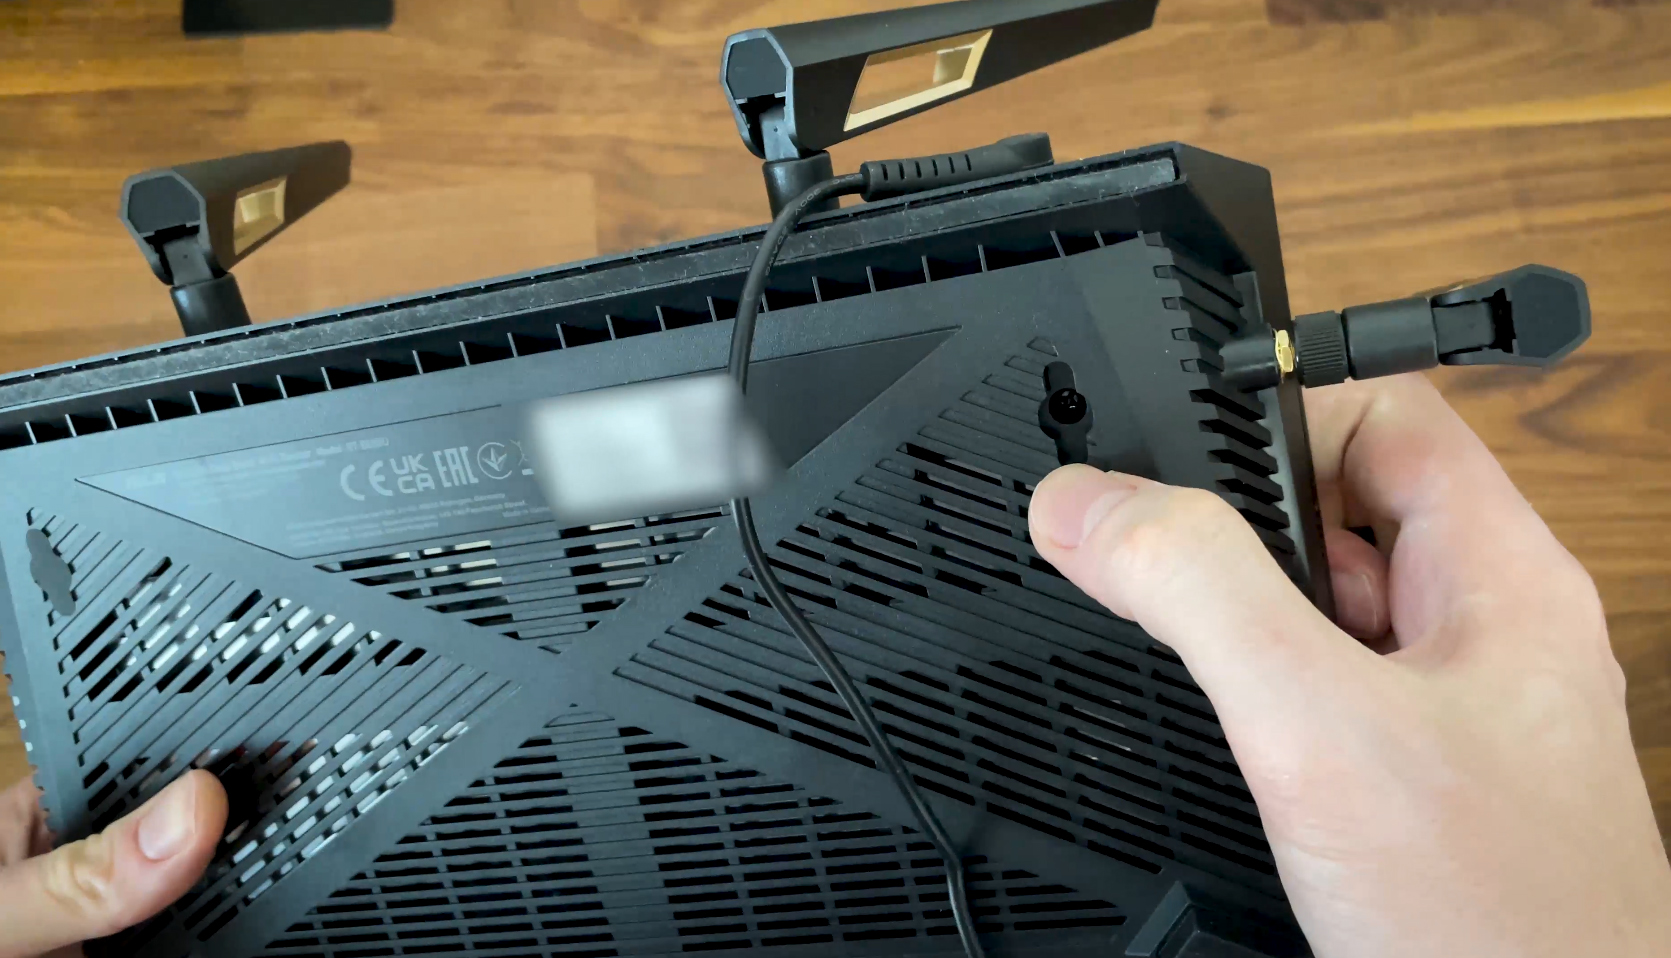
The case remains large and the two side antennas do increase the footprint even more, but we do get the option to mount the router on the wall, right? Not in the traditional sense, no. There are two silicone covers which hide what looks like mounting holes, but there is no canal where to hook up the router on the screw heads.
It’s flat. You can still hang the router, just be careful not to bump into it or accidentally yank a cable, otherwise, it will tumble to the floor.
On the front, we get to see the status LEDs and I am happy with the developers decision to not go with the minimalist, but incredibly confusing single multi-colored LED. There are no other buttons or ports here or on the sides, everything else can be found on the rear side of the router. From the left side, we get the 10GbE WAN/LAN port followed by an SFP+ slot that support 10GbE modules.
Then, there’s the WPS button preceded by eight LAN ports. The first four are 2.5GbE, while the last are Gigabit only. And also I need to mention that the first port is WAN/LAN, while the fourth is a Gaming port, so connecting a gaming device to it will automatically give it a higher priority.
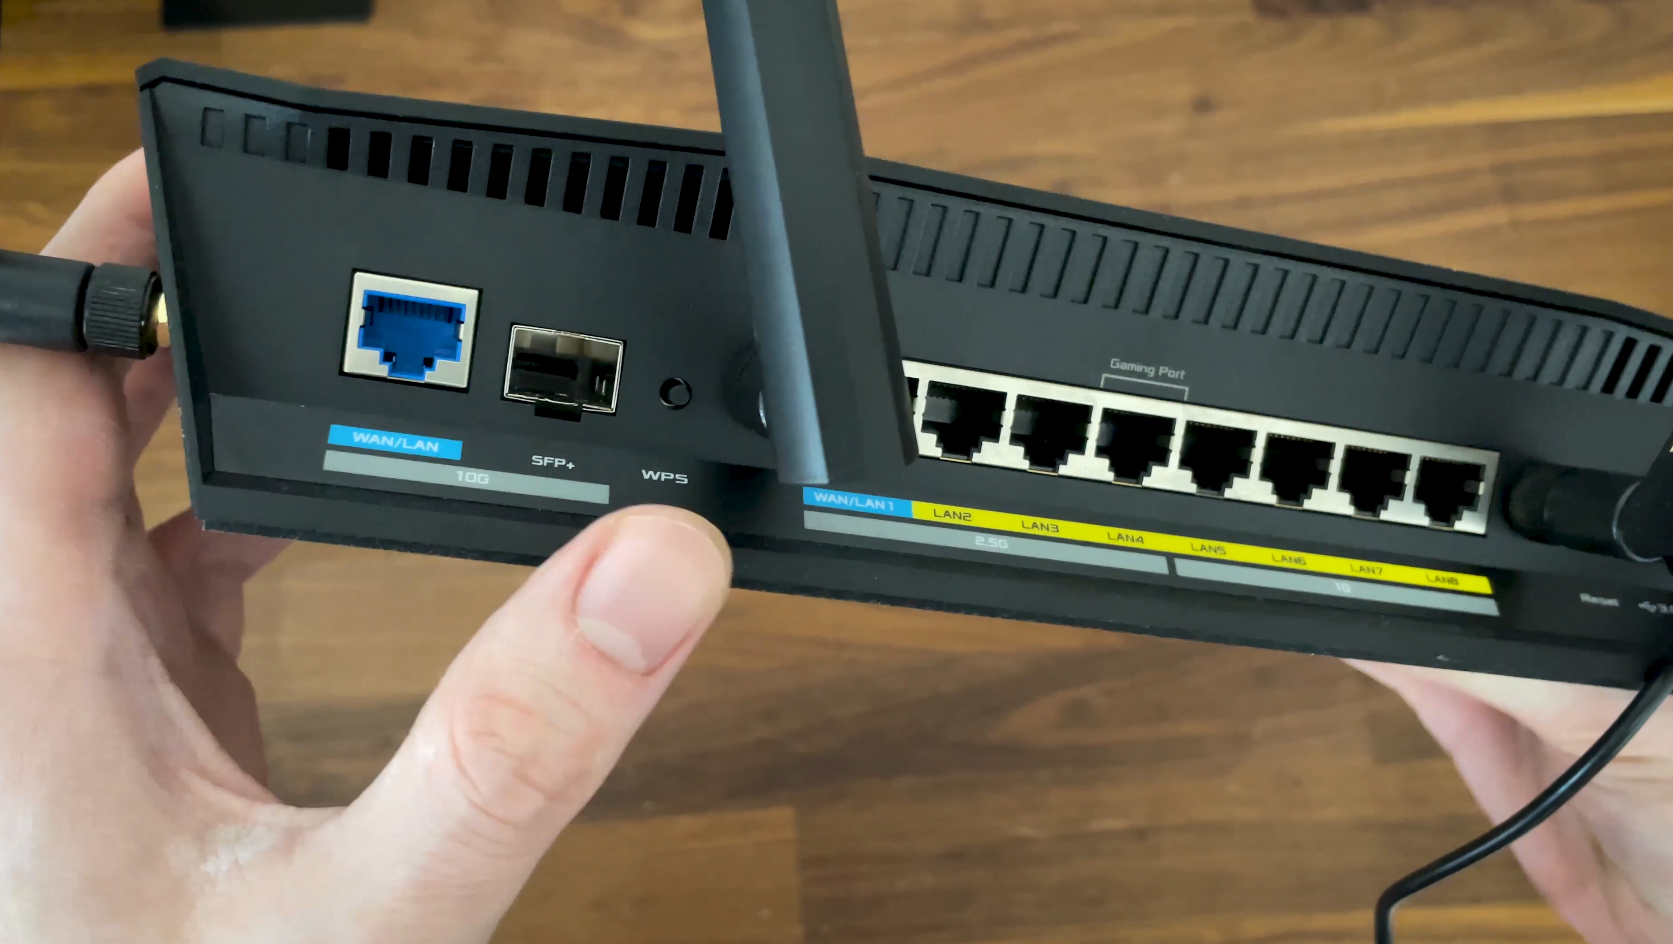
Lastly, there’s the Reset button, the USB 3.0 port, the DC In port and the Power button.
The Heat Management
The type of case that ASUS went for with the RT-BE88U has proven over the years to be successful at pushing the heat away from the inner components. There are lots of ventilation openings all around, including in the front and top side, so it should be enough for it to remain at a decent temperature, right?
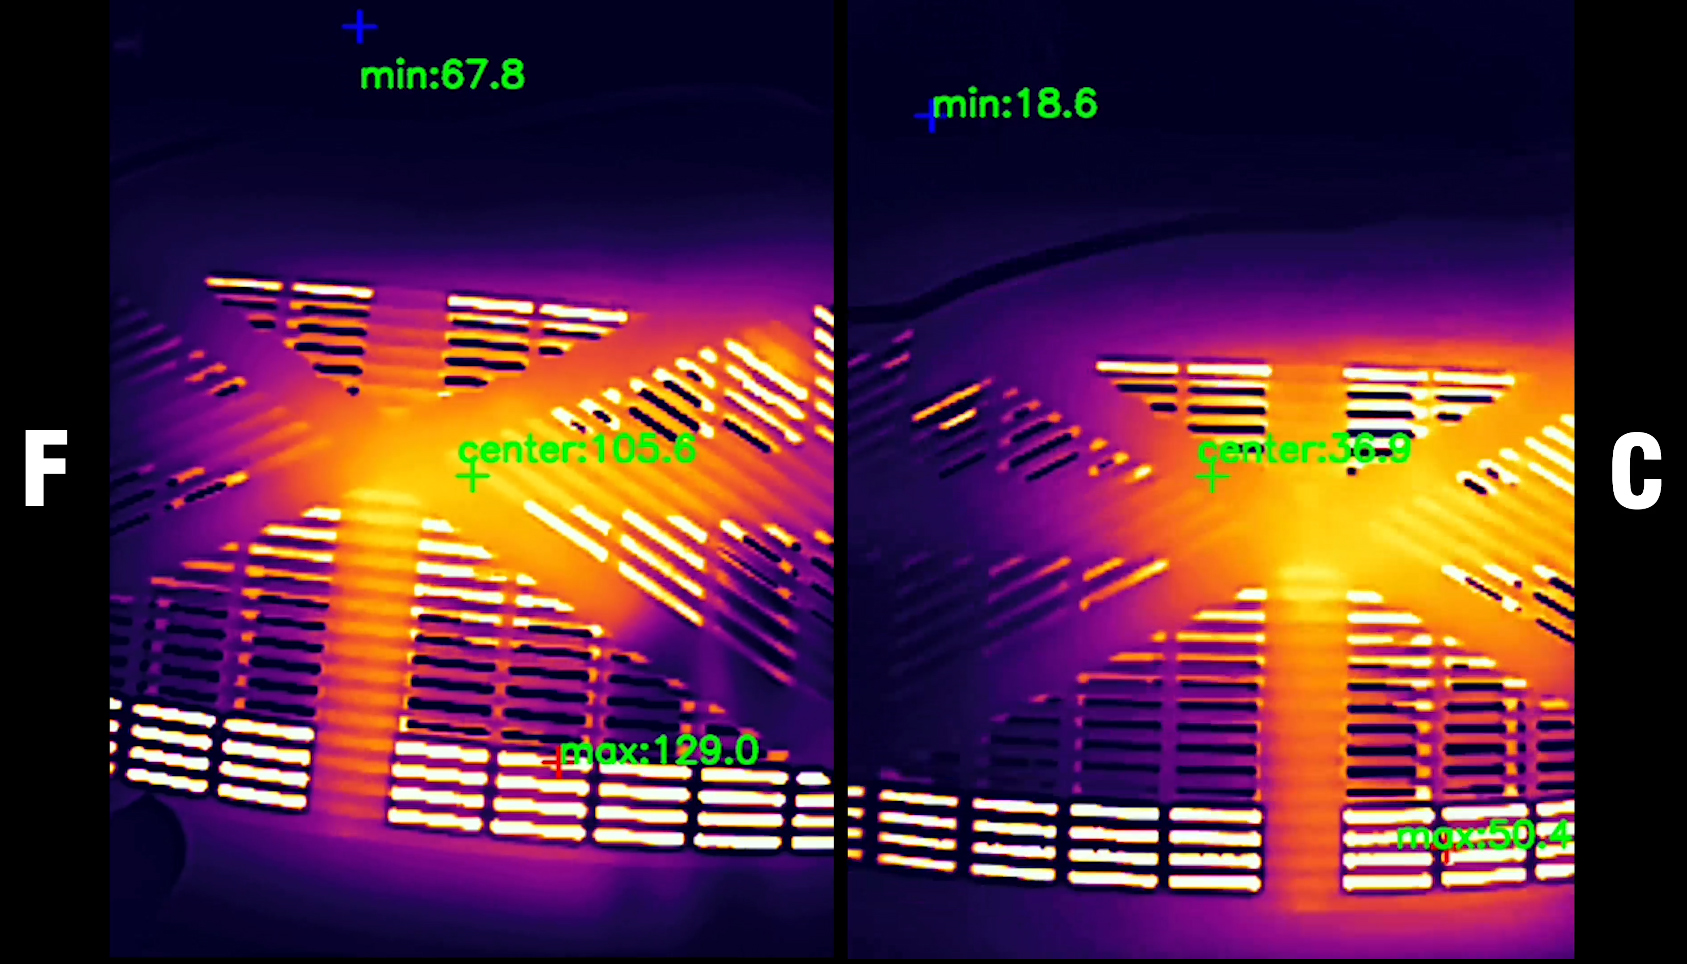
I used a thermal camera to show you the thermal management of the router and I had to include two type of footage, one for Fahrenheit, the other for Celsius since I had some complaints that the conversion can not be done easily. And, apparently, it does get heated up a bit more than its predecessors, although I doubt it will lead to thermal throttling.
ASUS RT-BE88U Teardown
I did open the ASUS RT-BE88U in a separate video and it wasn’t a very difficult process. There are four screws on the rear side hidden by silicone covers and one screw has a warranty seal glued on top of it. It’s more of a scare tactic in the US, but in other countries, I would be careful that the warranty can be voided by a small fragile piece of paper that holds no functional value for the router itself.
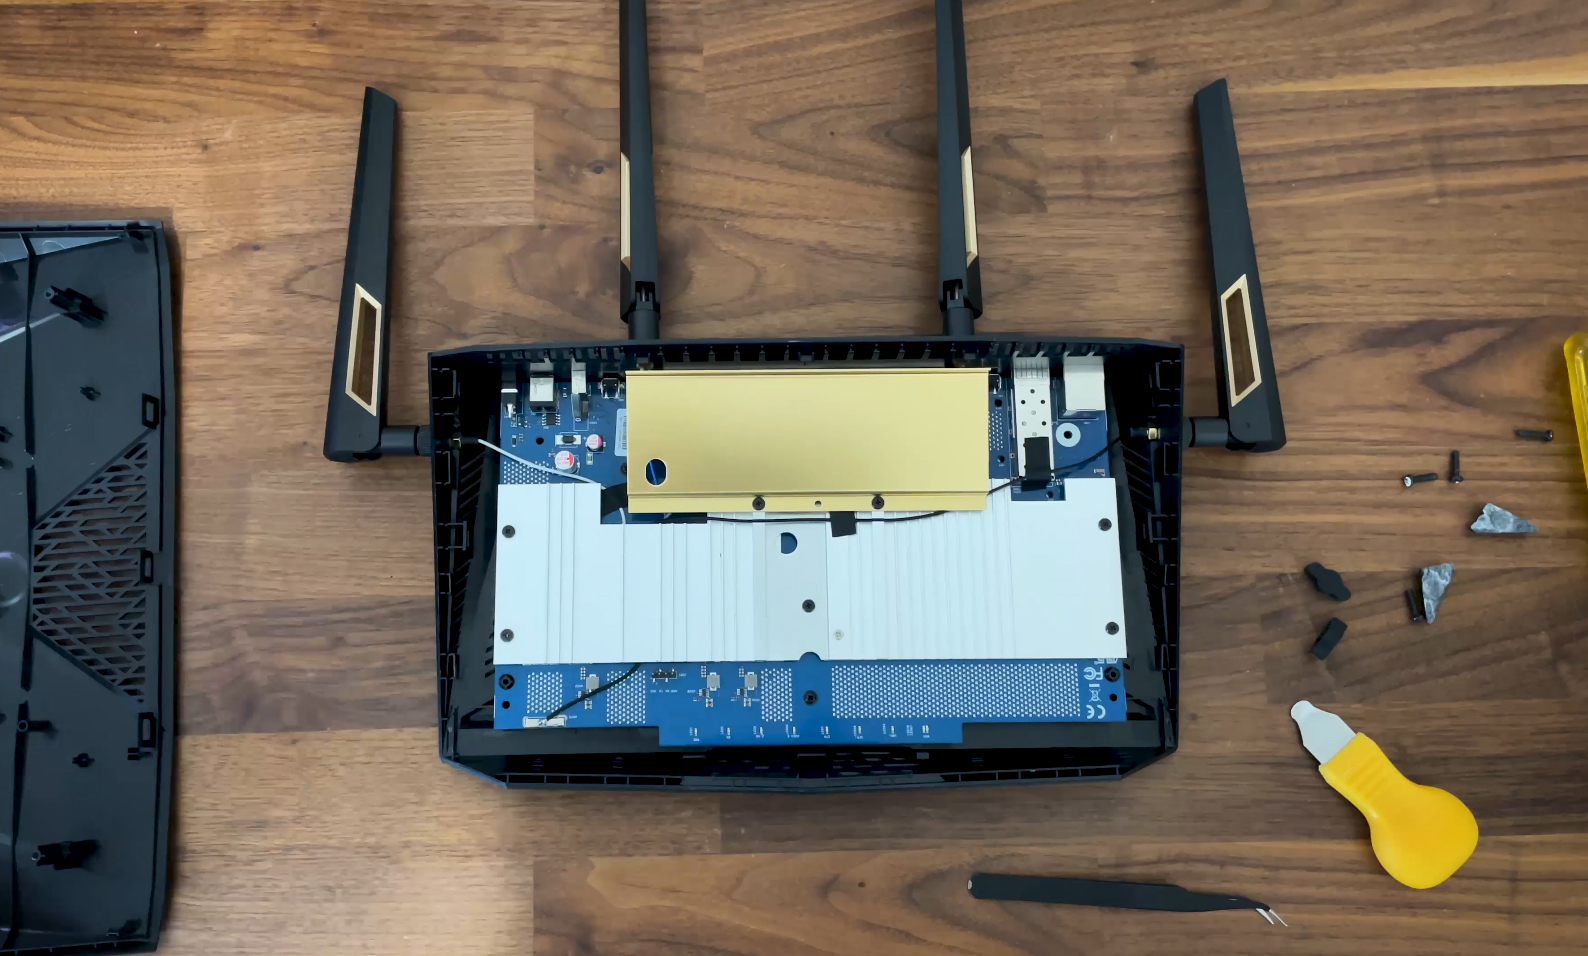
Funny how these things work. The PCB is large enough to cover most of the inner side and there are three heat spreaders to push the heat away from the main chipsets. You can have a closer took at the main components, but I did go through them a bit quicker, so either pause or check the dedicated video for a slower pace. At the end, I had to also include a comparison table with other similar wireless routers.
| Asus RT-BE88U | ASUS TUF Gaming BE3600 | Xiaomi BE7000 | Asus TUF-AX4200 | |
| CPU | quad-core 2.6GHz Broadcom BCM4916KFEBG | quad-core 2.0GHz Broadcom BCM6764LFKFEBG | quad-core 1.5GHz Qualcomm IPQ9554 | quad-core 2.0GHz Mediatek MT7986AV |
| RAM | 2GB Samsung SEC 346 K4AAG16 5WCBCWE | 1GB Nanya NT5AD512M16C4-HR | 1GB Nanya (2x NT5CC256M16ER-EK) | 512MB Nanya NT5CB256M16ER-FL |
| Storage | 256MB MXIC MX30LF2G28AD-TI | 256MB NAND Winbond 25N02KVZEIR | 128MB GigaDevice 5F1GQ5REY1G | 256MB Winbond 25N02KVZEIR |
| Switch | Broadcom BCM50904 | Realtek RTL83675 PHY | Qualcomm QCA8084 | MXL TC1PZ4122 |
| 5GHz Radio – 1 | Broadcom BCM6726 a/n/ac/ax 4×4:4 | Broadcom BCM6764LFKFEBG a/n/ac/ax/be 2×2:2 | Qualcomm QCN6224 a/n/ac/ax/be 4×4:4 | Mediatek MT7976DAN an/ac/ax 3×3:3 | 5GHz Radio – 2 | – | – | Qualcomm QCN6224 a/n/ac/ax/be 4×4:4 | – |
| 2.4GHz Radio | Broadcom BCM6726 a/b/g/n/ax 4×4:4 | Broadcom BCM6764LFKFEBG a/n/ac/ax/be 2×2:2 | Qualcomm QCN5024 b/g/n/ax 4×4:4 | Mediatek MT7986AV b/g/n/ax 2×2:2 |
The Wireless Test (5GHz)
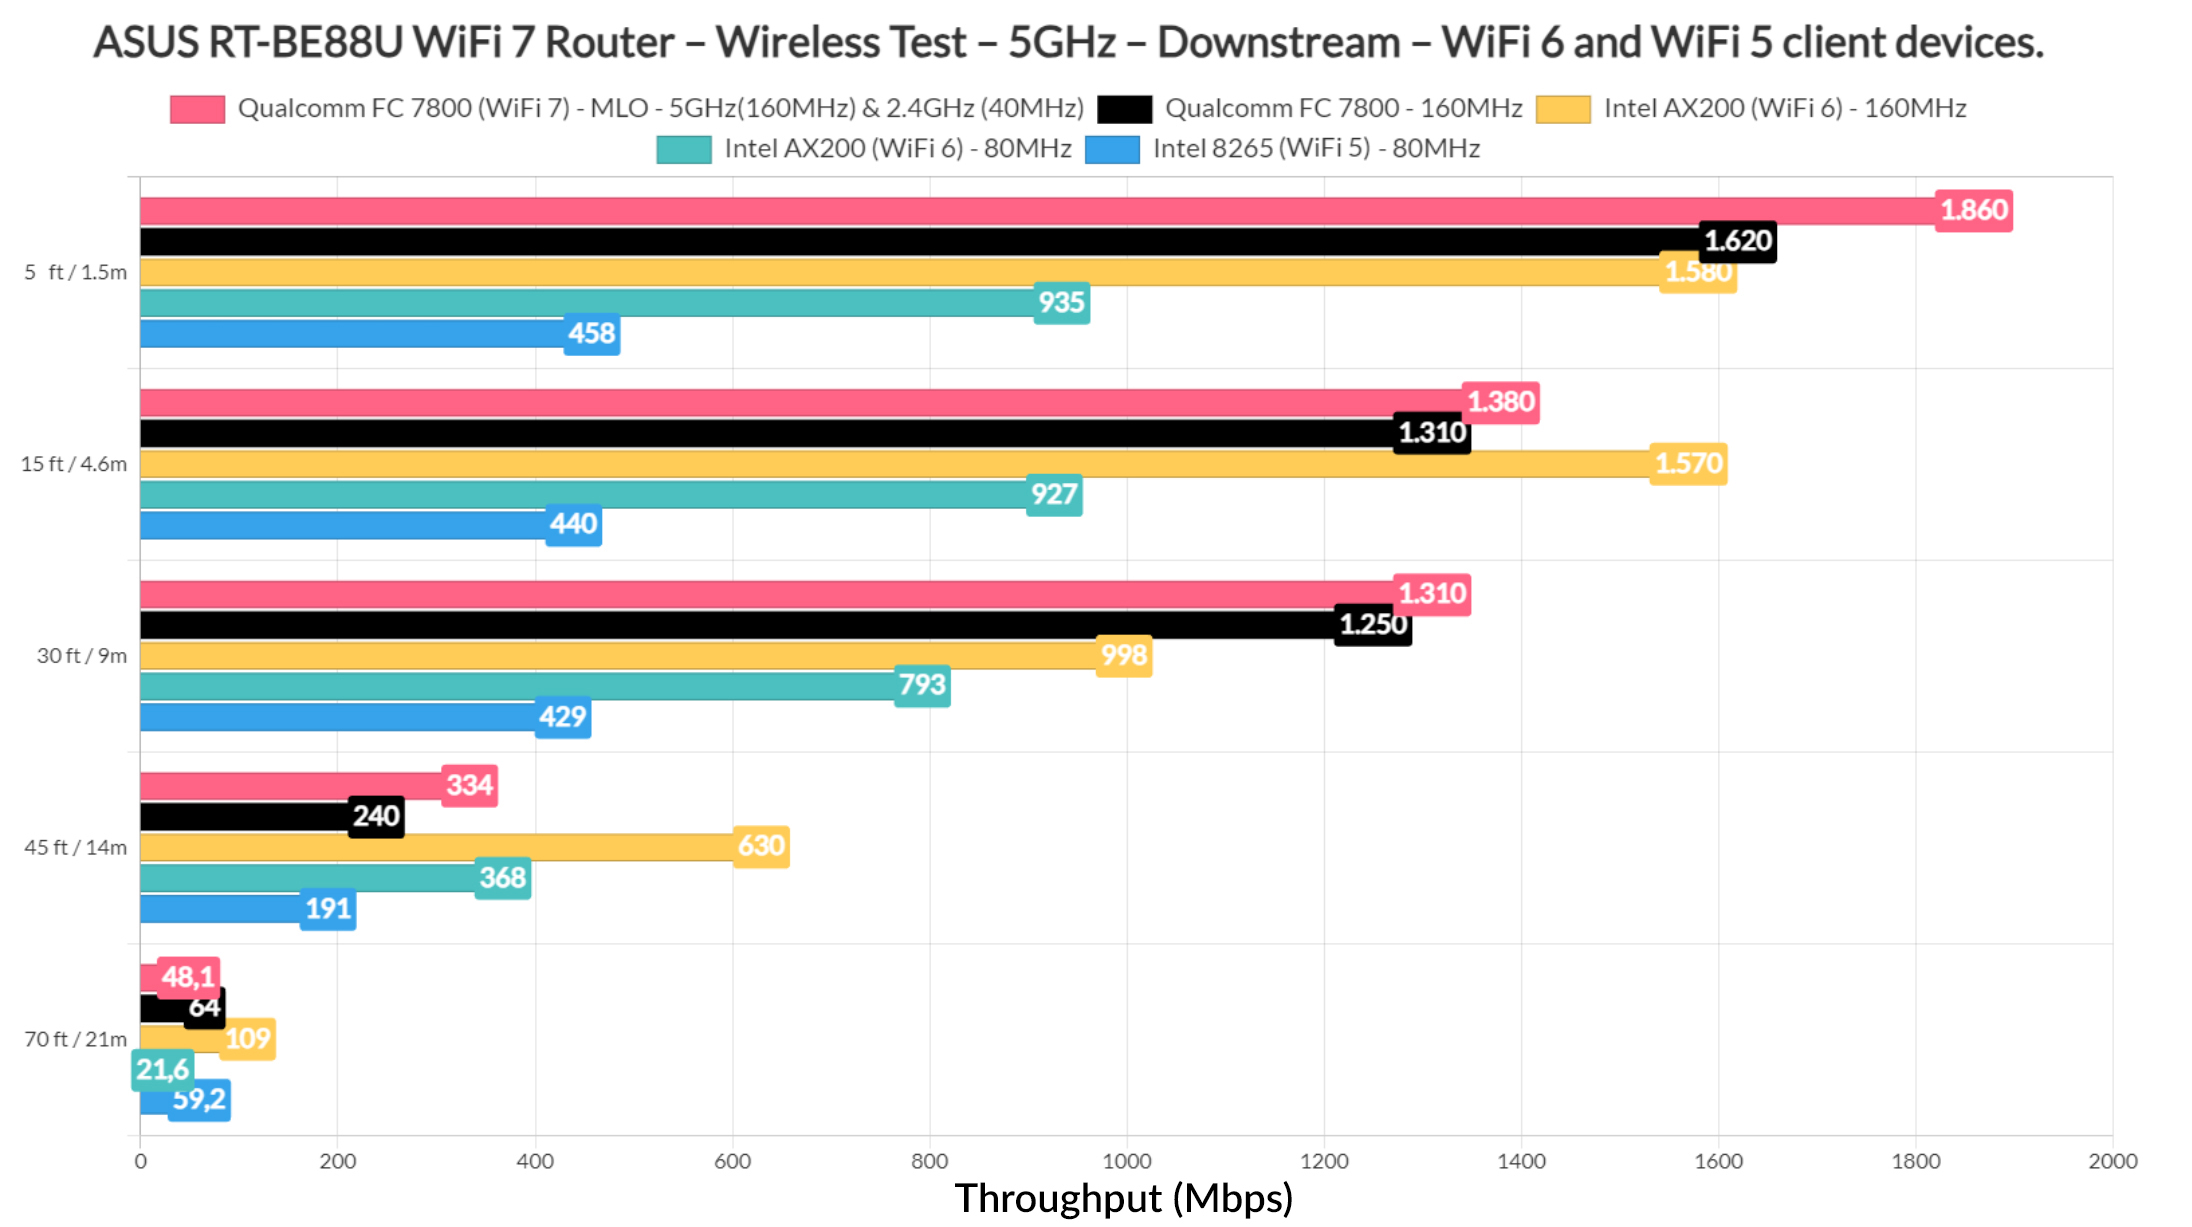
Now let’s talk about the wireless performance of the router. You can see it from the graphic, there are two new elements. Besides the usual WiFi 6 and WiFi 5 client devices, I also ran the same single-client throughput test using a WiFi 7 client device and it’s the same one that I had to use to test the MLO performance as well.
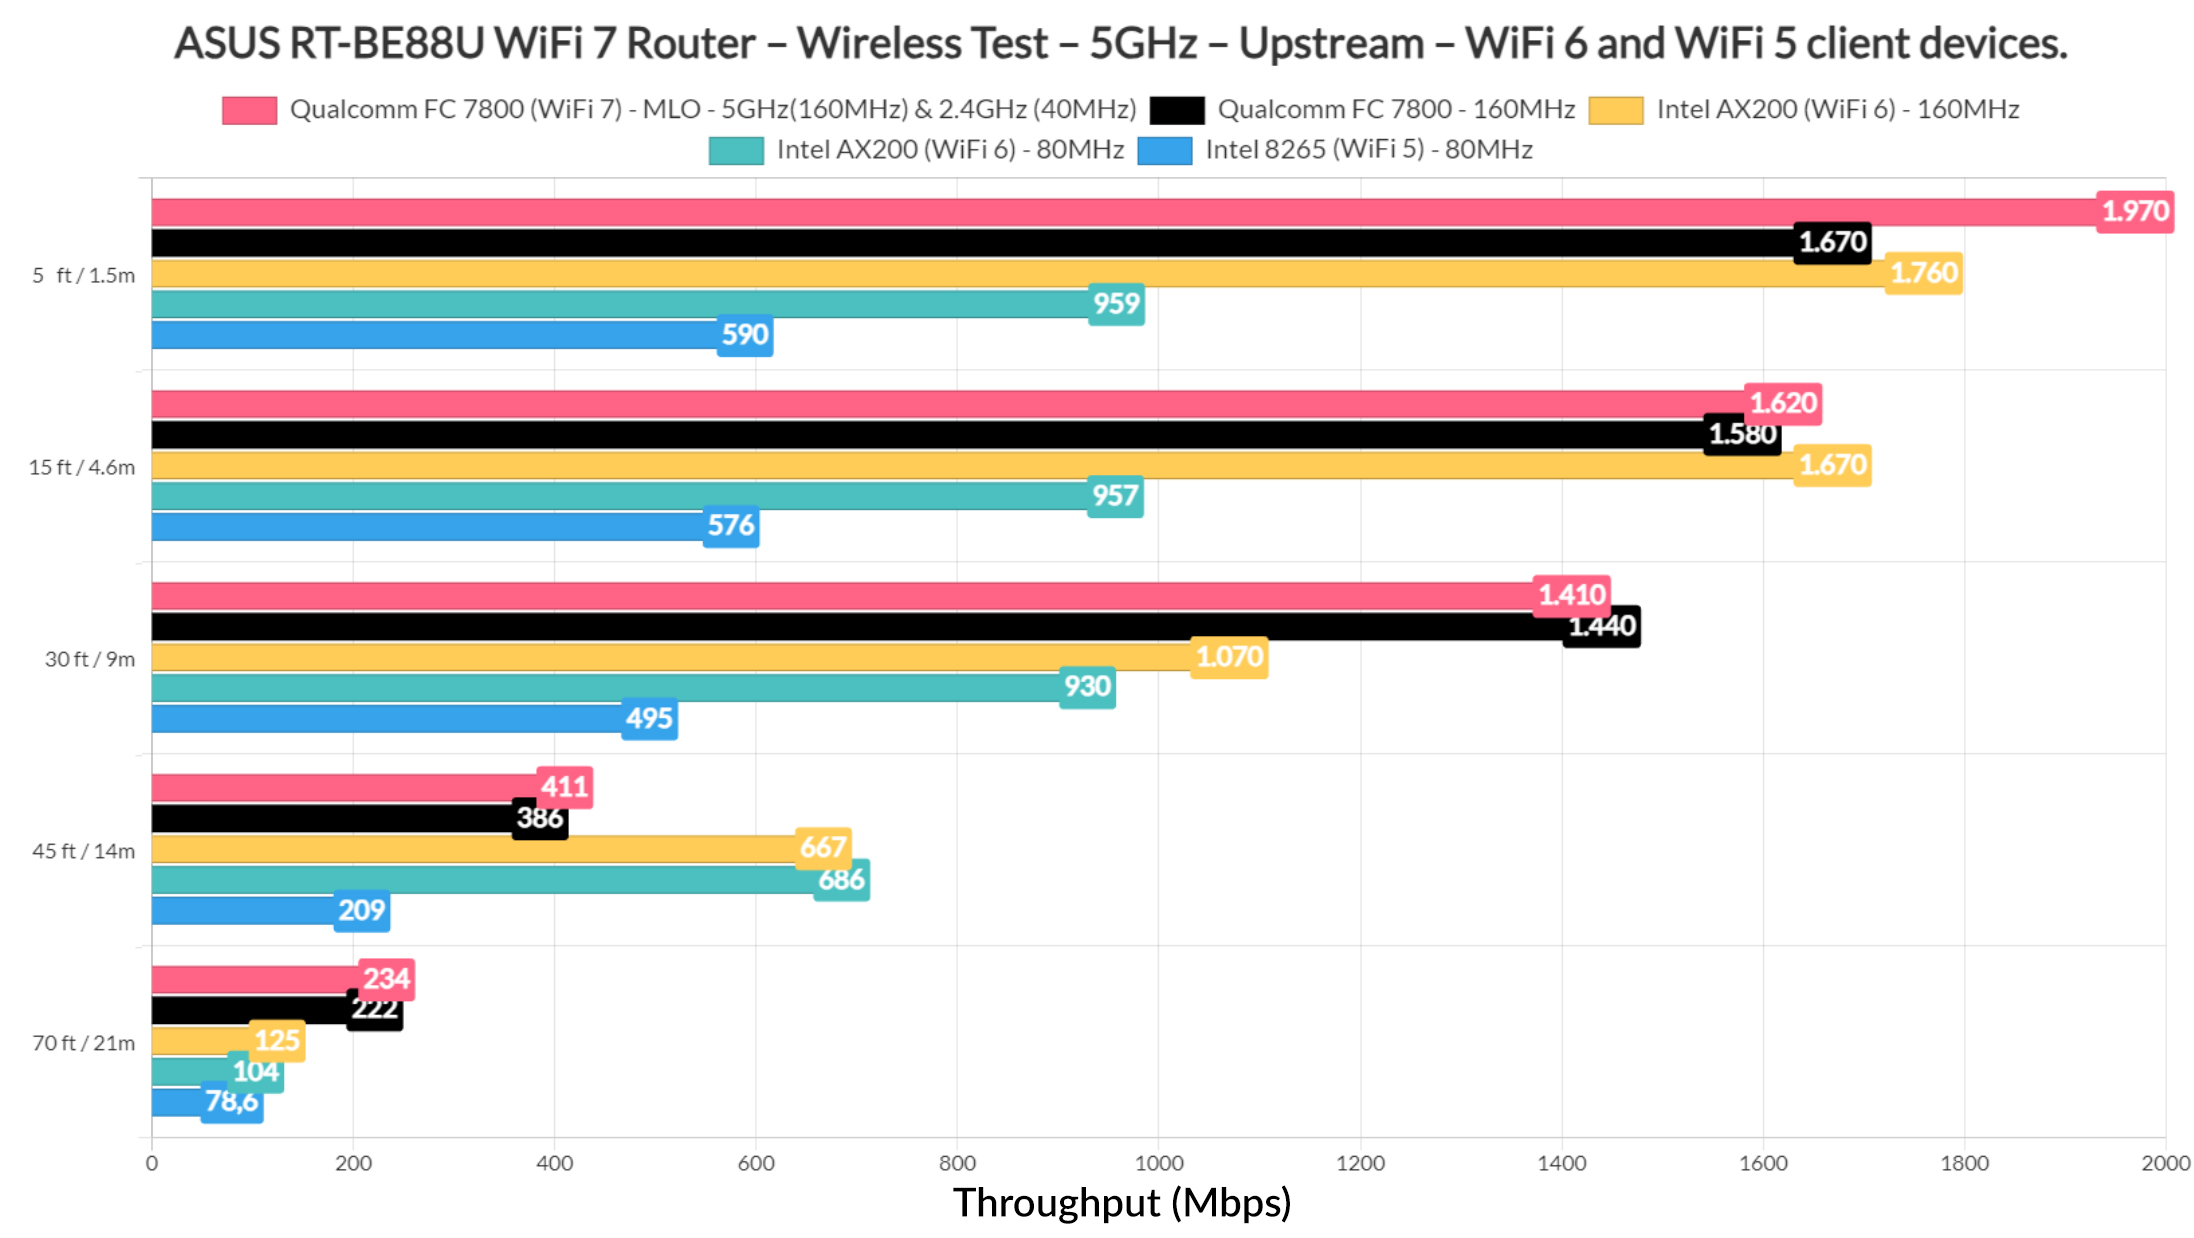
Since there are only the 5GHz and the 2.4GHz radios available, I could aggregated these two and there is an improvement in terms of throughput. And it’s has as much impact even at 70 feet where the signal attenuation is much more of a burden.
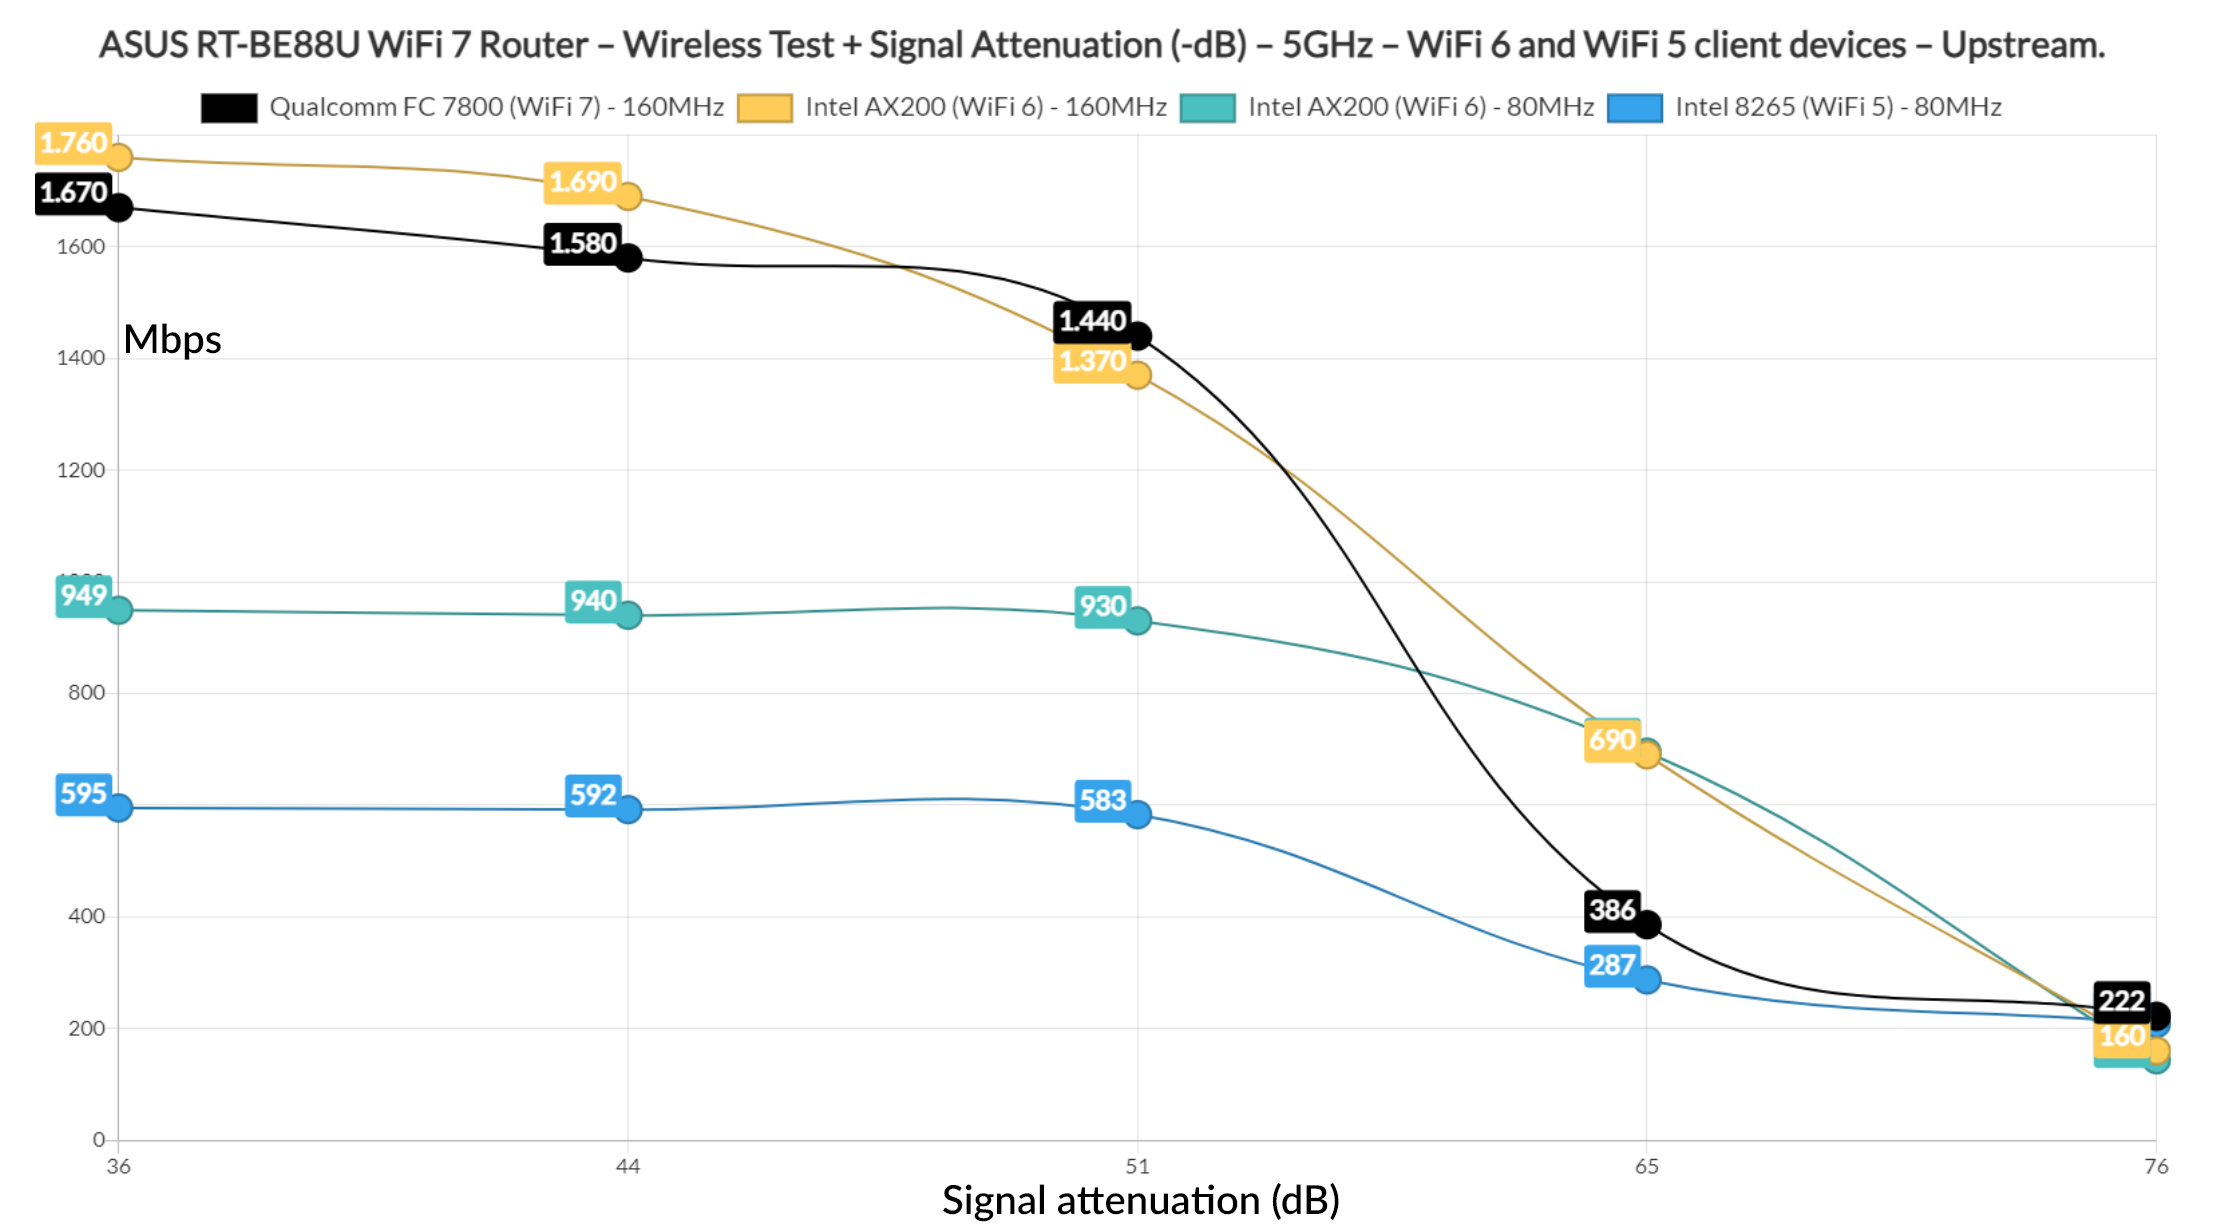
I didn’t include it in the signal attenuation graphic because I registered two simultaneous values from the two radios, as expected. You can also have a look at the values downstream. OK, I do enjoy seeing the throughput reaching almost 2Gbps, but the ASUS RT-BE88U has a 10GbE Ethernet port.
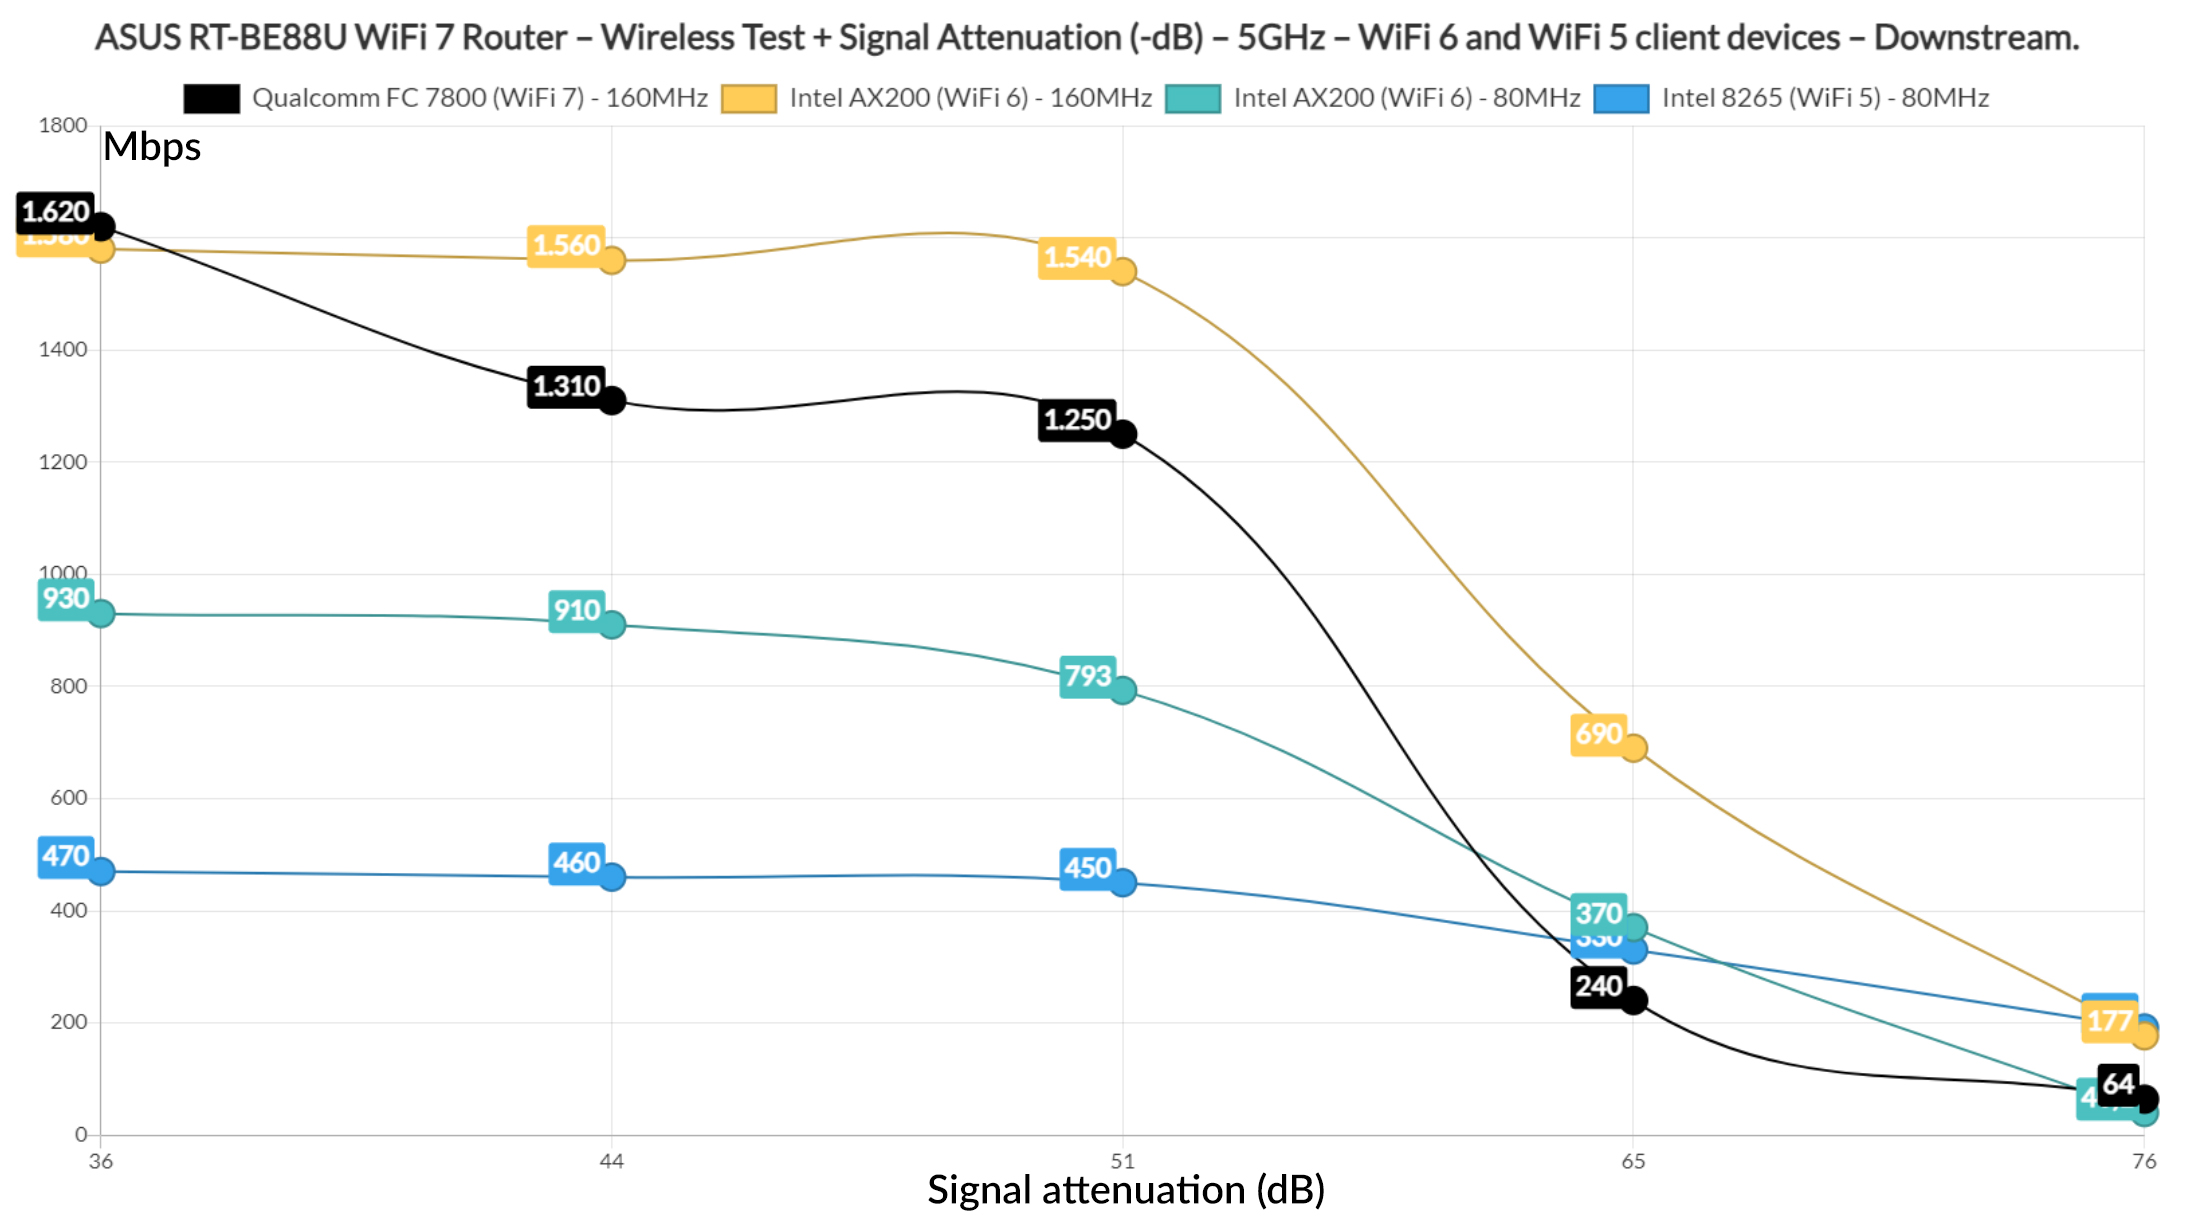
And I did connect a 10GbE server to it, so there was no bottlenecking, this is the max performance that the router can offer.
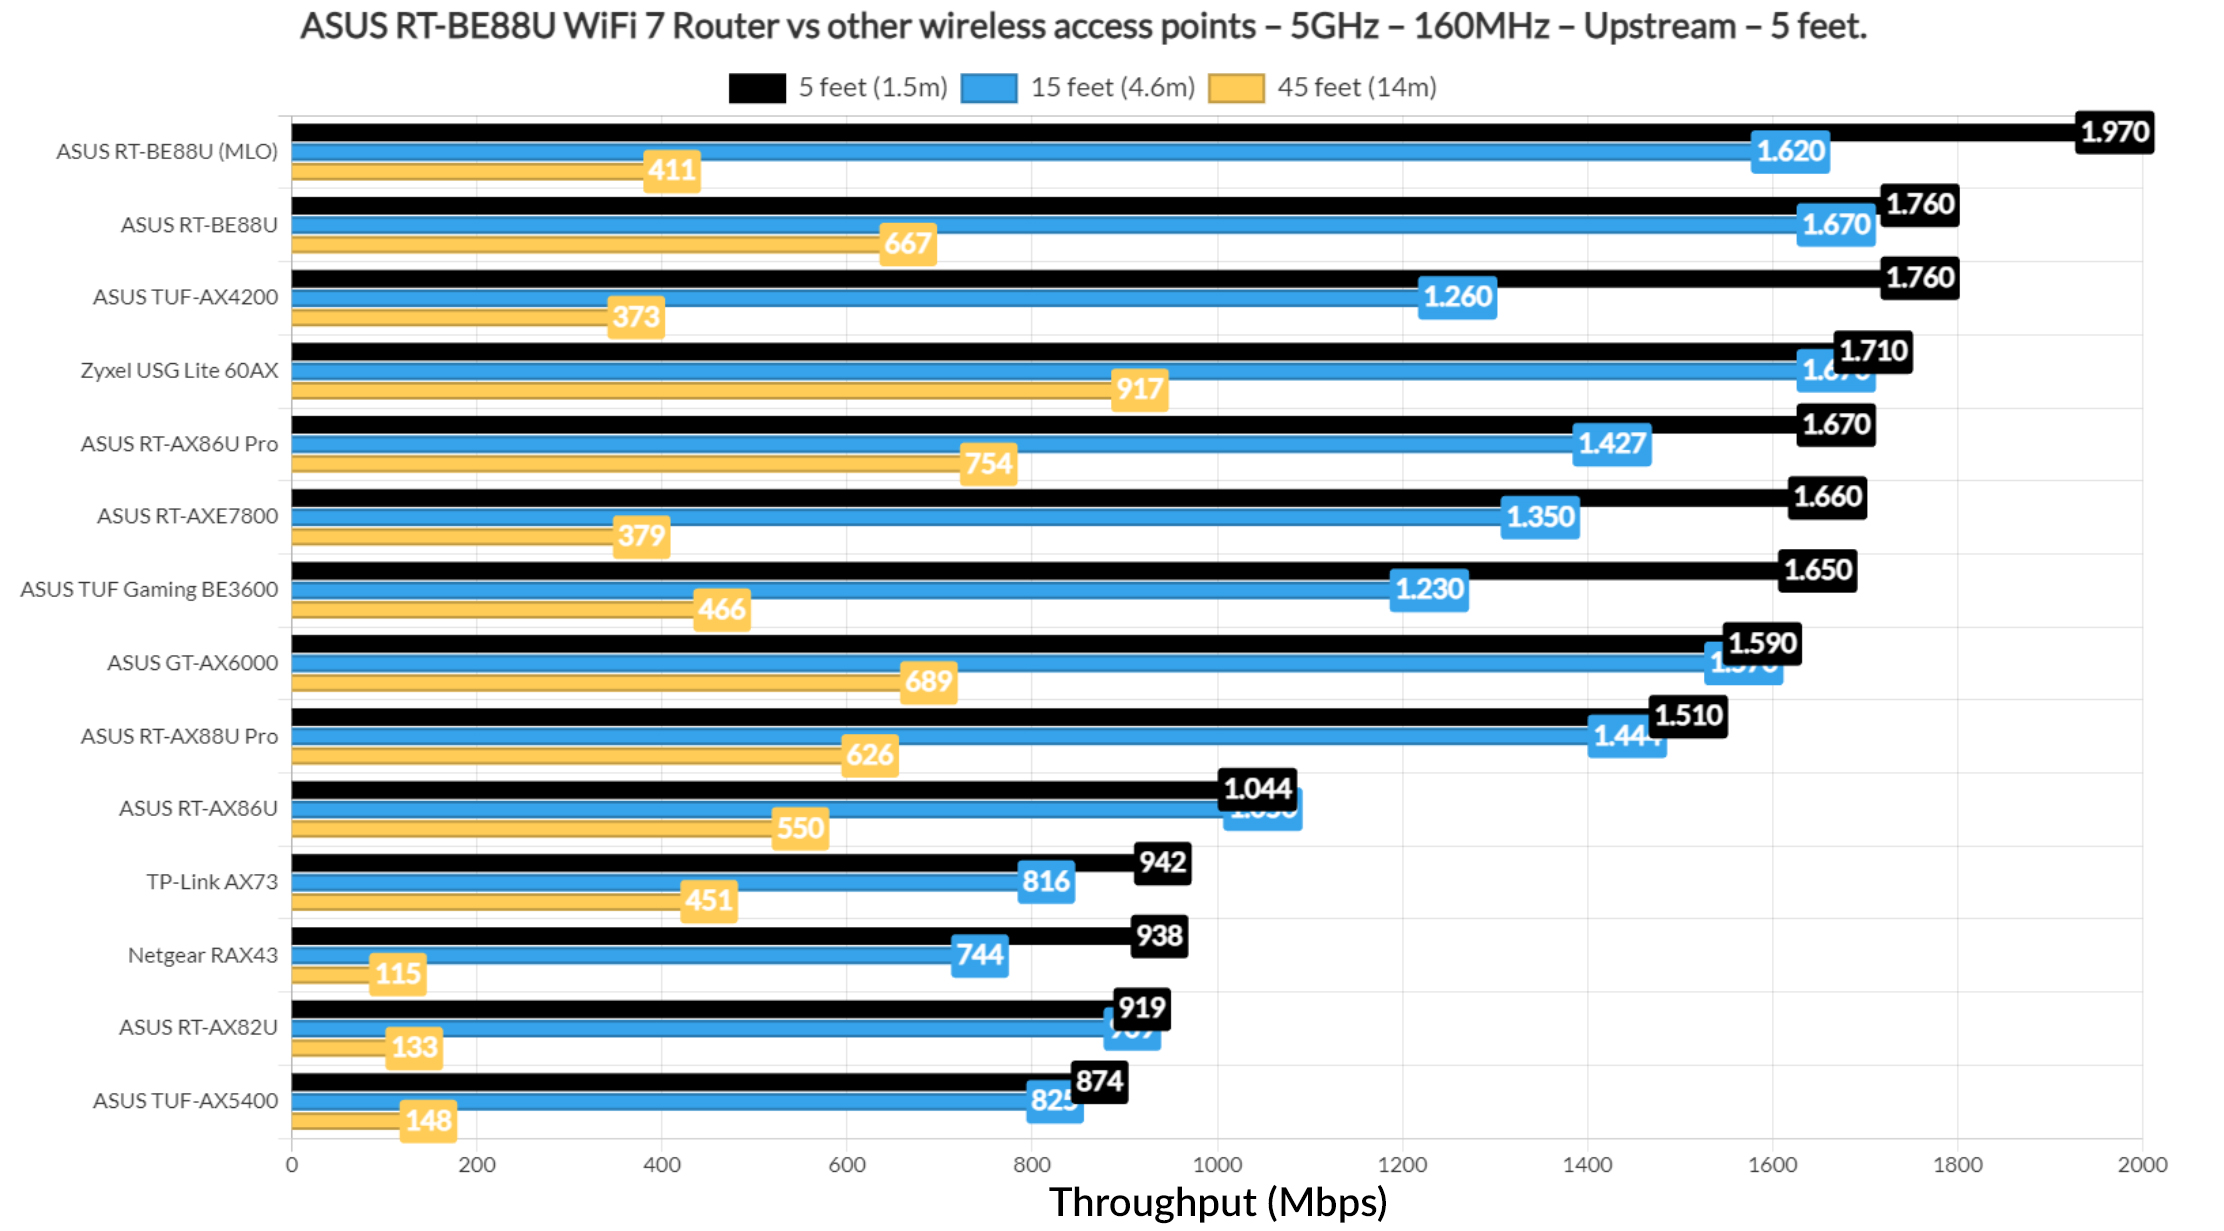
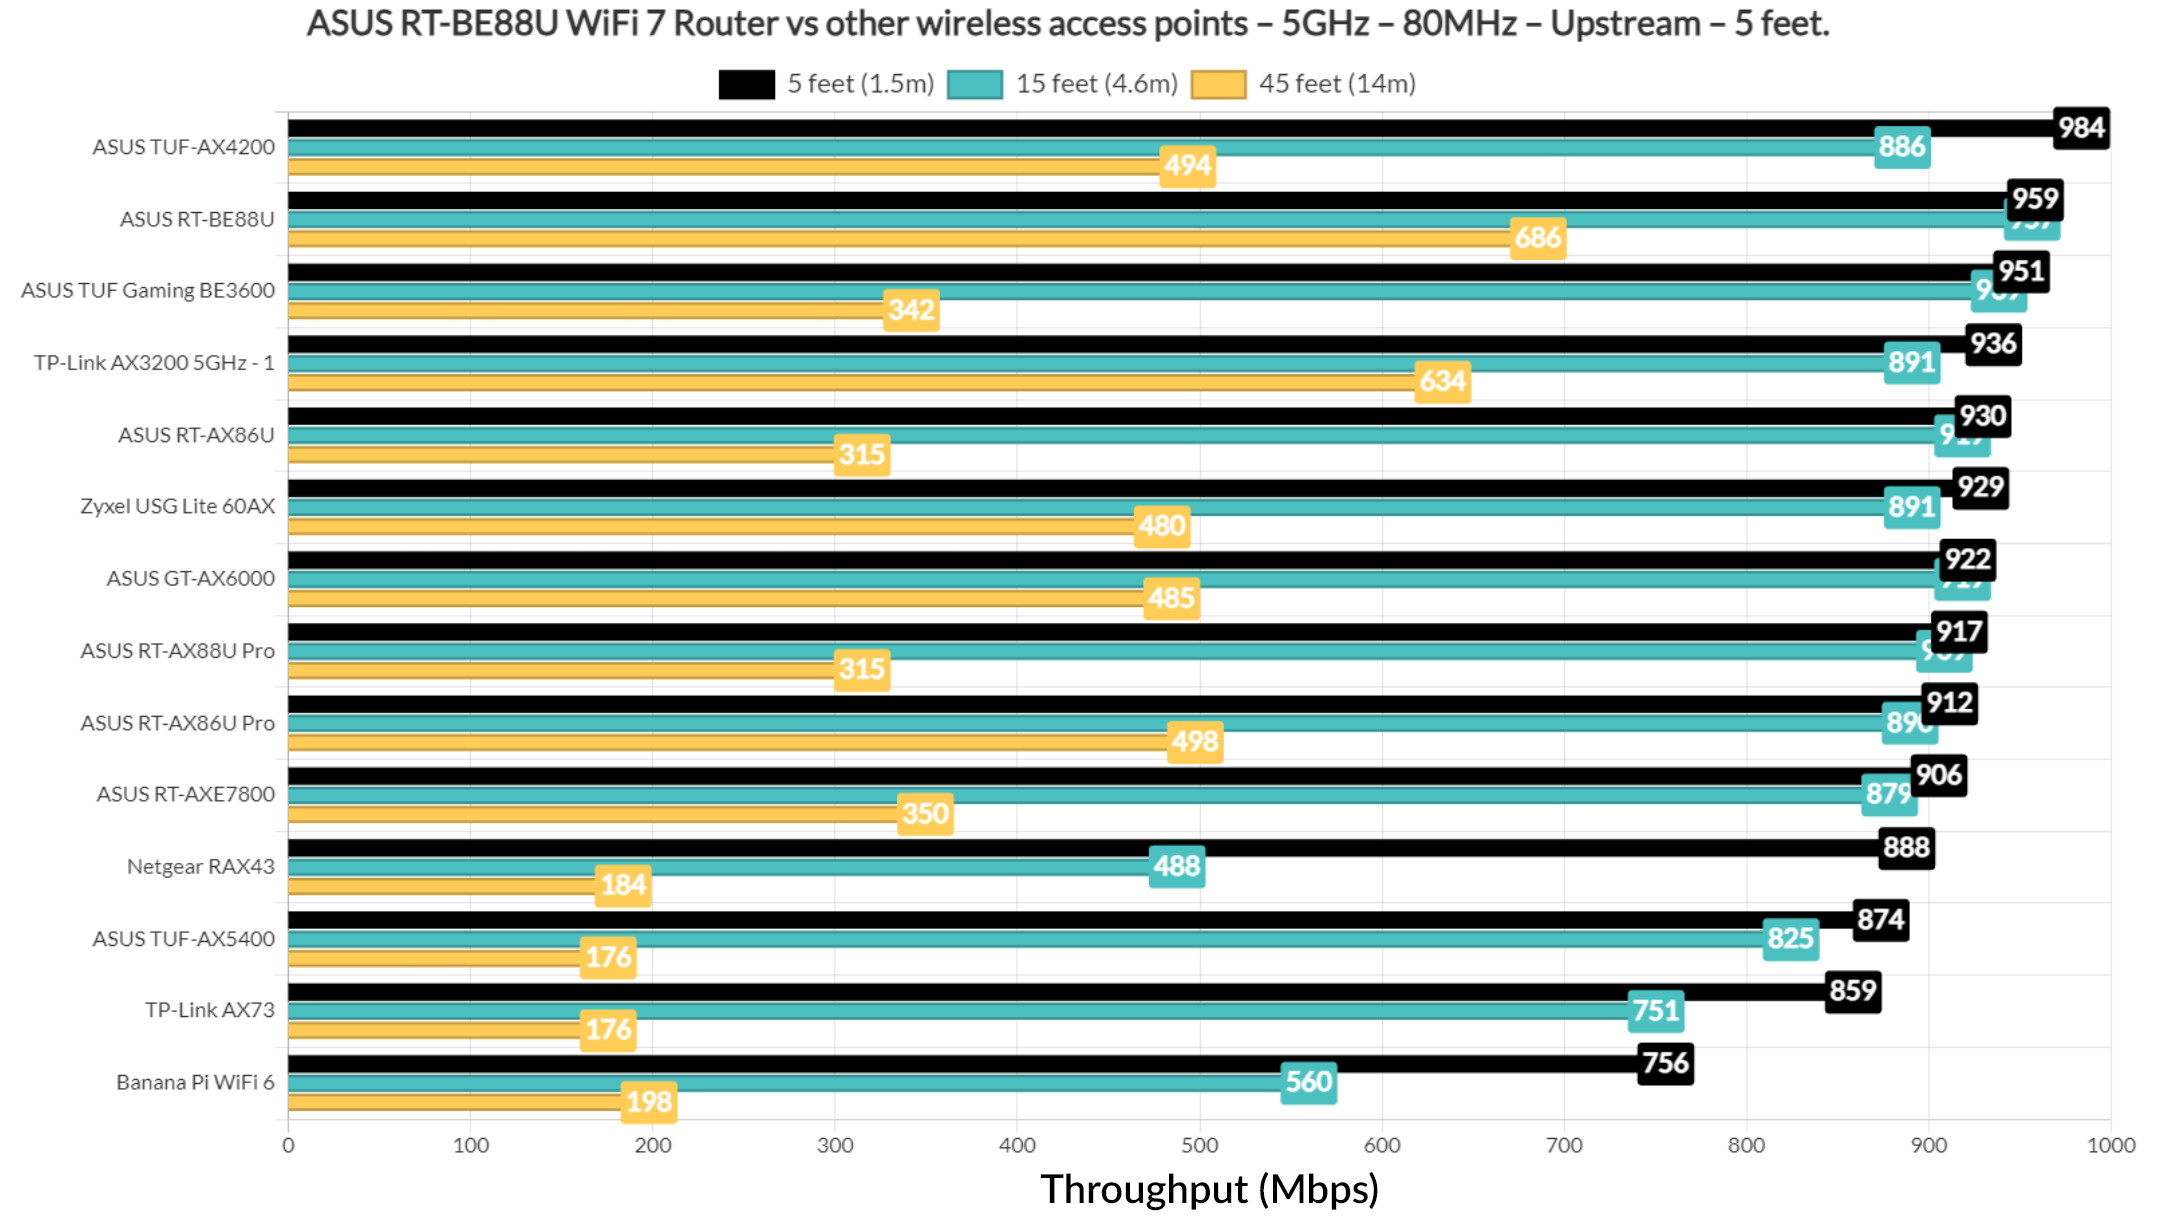
When compared to other wireless routers, we can see that while using the 160MHz channel bandwidth, it offer the best performance, and not only when relying on the MLO. But things do change a bit when using the 80MHz channel width, the TUF-AX4200 taking the top spot this time.
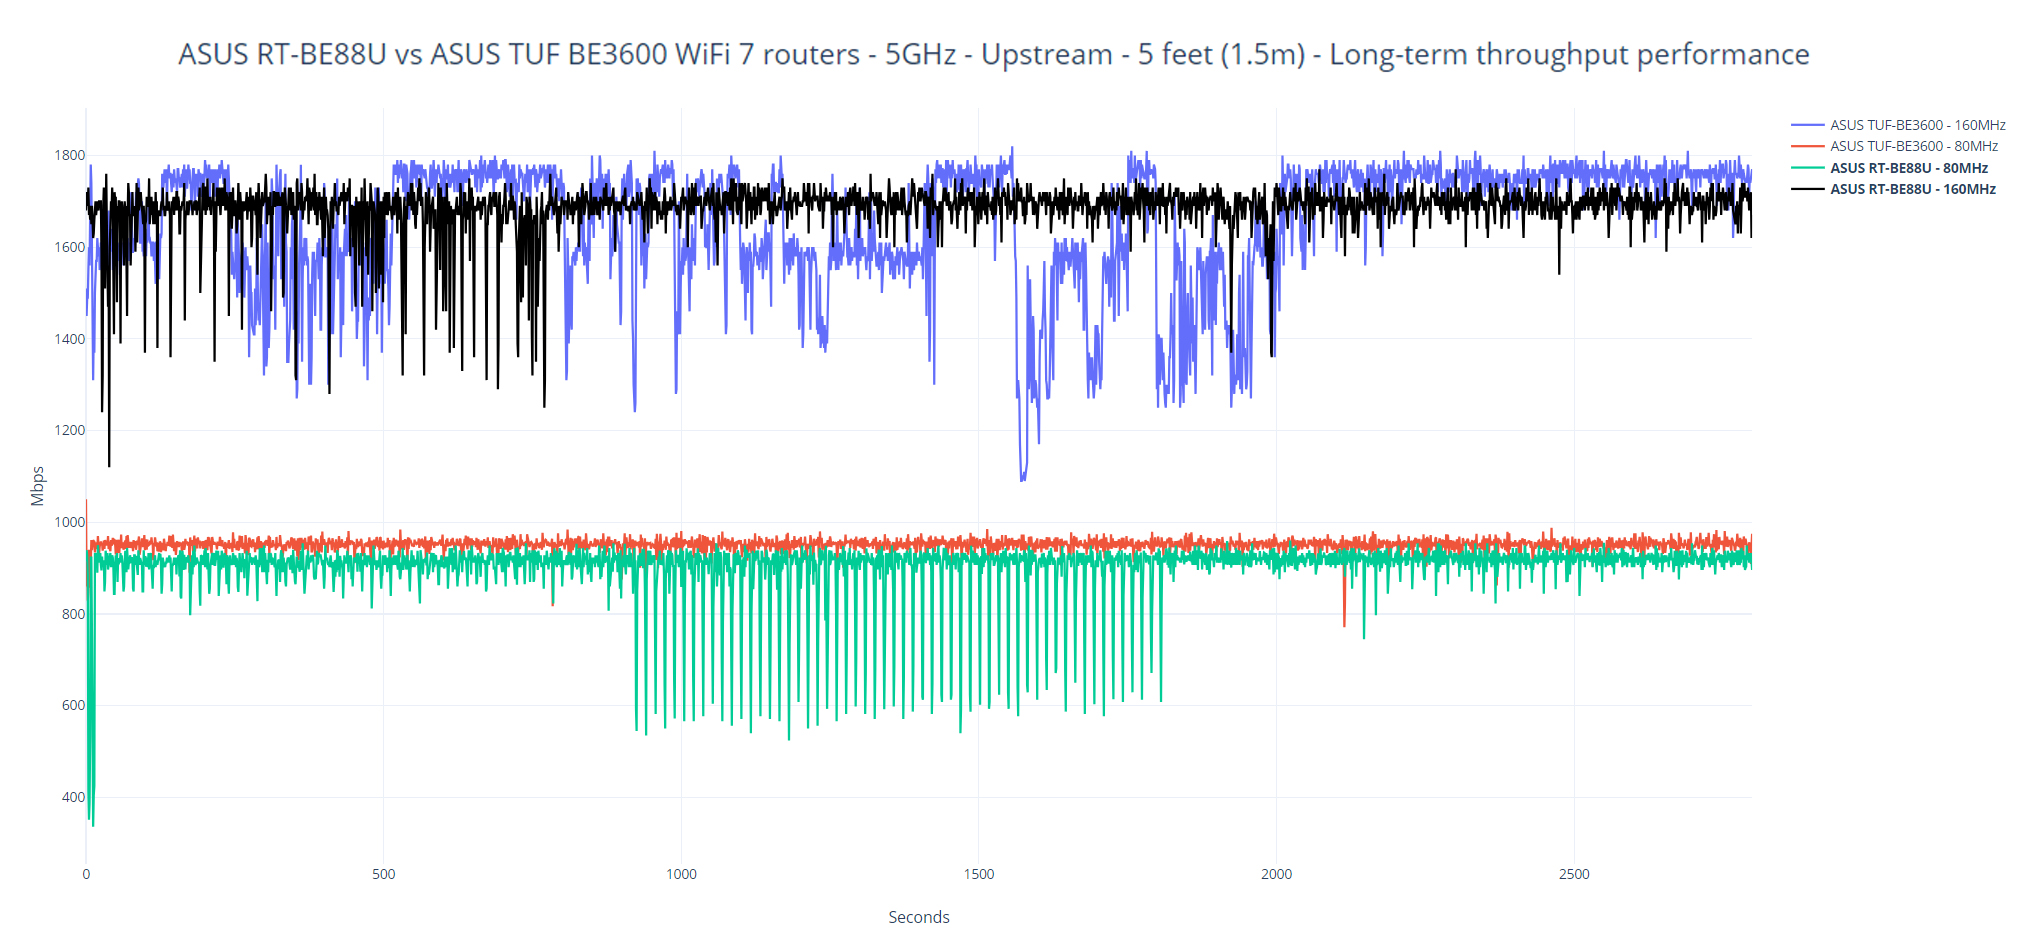
At the end, I also added a long-term throughput performance graphic with a comparison with another WiFi 7 router from ASUS, the TUF-BE3600. And there are some interesting patterns.
The Wireless Test (2.4GHz)
Let’s also have a look at the 2.4GHz radio throughput. I made sure to set it to use the 40MHz channel width and the throughput is fine, but not necessarily impressive.
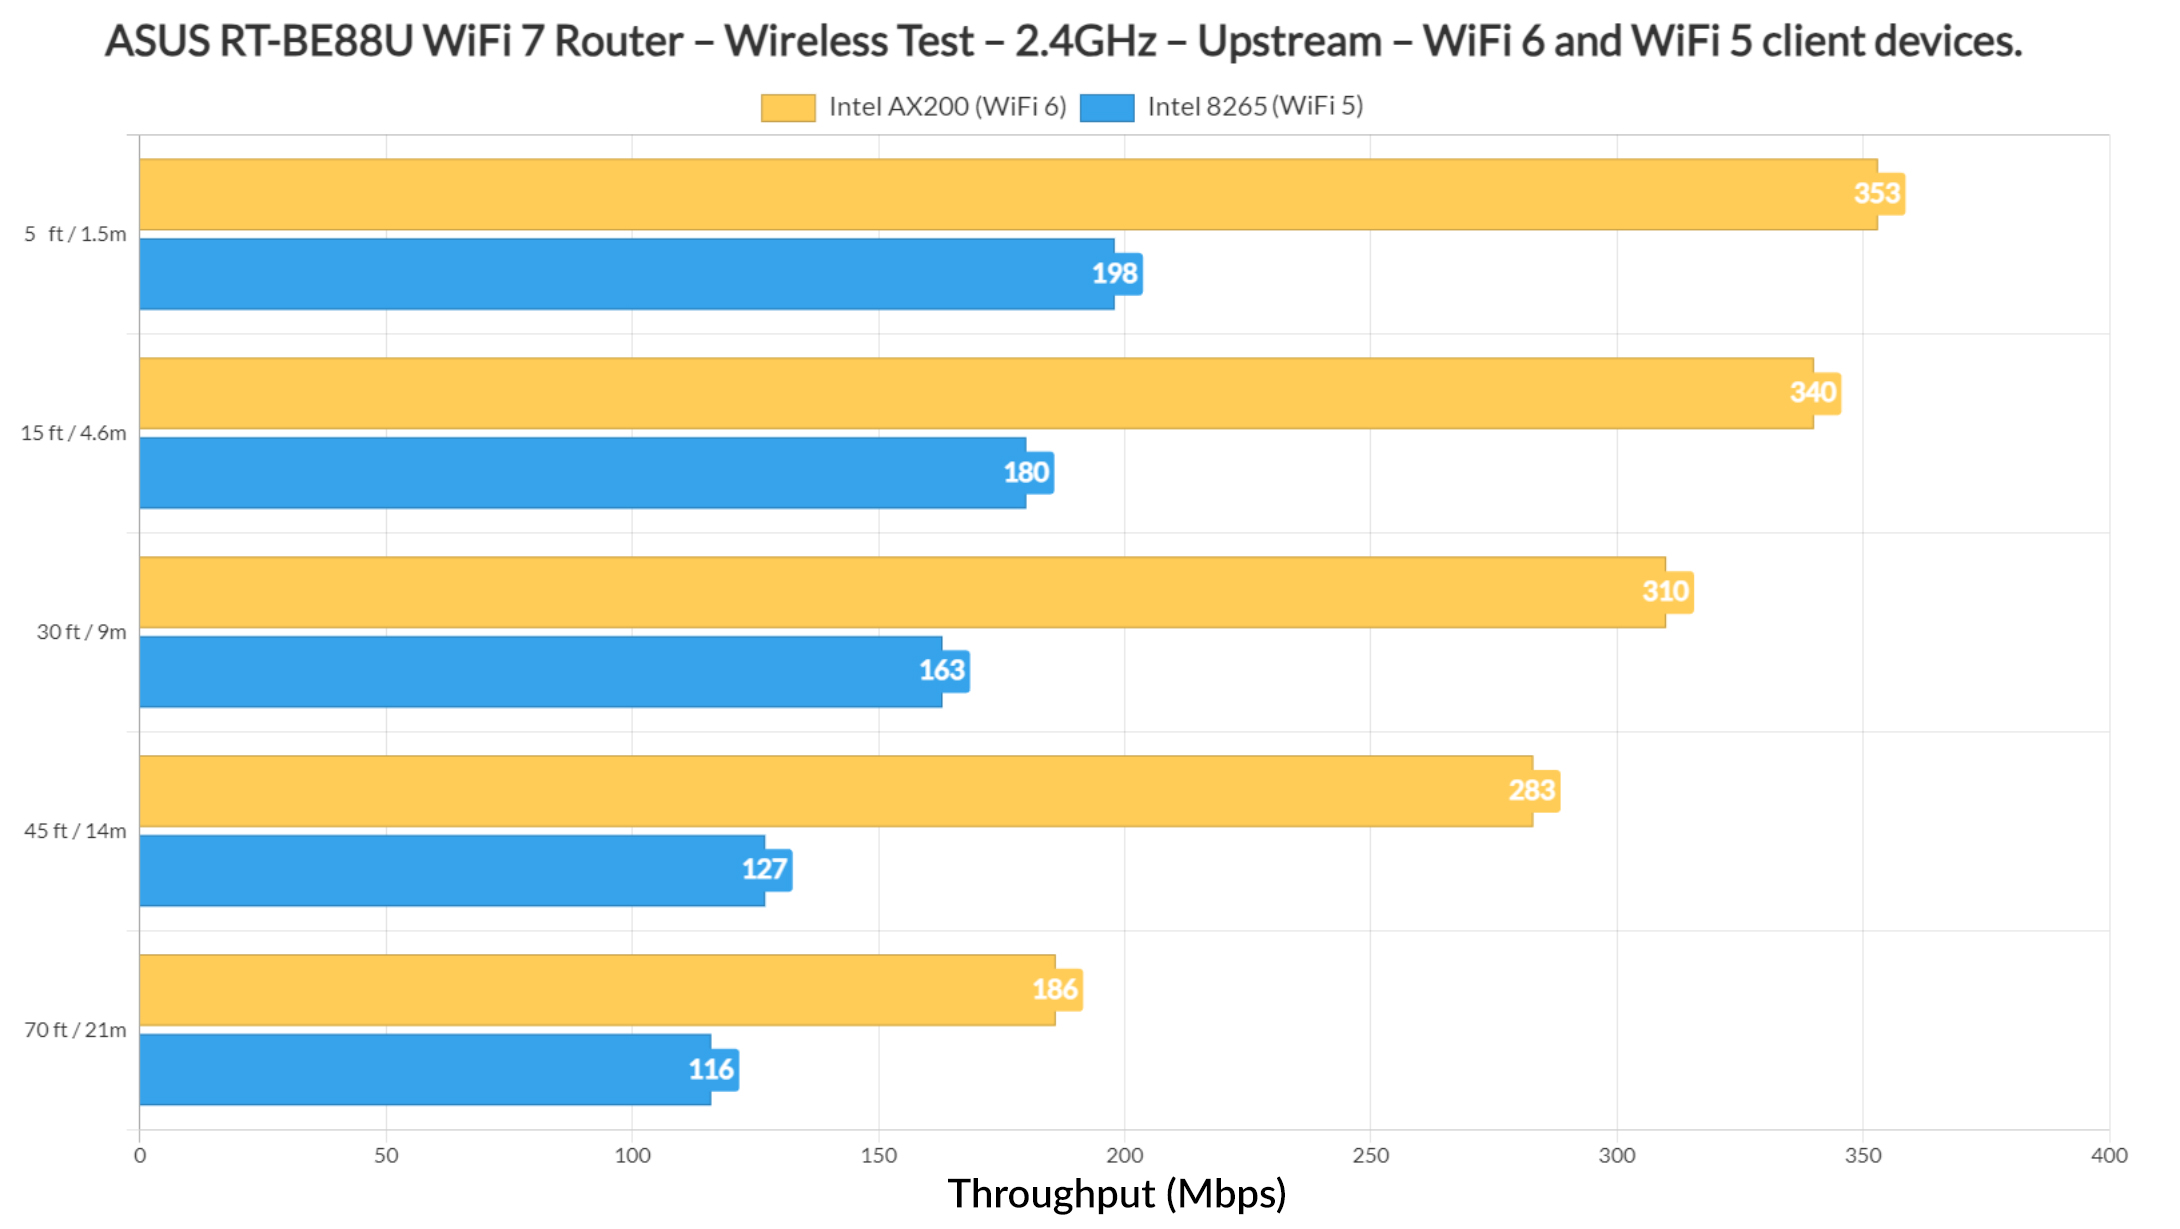
I mean, you can see that other routers did much better here.
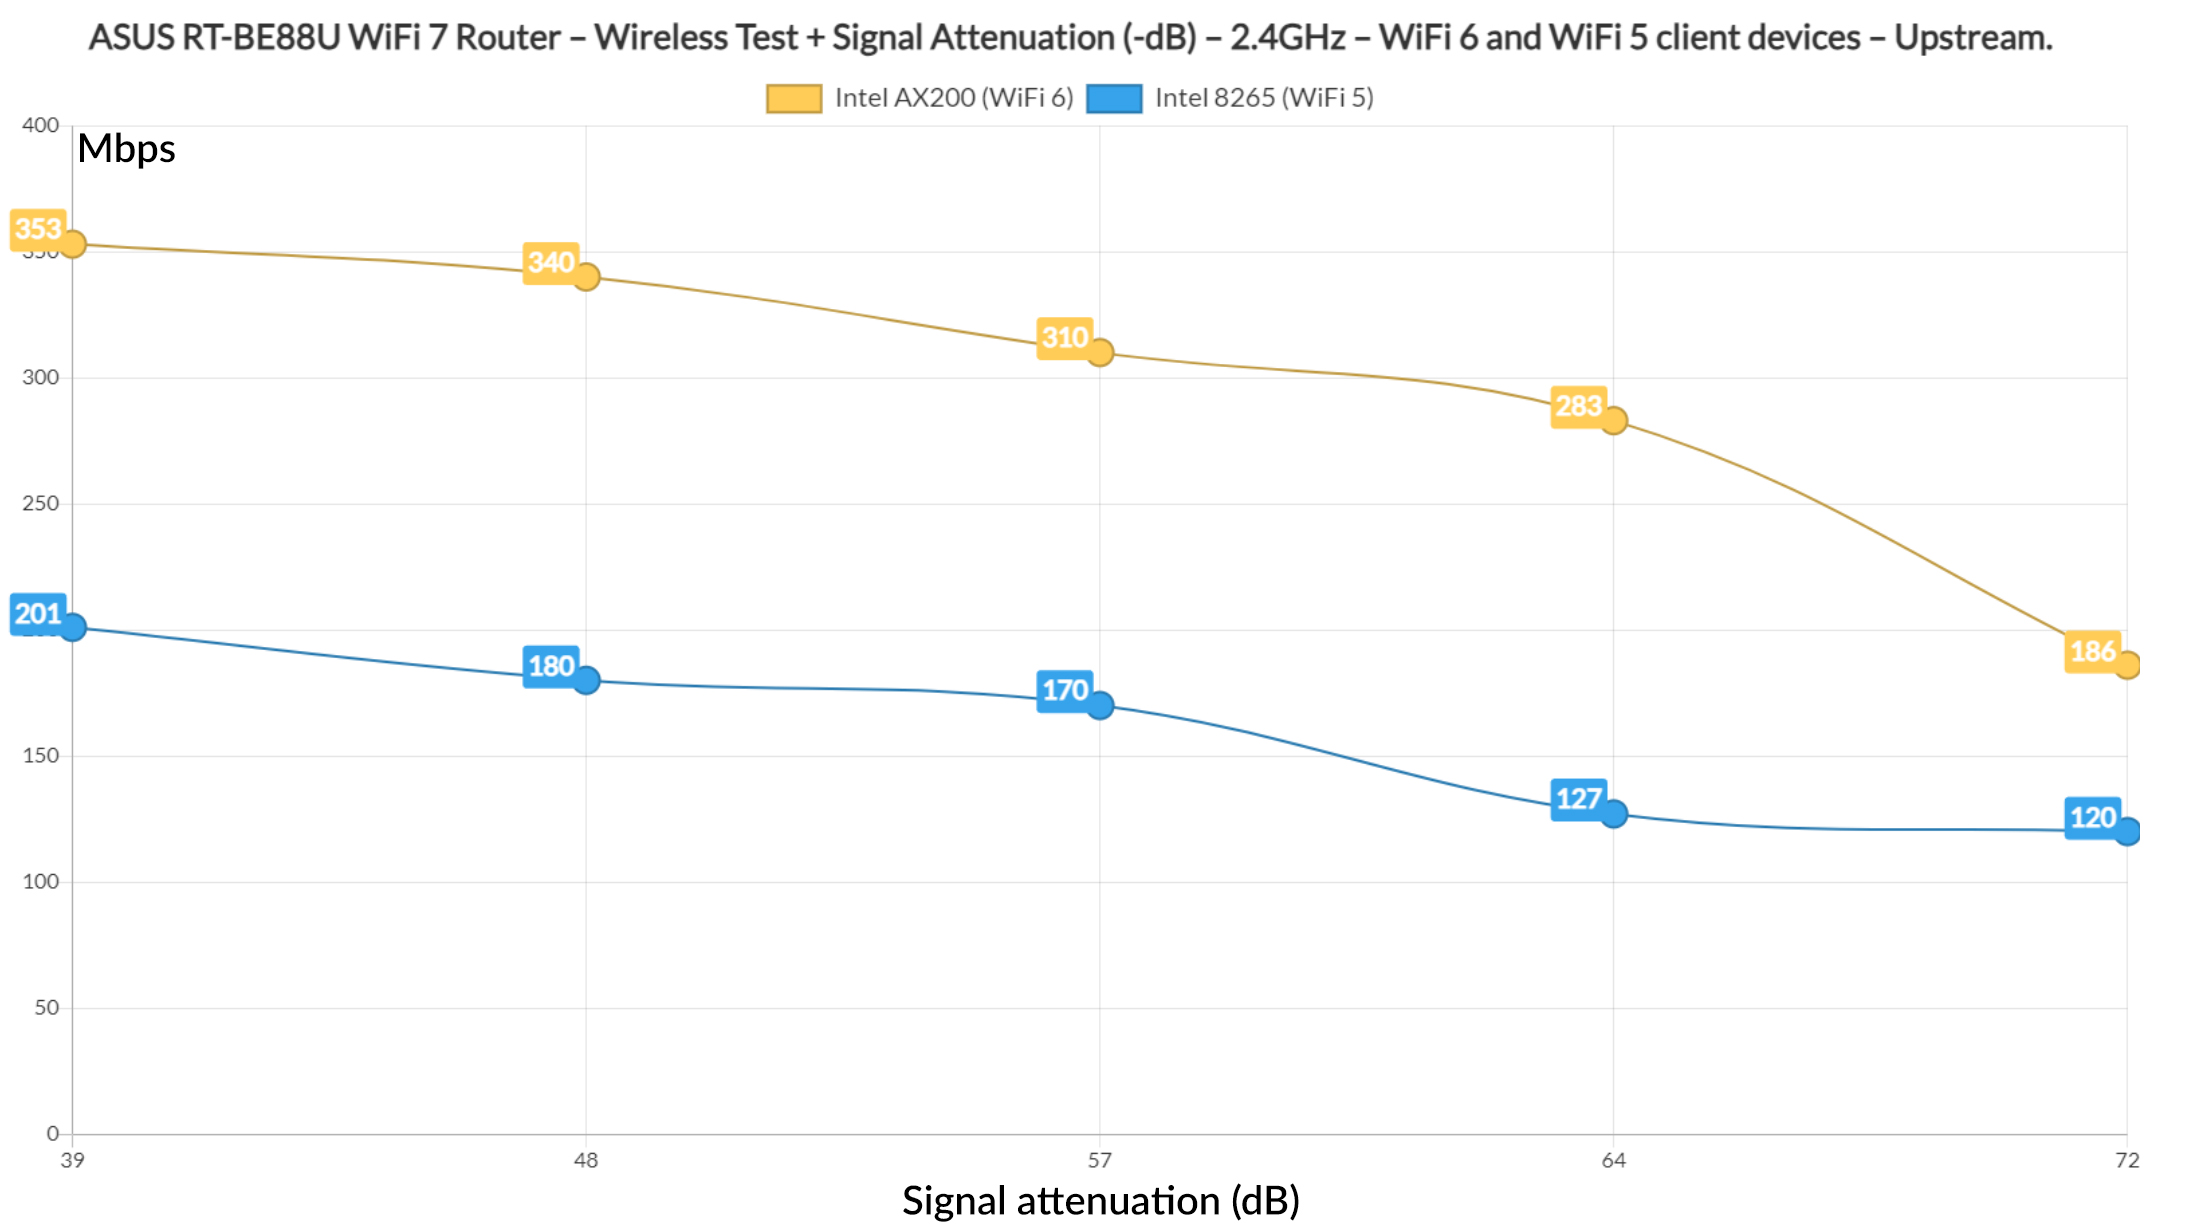
Then again, it’s worth mentioning the range of the router and that even if the signal attenuation was more than 70dB, we still get very much usable throughput for most applications.
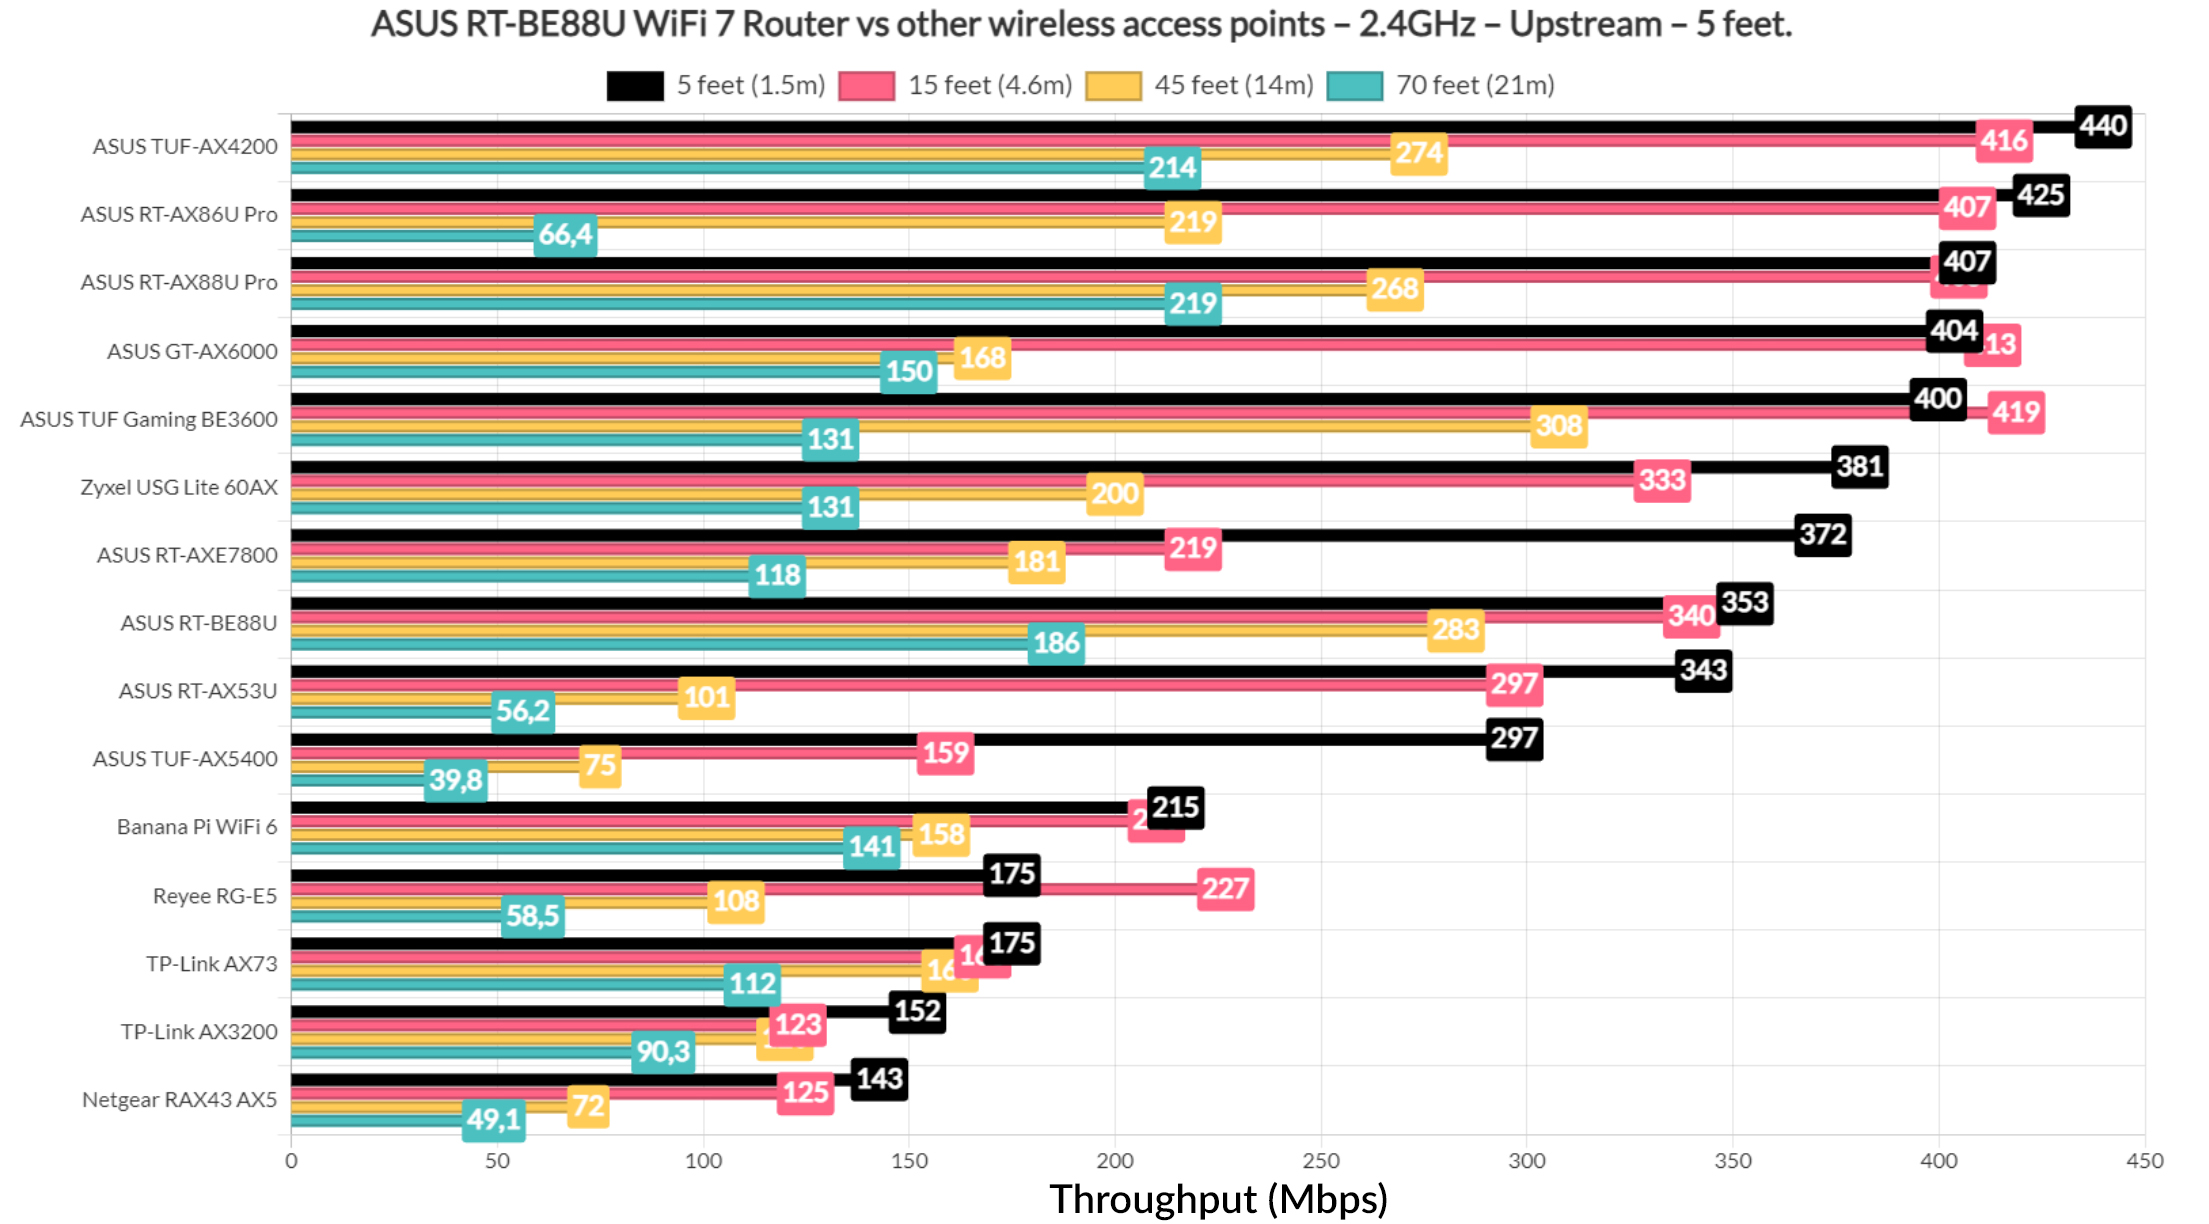
The Multi-Client Tests (5GHz)
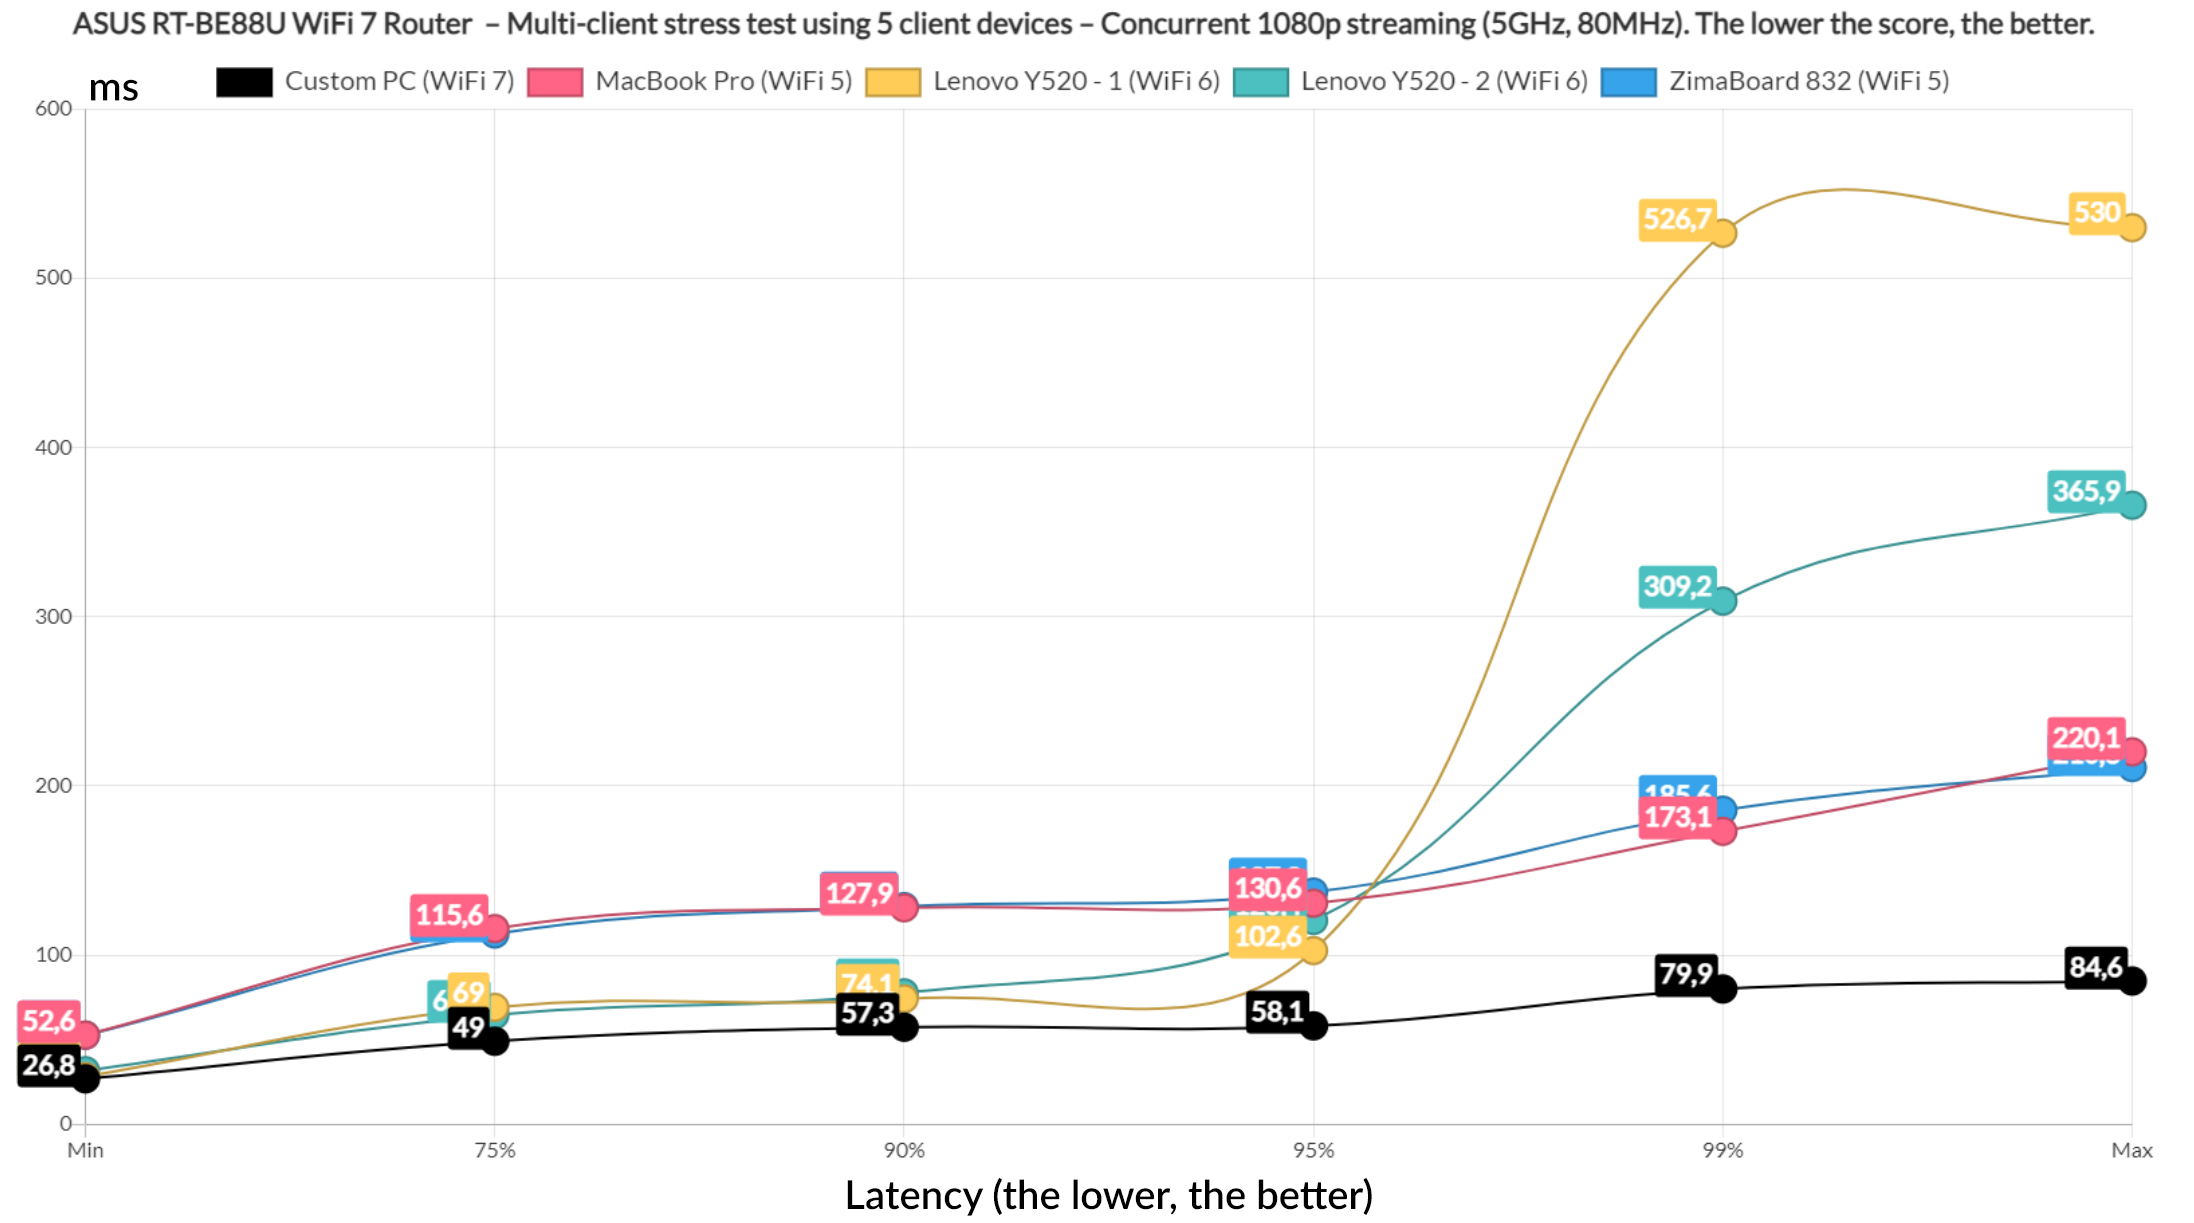
That’s about all for the single client tests for now, so let’s fire up the net-hydra tool and run the usual set of latency tests on the five client devices that I always use for this type of tests. Starting up with the simulated 1080p streaming, we can see that the two WiFi 5 clients did not perform well, while the WiFi 7 and WiFi 6 devices did much better, one of them managing to stay below 60ms for 95% of the time.
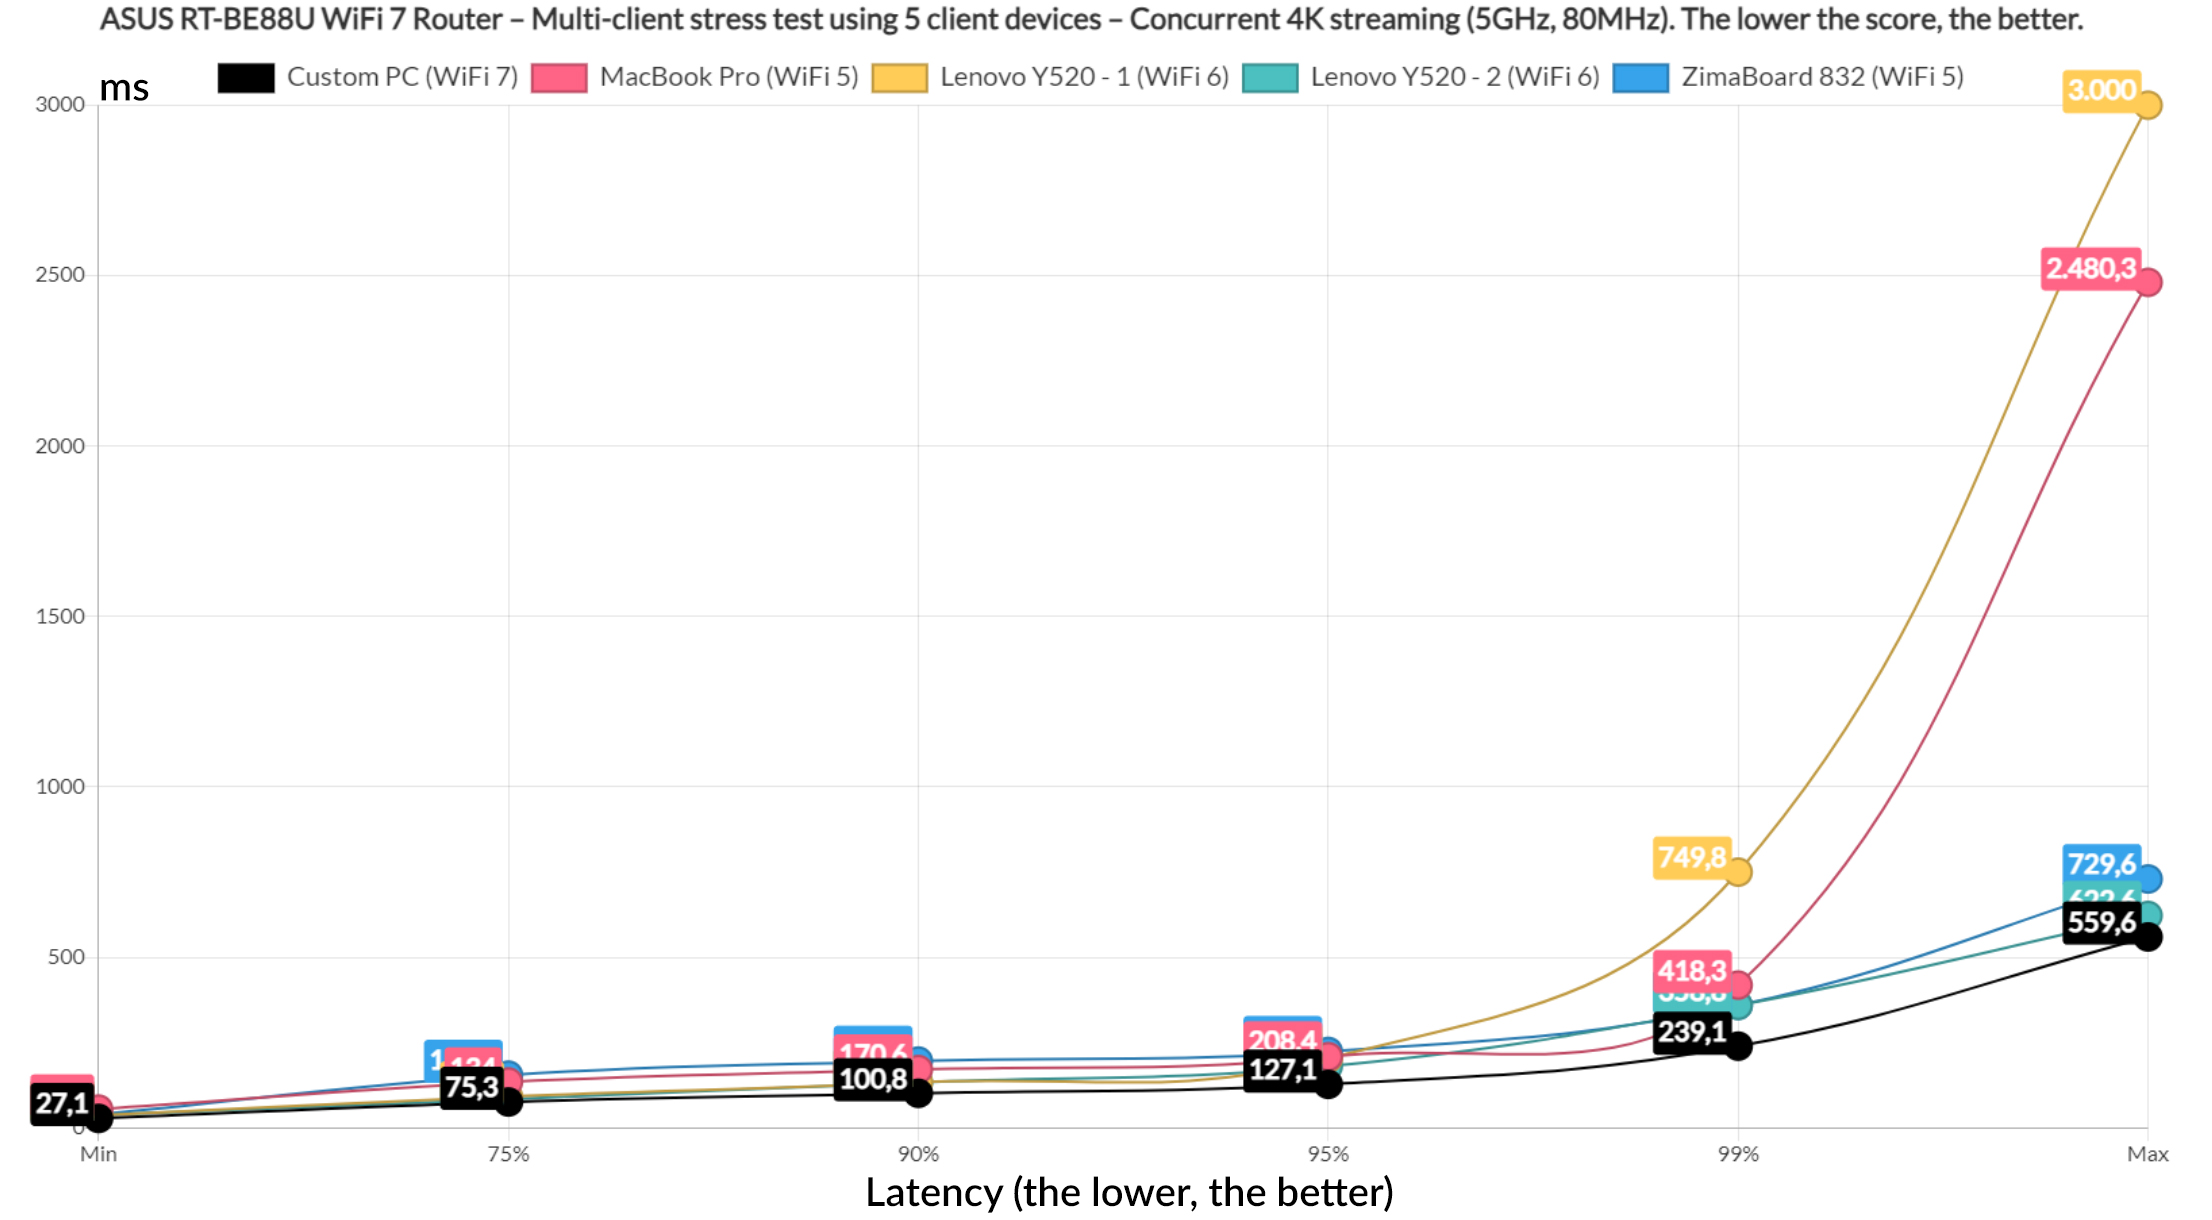
Running the 4K streaming test, the three aforementioned clients did better again, but I could only consider decent latency what we see for 75% of the time. Anything above 100ms is not good.
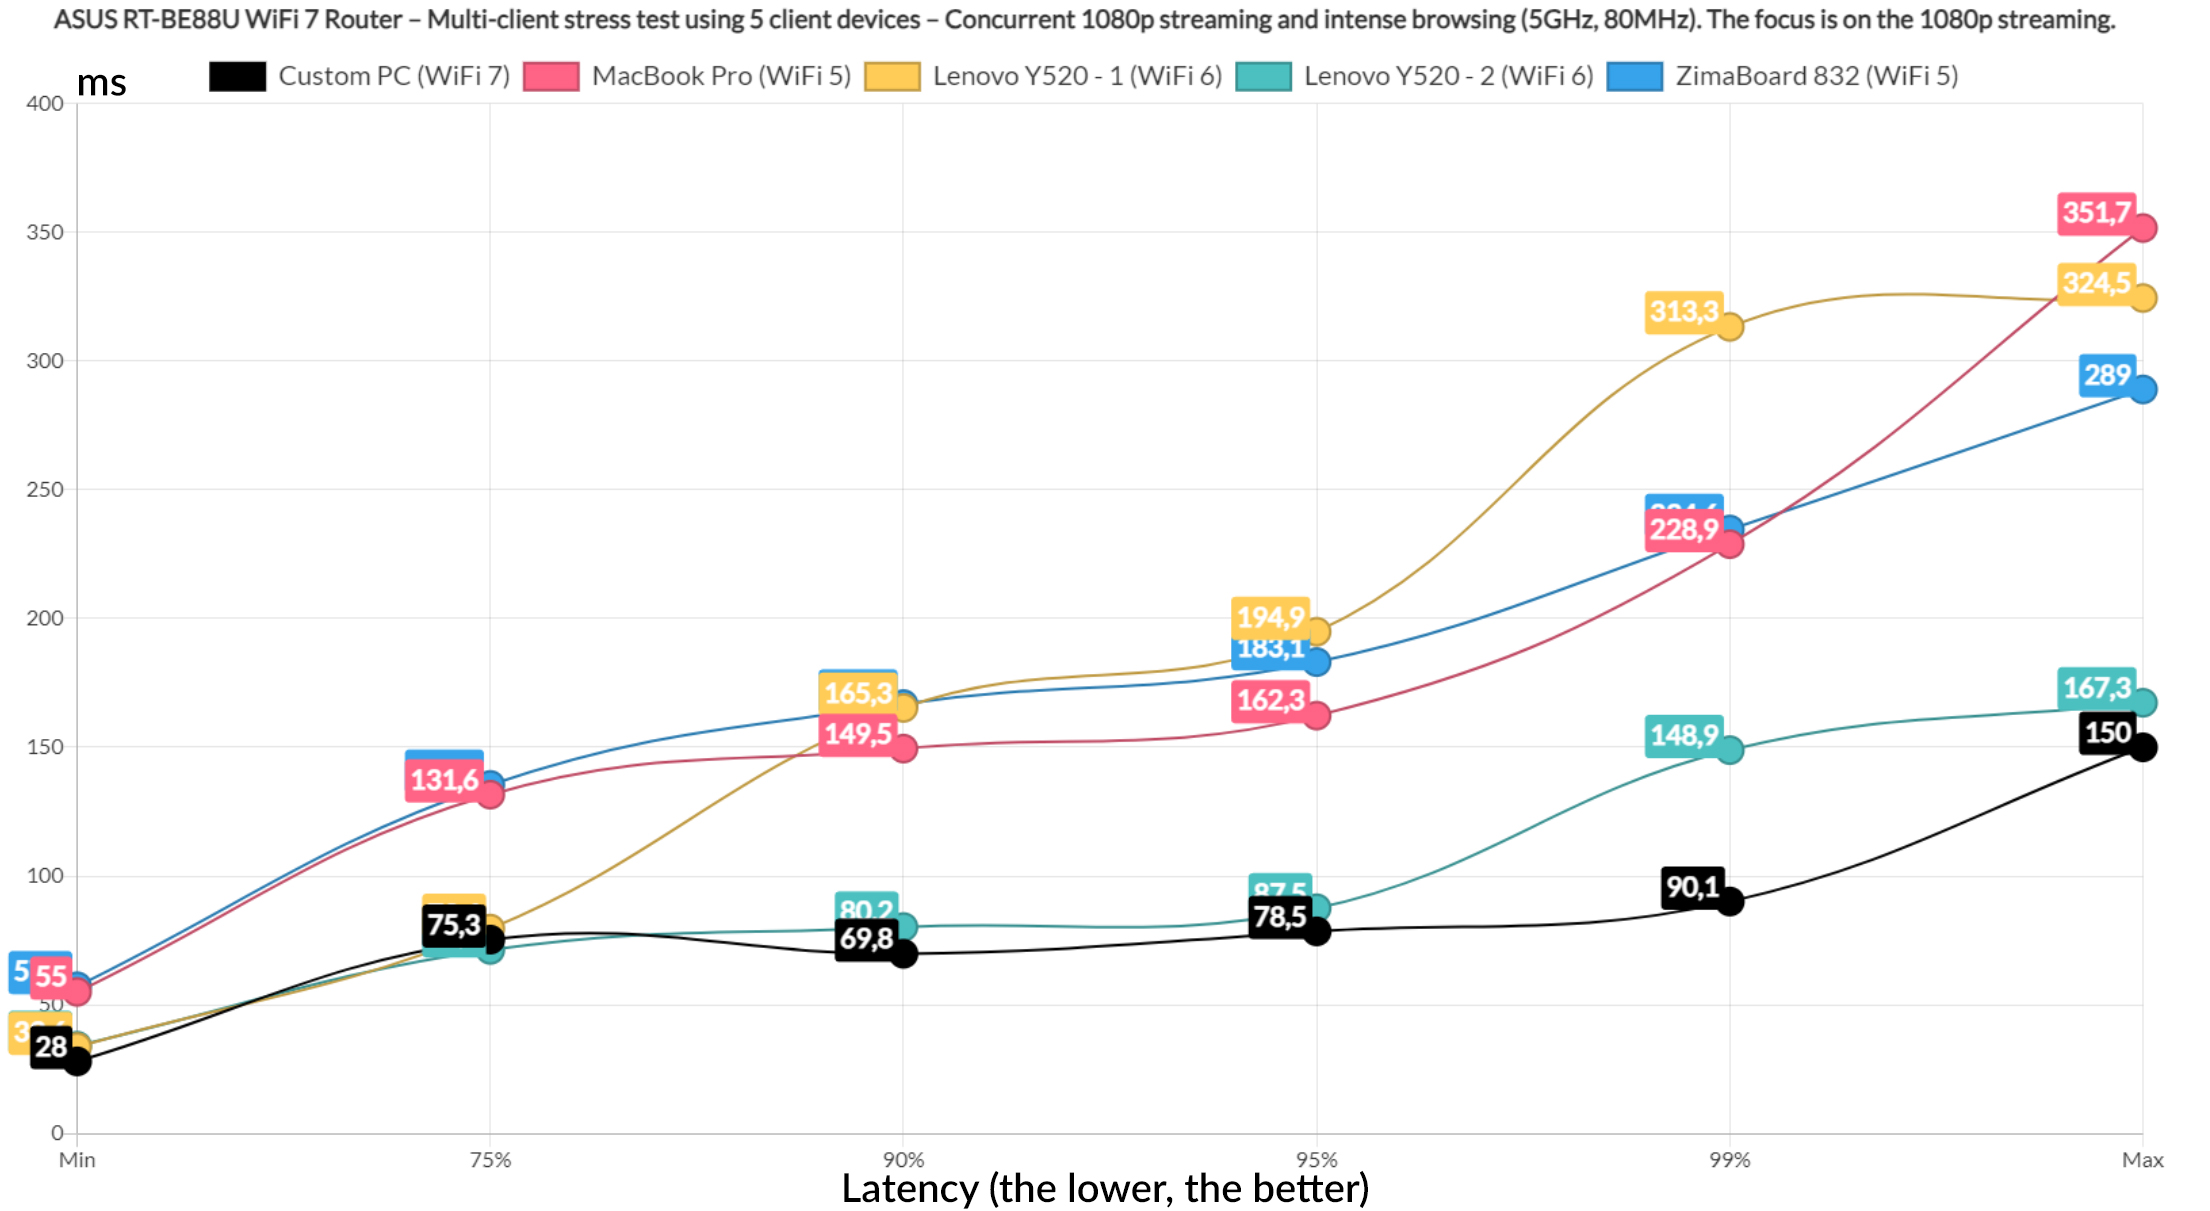
But, I did not stop here and included intense browsing as well which I ran alongside the 1080p streaming traffic. And we can see that one of the three clients did fail to stay below 100ms, while one WiFi 6 laptop and the WiFi 7 PC managed to stay below 100ms for at least 95% of the time.
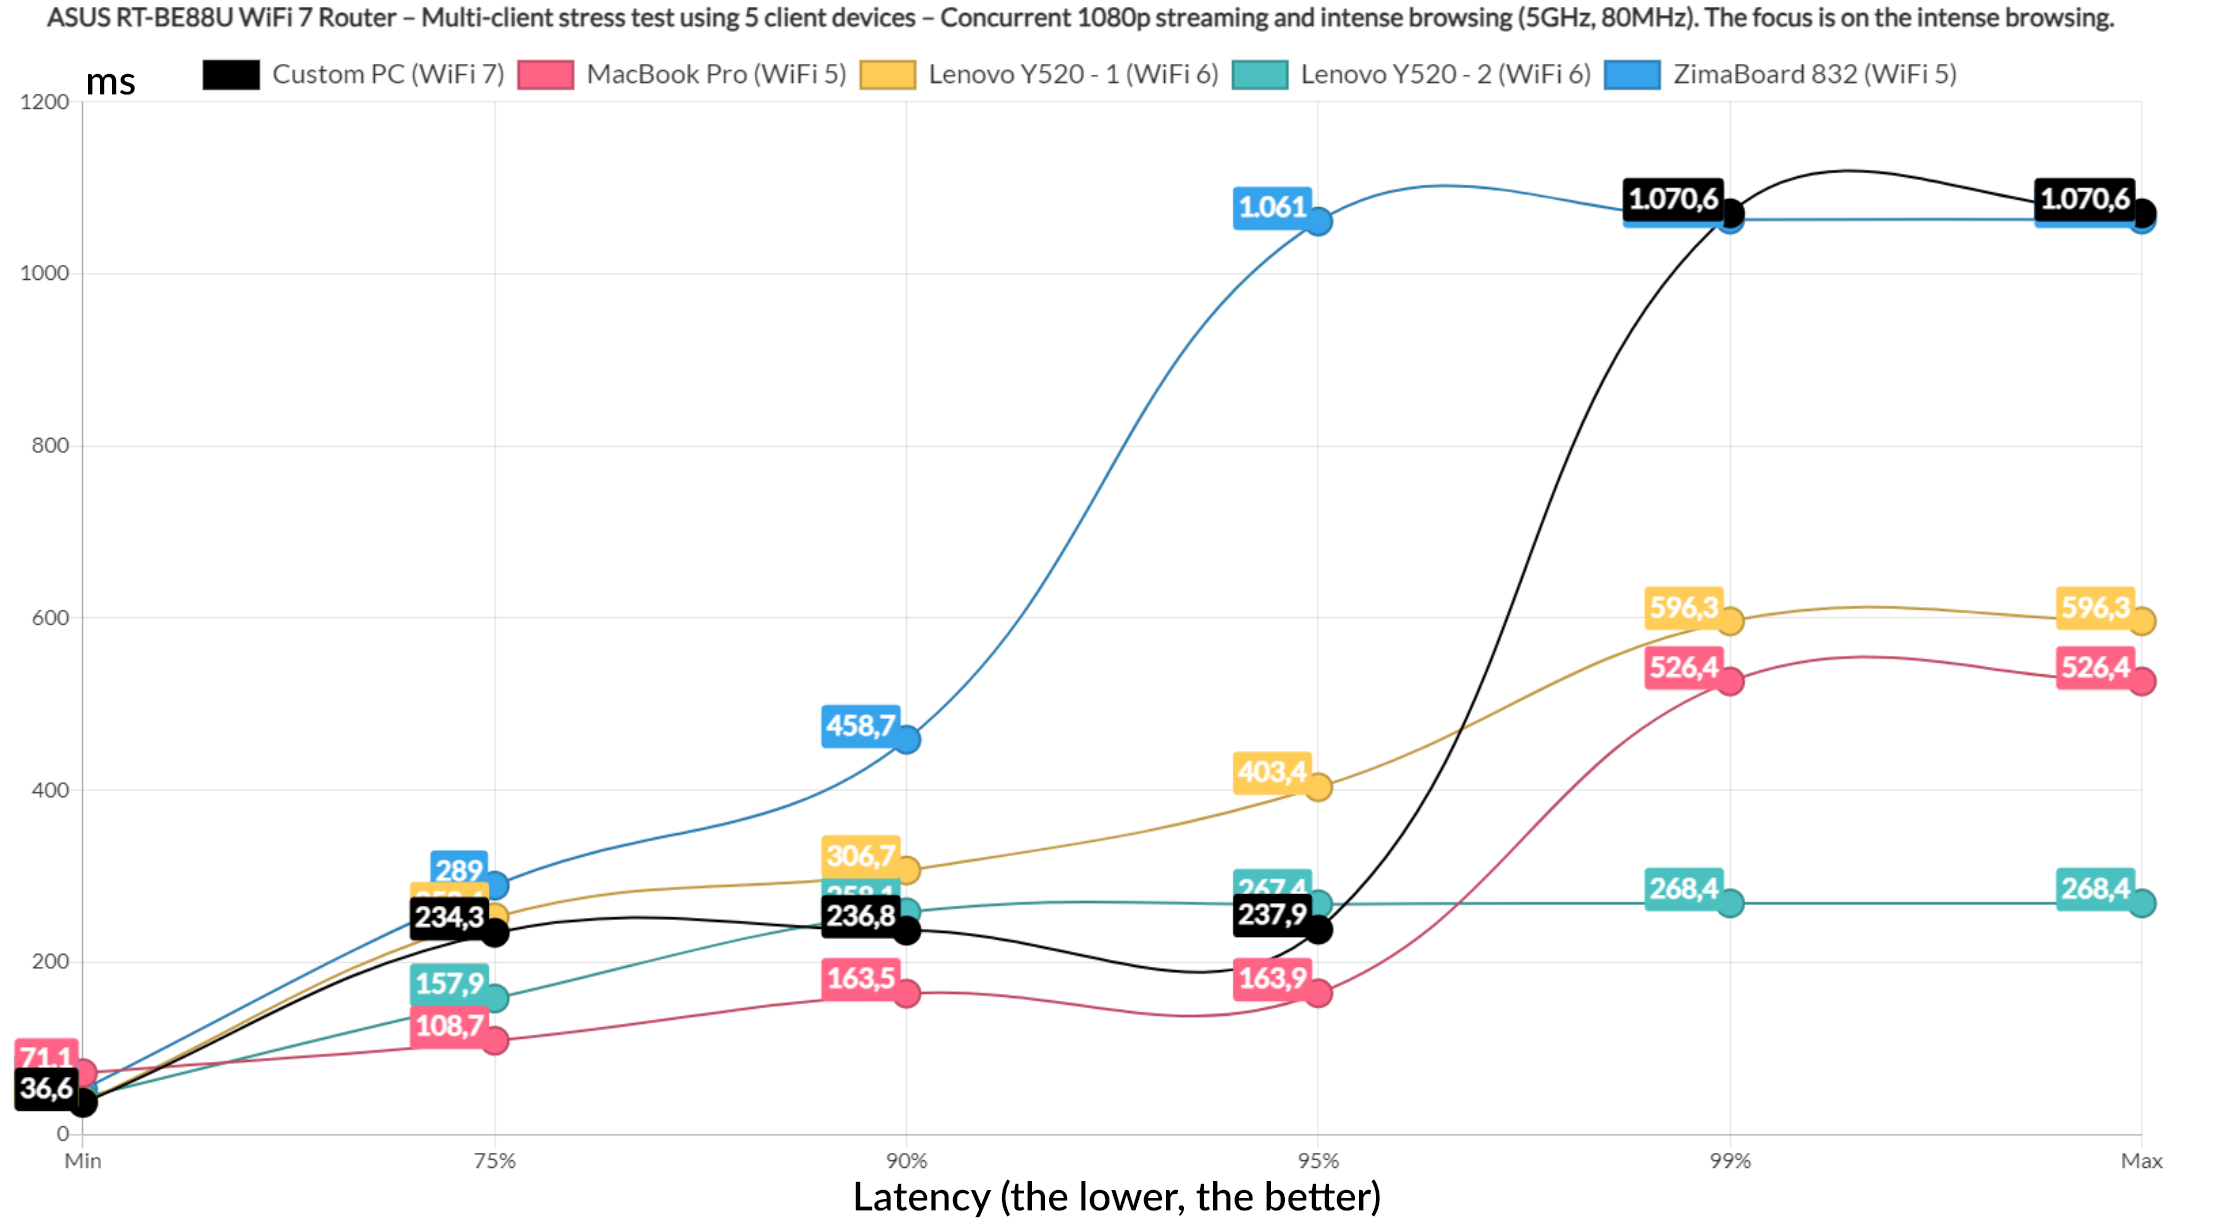
The rest performed much worse which means that it would be better to rely on the Ethernet ports, and we do get plenty. The intense browsing graphic shows that the latency on all five client devices stays below 1.5 seconds all the time, so all is fine here.
Now, let’s run the intense browsing traffic alongside the 4K streaming. And, it’s a slaughter. All clients immediately rose above 100ms, some even passing 1s for about 1% of the time. Don’t even think about running something similar.
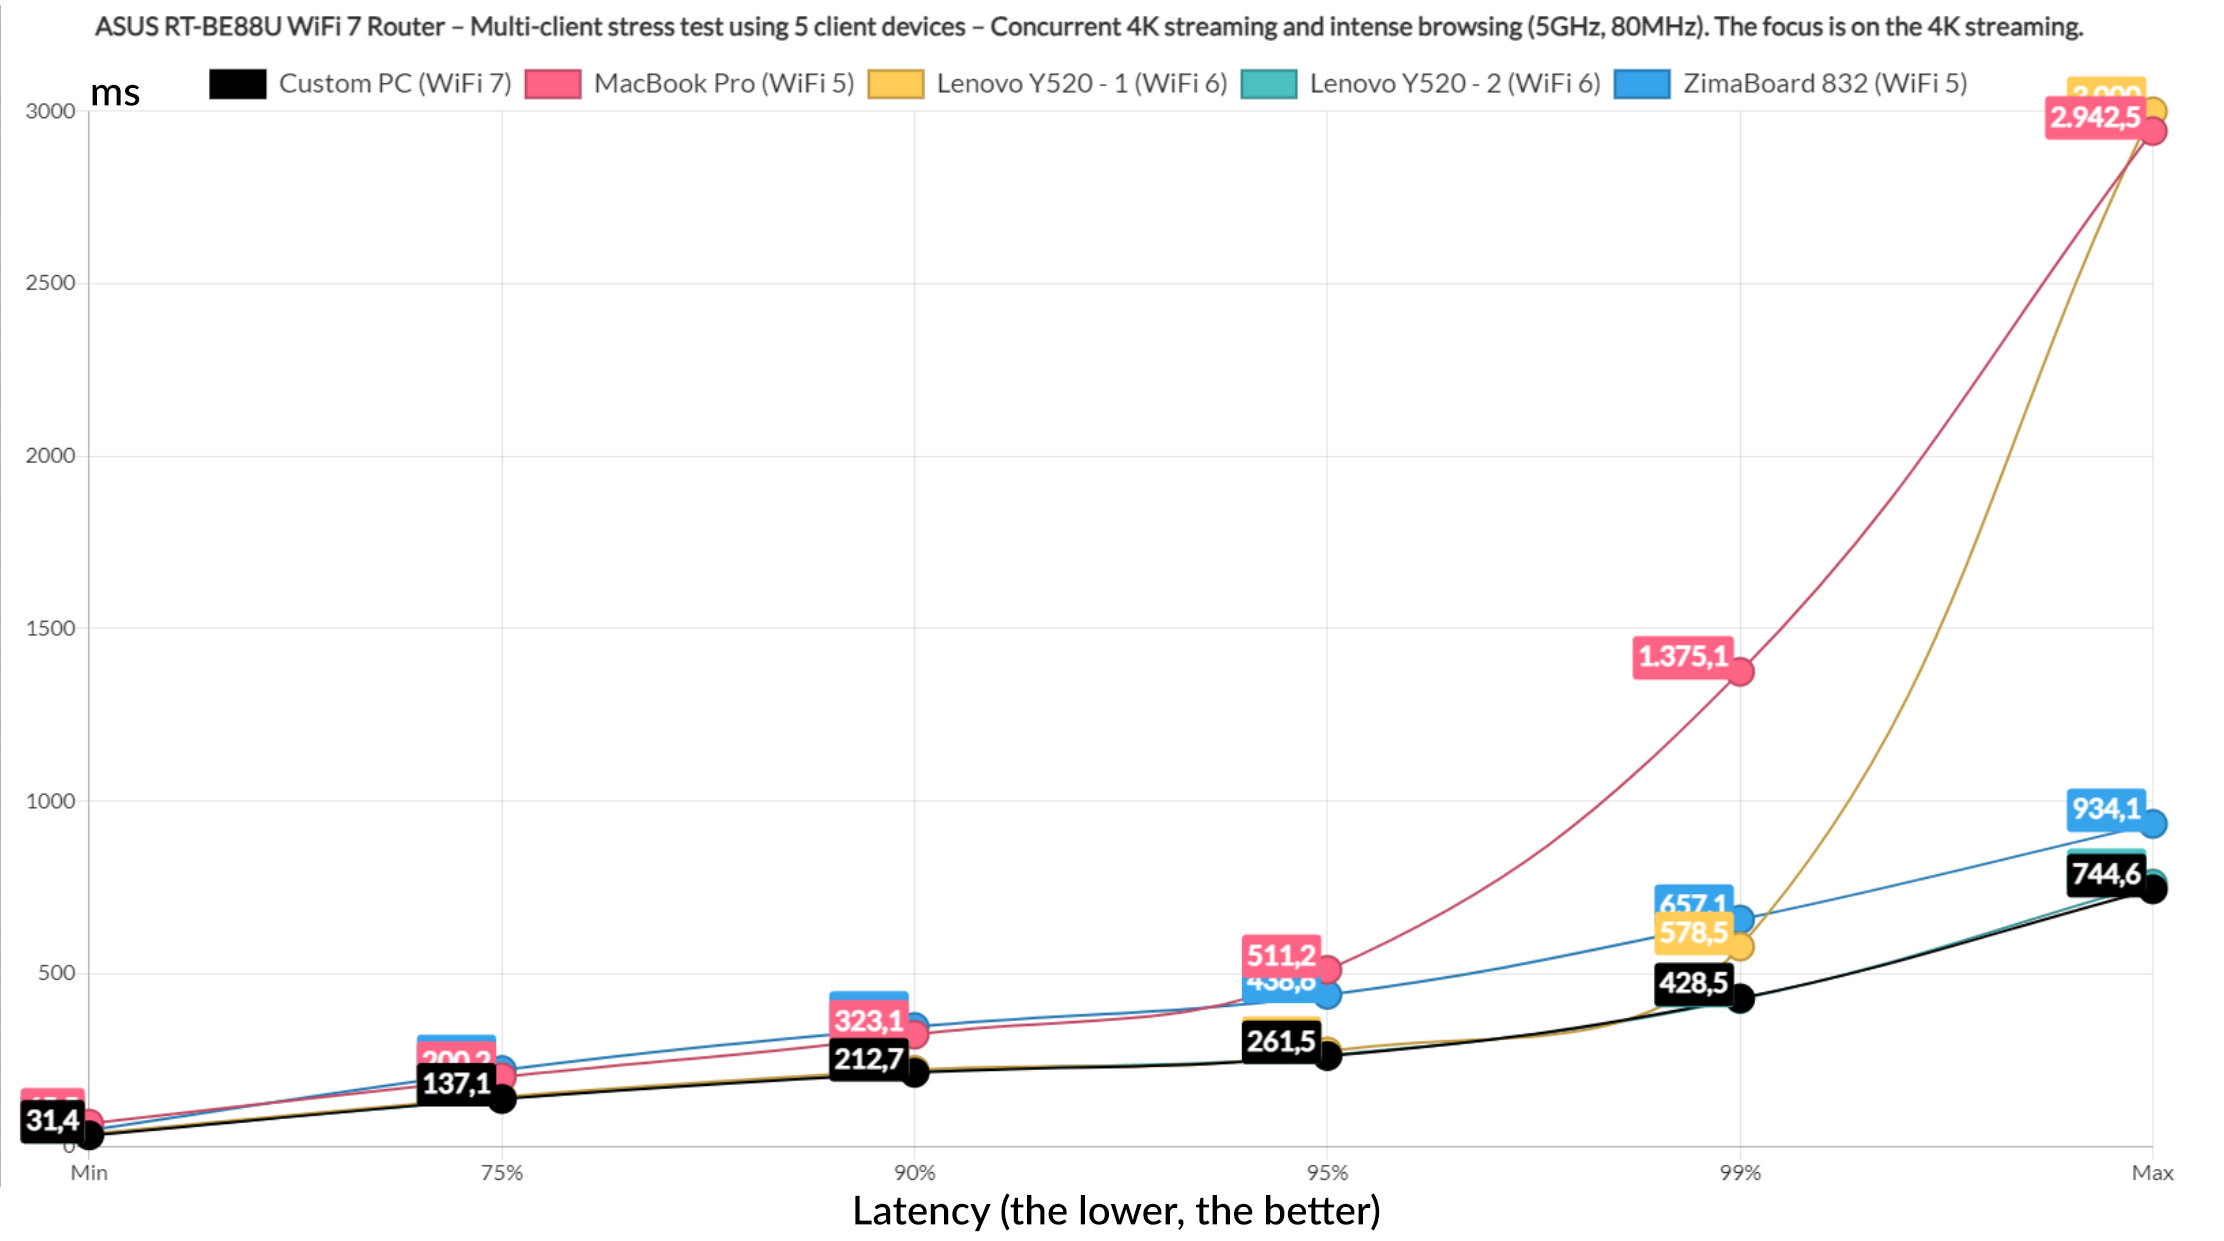
The intense browsing graphic shows that one client went above 1.5s which is not good, but the rest did remain below this limit.
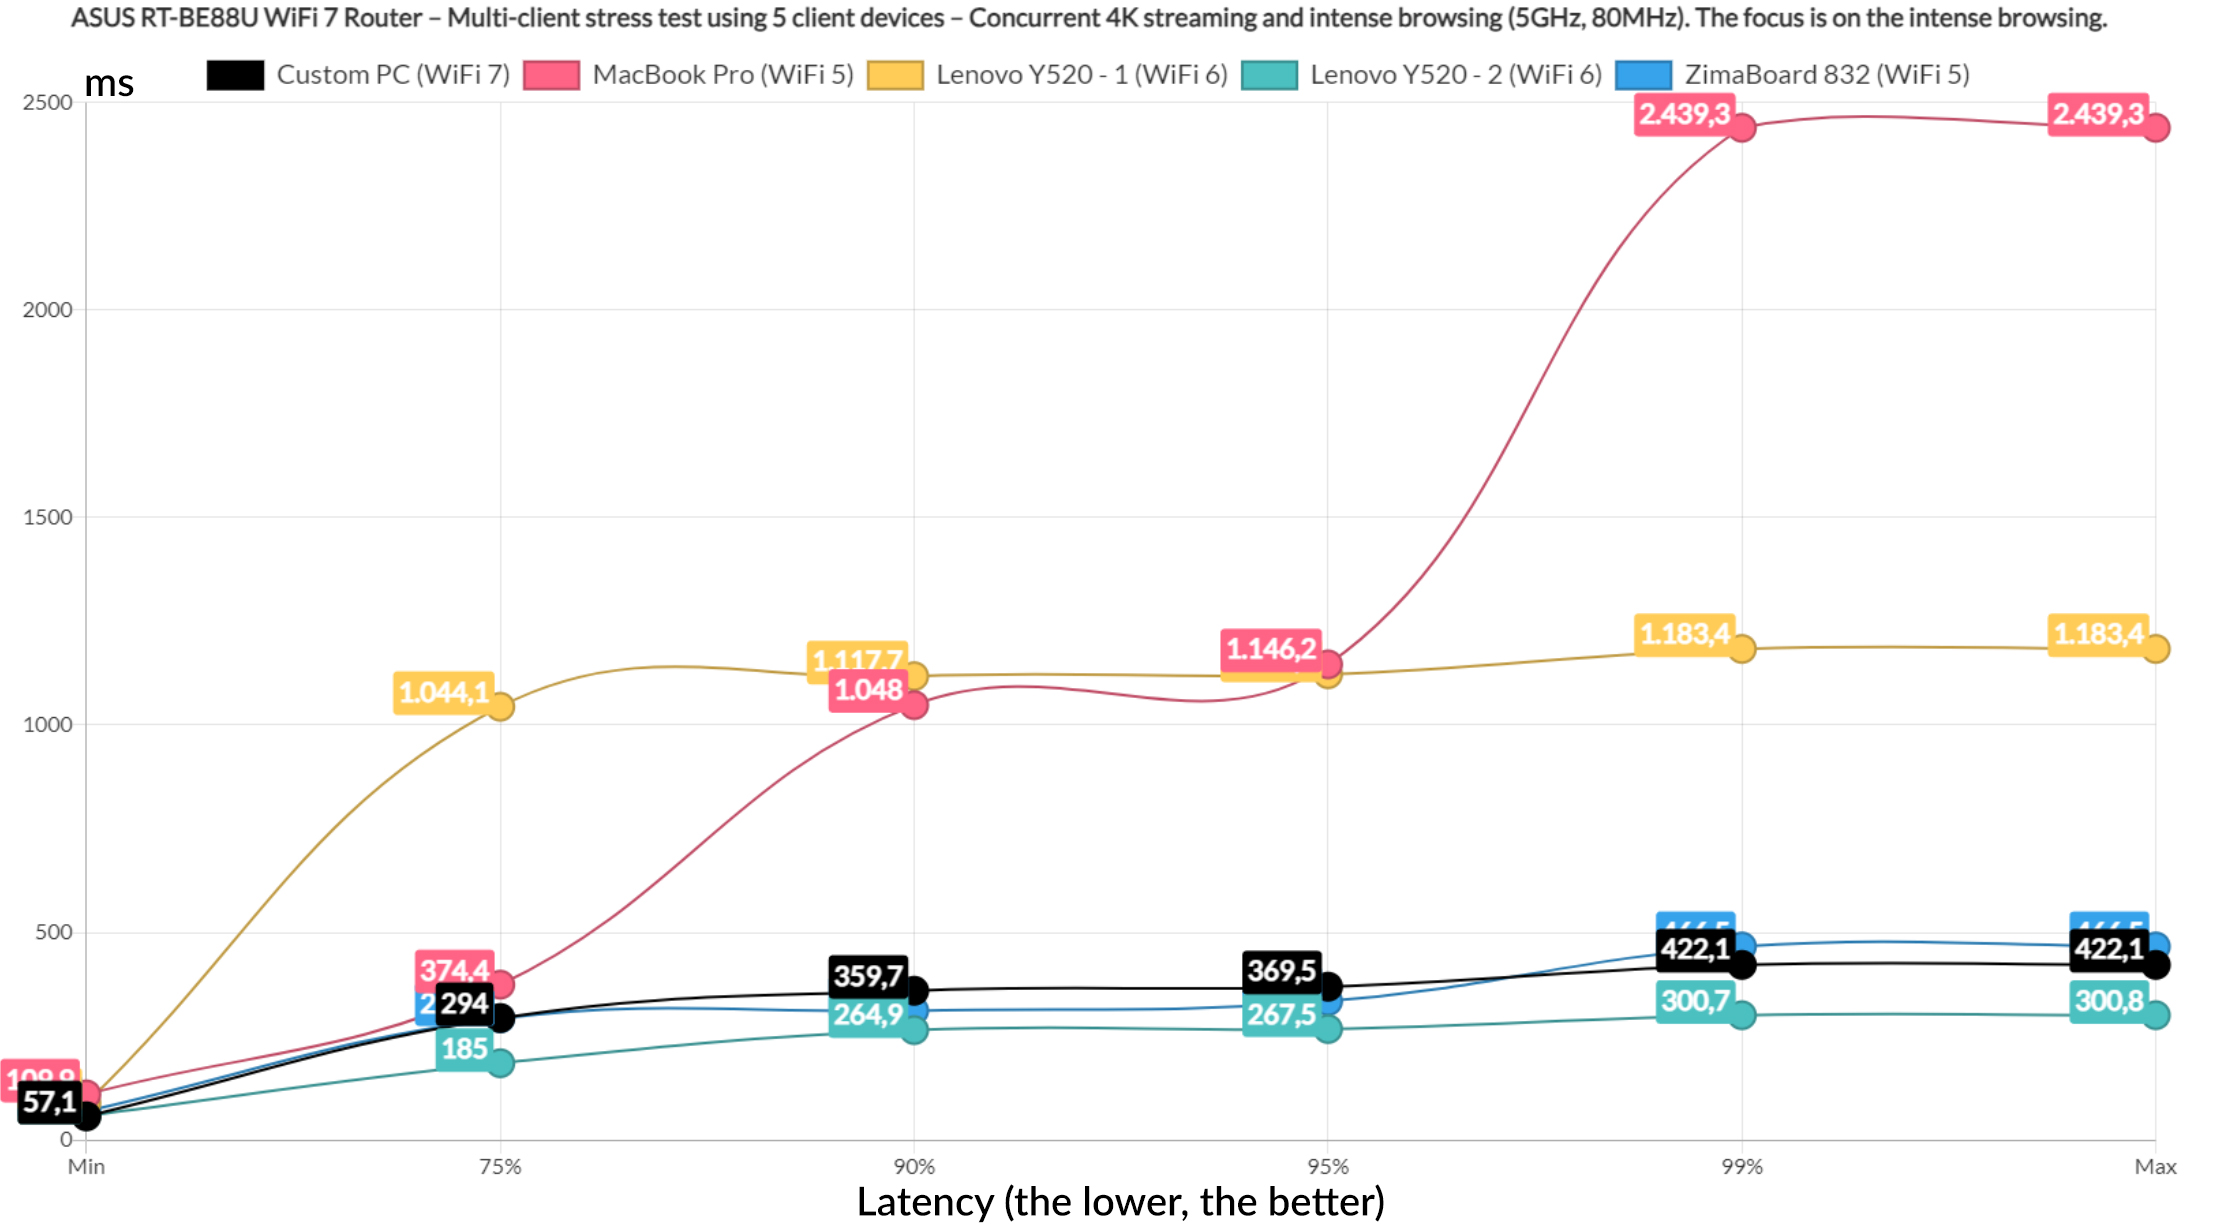
Moving on, I changed things a bit and included simulated downloading traffic of a 10MB file on 2 client devices. Two handled the intense browsing and one the 4K streaming.
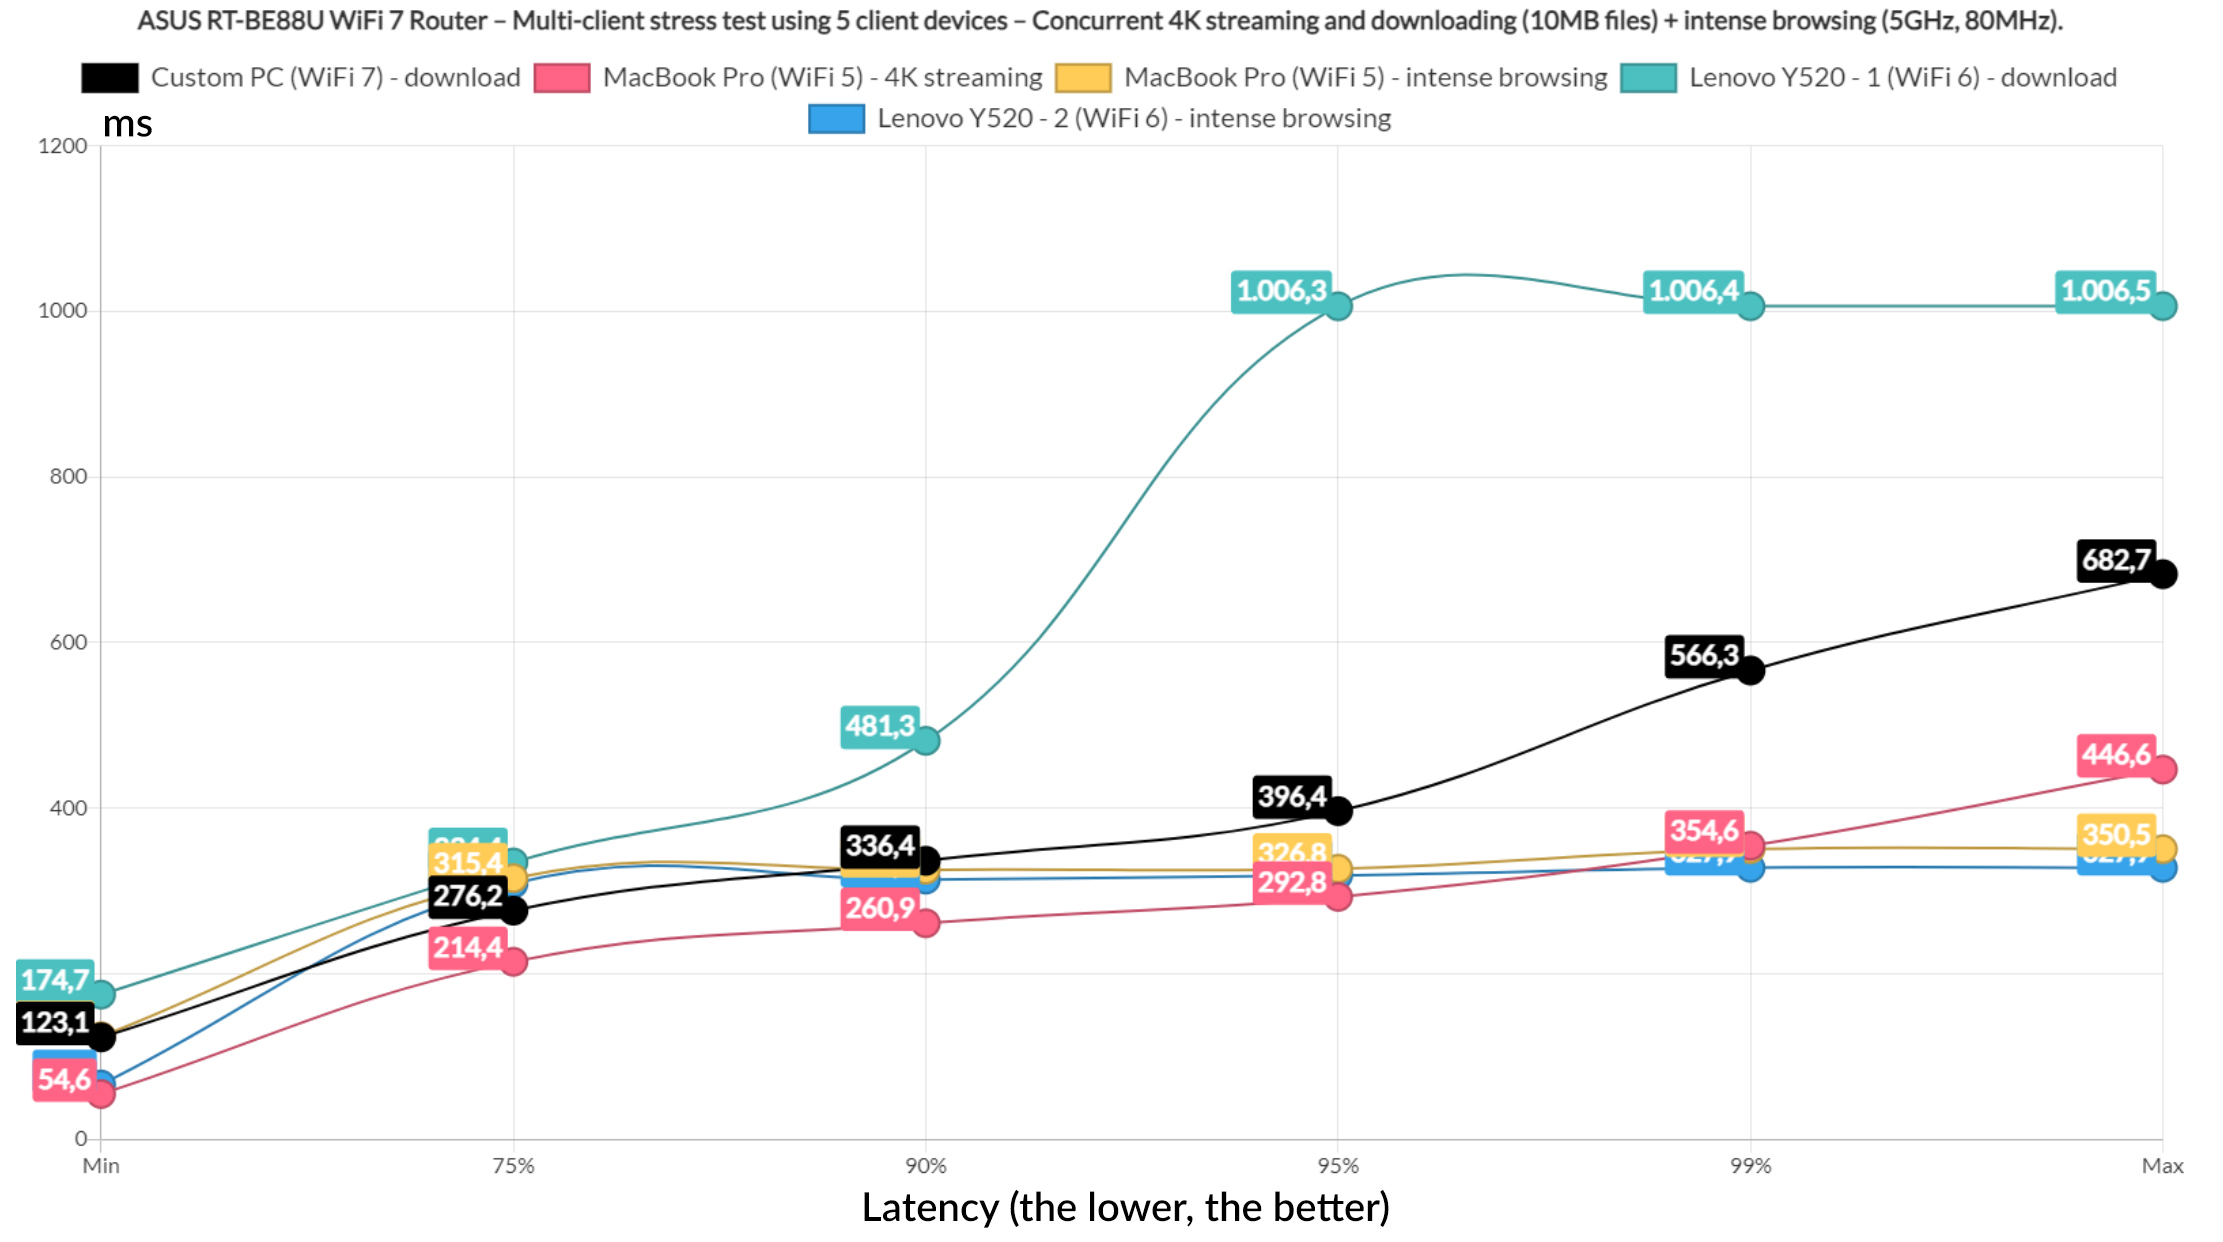
We can see that the WiFi 7 client was relatively contained, moreso than the WiFi 6 downloading client that passed 1s for at least 5% of the time. The 4K streaming shows latency values above 200ms which is far from decent, but the two intense browsing clients did fairly OK.
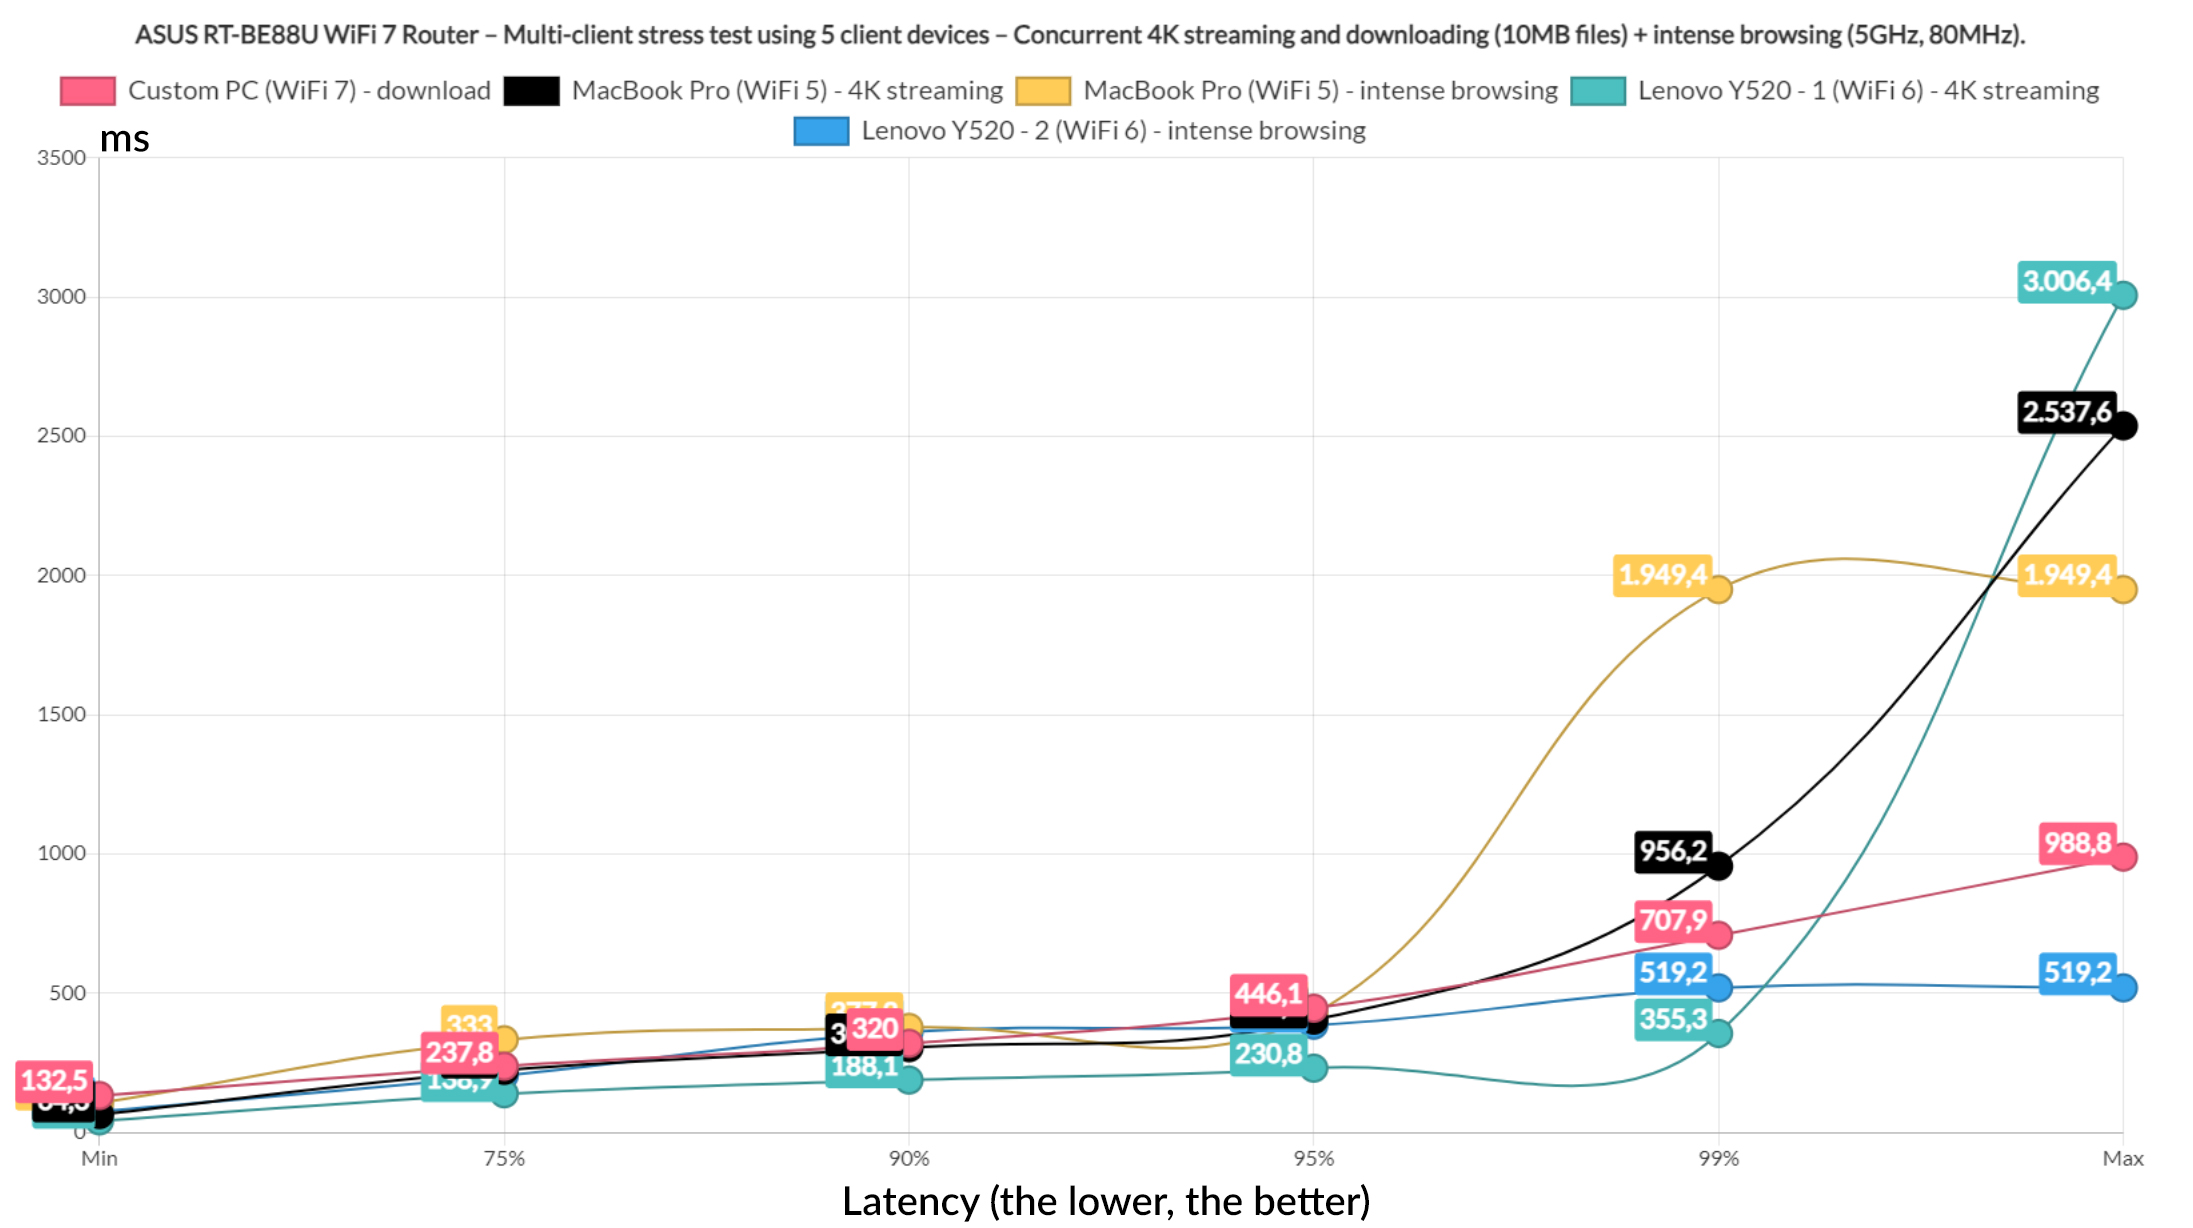
Let’s limit the load a bit by running the download traffic on a single client and, while things got better in terms of latency for the downloading client, I doubt anyone would be happy with a 200ms+ latency. The two 4K streaming clients did not offer decent latency values, but the two intense browsing did, as was anticipated.
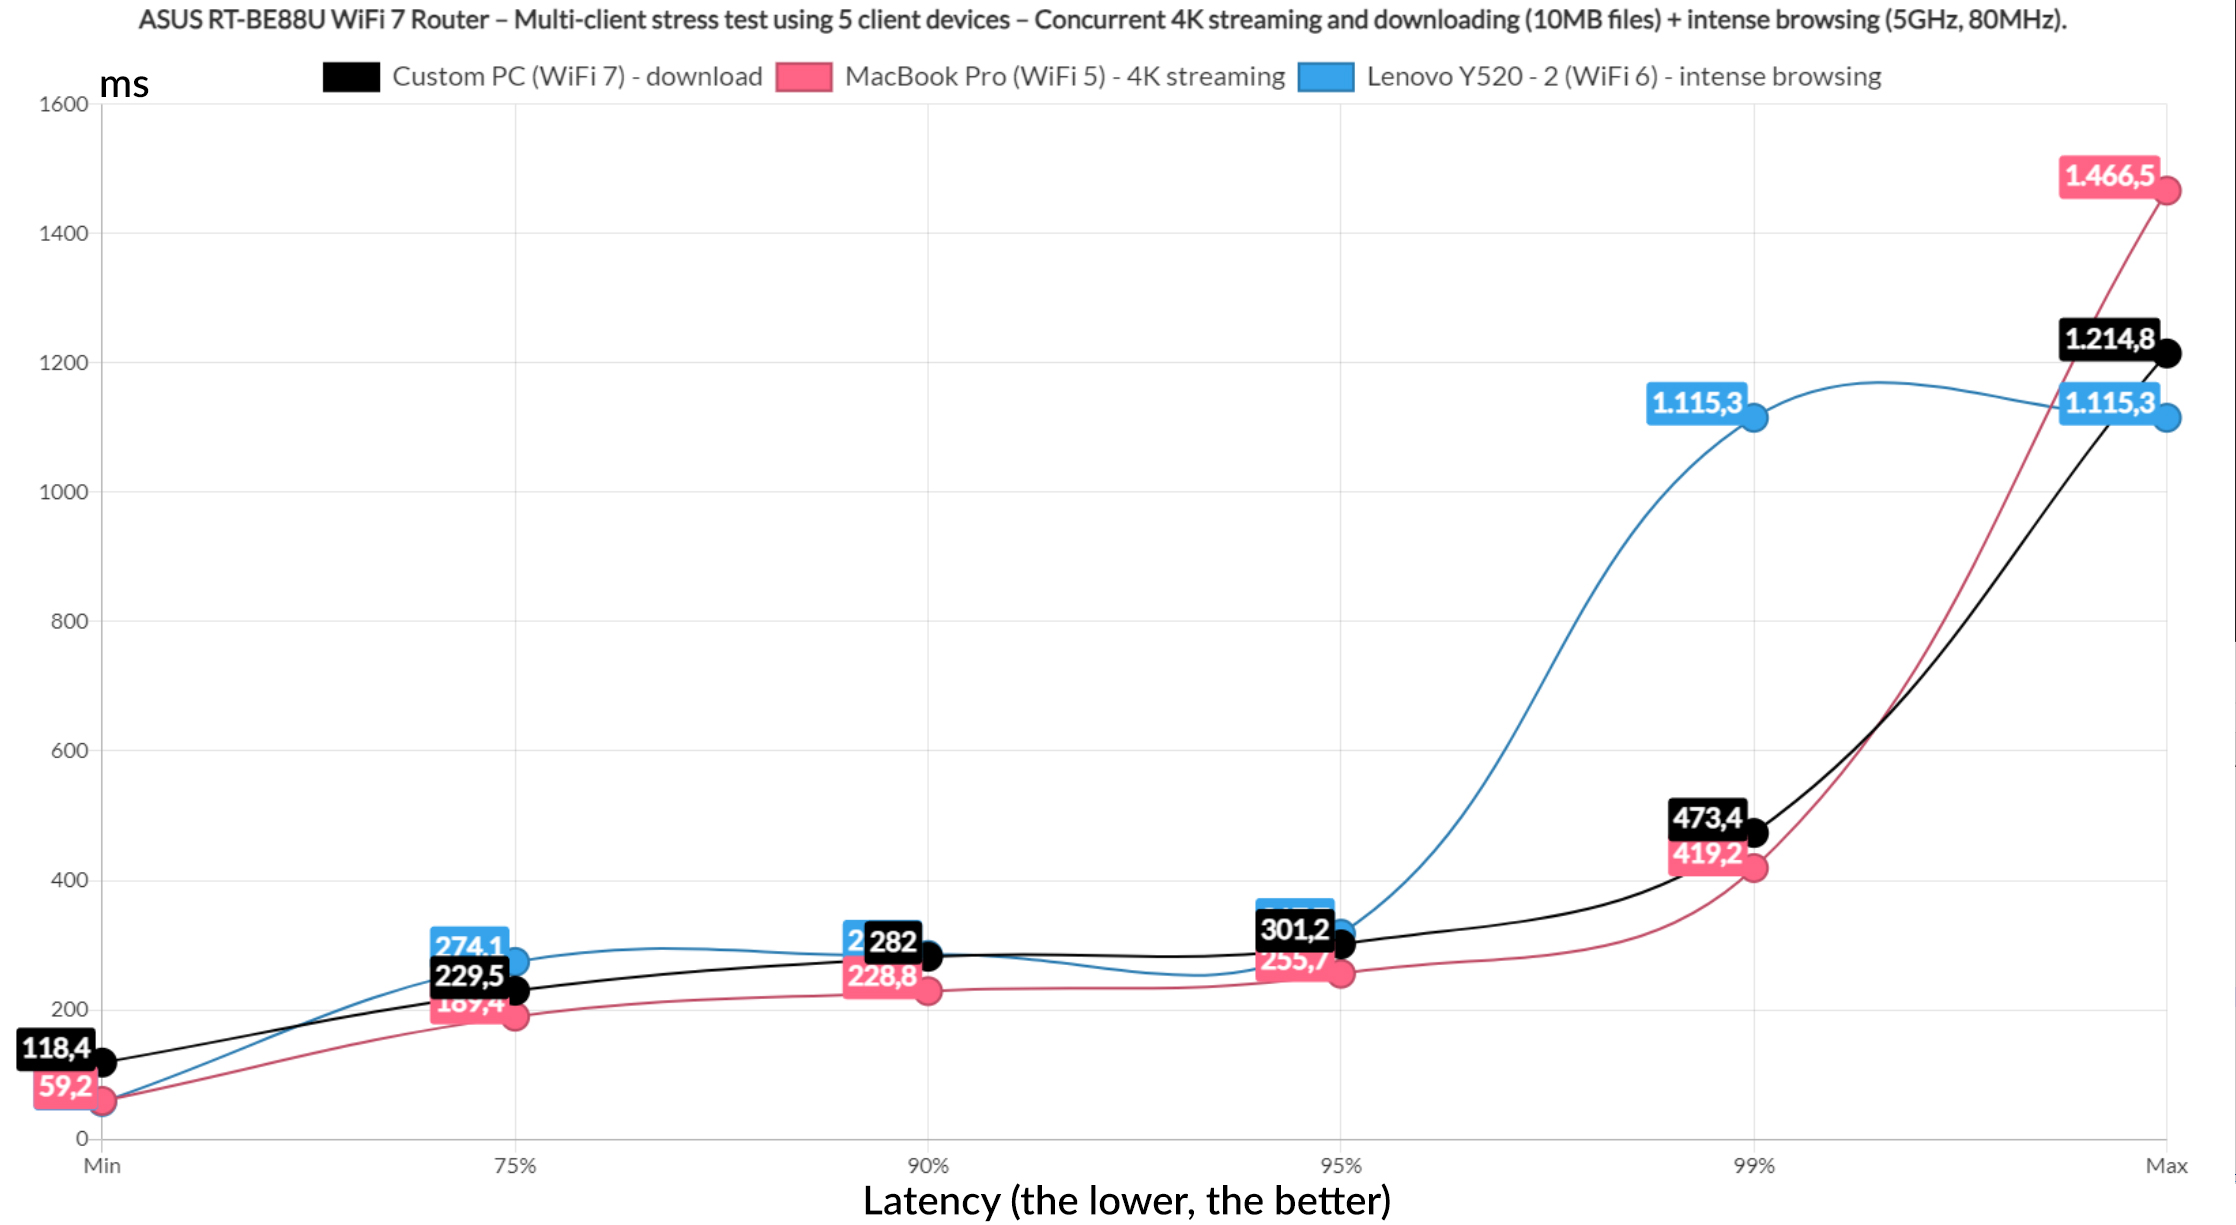
Let’s go a bit lighter and run the downloading traffic alongside just a 4K streaming client and one that’s running intense browsing. The download latency did not get much better and the only client with acceptable values remains the intense browsing device.
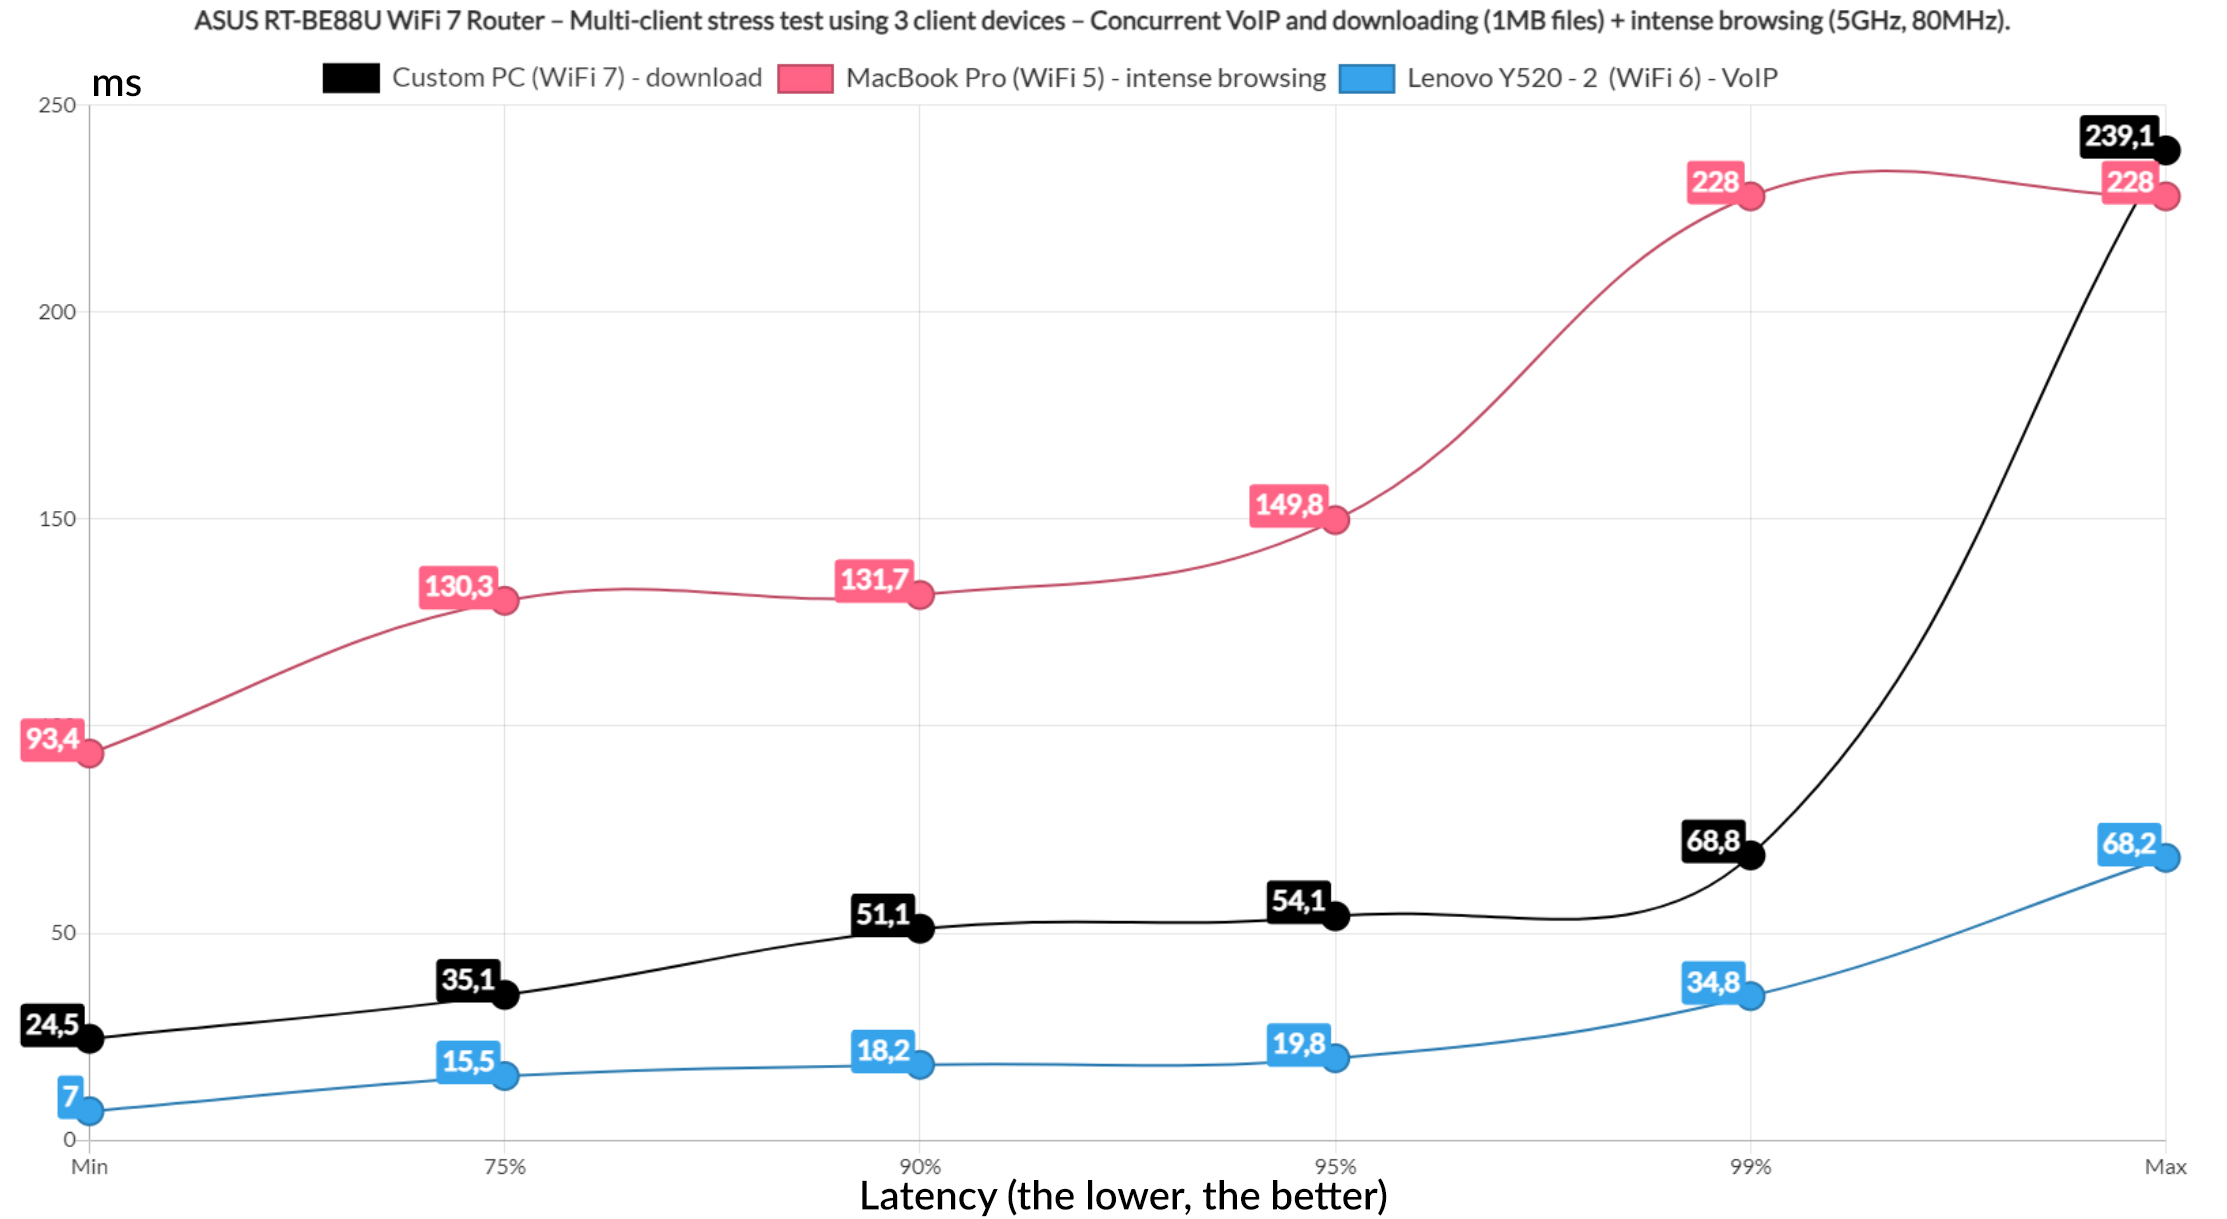
So, I decided to download a 1MB file continuously, while running intense browsing and VoIP on other two client devices. And, as expected, this is the point where we finally see decent latency values across the board.
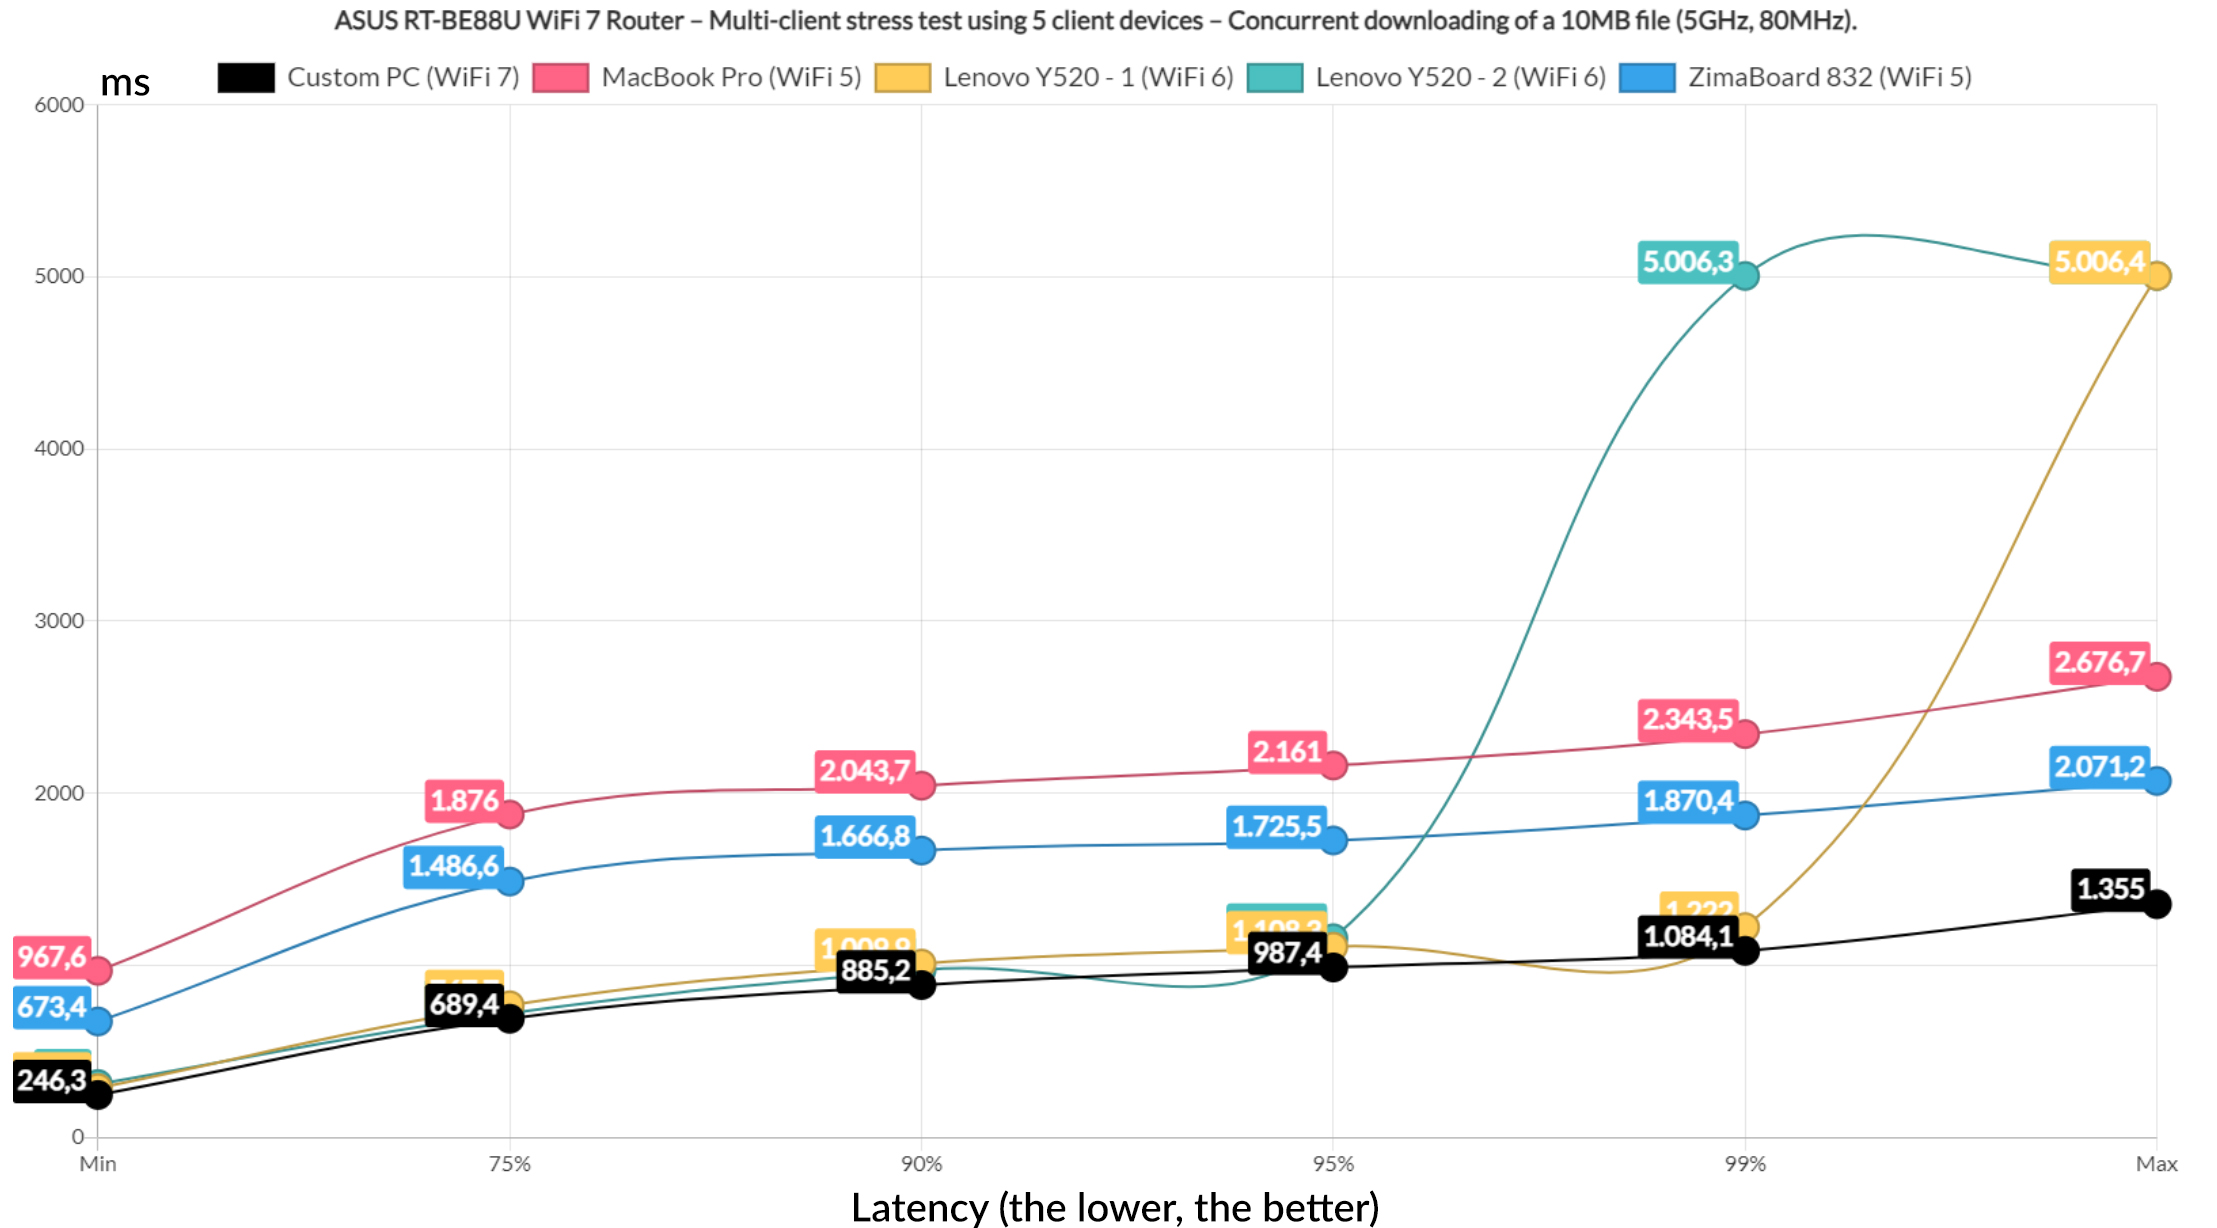
Lastly, I decided to run the 10MB downloading traffic on all five client devices and this is the result. I honestly expected worse.
MLO Latency Talk
Before moving forward, I also wanted to show you the values that I collected running Flent to check for bufferbloat. And I initially ran it on the 5GHz radio only to get a base latency. And, while using the 80MHz channel bandwidth, we do see an initial rise, but then the average latency does calm down, although above 100ms nevertheless.
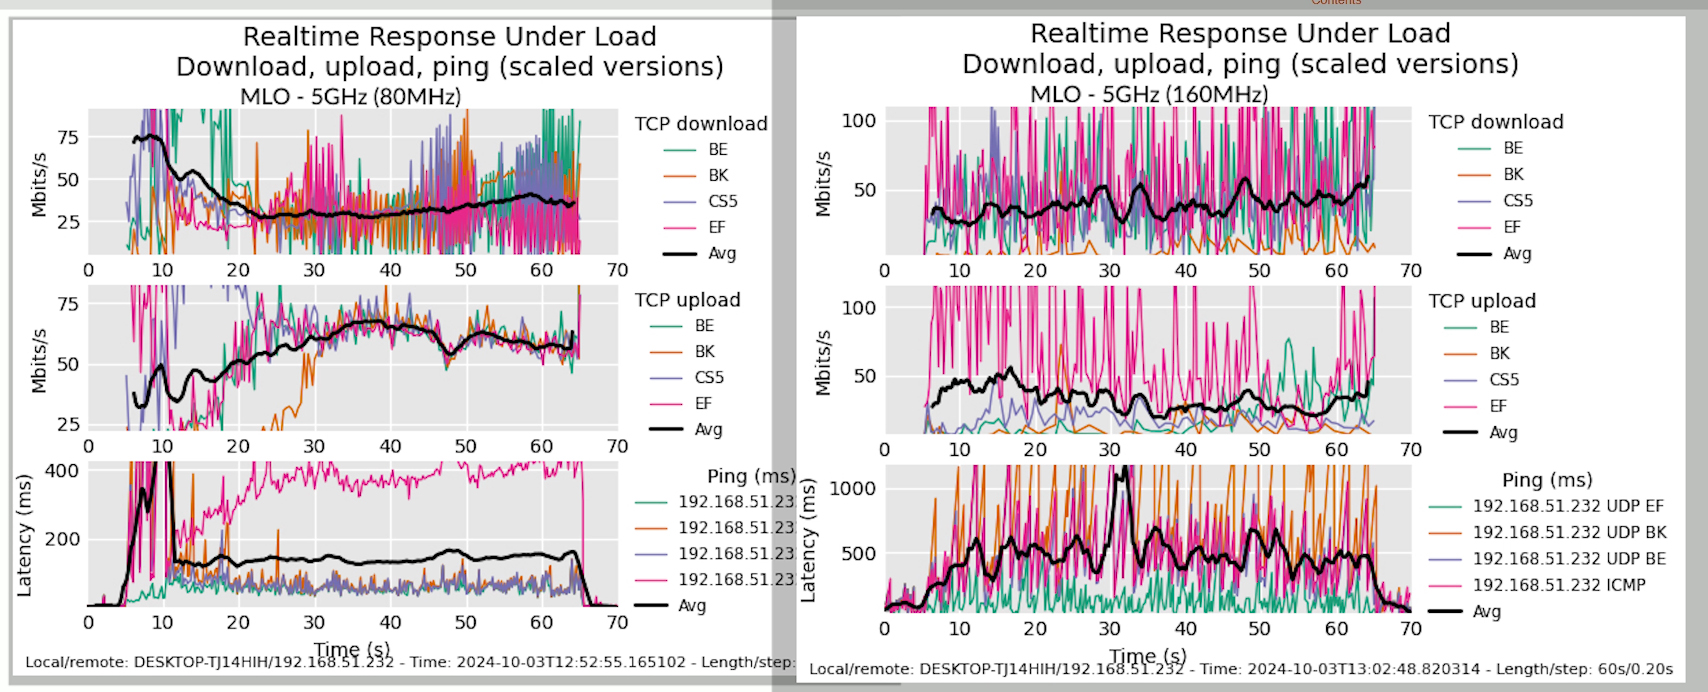
Moving on to the 160MHz channel bandwidth, we see some crazy numbers, the average moving above and below 500ms. This was on channel 60, so I moved to 44. Things get a tiny bit better, but not by much, really.
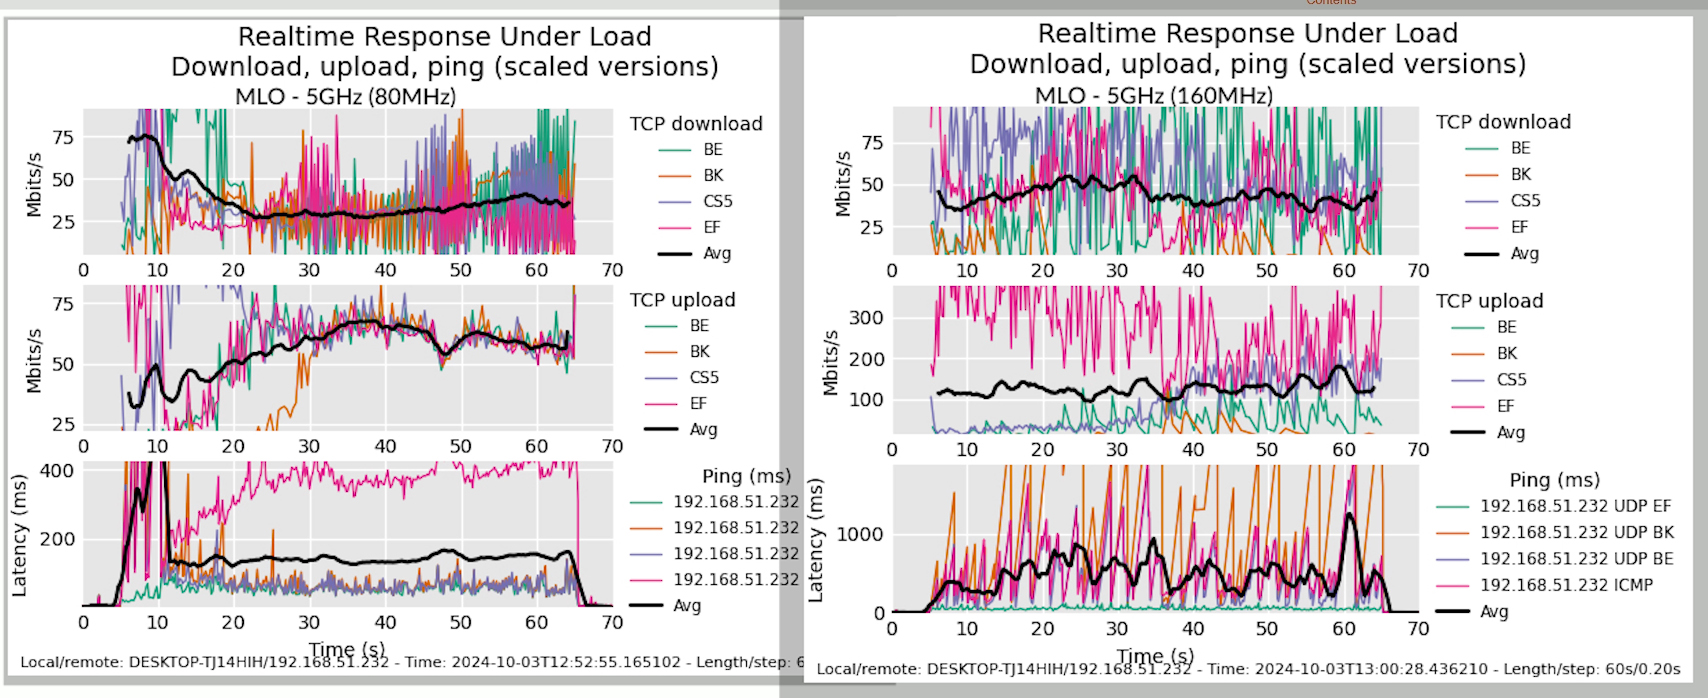
This kind of confirms the issues I had previously with the multi-client latency values. The ASUS RT-BE88U is not that great in this regard. In any case, I also ran Flent after I set up the MLO.
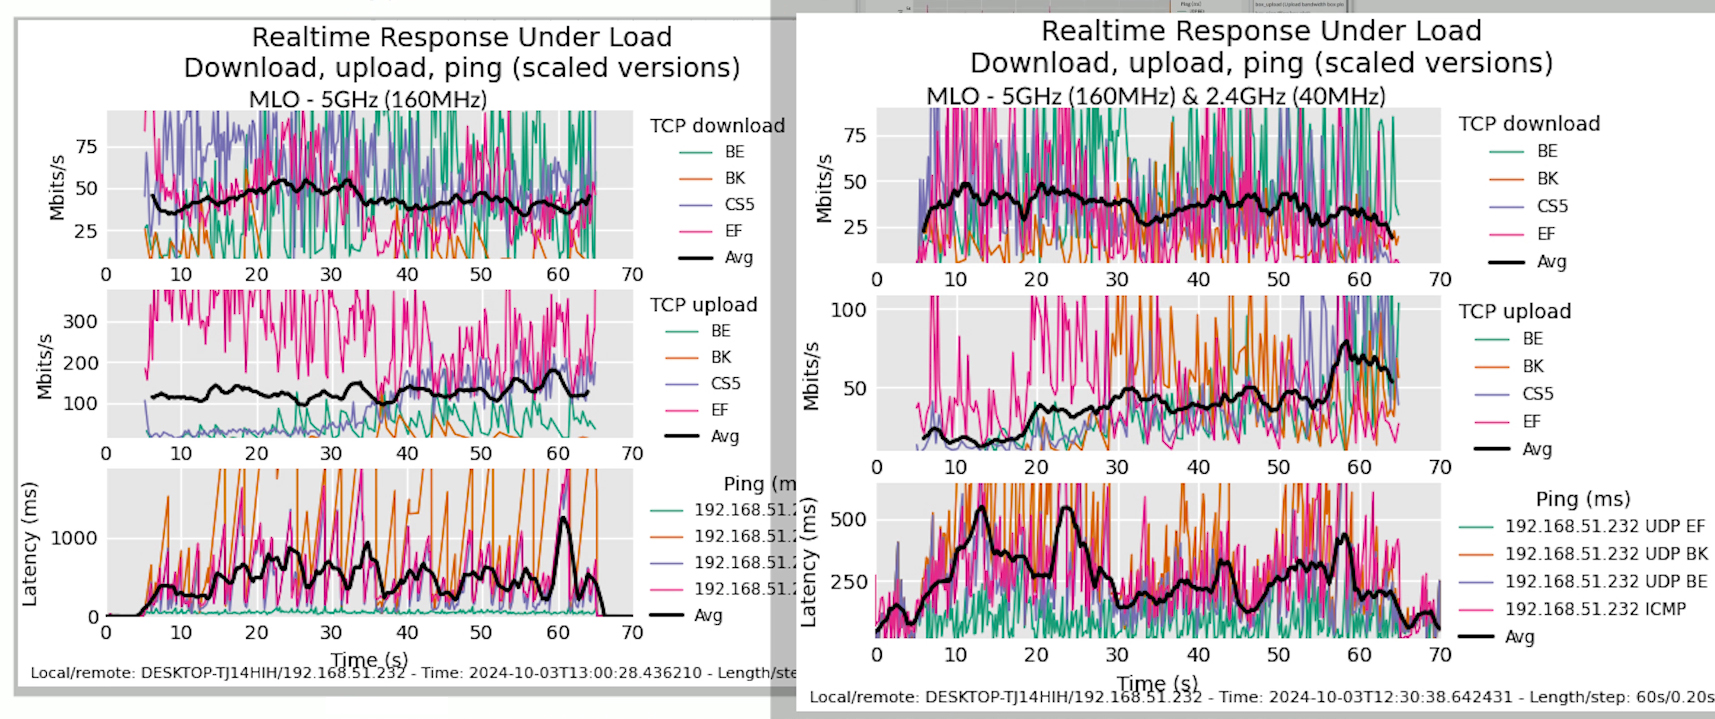
Using the 160MHz channel bandwidth and the 40MHz width with the 2.4GHz radio, we see better average latency values. Still lots of fluctuations though and a far cry from the values I got when I tested the Ubiquiti U7 Pro and the Zyxel NWA130BE MLO performance.

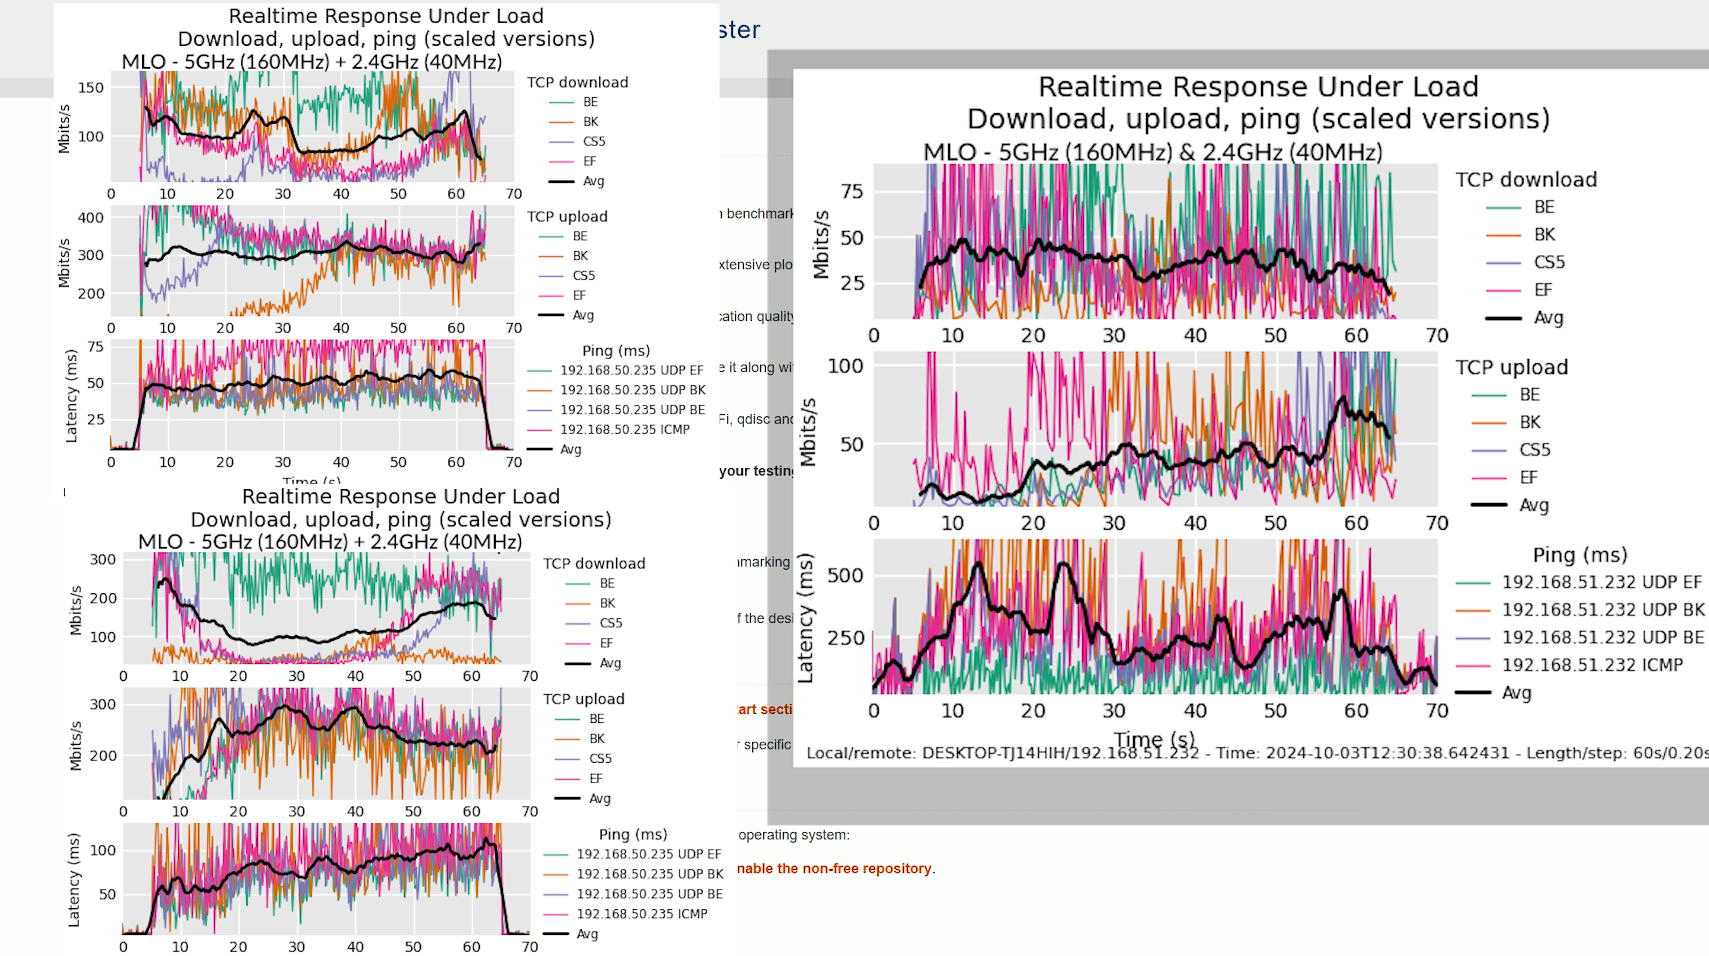
That’s a much better implementation of MLO and we also get the 6GHz radio band. Using the 80MHz channel bandwidth on the 5GHz radio and the same 40MHz for the 2.4GHz radio band, we also see an improvement in terms of average latency. But again, these are very high values and lots of fluctuations which is a sign of instability.
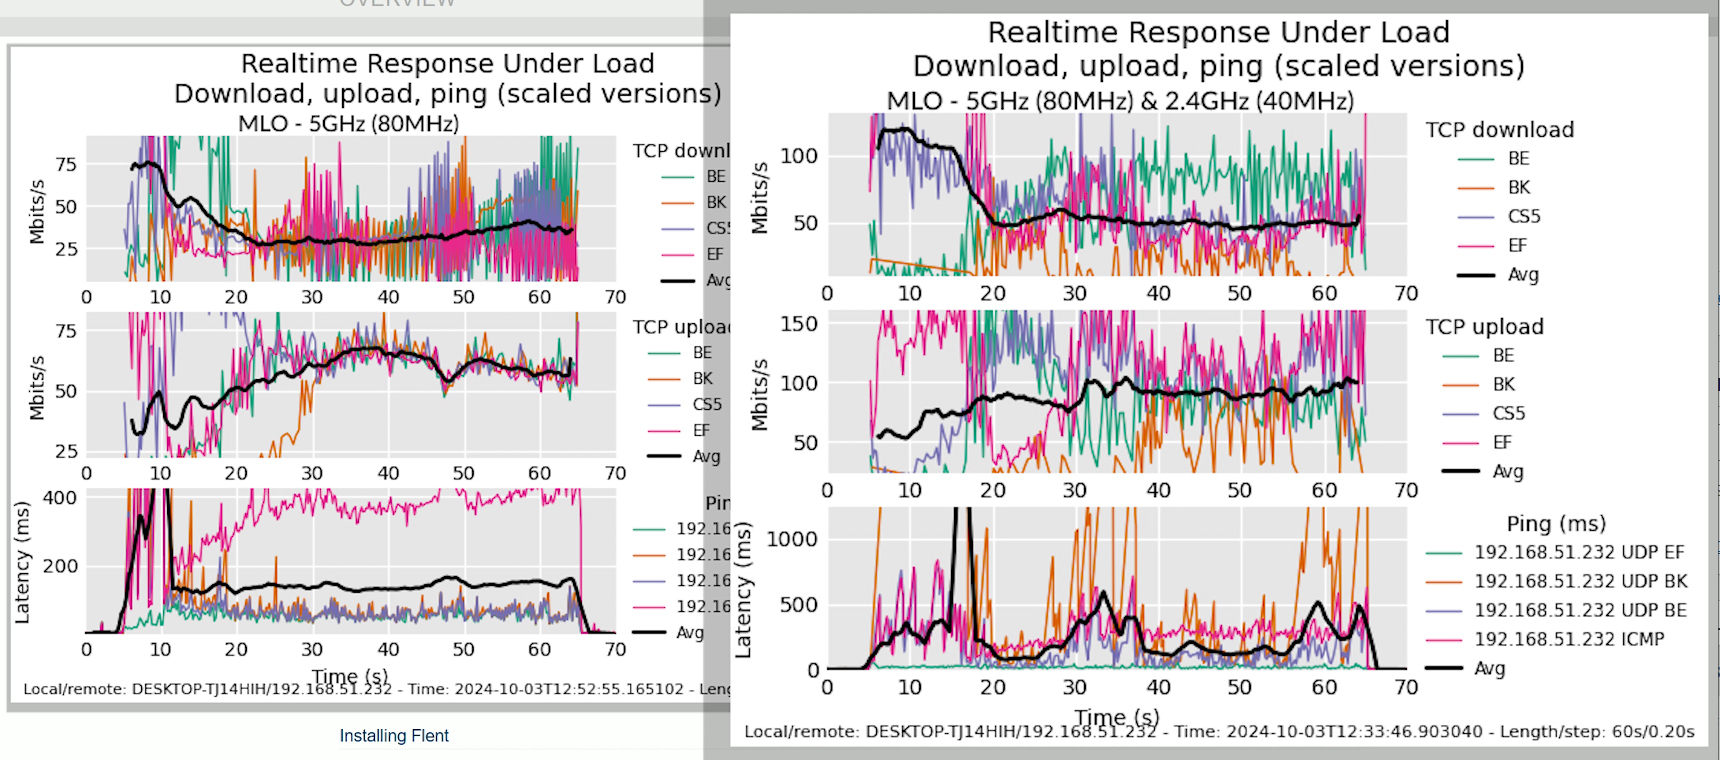
Hopefully, some future updates will make things more stable.
Dual WAN Performance
Now let’s move forward and put all those Ethernet ports to good use. First, I am going to check out the dual-WAN performance and to enable this feature, go to WAN, choose Dual WAN and simply enable it. Then, you can choose the Primary WAN and the Secondary WAN, and you can select any of the available ports, including the SFP+ and the 1GbE ports.
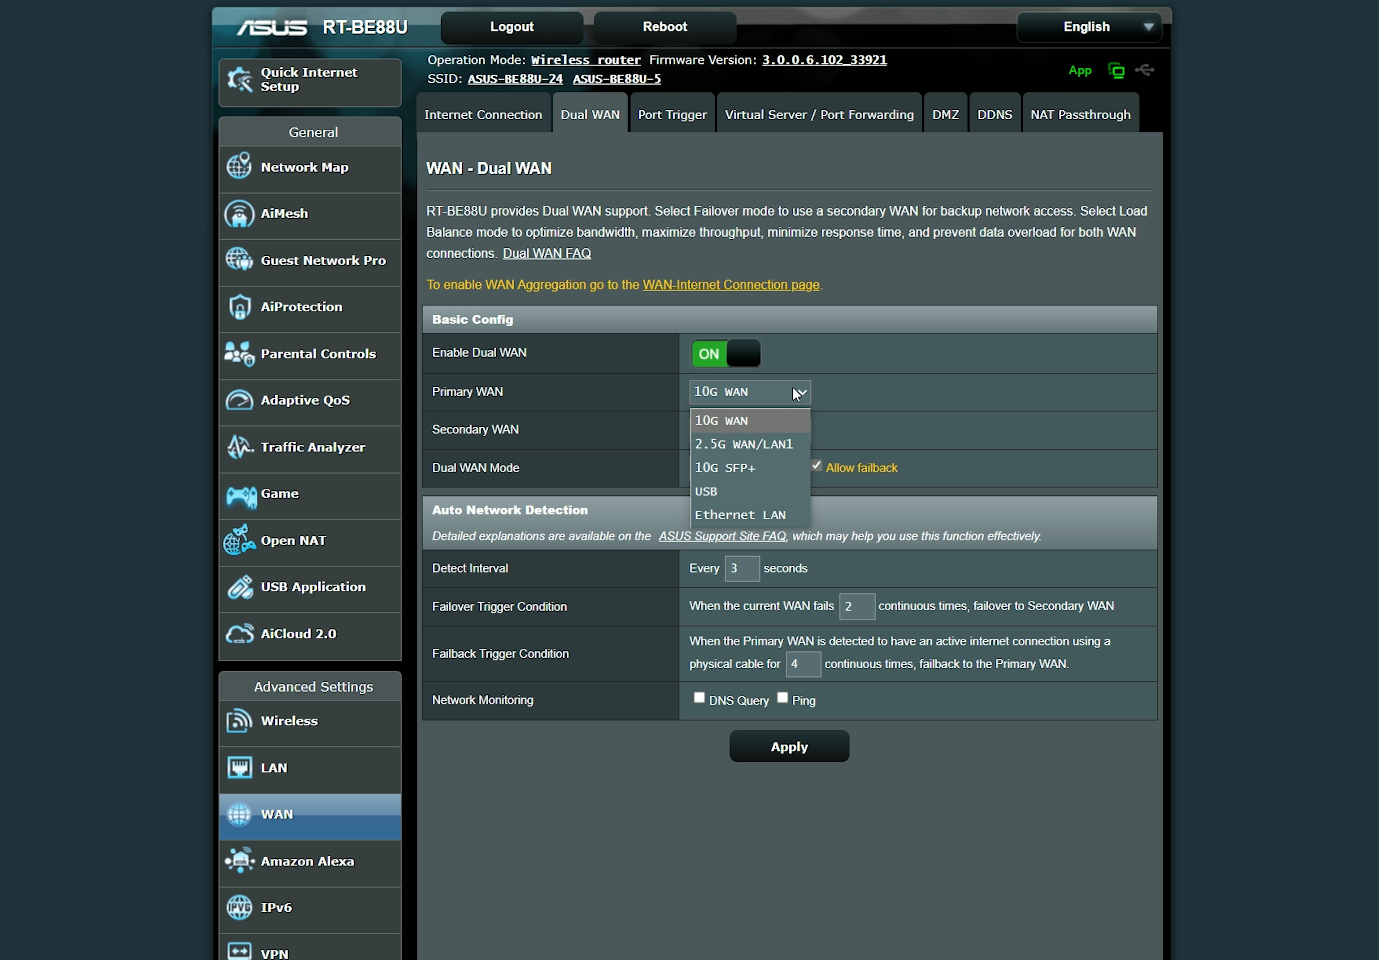
There is also support for USB dongles. The supported modes are Failover and Load Balance. I chose the former and after connecting the cables, I pinged two domains at the same time. Then, I disconnected the main link. It took a couple of tries to switch to the secondary connection which is better than what I saw on the TUF BE3600.

I reconnected the main line, waited a few seconds and disconnected the secondary cable. It very quickly moved to the main line, so it works as intended.
LACP Link Aggregation
The next application is the LACP aggregation which seems to be missing from some other models, but the 88U line is usually better equipped. So, to enable it, head over to the LAN section, select Switch Control and enable the Bonding/Link Aggregation. Wait a few seconds and you can now use the LAN1 and LAN2 to connect a NAS.
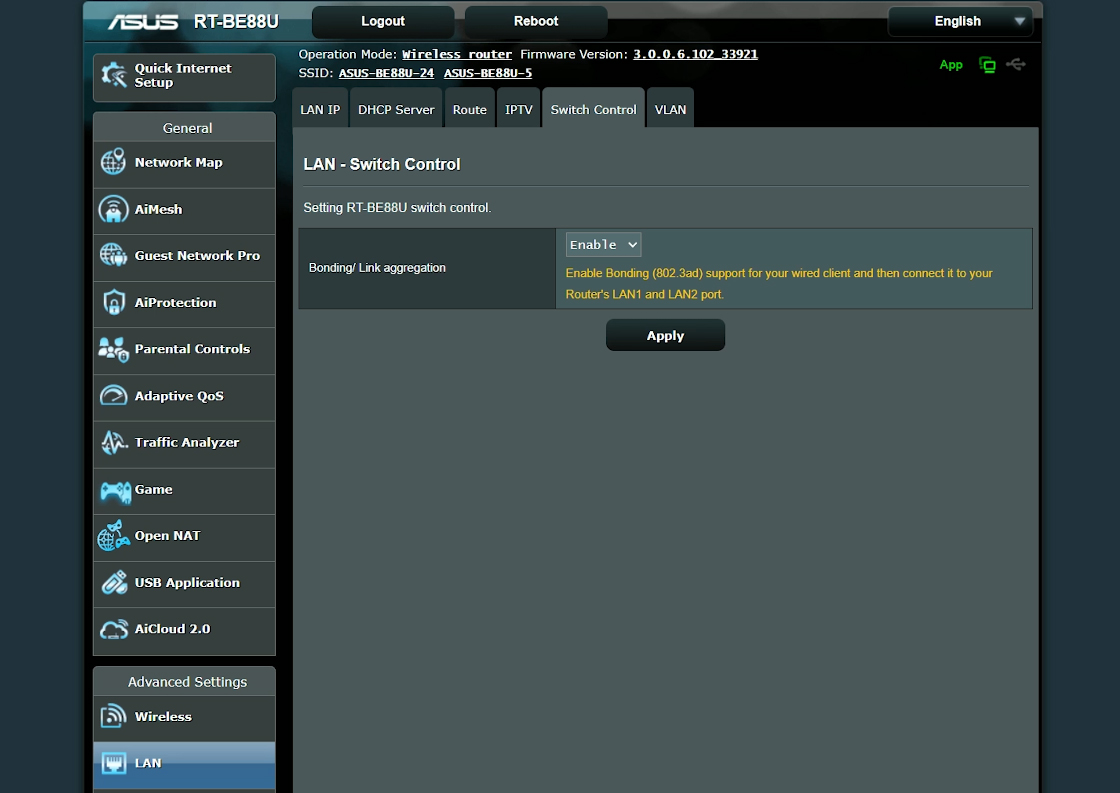
I relied on a ZimaBlade SBC that was flashed with TrueNAS and I had some trouble getting everything to work. I assumed that the NAS was flimsy, but I was wrong. After troubleshooting for a couple of hours and settings up the NAS from the grounds-up, I realized that it was the ASUS router.
Even though it said that the LAN1 and LAN 2 were aggregated, they were not. And I needed about three reboots and complete interface reconfiguration to confirm it. We can see in the TrueNAS graphical interface that we get up to 5Gbps bandwidth available, so the aggregation indeed took place.
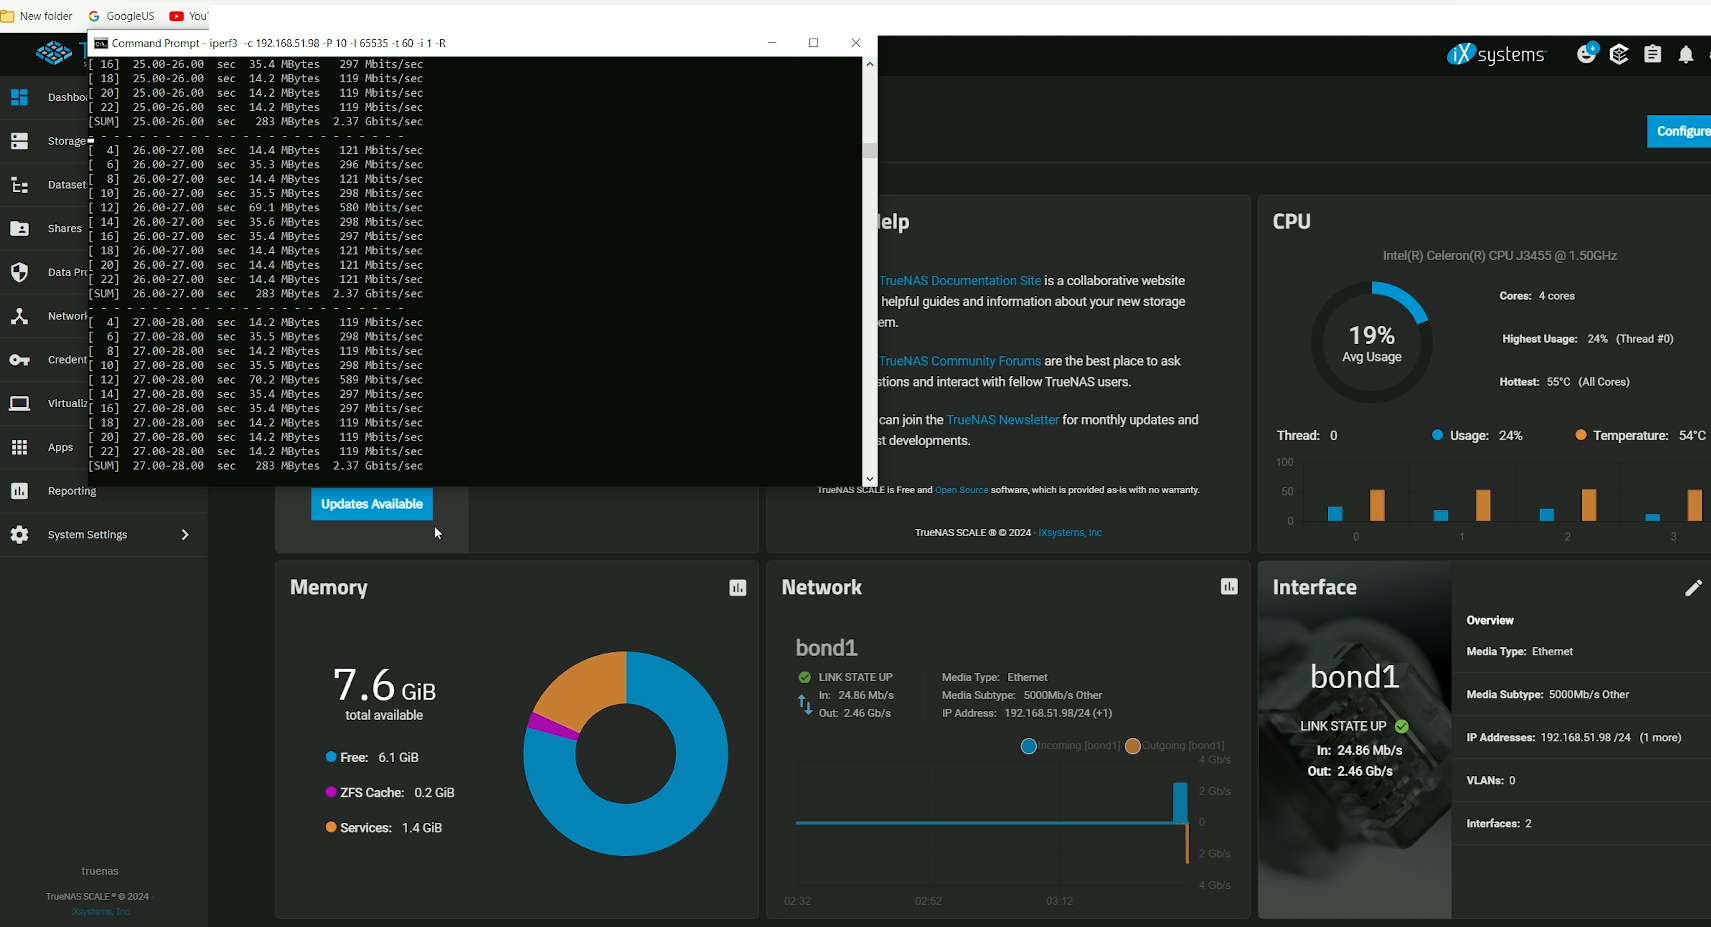
But what about the speed? I decided to run an iperf instance and, as you can see, upstream, we can see that it reaches up to 2.5Gbps. Same as downstream. I also need to mention the router’s ability to aggregate two WAN links, but unfortunately, I do not have a compatible modem to test it out. I also can’t really max the switching capacity of the router with my current equipment, so I will leave it to a future re-test.
The Power Consumption
Before moving to the software, let’s see the power consumption of the router. I used the same app associated to the EVVR smart relay and you can see the values while the router is in normal use.
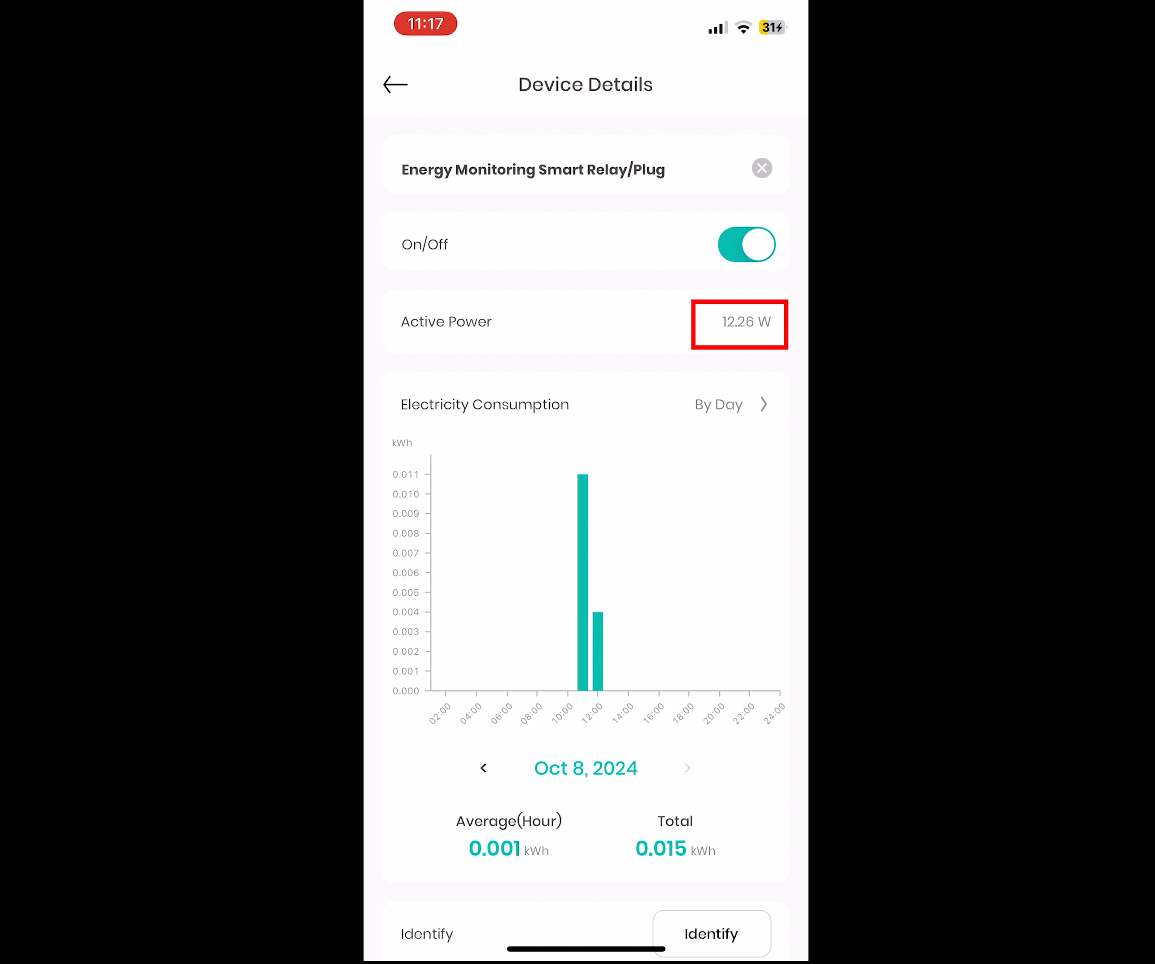
This is not the maximum power consumption.
The Web-based Interface
Now let’s have a quick look at the web-based interface. The layout is the same we got for many years now, with some General settings, as well as the Advanced ones on the left side. I need to mention revamped AiMesh section and I promise that I will test MLO with more than one ASUS routers very soon, especially since the developers insist that they made things much smoother.
Then, there’s the Guest Network Pro where you can configure various types of networks, including one dedicated to IoT, MLO and there’s even one suitable for Kids. The AiProtection is as comprehensive as ever and we get some gaming-focused features.
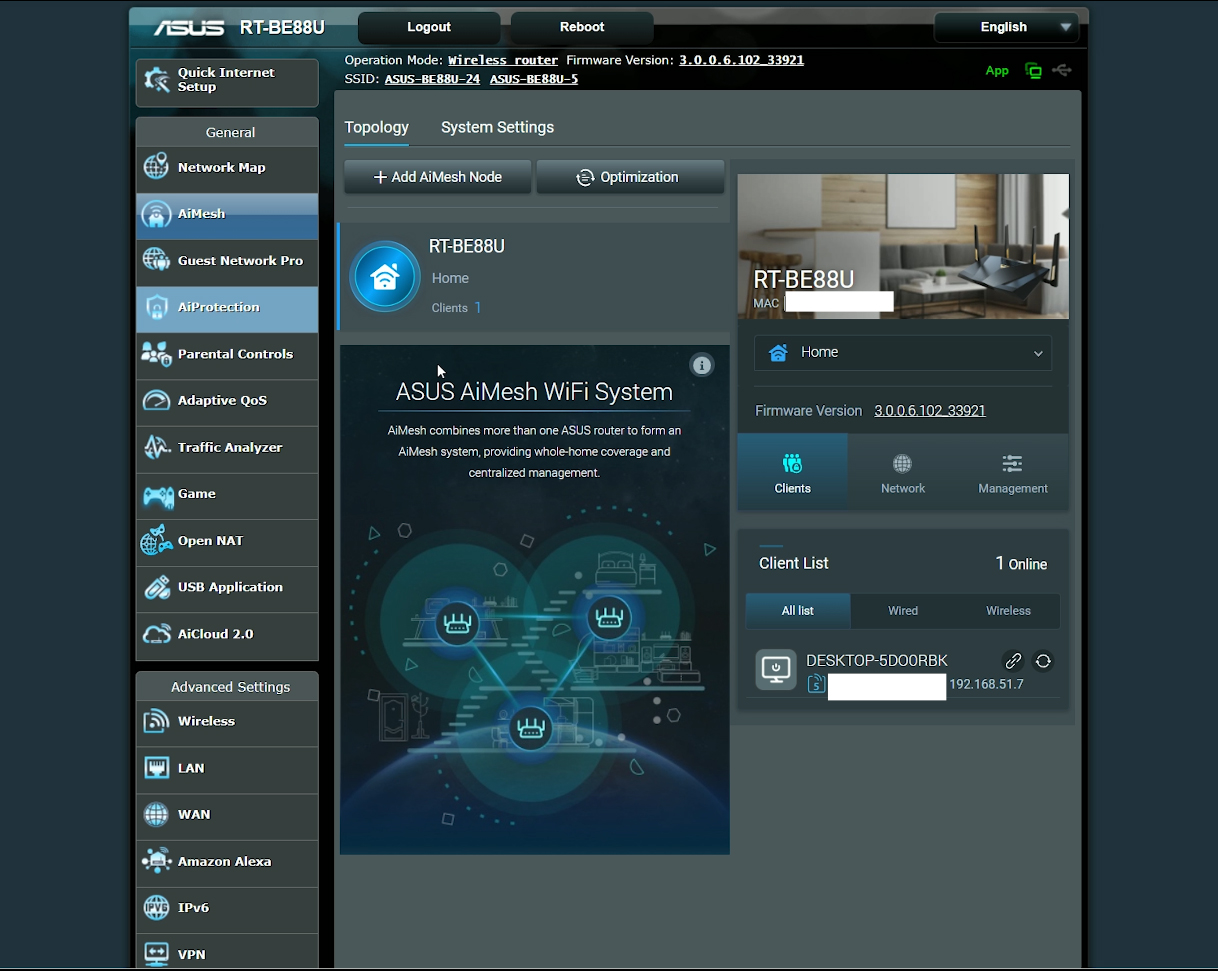
You may have noticed that WTFast is missing and that’s has been the case for a while now. It’s because it’s a separate service which can be used by relying on an app. I am not fond of extra apps and subscriptions, but you do you. The Advanced Settings section is comprehensive as always and we have already went through some of the available features there, such as dual WAN, WAN aggregation and LACP aggregation.
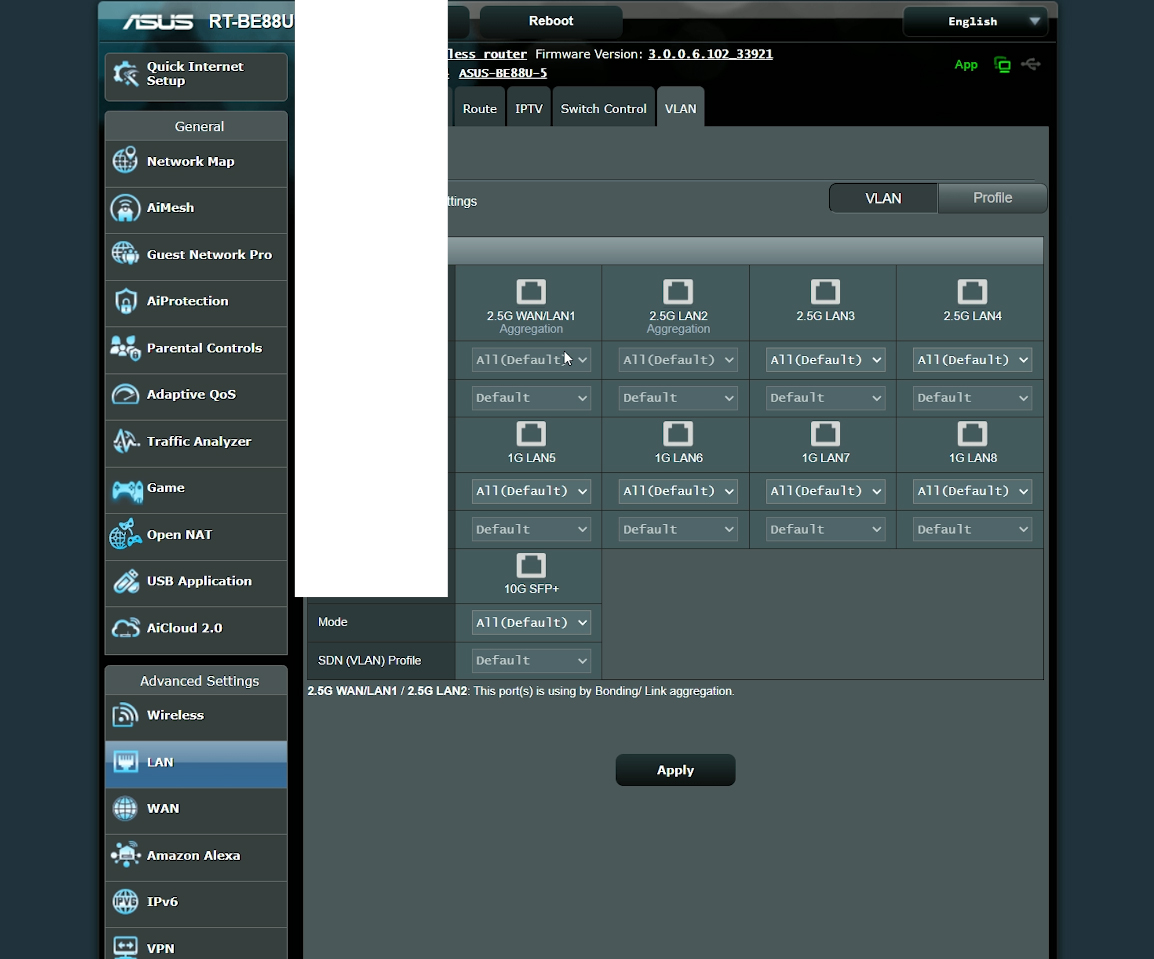
The support for VPNs is also very nice and there is a Firewall section as well. I suppose I do need to mention the VLAN section under LAN as well because this is where you can associate ports to your Guest Networks. There is support for Amazon Alexa, but I wouldn’t touch it if you care about your privacy.
The Mobile App
The layout of the app remains the traditional one, with Home page showing some Internet Status info, as well as the AiMesh configuration and the Mobile Game Mode which automatically prioritizes the mobile device. Then, there’s the Devices where we can set up its QoS priority, enable Safe Browsing based on the preset profiles which do include Ad Blocking.
It’s nice to see that ASUS has acknowledged the current extreme invasive nature of the ads. The Family section remains the same as what we saw on other ASUs routers, offering between age-based presets, the option to set up scheduled Internet access and select what type of content will be blocked.
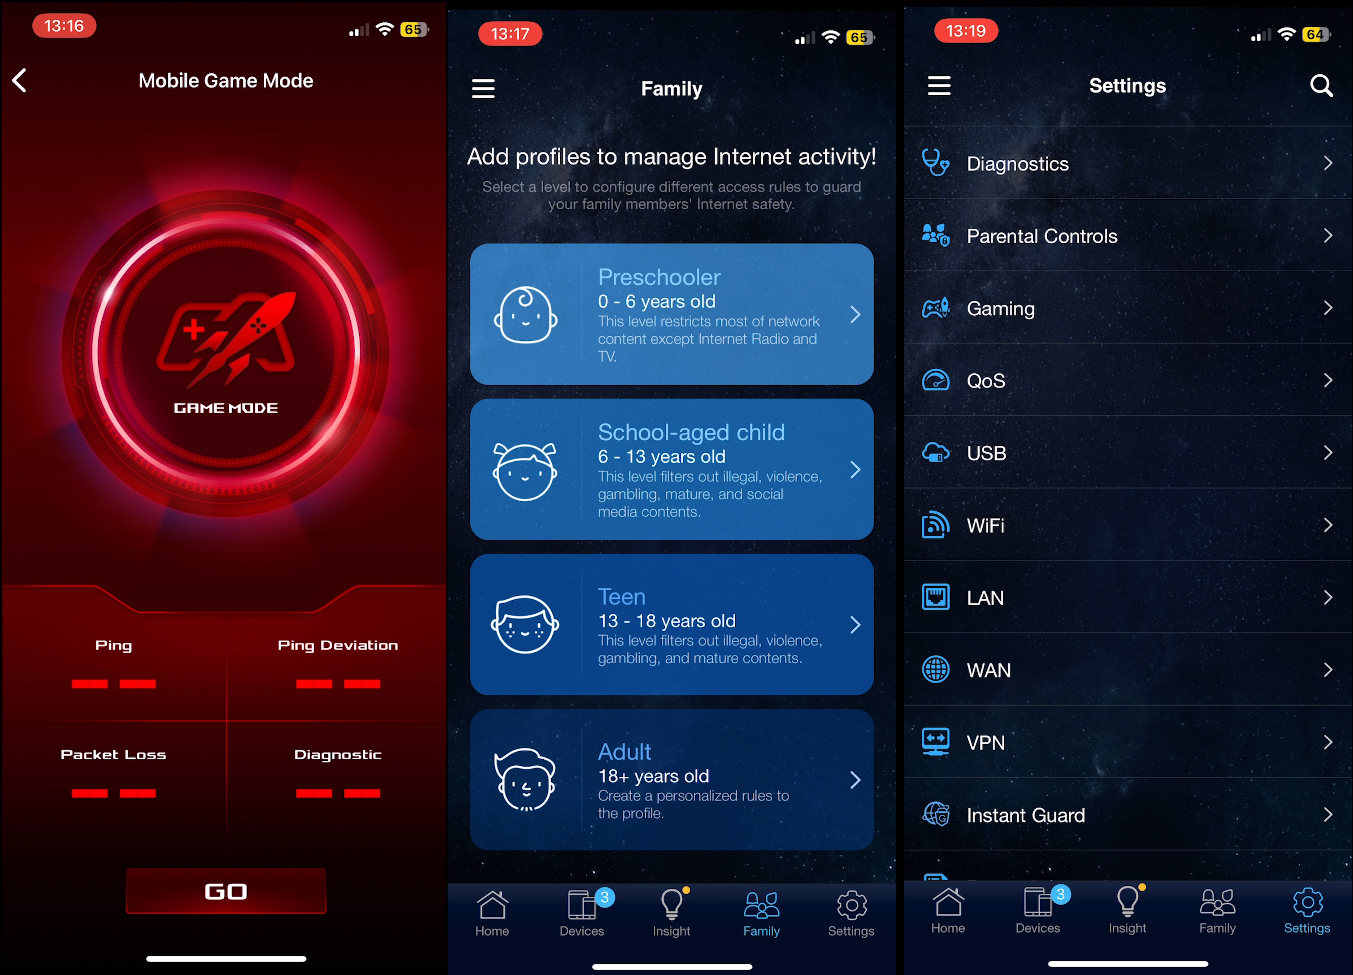
Of course, this is a part of the TrendMicro suite of features that’s embedded within the ASUSWRT, and there is some data collection that’s happening in the background. Then, we get to the Settings section which covers most of what we get on the web-based interface, but a bit less in-depth.
The Conclusion
As we reach the conclusion, I have to say that the 10GbE ports can be a bit misleading, raising the expectation that along with the WiFi 7 label, we would get phenomenal WiFi throughput. And that’s not at all the case. Don’t get me wrong, the MLO works decently well in the sense that the throughput can go past 2Gbps, although the latency is a bit strange. And that also came forward in the multi-client tests as well, which means that some more works needs to be done here.
That being said, is the price tag justified? Right now, it stays between 350 and 400 dollars, so it is a bit pricey. A U7 Pro offers a better performance and it does support MLO, while costing less. But, if you add a gateway and a 10GbE switch, you’ll easily go past $500. I mean, it’s probably worth it, but it’s up to you to decide. I would also keep an eye on the ASUS RT-BE92U which should be out soon and will have most of the features of the BE88U plus the 6GHz radio. That’s all for now. Thank you for watching and see you next time.

Mark is a graduate in Computer Science, having gathered valuable experience over the years working in IT as a programmer. Mark is also the main tech writer for MBReviews.com, covering not only his passion, the networking devices, but also other cool electronic gadgets that you may find useful for your every day life.
