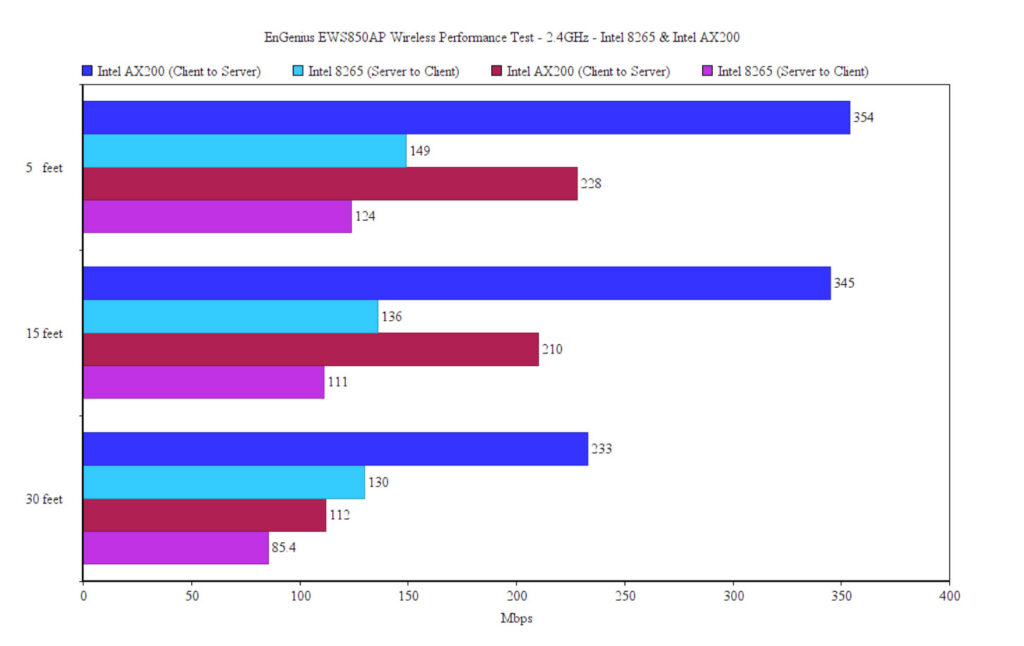
I afterwards connected the laptop to the 2.4GHz network and from the client to server, at 5 feet, I measured an average of 354 Mbps, while at 30 feet, the throughput fell to an average of 233 Mbps. From the server to the client, I measured around 228 Mbps at 5 feet and an average of 112 Mbps at 30 feet.
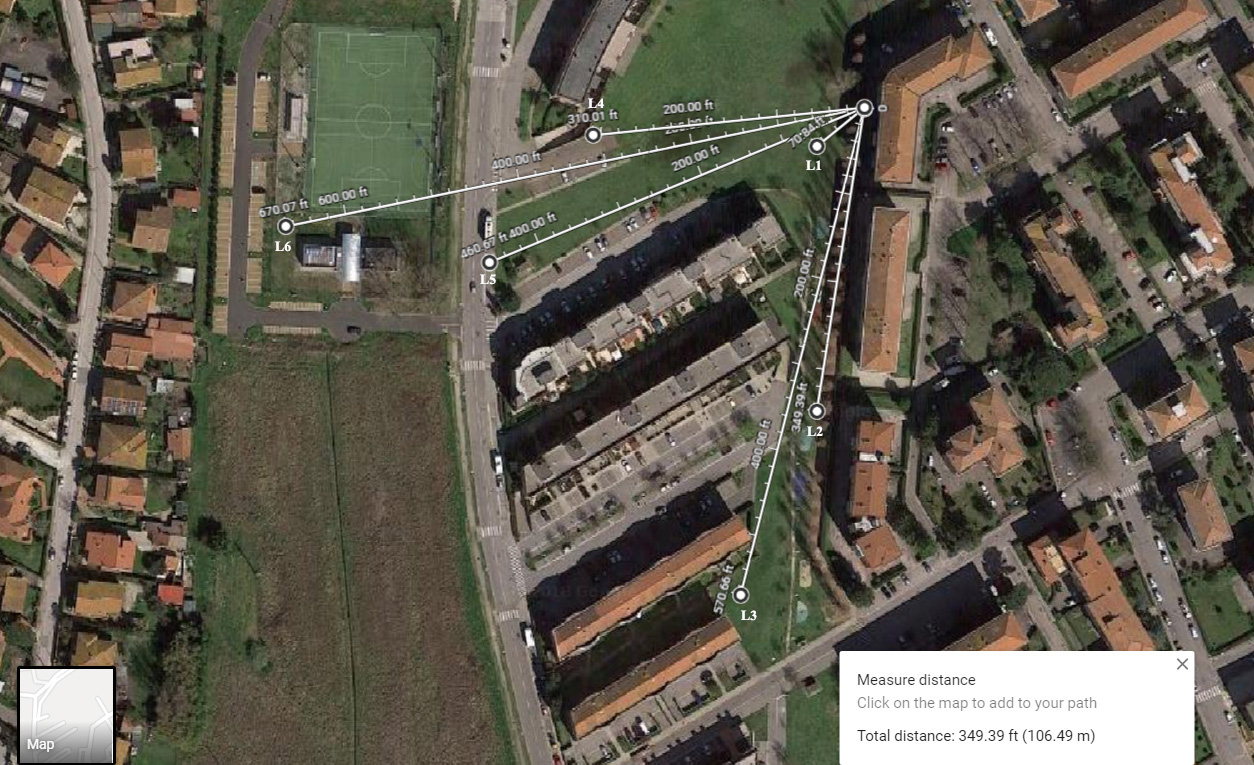
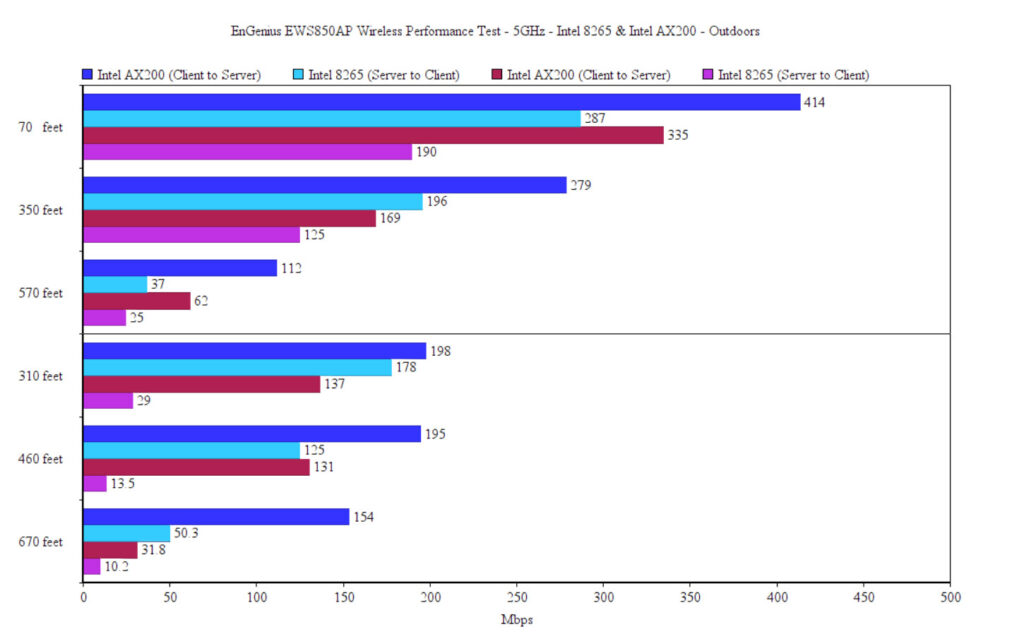
On the next step, I had to go outside (sigh), so I chose the same locations as when I tested the other outdoor access points – the results are from the client to the server, but you can check the upstream results in the graph that’s a bit further down (I have used the laptop with the Intel 8265 as the client, followed by the same laptop with the Intel AX200 WiFi card). So, while the client device (Intel 8265 802.11ac) was connected to the 5GHz network, I measured an average of 287 Mbps (-43dB), 70 feet away from the access point (in front of it, with clear line of sight) and, after moving away for a bit at up to 350 feet (-64dB), I saw an average of 196 Mbps.
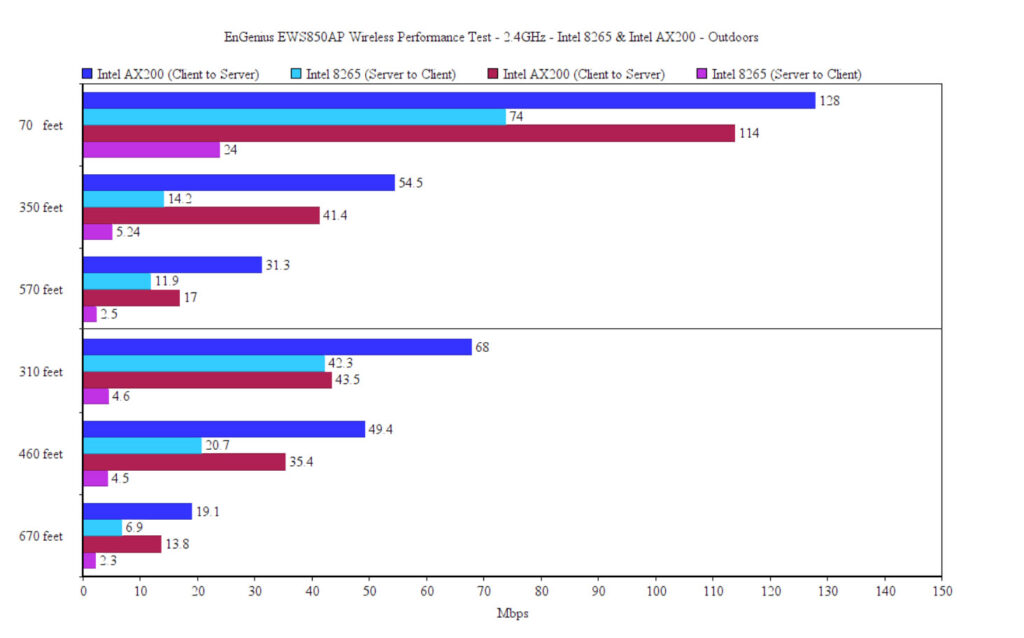
Moving even farther and with some branches in the way (it’s winter, so no leaves), I measured an average of 37 Mbps at 570 feet (-68dB). I then switched the direction and checked the throughput at 460 feet (-73dB), again, with a tree in the way (but no leaves) and I saw an average of 125 Mbps (it worth mentioning that the server to the client performance dropped quite a bit and only saw an average of 13.5Mbps). The last location and the farthest in that direction was at 670 feet (-81dB), where I saw an average of 50.3 Mbps upstream (and 10.2 Mbps downstream). The 2.4GHz wireless performance wasn’t that impressive and I saw about 74 Mbps at 70 feet (-37dB) and 14.2 Mbps at 350 feet (-62dB), while at the farthest point (670 feet, -72dB), the throughput was barely usable at an average of 6.9 Mbps upstream (and 2.3Mbps downstream).
The overall performance on both bands was alright, but it can be much better, so I connected the client equipped with the Intel AX200 WiFi adapter. At 70 feet, in front of the access point, the throughput was 414Mbps upstream (and 335 Mbps downstream), so we’re up for a treat. At 350 feet, I measured 279 Mbps upstream (and 169 Mbps downstream), while at 570 feet, in the same direction, the average throughput was 112 Mbps down and 62 Mbps downstream. Changing the direction and going at 460 feet (still with those annoying tree branches), I measured and average of 198 Mbps upstream (138 Mbps downstream) and at the highest distance, at 670 Mbps, the signal was still strong enough to deliver and average of 154 Mbps upstream and 31.8 Mbps downstream, so yes, I could still go farther in that direction and would still be able to have suitable Internet access.
After switching to the 2.4GHz network, it’s no surprise that the wireless performance was overall better than with the 802.11ac client. At 70 feet, I got an average of 128 Mbps and at 350 feet, it dropped to around 54.5. Changing the direction and going to 670 feet, I saw an average of 19.1 Mbps upstream and an average of 13.8 Mbps downstream.
The Standalone Mode
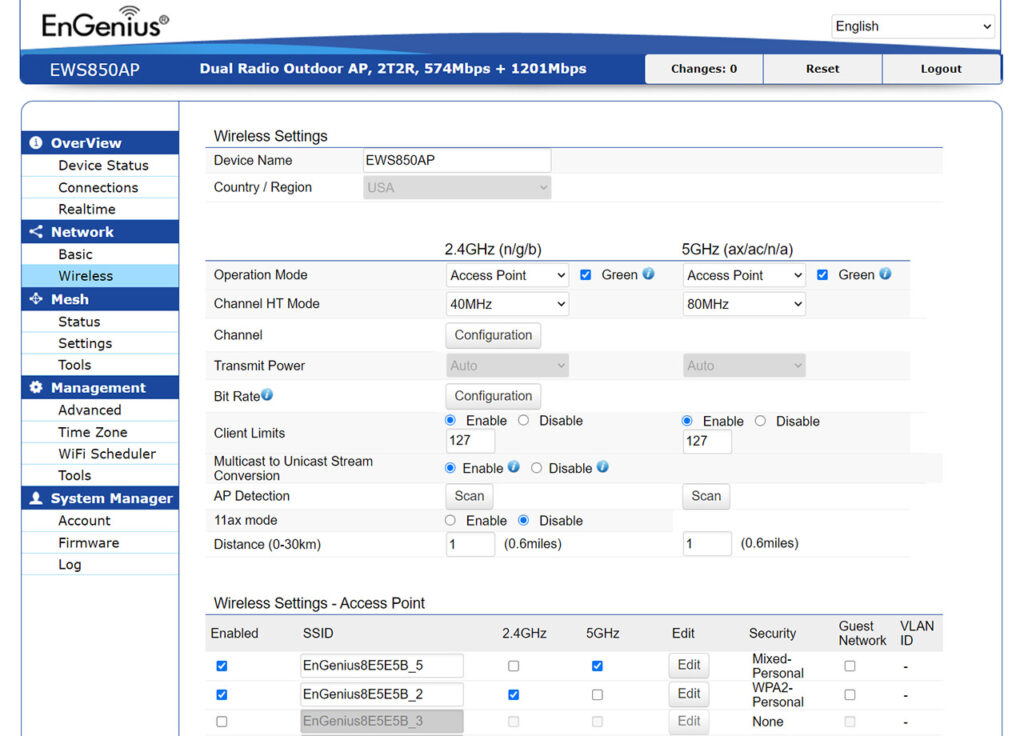
The EnGenius EWS850AP is advertised as being compatible with ezMaster, but what if you don’t have multiple EnGenius devices and don’t care for the network management platform and simply want to use your AP in standalone mode? Well, you definitely can and to access the user interface, you will need to know what IP address it has been given by the router – check it in the client list and insert it into the URL. Doing so, will open a small window where you need to insert the username and password (admin for both) and that’s it, you can now roam the GUI – immediately change the user name and default password. The interface is quite simple with the menu on the left side positioned vertically and the first set of options is the Overview, where you can check some status info, the SSIDs that have at least a client connection, as well as the Realtime CPU loading and live Traffic.
Under Network, you get to set the IPv4 or the IPv6 connection and the STP settings, but you can also adjust the Wireless settings (here, you get to create SSIDs and change the parameters of the two bands – the Operation Mode, the channel mode, the security which includes WPA3, the bit rate, and so on – you can also set the Guest Network DHCP Settings and enable the Management VLAN). Further down, there’s the Mesh section, where you can check the status of the mesh network, adjust the network settings or run various tools (includes Ping, Traceroute and a iperf3 Throughput test).
Next, there’s the Management section, where you can check the Controller address, as well as adjust the SNMP Settings, enable CLI, SSH, HTTPS Forward or the Email notifications. But there is more, since here is the place to adjust the Date and Time Settings, set the WiFi Scheduler (when your clients will receive Internet) and run some network Tools (Ping, Traceroute, NSlookup, Speed test and Device Discovery). The last section is the System Manager, where you can change the Account Settings, update the Firmware or check the System Log.
The ezMaster
If the standalone mode is not enough for your needs, the EWS850AP can be used with the ezMaster centralized network management software and you can definitely install an instance on your computer and keep it running all the time or you can use the SkyKey to make things easier. I already have one from a year back when I tested the EnTurbo EAP1250 access point, so I decided to see if it will work with our outdoor wireless access point, the EWS850AP. After connecting the SkyKeyI to the Ethernet switch, I inserted its IP address in the URL (again, check the router for the client list) and then, after writing the username and password (or creating a new account), I gained access to the user interface.
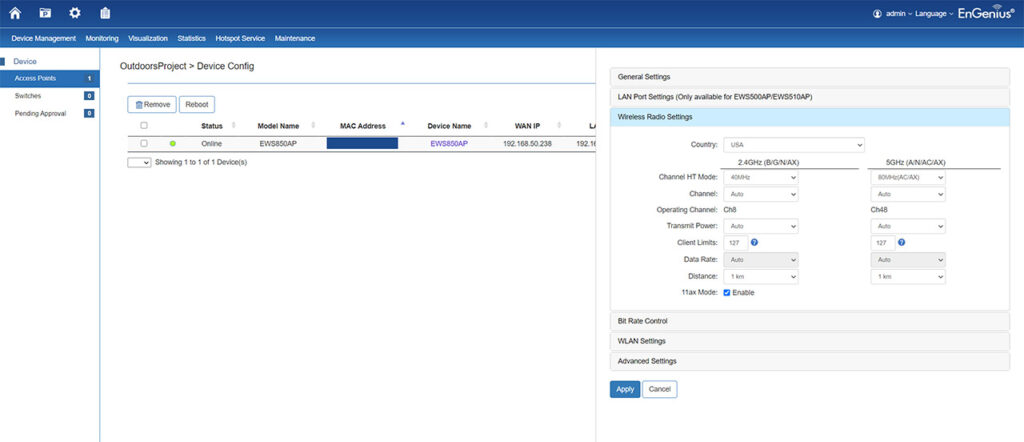
Keep in mind that the ezMaster is a management software for multiple sites that have hundreds or even thousands of clients, so it will help keep track of every connected device and will quickly push group configurations, so you don’t have to adjust the settings of each client device. That being said, ezMaster supports Access Points and Ethernet Switches, and to add the EnGenius EWS850AP, you need to create a new Project and then, if the AP is in the same network, it should be detected in the Device Config page. Add the access point to the newly created Project and then wait a bit until it gets Connected (check the Status – it shouldn’t take more than a couple of minutes). After the AP became Active, it immediately saw that the device needs to be updated and then I could explore the interface to the fullest.
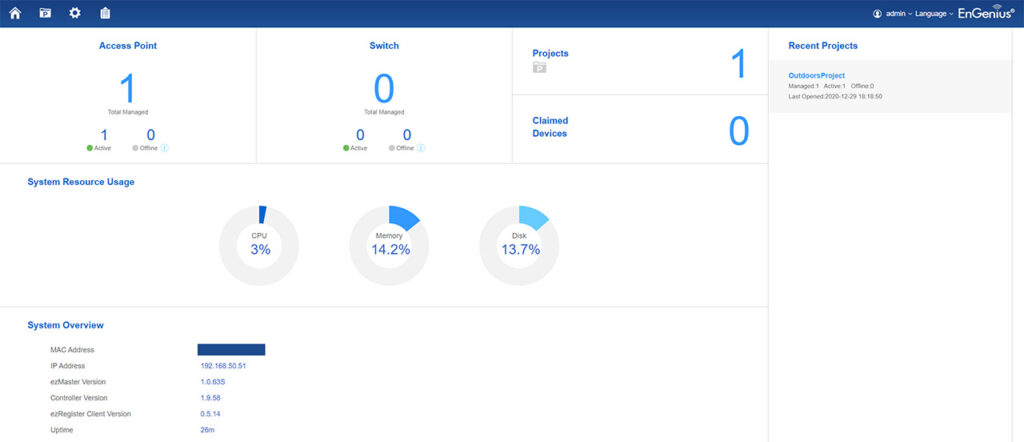
The Home page will show the number of connected Access Points (as well as the Active and Offline Switches), the number of Projects, the Claimed Devices, the System Resource Usage and some network stats, and, in order to monitor and configure the newly added AP independently of other devices, you will need to return to the Project page and click on the Device Name to summon the general Settings mini-window on the right side. Here, you will be able to change the admin username credentials, the Wireless Radio Settings (the basics, such as the Channel HT Mode, the Transmit Power or the Client Limit per radio), the Bit Rate Control, the WLAN Settings, where you can create up to eight SSIDs and the Advanced Settings (RSSI Threshold and the Management VLAN).
Each SSID will allow you to enable the Captive Portal, enable the Hotspot 2.0, Traffic Shaping (limiting the bandwidth per SSID or per User), the RADIUS Accounting, the NAS Port/ID, MAC Filter, Fast Roaming and Security. Some of the features from the standalone mode can also be found under the Device Management, such as the Mesh settings and the Scheduled traffic, but one of the most important sections is the AP Groups. Here, you need to create a new group (it can have separate admin access) and set a global configuration that will then be applied to a certain number of access points automatically – this way, you will be able to monitor each group separately.
Furthermore, you can check all the Active Clients under Monitoring and I fully advise that you enable the AP Device Name tag since otherwise, you won’t know to which access point it’s connected to and it’s also good practice to enable Rogue AP detection (you can do it from the general Wireless settings > Background Scanning). Next, you can monitor your device in Visualization and Statistics, while under Hotspot Service, you can configure the global Captive Portal, Guest Account and the Hotspot 2.0 (which brings a far more secure way to connect to outdoor WiFi networks).
And as expected, each of these sections is feature rich – the Captive Portal supports multiple Authentications Types (Splash & go, ezMaster auth, RADIUS, third-party and Social Login), Redirect Behavior and Walled Garden, while the Hotspot 2.0 will allow you to define the venue, as well the Domain Name List and the Roaming Consortium List (and more, of course). Under Maintenance, you get the possibility to Bulk Update the APs (or switches) and enable the Remote Log.
Conclusion
I admit I was a bit curious about how the WiFi 6 would hold up outdoors and the EnGenius EWS850AP has proven that you can get an excellent wireless performance using either WiFi 5 or WiFi 6 clients. Of course, using a proper WiFi 6 client device will essentially blow any WiFi 5 competitor out of the water, by offering a far better (and more stable) throughput and the possibility to go farther away before losing signal (even at -80dB, I could still check YouTube videos and navigate the web). The build quality is also great (I liked the extra ESD and surge protection) and the software doesn’t require a steep learning curve to understand (such as the RouterOS), so it should be fine for both home users and SMBs alike (the latter group will also have more fun with the ezMaster). So, overall, should you consider the EnGenius EWS850AP? Since it works great with WiFi 5 and especially with WiFi 6 client devices, then absolutely yes.
EnGenius EWS850AP
-Pros
- Excellent wireless performance with both WiFi 5 and WiFi 6 clients
- Lots of WiFi 6 features
- Rugged and weatherproof
- Stand-alone software + support for ezMaster
- WPA3
Cons
- Since the maximum theoretical data transfer rate is 1,201 Mbps on the 5GHz band, the 2.5GbE port is a nice, but not really necessary addition
- Only one Ethernet port

Mark is a graduate in Computer Science, having gathered valuable experience over the years working in IT as a programmer. Mark is also the main tech writer for MBReviews.com, covering not only his passion, the networking devices, but also other cool electronic gadgets that you may find useful for your every day life.

