UPDATE 02.14.2020: I have retested the Google WiFi system once again in 2020, but, since there was no major difference from the last year (the same location), I will leave the results unchanged.
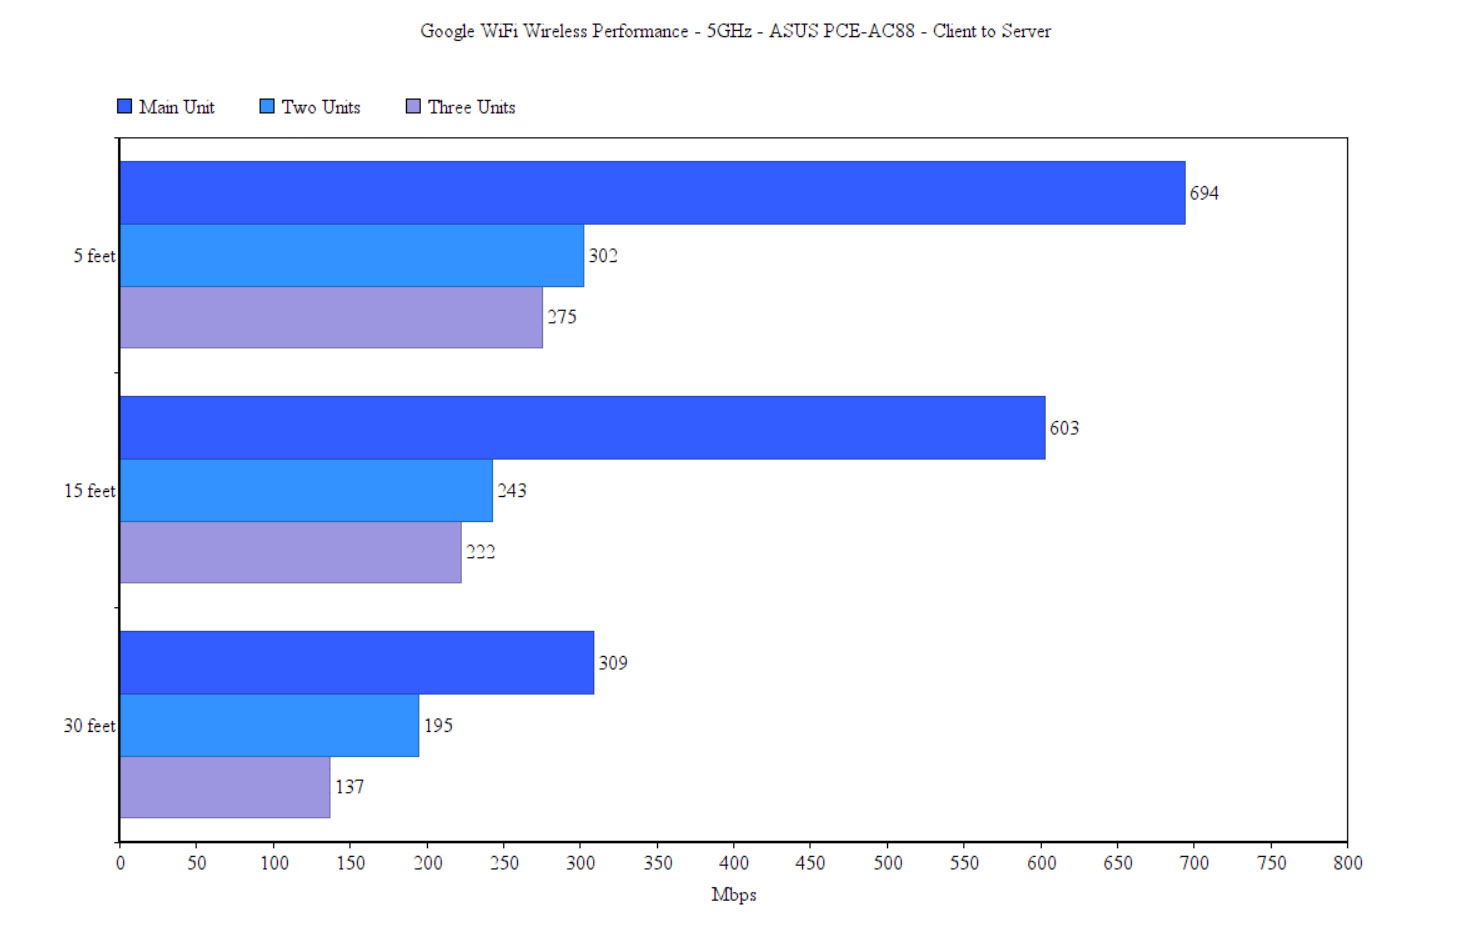
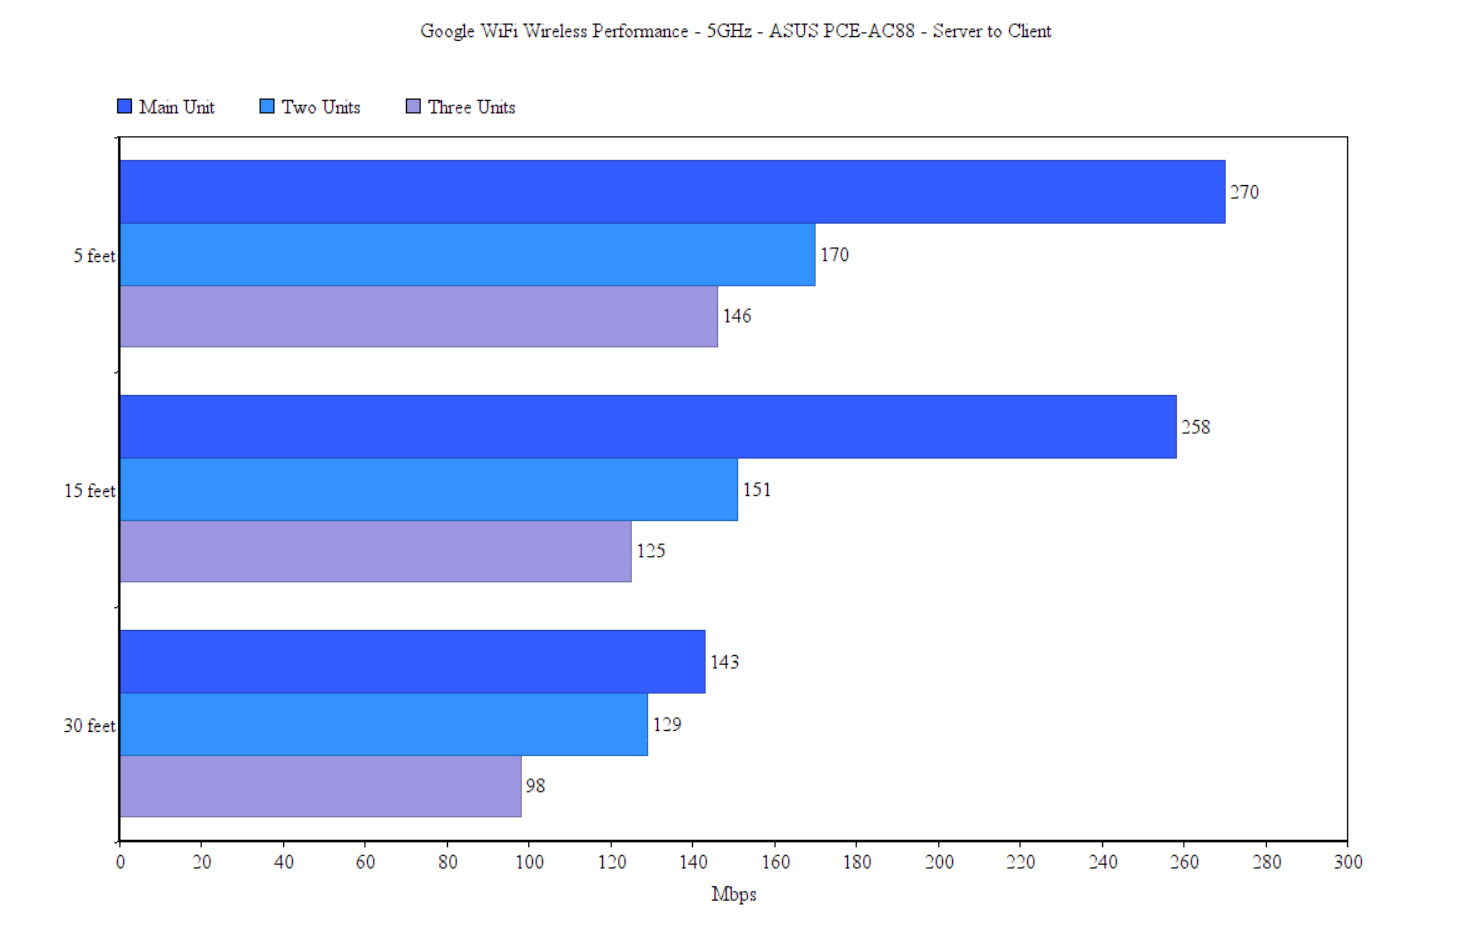
Moving on, let’s talk about the testing process. In order to test the wireless performance, I took one Google WiFi router and connected it to the cable modem. Next, I took a laptop with an Intel 8265 2×2 MU-MIMO wireless adapter and a Desktop PC equipped with an Asus PCE-AC88 4×4 MU-MIMO WiFi adapter, and I measured the speed rates at different locations inside the house. On the first step, I used the Desktop PC as the client, while the laptop acted as the server and, while connected to the 5GHz network, at 5 feet, from the client to the server, I measured an average of 694 Mbps, while at 15 feet, the speed decreased to 603 Mbps; at 30 feet, I measured an average of 309 Mbps. From the server to the client, I measured an average of 270 Mbps at about 5 feet from the router, while at 15 feet, the speed remained relatively consistent at 258 Mbps; at 30 feet, I got around 143 Mbps.
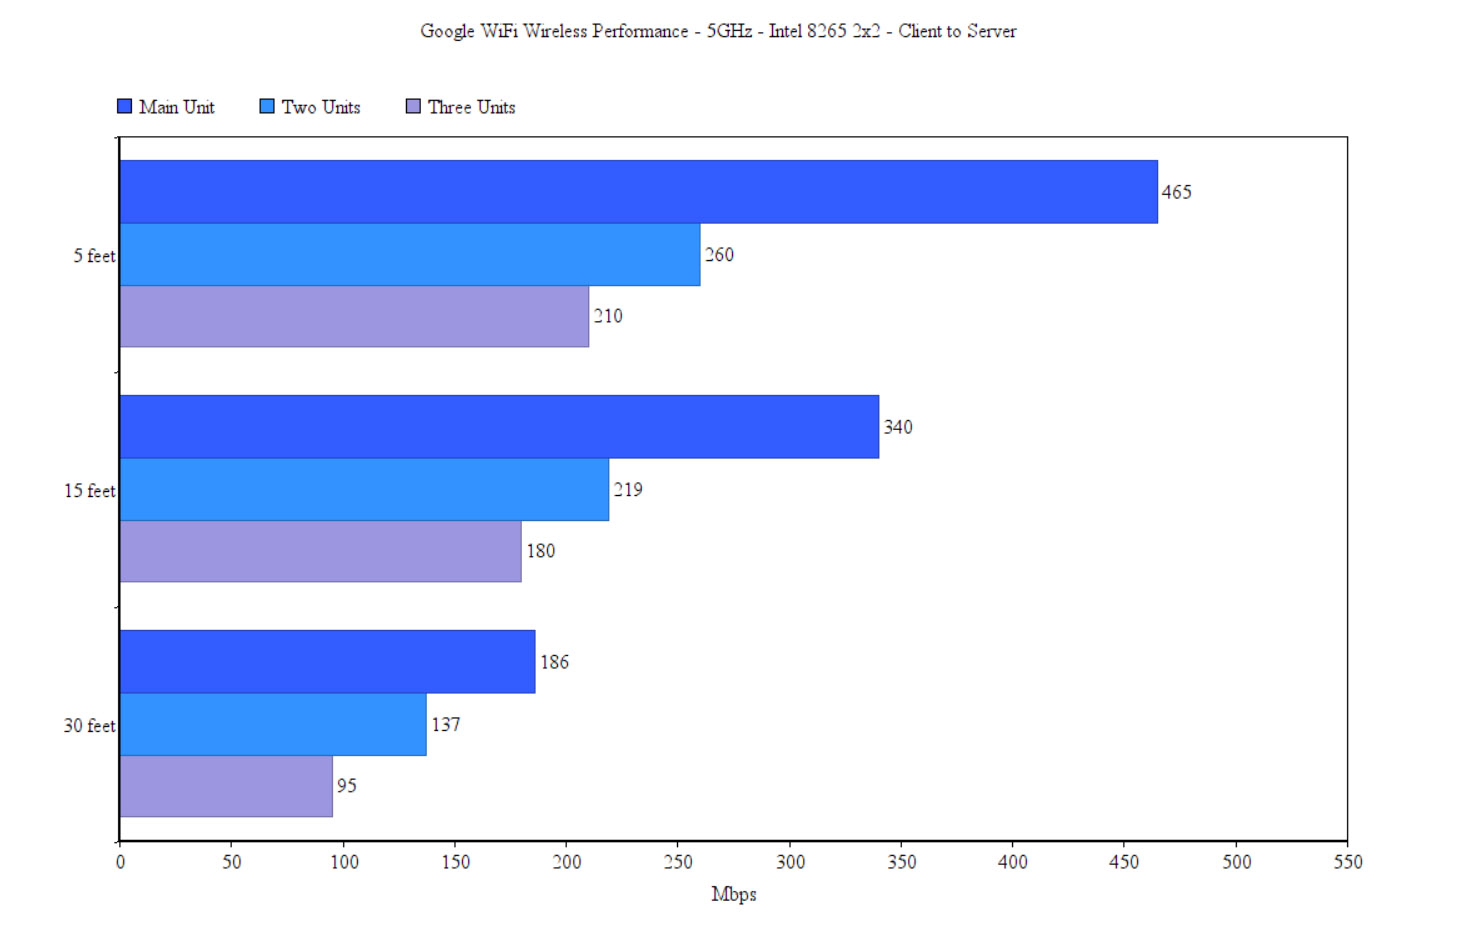
Afterwards, I switched the computers and ran the laptop as the client (Intel 2×2). This way, from the client to the server, I measured an average of 465 Mbps at close range (around 5 feet between the client and the router unit) and, at 15 feet, the speed went slightly down to 340 Mbps; at 30 feet, I measured an average of 186 Mbps. These results seem to match what I got the first time I tested the Google WiFi, so no major improvements have been made in this regard (not that it necessarily need to). As a point of reference, the first time, I got 464 Mbps at 5 feet, 389 Mbps at 15 feet and 188 Mbps at 30 feet (there results were only slightly under the tri-band Linksys Velop).
Still keeping the laptop as the client, I tested the throughput from the server to the client and I managed to measure an average of 245 Mbps at 5 feet and, at 15 feet, I measured around 218 Mbps; at 30 feet, I got 121 Mbps. On the second step, I decided to add one more Google WiFi point (at about 30 feet from the main unit) and using the Desktop PC as the client (PCE-AC88), from the client to the server, at 5 feet, I measured an average of 302 Mbps, while at 15 feet, the speed went down to 243 Mbps; at 30 feet, I got around 195 Mbps.
From the server to the client, at 5 feet, I measured an average of 170 Mbps and at 15 feet, the speed slightly decreased to 151 Mbps; at 30 feet, I measured around 129 Mbps. Next, I switched back the laptop as the client (with the Intel adapter) and, once again, the results are similar to what I got a couple of years back: from the client to the server, I measured an average of 260 Mbps, while at 15 feet, I measured around 219 Mbps; at 30 feet, the speed went down to 137 Mbps. From the server to the client, I measured an average of 140 Mbps (at 5 feet) and, at 15 feet, I got around 118 Mbps; at 30 feet, I measured an average of 95 Mbps.
Lastly, I added the third Google WiFi point (at approximately 35 feet from the main unit, but with a thick concrete wall in between the nodes) and again, using the Desktop PC as a client (PCE-AC88), from the client to the server, I managed to measure an average of 275 Mbps at about 5 feet from the unit and, at 15 feet, the speed went down to 222 Mbps; at 30 feet, I measured around 137 Mbps. From the server to the client, I got an average of 146 Mbps at 5 feet, while, at 15 feet, I measured an approximately 125 Mbps; at 30 feet, I managed to measure an average of 98 Mbps.
I also decided to test the three-unit system using the laptop as the client (Intel WiFi adapter) so, from the client to the server, I managed to measure an average of 210 Mbps at 5 feet, while at 15 feet, the speed went down to 180 Mbps; at 30 feet, I measured around 95 Mbps. From the server to the client, at 5 feet, I measured an average of 115 Mbps, while at 15 feet, the speed went down to 97 Mbps; at 30 feet, I got an average of 74 Mbps.
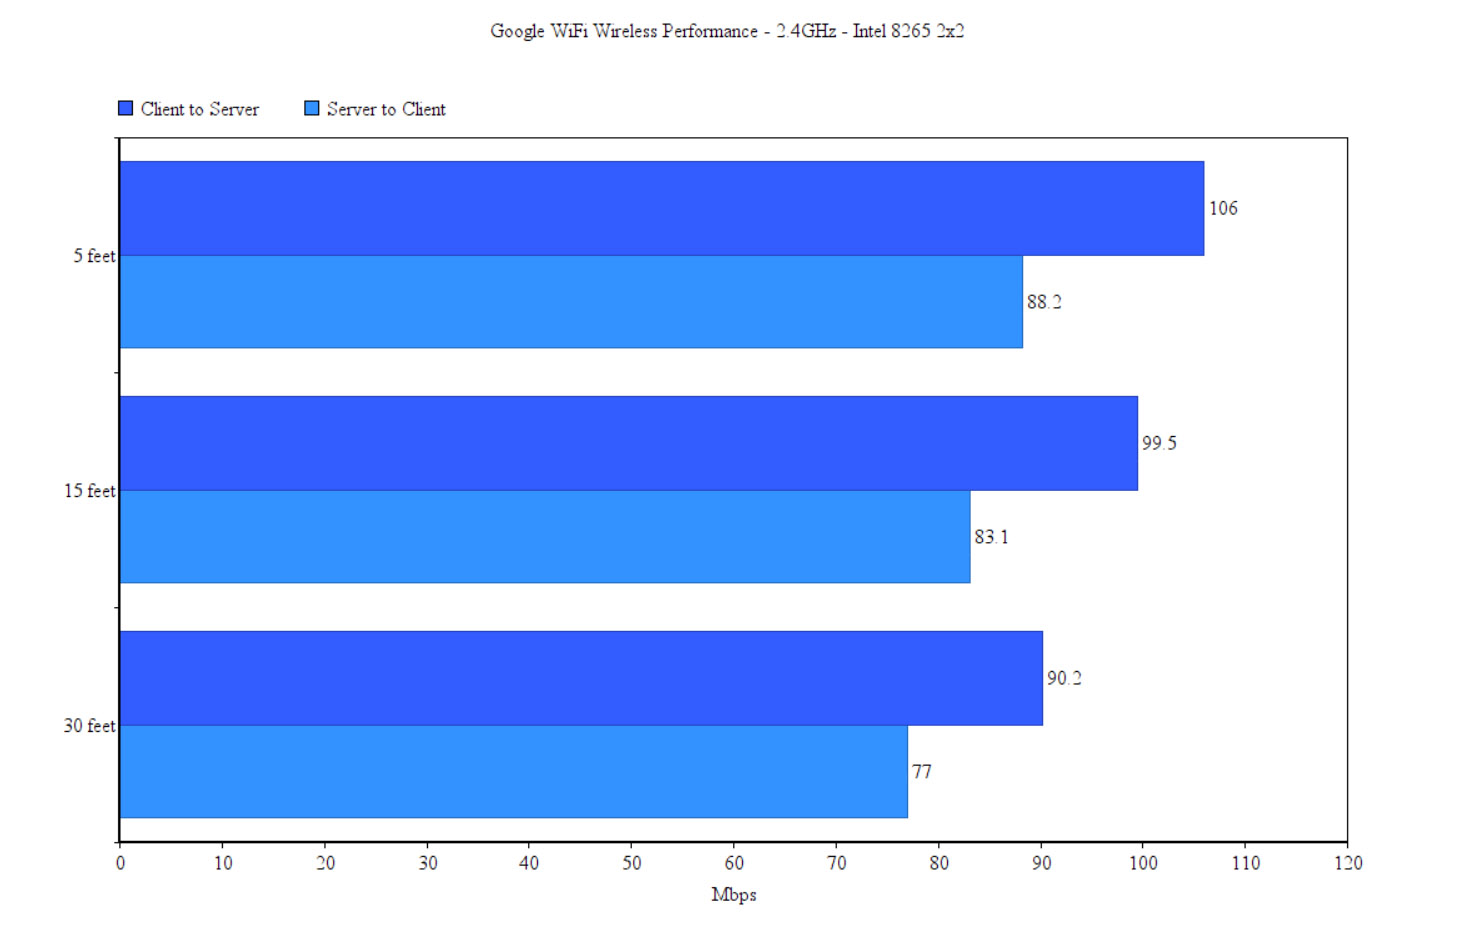
To conclude this test, I connected the client (laptop) to the 2.4GHz network (to do so, I had to force the Intel adapter to connect only to this band, since Google didn’t offer a way to differentiate the networks) and once again, I tested the wireless performance at different locations inside the house. While connected to the main router and, at 5 feet, from the client to the server, I measured an average of 106 Mbps, while at 15 feet, the speed decreased to 99.5 Mbps (previously, I got 102 Mbps) and lastly, at 30 feet, I measured around 90.2 Mbps (while the first time, I tested the system, I got only 68 Mbps). From the server to the client, at 5 feet, I measured an average of 88.2 Mbps, while at 15 feet, I got around 83.1 Mbps; at 30 feet, I measured an average of 77.0 Mbps.
One last feature that I have to mention is that the Google WiFi mesh system is compatible with the the Google OnHub routers and these devices can be used to expand the mesh network a lot more – every router will act a mesh node, but this solution is useful if you already own the devices since they may soon reach EOL.
Note: One Google WiFi point should be able to cover up to 1,500 square feet and every added node should increase the coverage by another 1,500 square feet.
Google WiFi: Setup and Interface
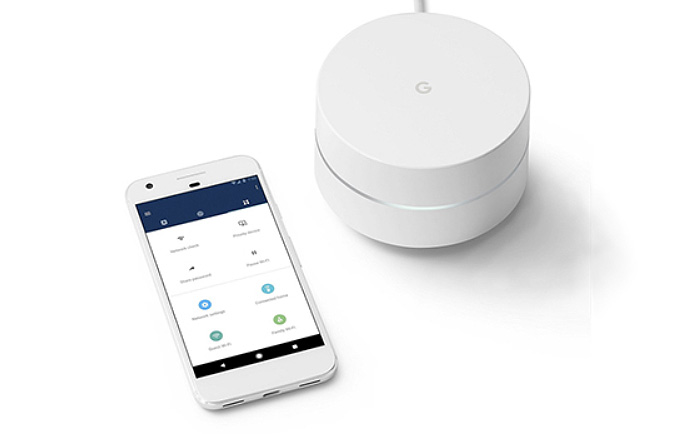
In order to properly setup the Google WiFi system system, you need to follow these simple steps: first, you need to find the best locations for your wireless mesh system (remember that you’ll get a better signal if you keep the units in the open, preferably in the center of the room), connect one Google WiFi point to the Internet (via a cable modem) and to a power source and then you need to download the Google WiFi app (compatible with both iOS and Android) in order to start the setup wizard.
The process involves scanning the QR code (after the app automatically finds your Google WiFi point), which will automatically connect the device to the WiFi point and afterwards, select the location of your router and lastly, create a user name and password for your new WiFi network. After the first node is successfully installed, you can add more WiFi points to the network by clicking Add WiFi point and Test Now to see if the location chosen for the second node is the best one. And that’s pretty much it. This is without a doubt one of the simplest setup process I have encountered so far on a networking product.
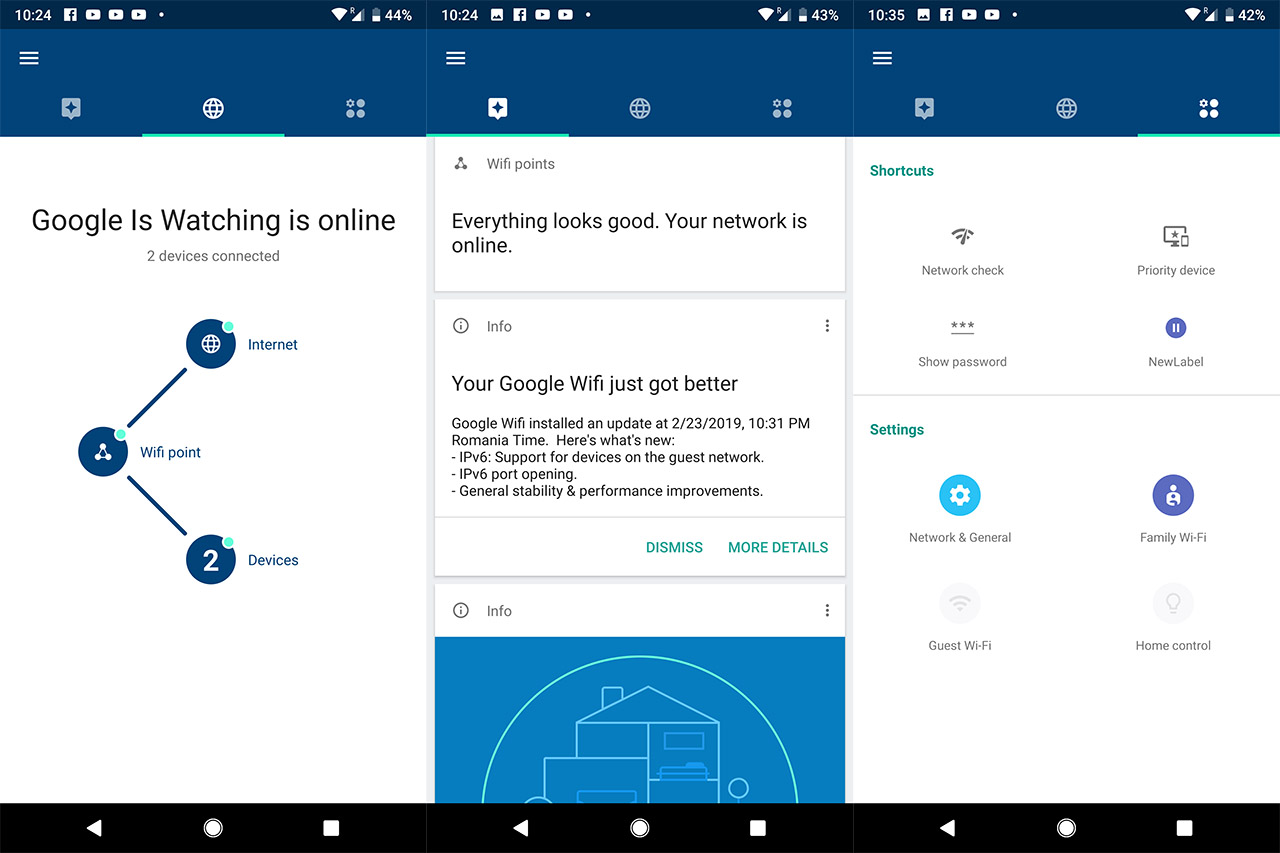
The interface features three main windows, with their respective sub-sections: the first window display all the notifications and different information about your WiFi system, the second window shows the status of the network, including a graphical representation of the Internet connection, number of WiFi points and the number of connected devices (tap any of the three circle icons to open lists of the connected devices and the WiFi points – it also allows you to create priorities -, as well as viewing the average download/upload stats of the Internet connection).
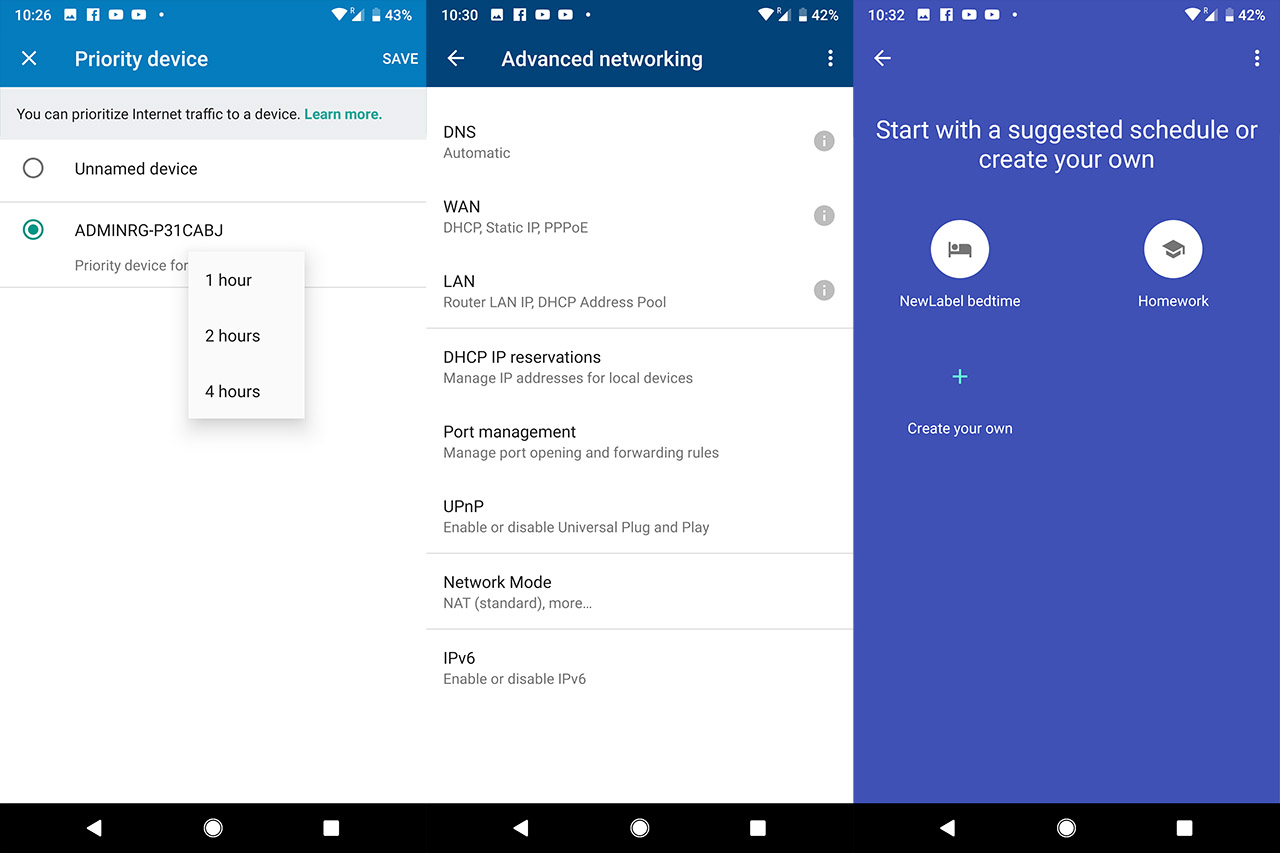
The third window is the place where you can configure the router ‘more in-depth’: the Shortcuts mini-section includes the Network check (Test the internet speed, the connection quality between the points and the WiFi strength to the device from which you are accessing the UI), the Priority device, Show the password and it allows you to add more actions (where you quickly access Family WiFi profiles), while the Settings mini-section gives you access to the Network & General settings (Network (WiFi network, WiFi points and Advanced networking: DNS, WAN, LAN, DHCP IP reservations, Port management, UPnP, Network Mode and IPv6 – there is also some optimization for Stadia gaming traffic) and General (Managers, App & support details, Privacy and Email Notifications)), the Family Wi-Fi (allows you to create Labels that can be attached to your Devices and set specific schedules for when the Internet connection will be available for that specific client), Guest WiFi and Home Control (allows you to control any connected smart devices by entering On.Here in a web browser).
There isn’t much else about the app UI, but there are a few things that I’d like to point out. First, you can only set up and configure the Google WiFi using the mobile app, there is no web-based version, secondly, after you have completed the initial setup, the WiFi system stands connected to Google all the time (although you can control the system if it goes offline).
While online (which is required for the system to function properly), Google sends all kind of info and statistics to its Cloud servers, so it can analyse your network performance and if it detects that a change in channel for some clients would benefit your system, it will remotely make the necessary changes via the Cloud. Overall, this approach has been reliable, but, about two years and a half ago, Google accidentally reset a large number of Google WiFi points to their factory default settings, so a lot of people lost their data (and shows that you’re not really fully in control over your network).
Now, there were lots of people already complaining about private data being collected by Google through its other devices and software, so a new product from Google further augmented these concerns. Of course, Google claims that the data collected does not include the websites you have visited or any other activity data, but by default (this can be changed by going to Advanced Networking Settings), the DNS provider is set to Google Public DNS and of course (quoted the Google support page), “the DNS provider can associate your web traffic with your public IP address”, so its up to you to draw conclusions.
Update: If you remember the Netgear Orbi drama where a firmware update destabilized the system for lots of users and, up until now, many people still have issues with the WiFi system, well, Google WiFi went through a similar phase (although with less of an impact). Specifically, about two years ago, Google released a new firmware update which, as a side effect, made the port forwarding feature unusable. It did took about a couple of months to get it fixed, which is unacceptable for someone running a business and it’s also significant for people that have a smart home.
That being said, the Google WiFi app remained very intuitive and absolutely perfect for non-tech-savvy people or for the people that don’t have the time or the desire to manage and configure a more complex device. But, it lacks a lot of important features that the other routers do not and this makes it impossible to perform any serious in-depth configuration (an optional web-based interface would have been a nice addition).
Conclusion
The Google WiFi does a lot of things right, as you get one or three small units that are easily placed anywhere inside the home, these devices can create a fully functional mesh network and can deliver a very stable wireless performance (in some aspects, it’s even on par with some more expensive tri-band systems), but, at the same time, the Google WiFi app lacks many features that are a common occurrence with other recently released routers (and even the recent mesh network systems), so, the Google WiFi is a mixed bag for the people who like to configure their network and have full control over it. For the users that value simplicity over functionality, so they don’t want to be bothered with every option and don’t intend to do some advanced stuff with their system, then the Google WiFi still remains the best option available (especially since it still has a very attractive price), yes, even in 2020.
Check the product here:

Mark is a graduate in Computer Science, having gathered valuable experience over the years working in IT as a programmer. Mark is also the main tech writer for MBReviews.com, covering not only his passion, the networking devices, but also other cool electronic gadgets that you may find useful for your every day life.

