The Parental Controls are a set of features which are usually an integrated part of a router (and mainly include traffic filtering and scheduling) but it’s not always clear how to properly set them up, especially for the users that aren’t familiar with the networking terms, so, if you have an Asus router and need to limit the Internet access, there are some simple steps that you need to take in order to ensure that your home network is safe for your children.
But, before that, let’s talk a bit about the importance of Parental Controls. If before, the main entertainment source was the TV (which was, to a certain degree, safe for kids), the parents of today face a serious challenge due to the fact that the Internet has become an integrated part of our society and private lives. It is not uncommon to see toddlers with tablets and children at school with their own phone and laptop, so they’re easily exposed to dangerous content and some robust Parental Controls can ensure that some websites can’t be accessed (such as those that contain explicit content), that the search engine will show only results that are kid-friendly and you can easily set up a schedule to when the Internet is completely turned off for specific devices (some routers, such as the pcWRT will also display the entire traffic history of a specific user).
Of course, you can take some extra steps and ensure that the gaming console won’t run violent games and that some features are limited (like chatting with strangers), but these go beyond what a wireless router can do and you will have to set it up locally (on the console). Furthermore, it is important to know that even if you set some filters in place, if your children can access the Internet using your carrier’s Internet service, then the router can’t do anything to stop them from accessing malicious or adult websites (both Android OS and iOS allow you to configure the access to certain apps using the built-in Parental Control filter / Content Restrictions).
ALSO CHECK OUT: HOW TO BLOCK ADS USING ASUS ROUTERS
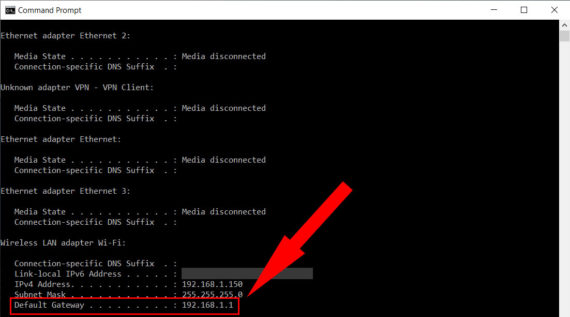
That being said, in order to access the router’s interface, you need to open a browser and, in the URL section, either go to http://router.asus.com or enter the IP address of the Asus router, which is usually 192.168.1.1 – if the IP address is different, when using the Windows 10 OS, enter cmd in the search bar and, after the console window is open, enter ipconfig (the IP address of the router is going to be the Default Gateway); if you use MacOS, you can find the router’s IP address by clicking the WiFi icon (on the top) while holding the ‘option’ button down – the IP address will be next to the Router.
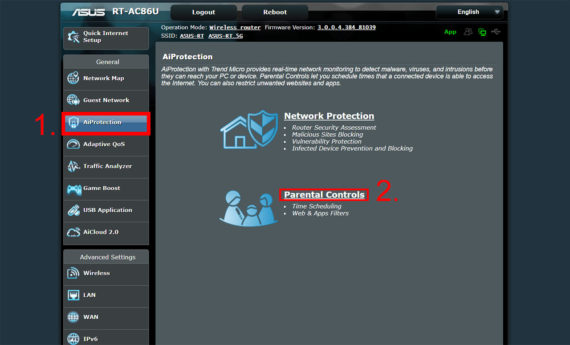
The Asus user interface went through several transformations over the years (I used an Asus RT-AC86U with the firmware version 3.0.0.4.384_81039), but on the latest implementation, after gaining access to the Dashboard, you will have to go to the General settings (from the menu on the left) and click on the AiProtection. Doing so will display the two main sub-features, the Network Protection and the Parental Controls. We’re interested in the latter, but the former is also worth exploring since it will allow you to enable various features to protect your network against viruses, malicious websites and more (they’re part of the Trend Micro suite and it includes the Two-Way Intrusion Prevention System).
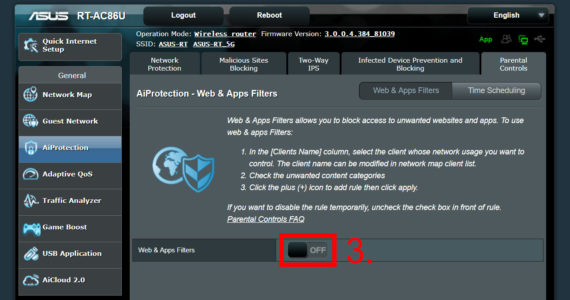
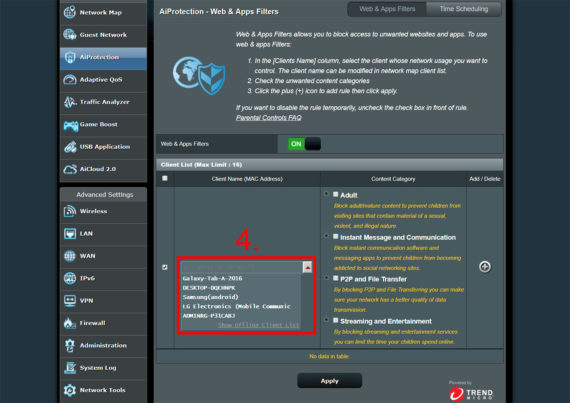
After clicking on the Parental Control, you will be taken to a new window where the AiProtection is divided in two sections: the Web & Apps Filters and the Time Scheduling (it’s worth noting that both sections have clear instructions to help you properly set up the features). First, we’re going to enable the Web & Apps Filters and, after a few seconds, it will show a table with the Client Name (MAC address), the Content Category and the Add/Delete button. Under the Client Name, you can select the device that has to have the access to the Internet restricted. It is important to know that Asus ties the name to the MAC address and not to the IP, so, even if your child changes the IP address of his device, the filters will remain operational.
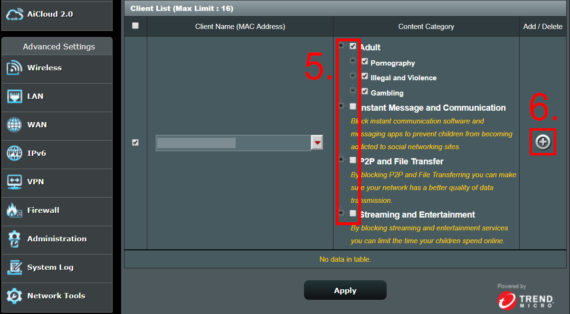
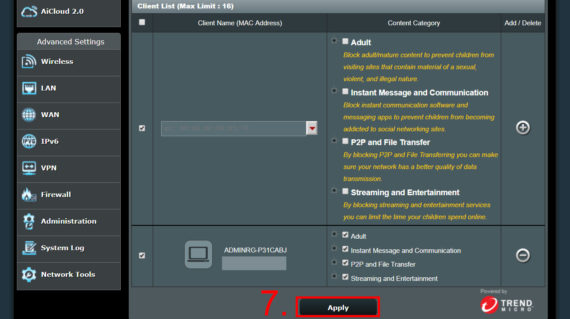
After you chose one client, you can choose between four main categories (from the Content Category), each with its own subcategories: first, there’s the Adult category (which should be a default for any devices used by children – includes three subcategories), the Instant Message and Communication (blocks access to messaging apps and other social messaging websites – includes Internet Telephony (VoIP), Instant Messaging (no more Messenger), Virtual Community, Blog and Mobile), the P2P and File Transfer (here, you can block Peer to Peer connections and File Transfers to ensure that a client won’t get a large chunk from the bandwidth – it acts more as a QoS tool) and Streaming and Entertainment (blocks streaming and entertainment services, such as YouTube – it contains three sub-sections, Games, Media Streaming and Internet Radio and TV). After you have selected the suitable categories, click on the ‘Plus’ sign and you’ll be able to see the Client with the filters towards the bottom – to finish the procedure, click on Apply.
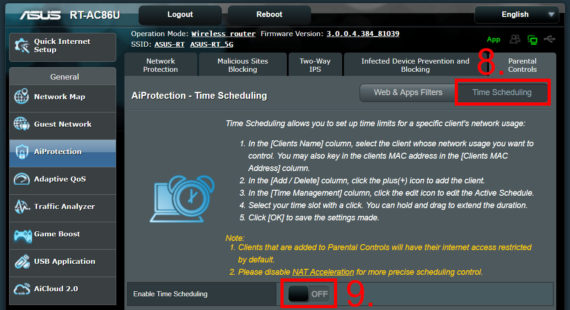
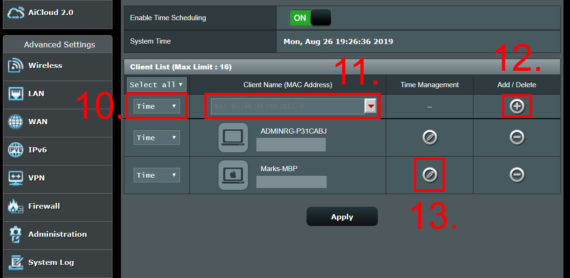
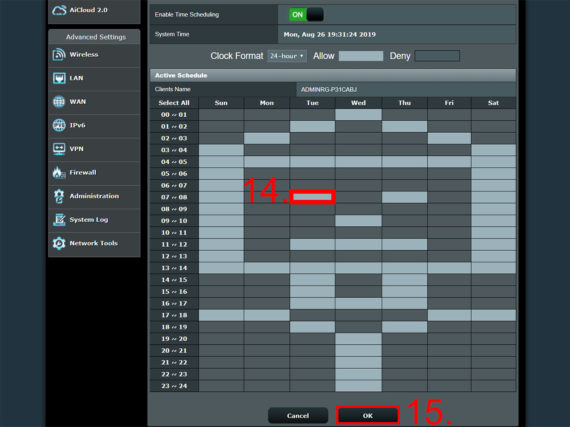
The AiProtection also includes the Time Scheduling which you can enable (there are instructions on how to use the feature written on the upper half of the window). After a few seconds, the Client list will appear towards the bottom of the window, where you can add the clients that will have a custom schedule: select them from the Client Name drop-down list, select between Disable, Time and Block from the left and press on the ‘Plus’ button. The newly added client will now have an Edit icon under Time Management and, after you press it, it will display a weekly schedule (the Clock Format can be either 12 or 24 hours) where you simply have to click the block corresponding to the hour and day that you want the Internet access to be restricted. Lastly, click OK to save the settings and Apply to finish the Time Scheduling configuration.
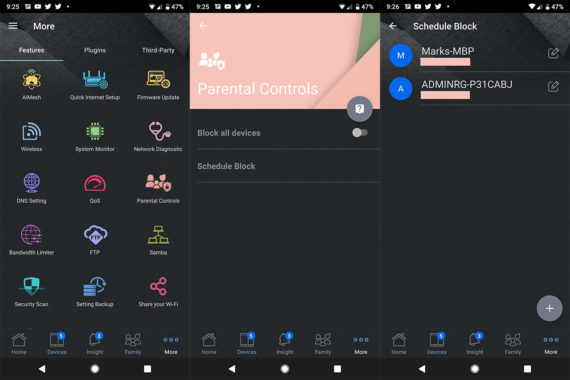
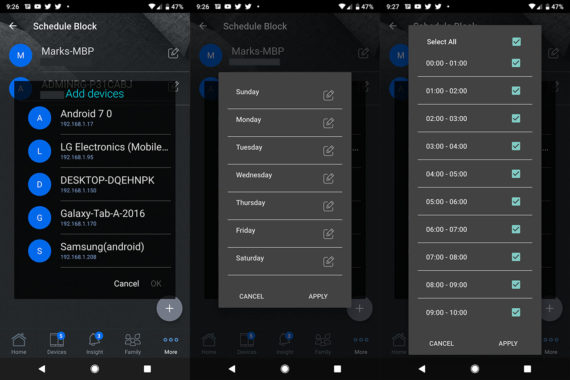
The Asus routers also come with a mobile application (compatible with Android OS and iOS), so, some of you may want to skip the hassle of logging into a web-based interface and set up the Parental Controls directly on the app. To do so, click on More from the app’s Home window and scroll down to the Parental Controls icon. Tapping on the Parental Controls will summon a new window where you can Block all devices or Schedule a block. The latter will allow you to add a client to the Schedule Block list and to select the day and the hours when the Internet will be paused for that specific client. And that’s all that the app has to offer in terms of Parental Controls – if you wish to block a specific type of content, you will have to use the web-based UI.

Mark is a graduate in Computer Science, having gathered valuable experience over the years working in IT as a programmer. Mark is also the main tech writer for MBReviews.com, covering not only his passion, the networking devices, but also other cool electronic gadgets that you may find useful for your every day life.

