
This is the Banana Pi WiFi 6 router and the people behind the project do also make it available only as an SBC, so you can use whichever case you want. They did a good job nevertheless and it could easily pass as something developed by ASUS or Netgear.
But what exactly is a Banana Pi? It’s an open source project which is very similar to the Raspberry Pi, so you get a lot of flexibility in terms of the software that can run on the SBC. And it did get more popular during the last couple of years because the Raspberry Pi is very often out of stock and it has gotten way more expensive than it was initially. The Banana Pi is also trying to include more powerful chipsets and they’re not afraid to get into very competitive markets, such as the consumer-based networking hardware.
That’s how we got the Banana Pi WiFi 6 router which comes with a version of OpenWRT already flashed and if you don’t trust the developers, you can easily flash your own software. In terms of WiFi-centered features, there is no mention of OFDMA support, or even the more common MU-MIMO and BeamForming, so I checked whether the chipset supports them. I could find the support for the WPA3 encryption, both Personal and Enterprise, the spatial streams configuration is 2×2 on both the 5GHz and the 2.4GHz radio bands, but no mention about OFDMA or BeamForming. So yeah, the WiFi 6 certification is a bit bare-bones, but then again, the price tag of the router is 30 dollars, so I can’t really complain that much.
Design and Build Quality
Design-wise the Banana Pi WiFi 6 router looks like a regular wireless router with some sharp angles here and there, and in terms of antennas, we get four of them, two on the rear side and two on the sides. I would have preferred to have all of them on the rear side, but I assume the heat from the ports would have an impact on the cables.
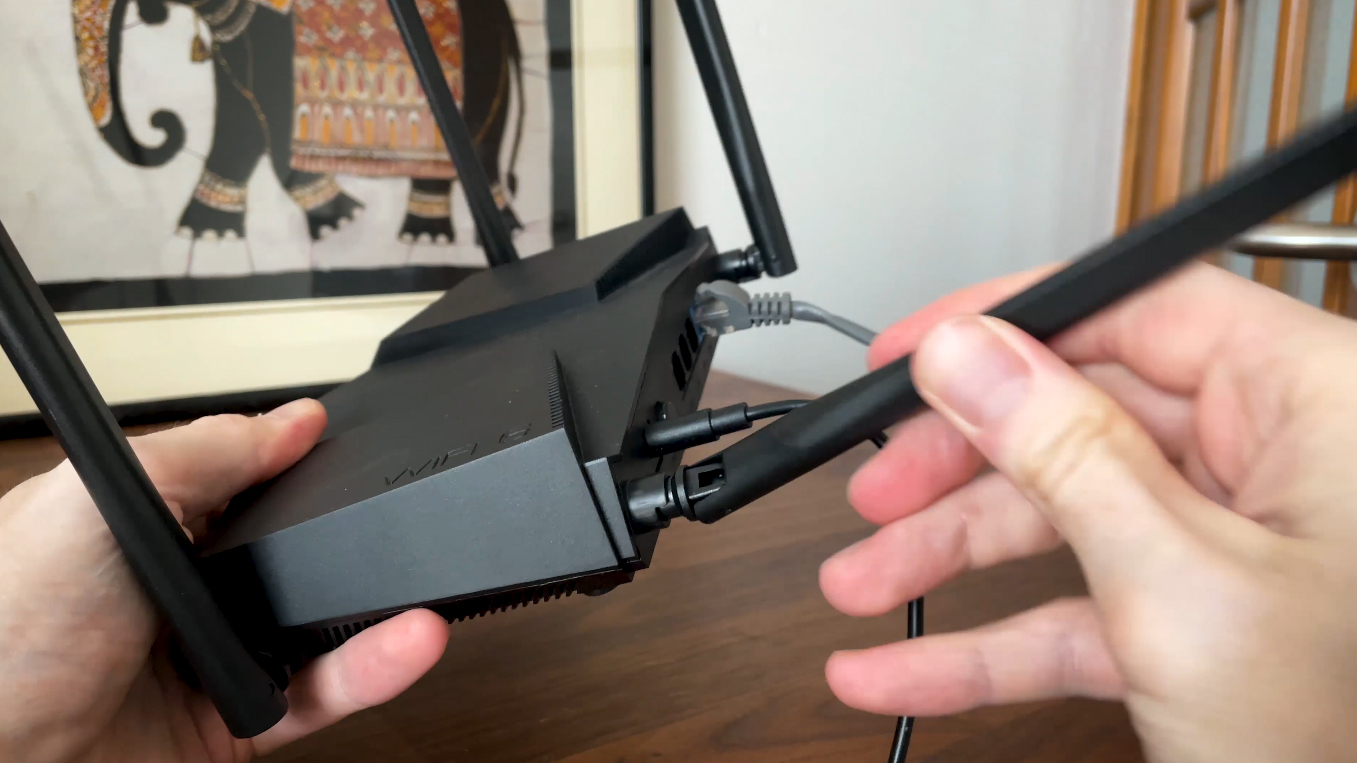
The antennas cannot be removed, but the joints are similar to other routers, so it’s still possible to replace them in case they’re broken. I did a video which shows how that can be done. The device can be left on a desk since there are four feet to keep in place or, if you don’t have the space, you can mount it on the wall using the dedicated mounting holes.
As for the LEDs, we get quite a few of them on the front side, it looks like about 15 LEDs. But, while the variety is high, each LAN getting its own status LED, as well as the WPS, the radios and the Power, the rest don’t really serve a purpose. They’re there just for aesthetic reasons. Moving on to the ports, from the left, we get the Power port and the Power connector followed by three LAN ports, all Gigabit, same as the WAN port. For the price tag, it would have been interesting to see 2.5GbE ports, but it makes sense to not go this route.
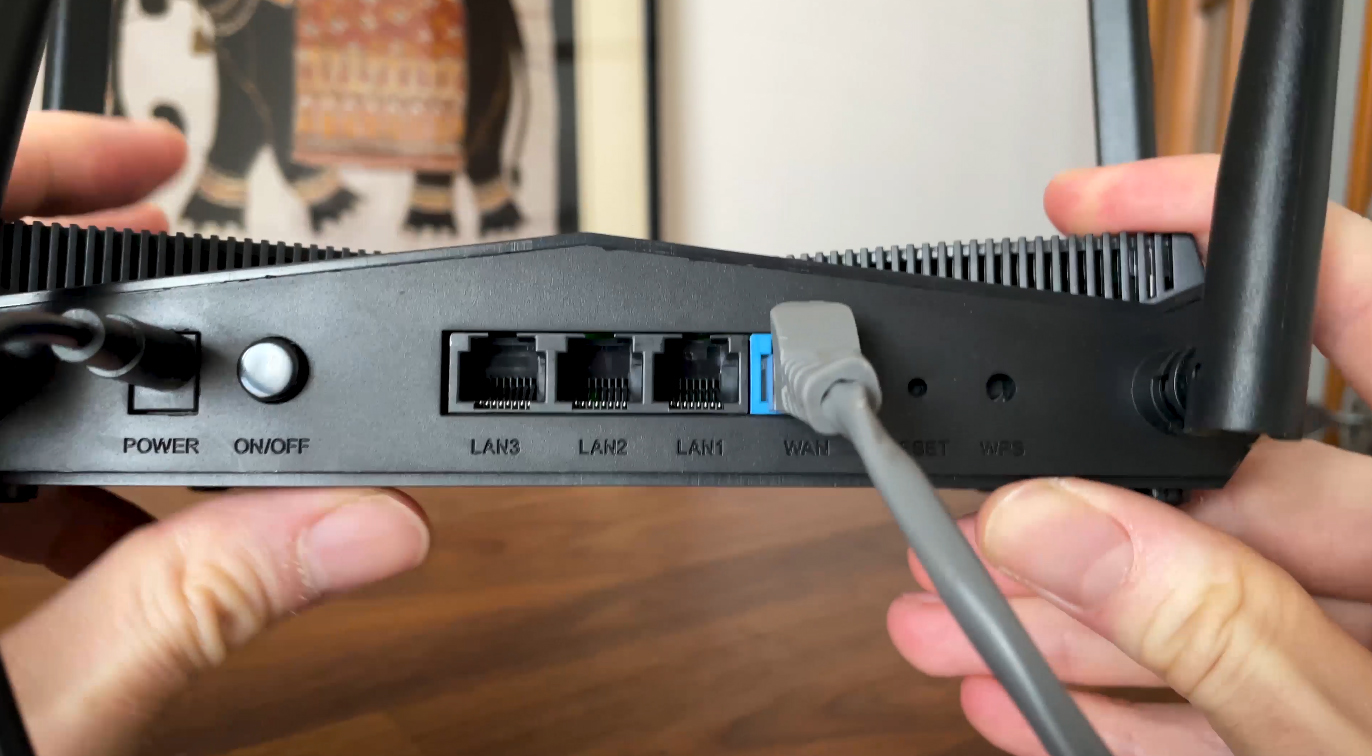
There is a Reset and a WPS button as well, but I noticed that the WPS enabled itself after start-up which no bueno. I need to mention that the developers have included the option to power up PoE devices as we’ll see in the teardown section.
The Heat Management
As with all other wireless router and access points that I tested so far, I need to check how well the manufacturers managed to find a way to efficiently move the heat away from the PCB and the chipsets. And to do so, I used a thermal camera and checked how the Banana Pi was doing while I was running some fairly intense tests. This is not in idle mode. And, as you can see, we initally don’t see anything out of the ordinary, but after turning the router upside down, there are some hotter spots.
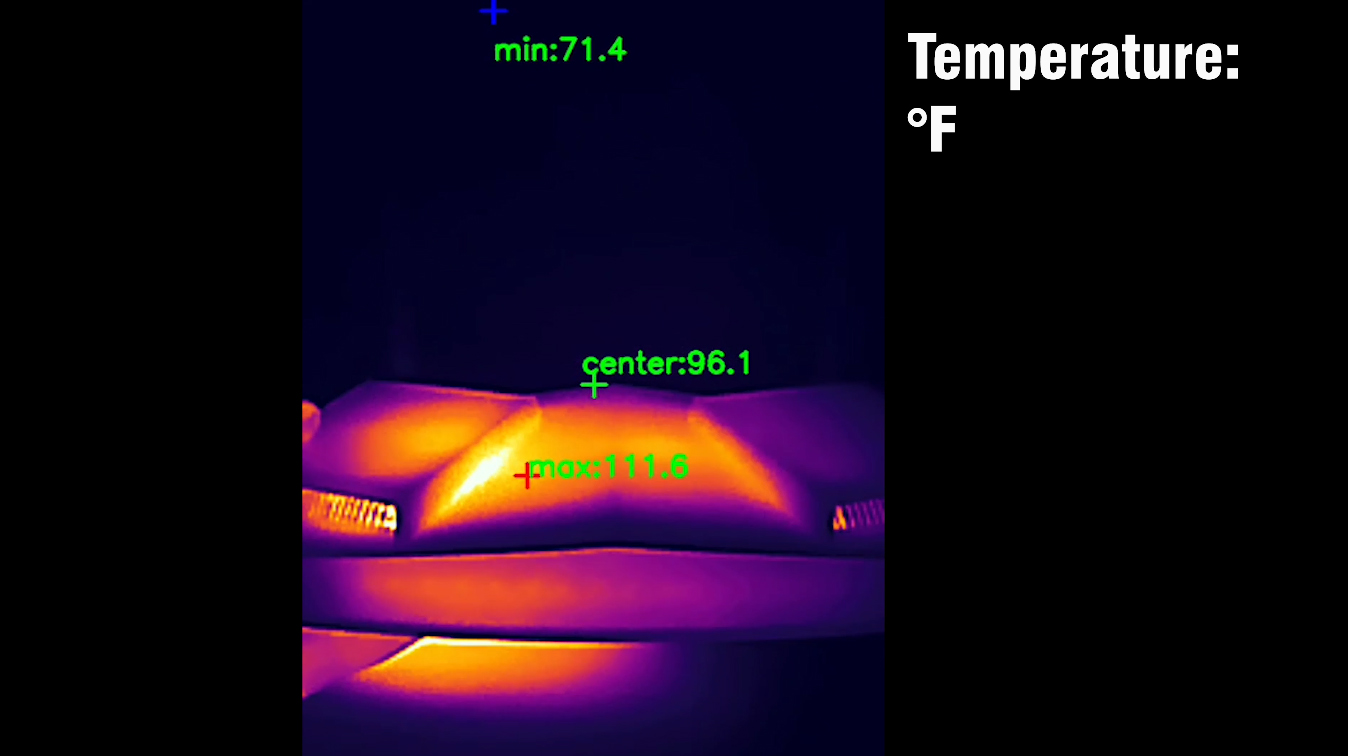
Will this lead to thermal throttling? I am fairly sure that it will because I have already seen some throughput limiting when running some WiFi tests. The developers should have added some aluminum heat spreaders. Or maybe the chipsets are not that energy efficient. I am not sure at the moment.
The Banana Pi Quick Teardown
Besides the fact that you can see everything you need on the official Banana Pi WiFi 6 router page, I decided to make a teardown video regardless of that to see if we get what’s being promised. And I was pleasantly suprised by the sturdiness of the plastic case and the access to the PCB is quite easy. Just remove the four screws and use a prying tool to detach the upper part.
We can see that the four antenna connectors and the PCB which, unfortunately lacks any type of heat spreaders. I also need to mention the PoE module, so there is the option to use it to power up PoE devices, but it does need extra hardware. That being said, this is a very quick run through the main components. And I also included a comparison table at the end.
| Banana Pi WiFi 6 | Xiaomi BE7000 | Asus TUF-AX4200 | |
| CPU | dual-core 1.2GHz TRIDUCTOR TR6560 | quad-core 1.5GHz Qualcomm IPQ9554 | quad-core 2.0GHz Mediatek MT7986AV |
| RAM | 128MB DDR3 Winbond (W631GG6MB-12) | 1GB Nanya (2x NT5CC256M16ER-EK) | 512MB Nanya NT5CB256M16ER-FL |
| Storage | 128MB Winbond 25N01GVZEIG | 128MB GigaDevice 5F1GQ5REY1G | 256MB Winbond 25N02KVZEIR |
| Switch | TRIDUCTOR TR6560 | Qualcomm QCA8084 | MXL TC1PZ4122 |
| 5GHz Radio – 1 | TRIDUCTOR TR5220GCF a/n/ac/ax 2×2:2 | Qualcomm QCN6224 a/n/ac/ax/be 4×4:4 | Mediatek MT7976DAN an/ac/ax 3×3:3 | 5GHz Radio – 2 | – | Qualcomm QCN6224 a/n/ac/ax/be 4×4:4 | – |
| 2.4GHz Radio | TRIDUCTOR TR5220GCF a/n/ac/ax 2×2:2 | Qualcomm QCN5024 b/g/n/ax 4×4:4 | Mediatek MT7986AV b/g/n/ax 2×2:2 |
The Wireless Test (5GHz)
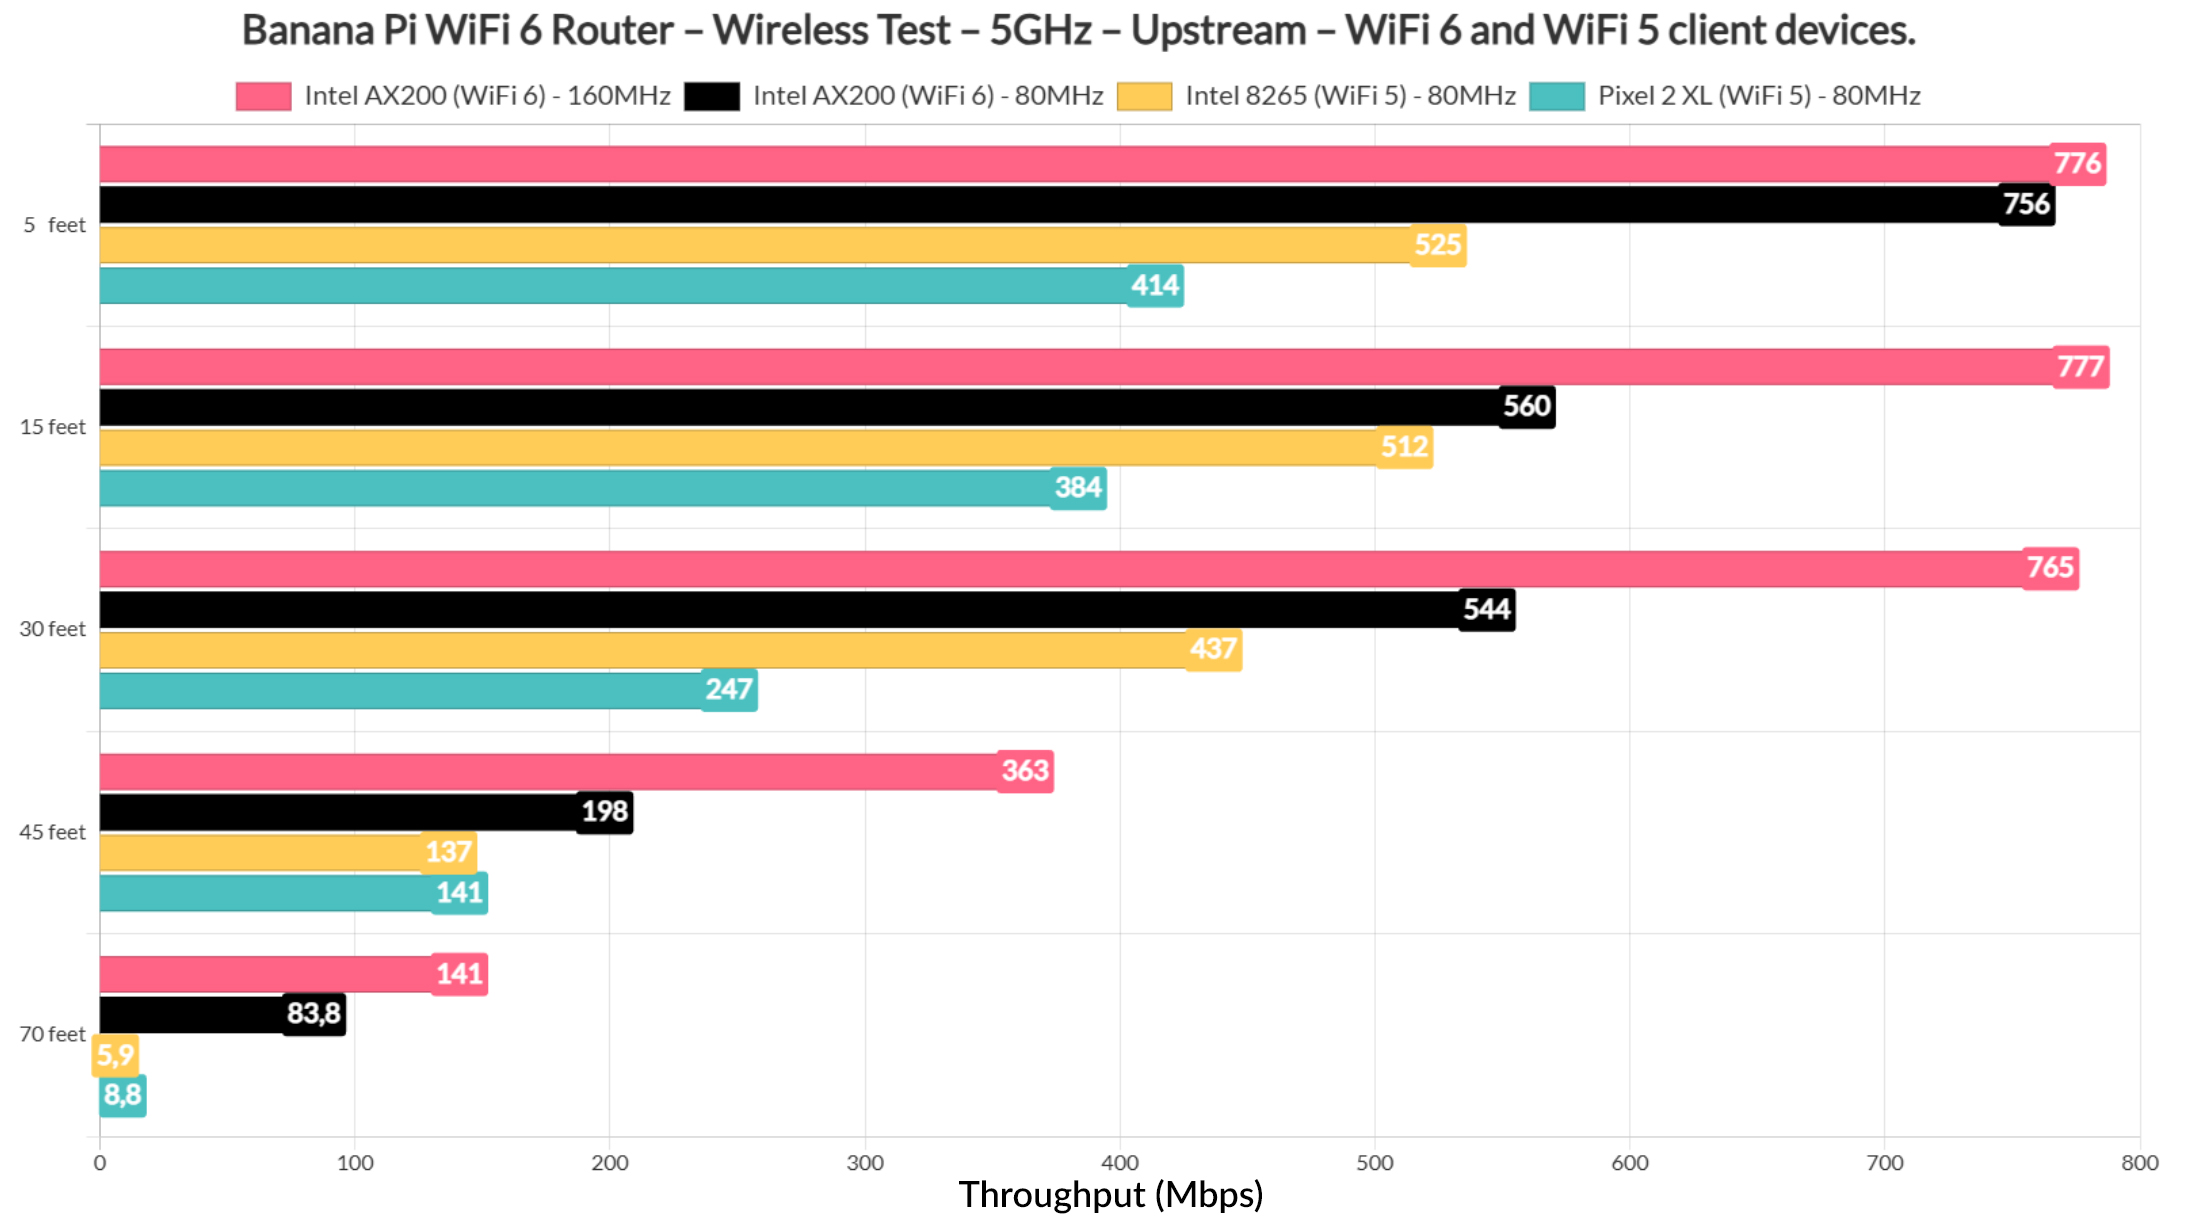
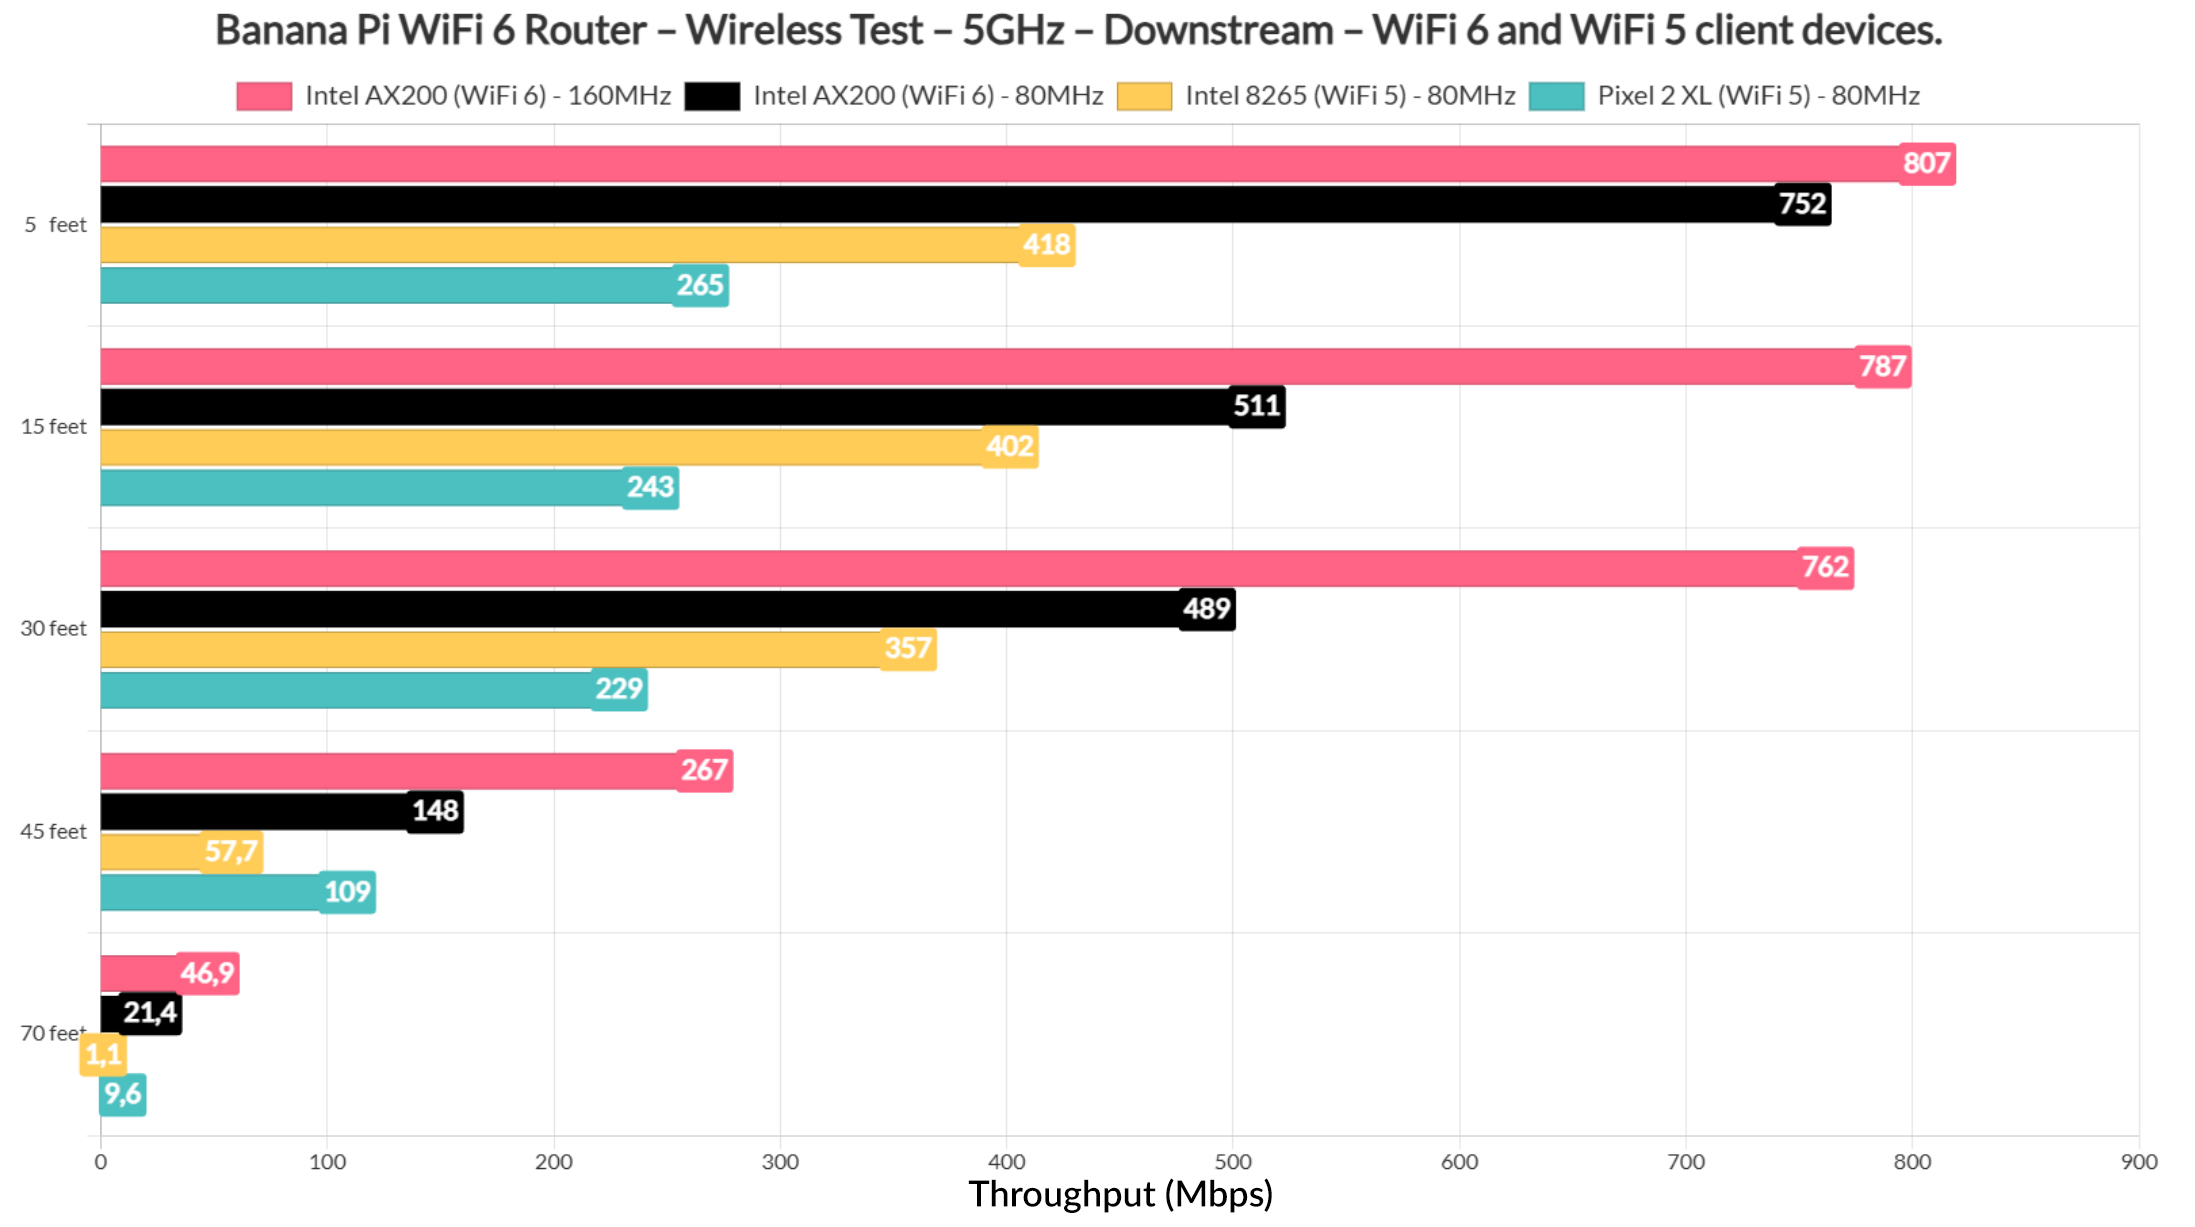
For the single-client wireless test, I used a WiFi 6 client and two WiFi 5 devices, including the Pixel 2 XL that I previosuly discarded. And, after being accustomed to seeing near Gigabit throughput on other WiFi 6 routers, this is a bit underwhelming, especially when using the 160MHz channel bandwidth.
The interesting thing is that if I ran the iperf test for a few minutes, I would see an average of 950Mbps, but this would not really tell the full story.
So, to better understand the throughput, we need to have a look at the longer-term performance graph. As you can see everything ran fine for a few minutes, but the Banana Pi WiFi 6 router seems to have a drop to about an average of 600Mbps at some point and it doesn’t recover immediately.
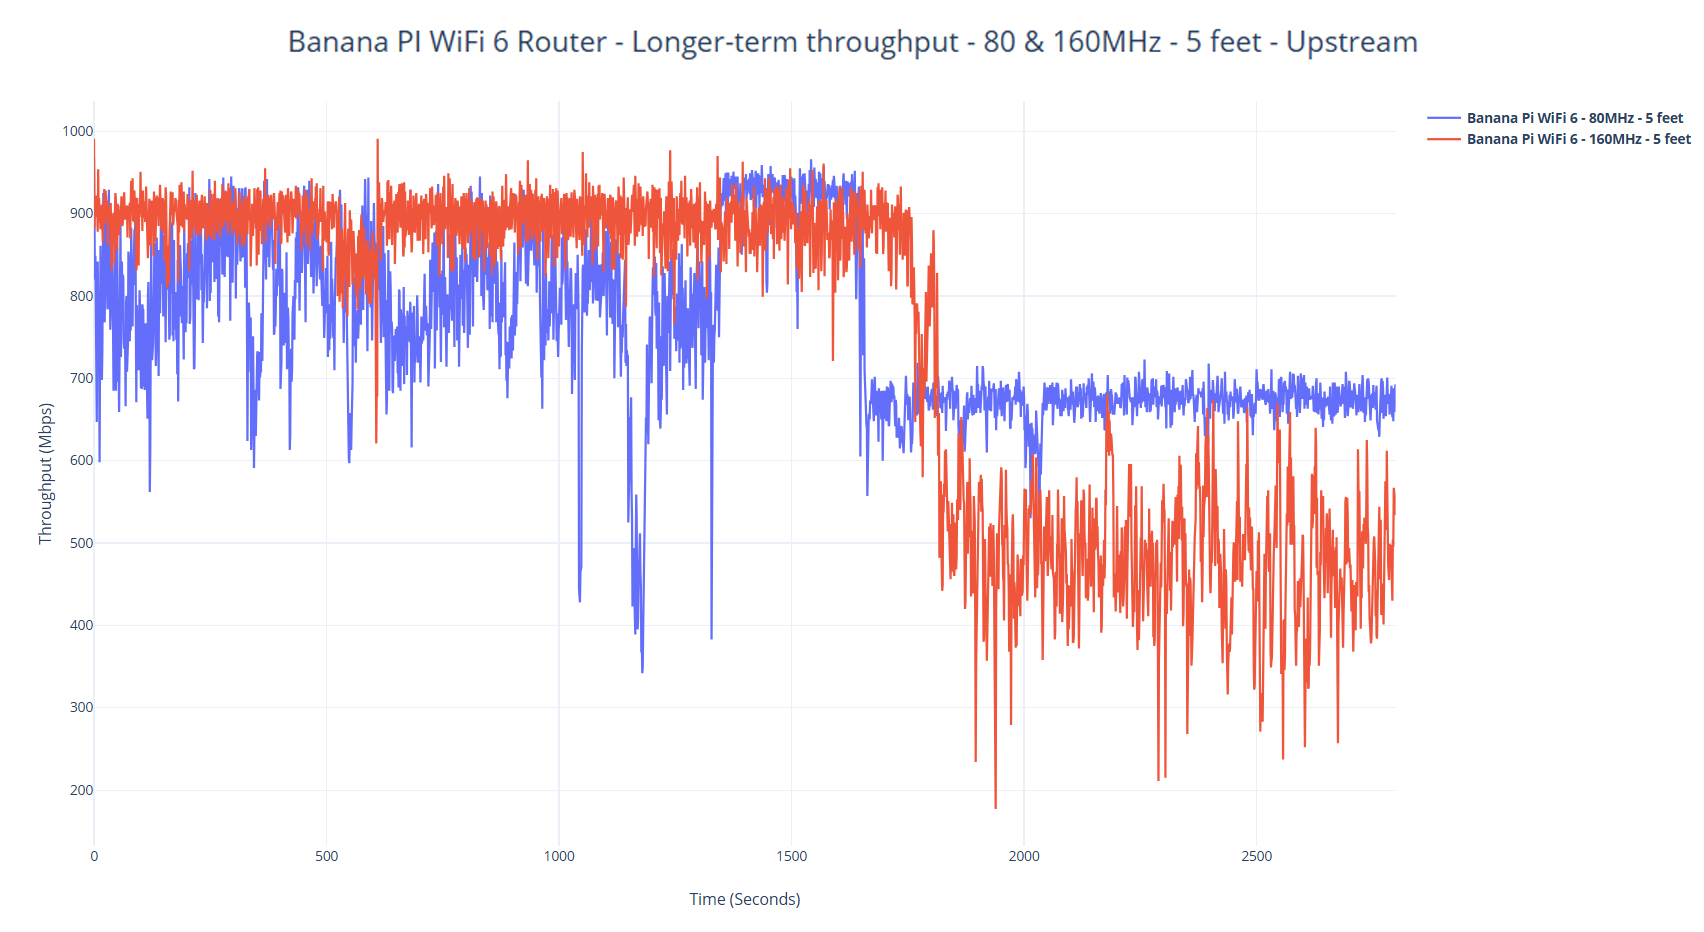
It happened when using both the 160 and the 80MHz channel width and I think it shows that there is some thermal throttling that occurs some time during the test and it does drop the overall throughput performance. Which is why it’s important to run these tests over many, many hours. And unfortunately not many publications do since it costs money and time that most don’t have. That being said, it’s still a decent performance considering the price tag of the device and there is always room for improvement.
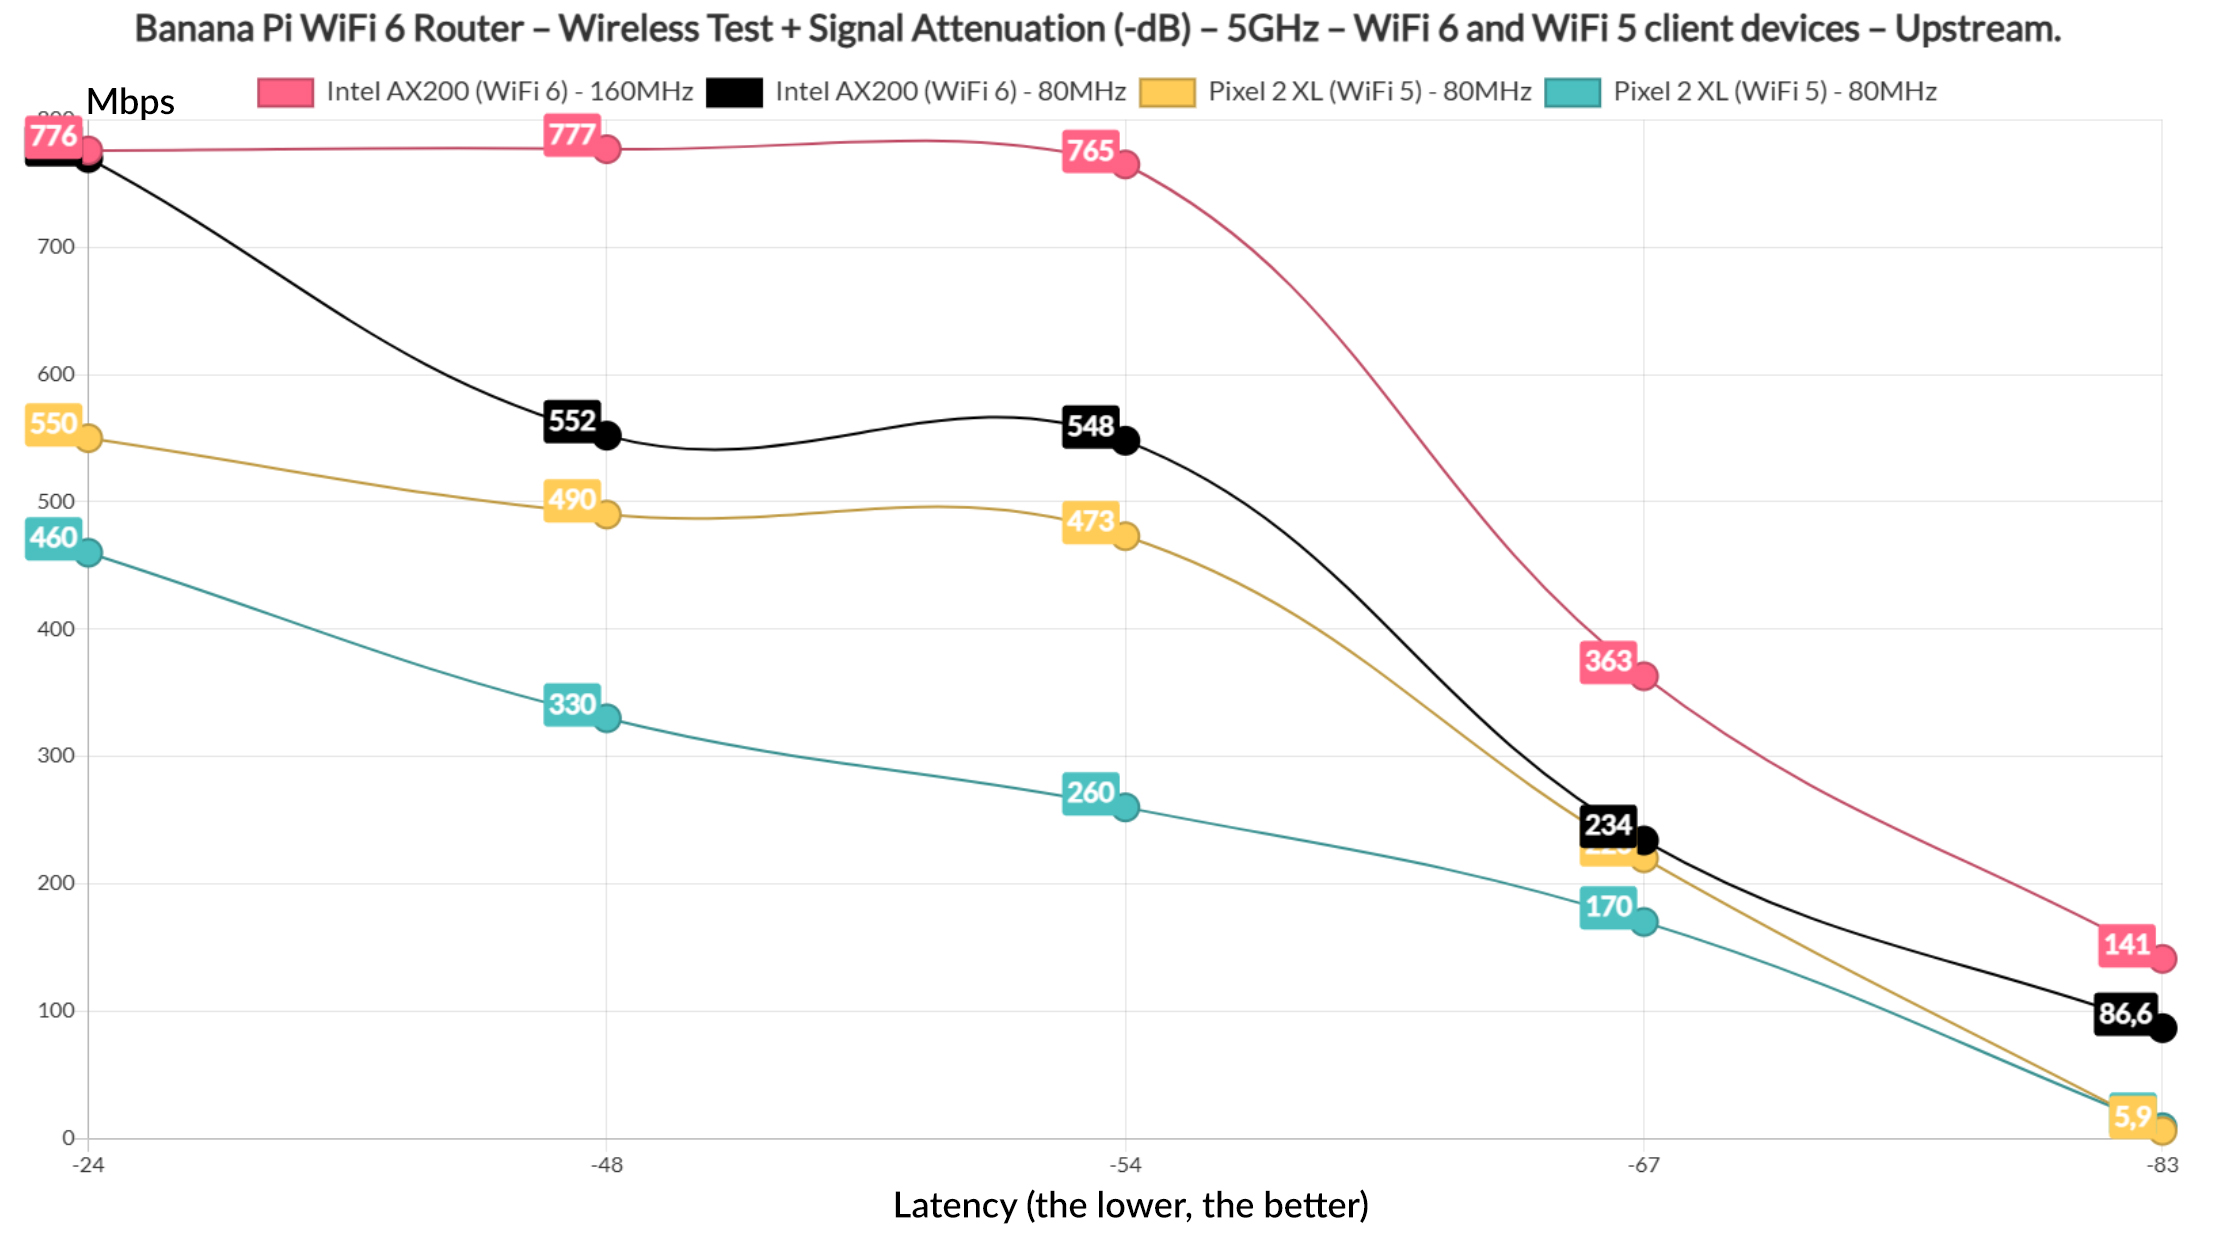
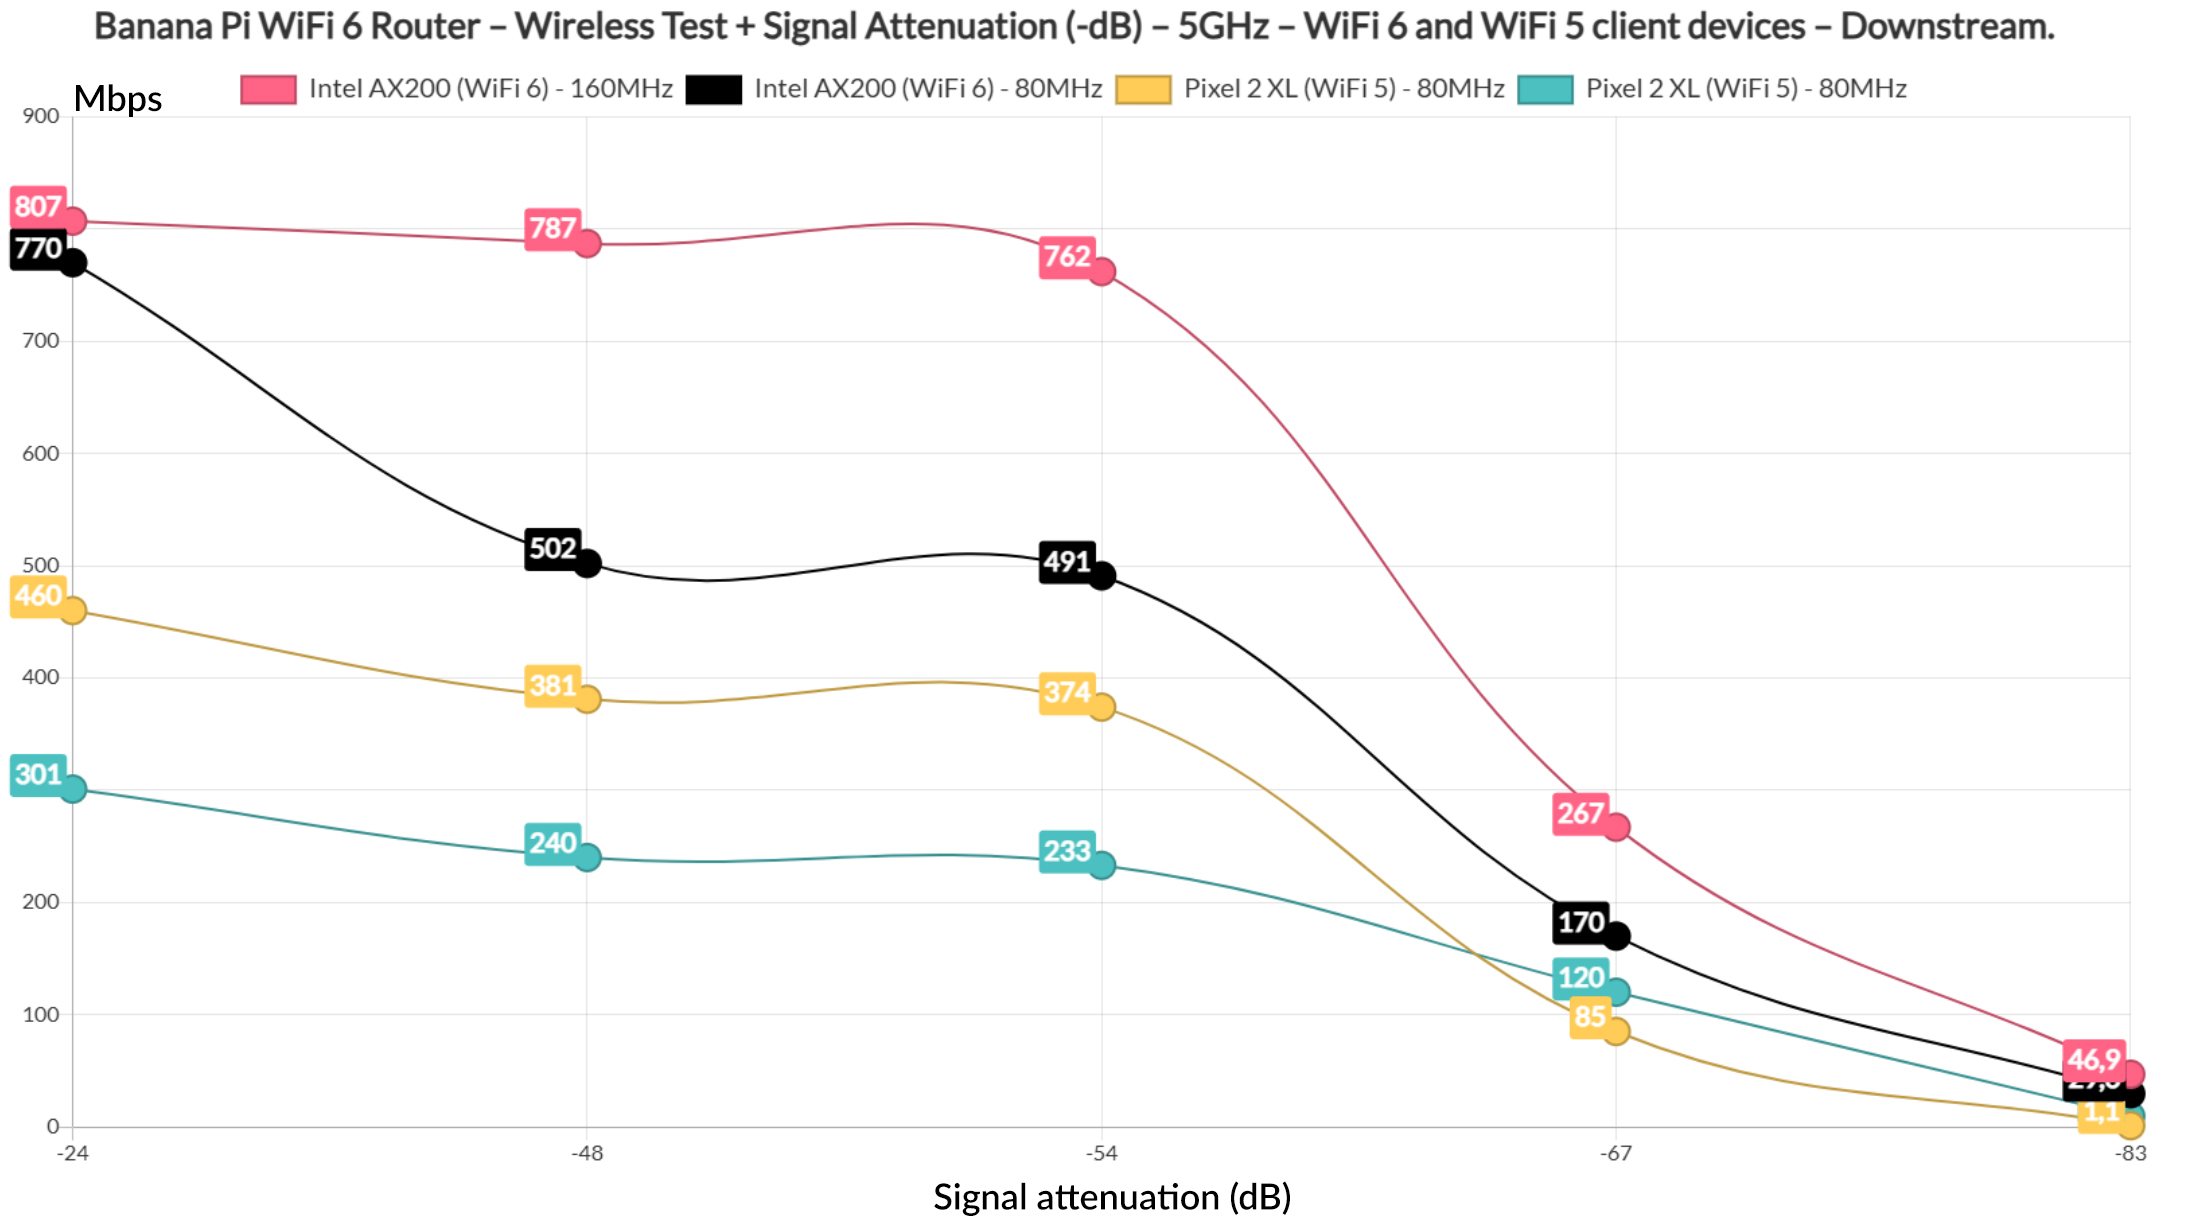
If we have a look at the signal attenuation graphic, we can see that even at -83, we’re still getting usable throughput, well, only when using the WiFi 6 client device. And this is true both upstream and downstream, as we can see in the following graphics.
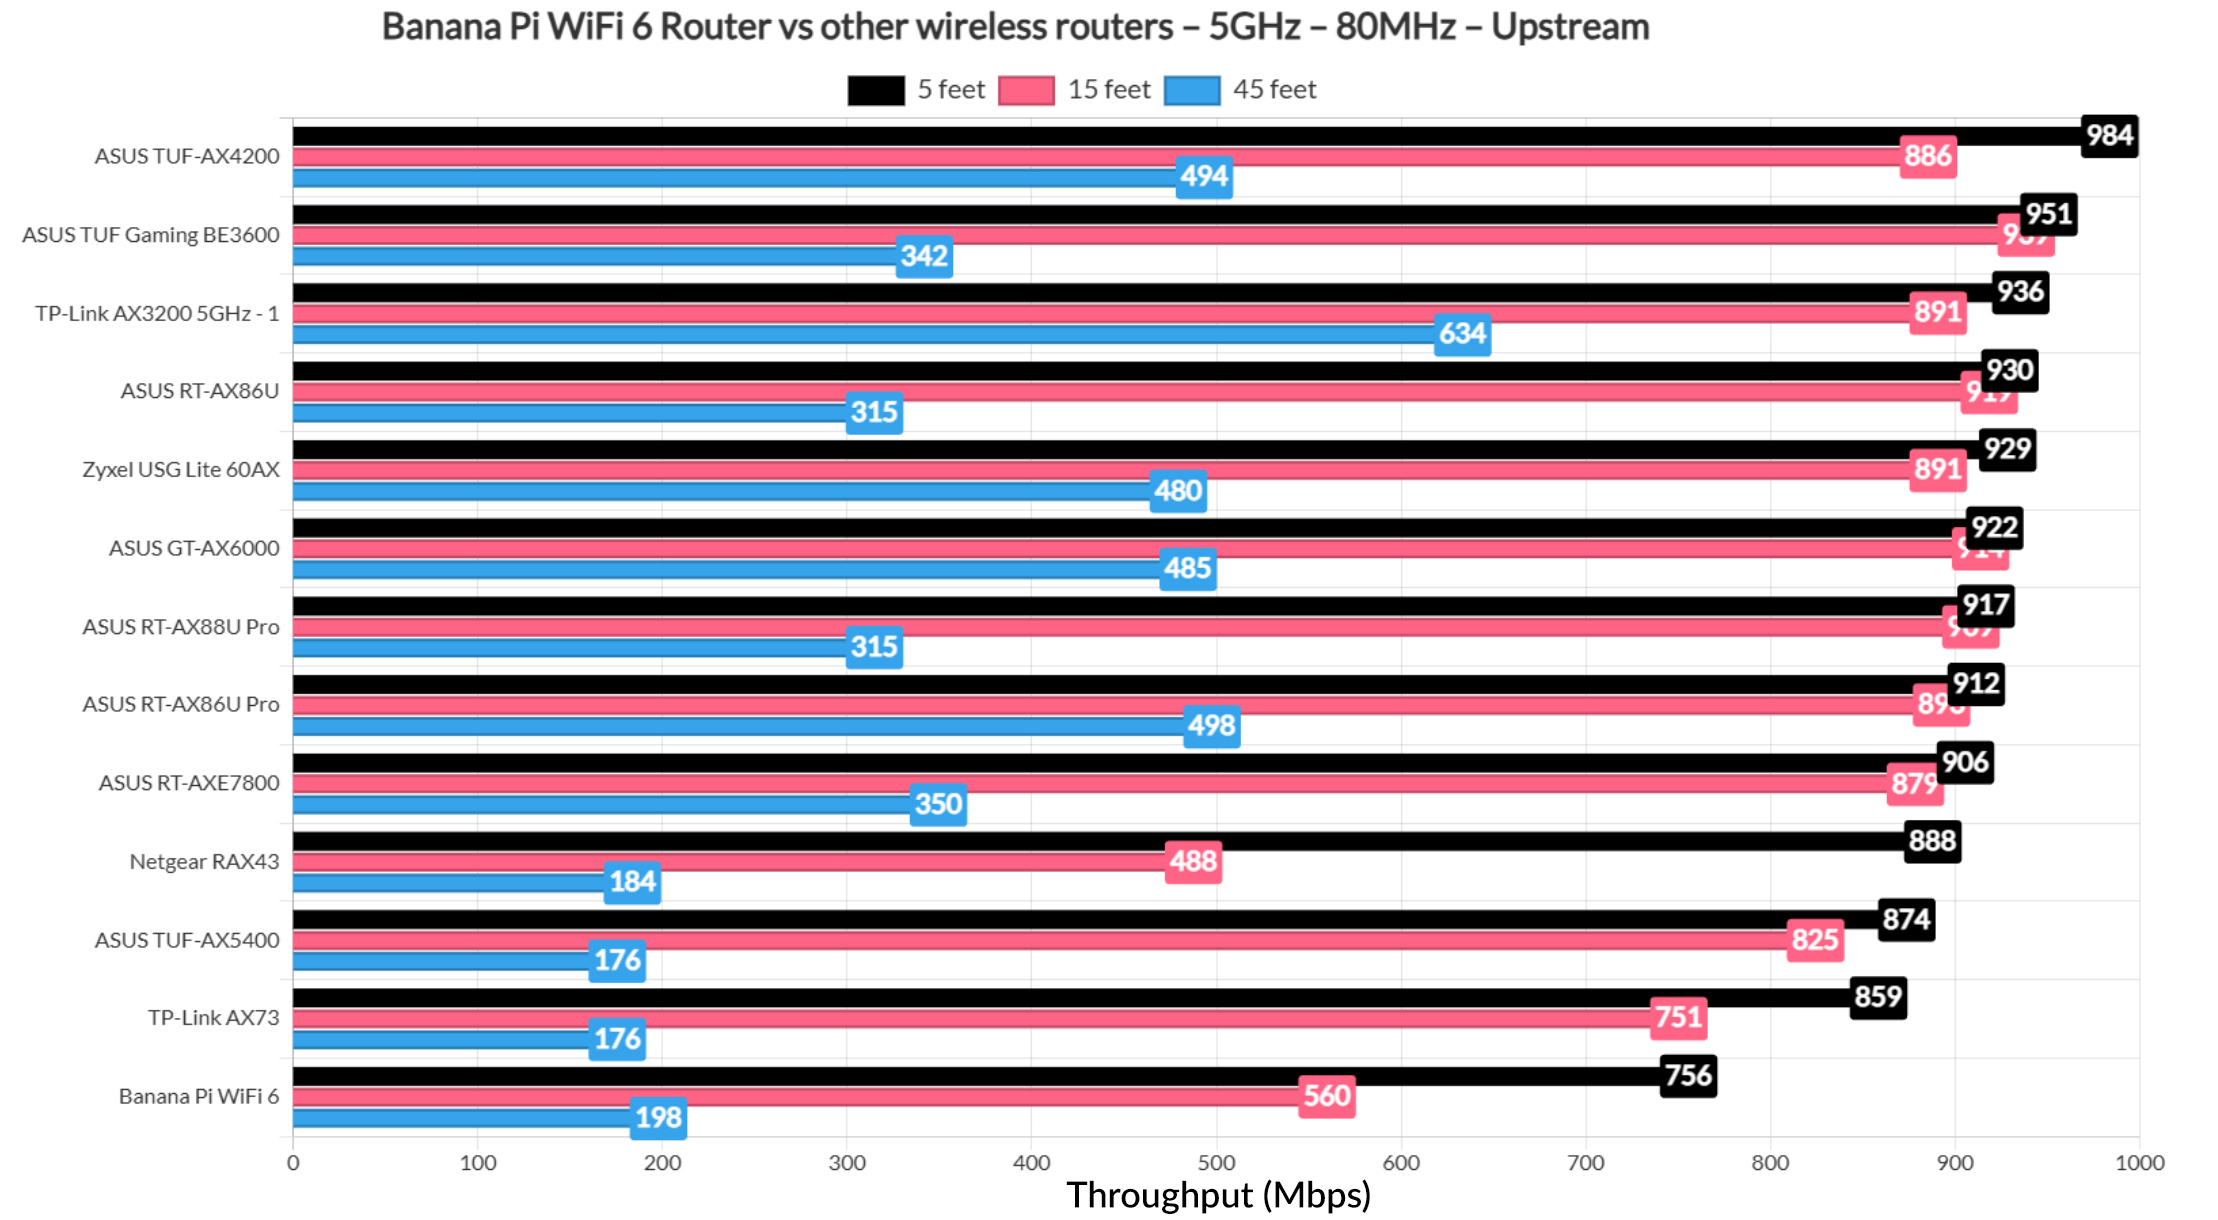
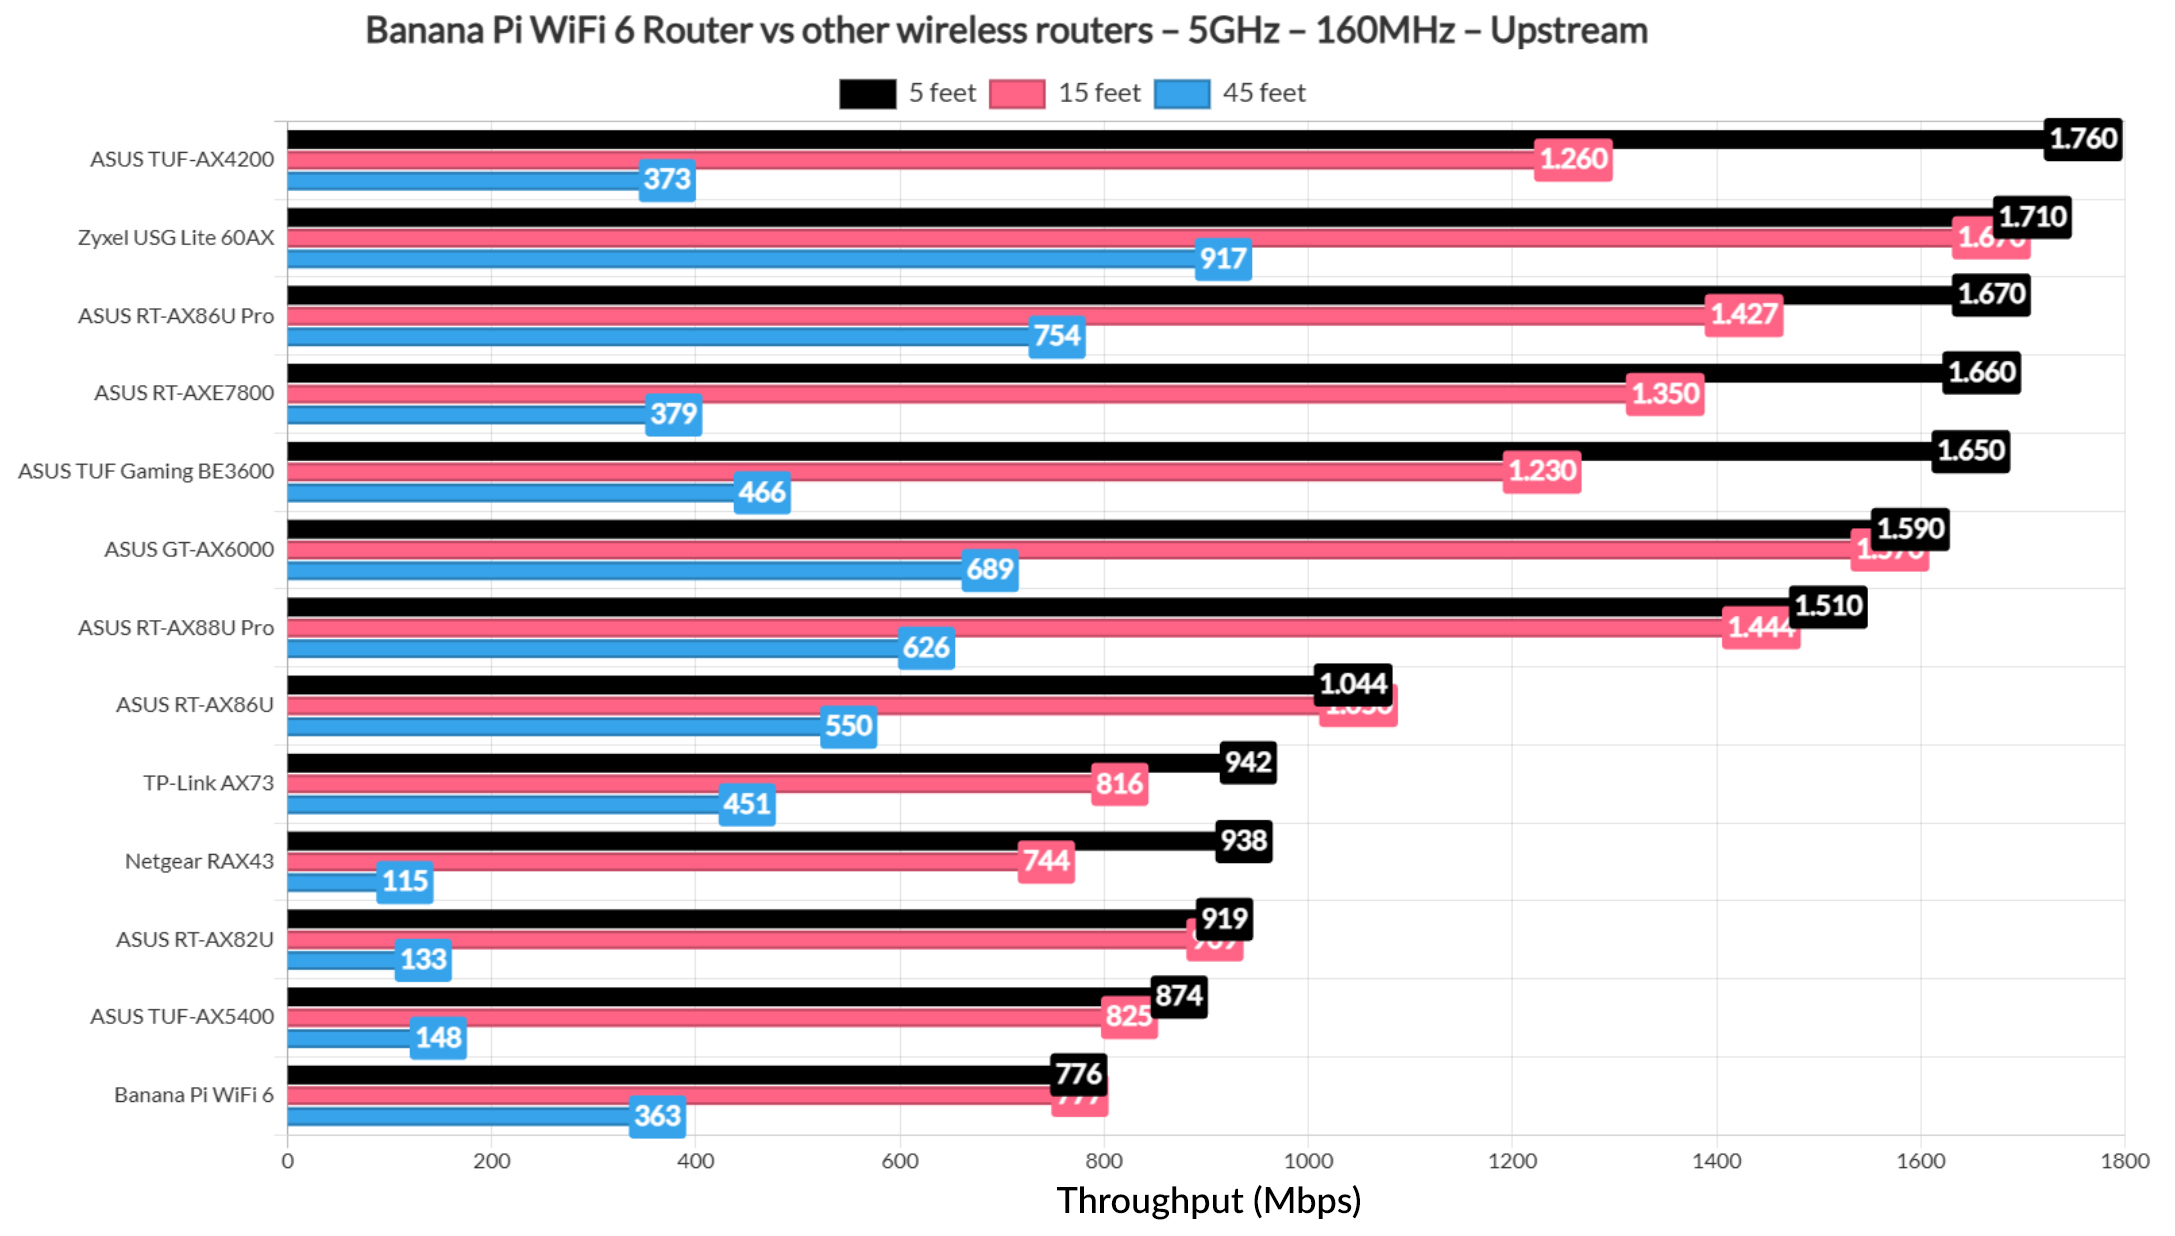
If I were to compare the Banana Pi to other wireless routers that I tested so far, it does sit at the bottom of the list when using the 160MHz width which I suppose makes sense and that’s also true when using the 80Mhz channel bandwidth. It’s a cheap device that does its best.
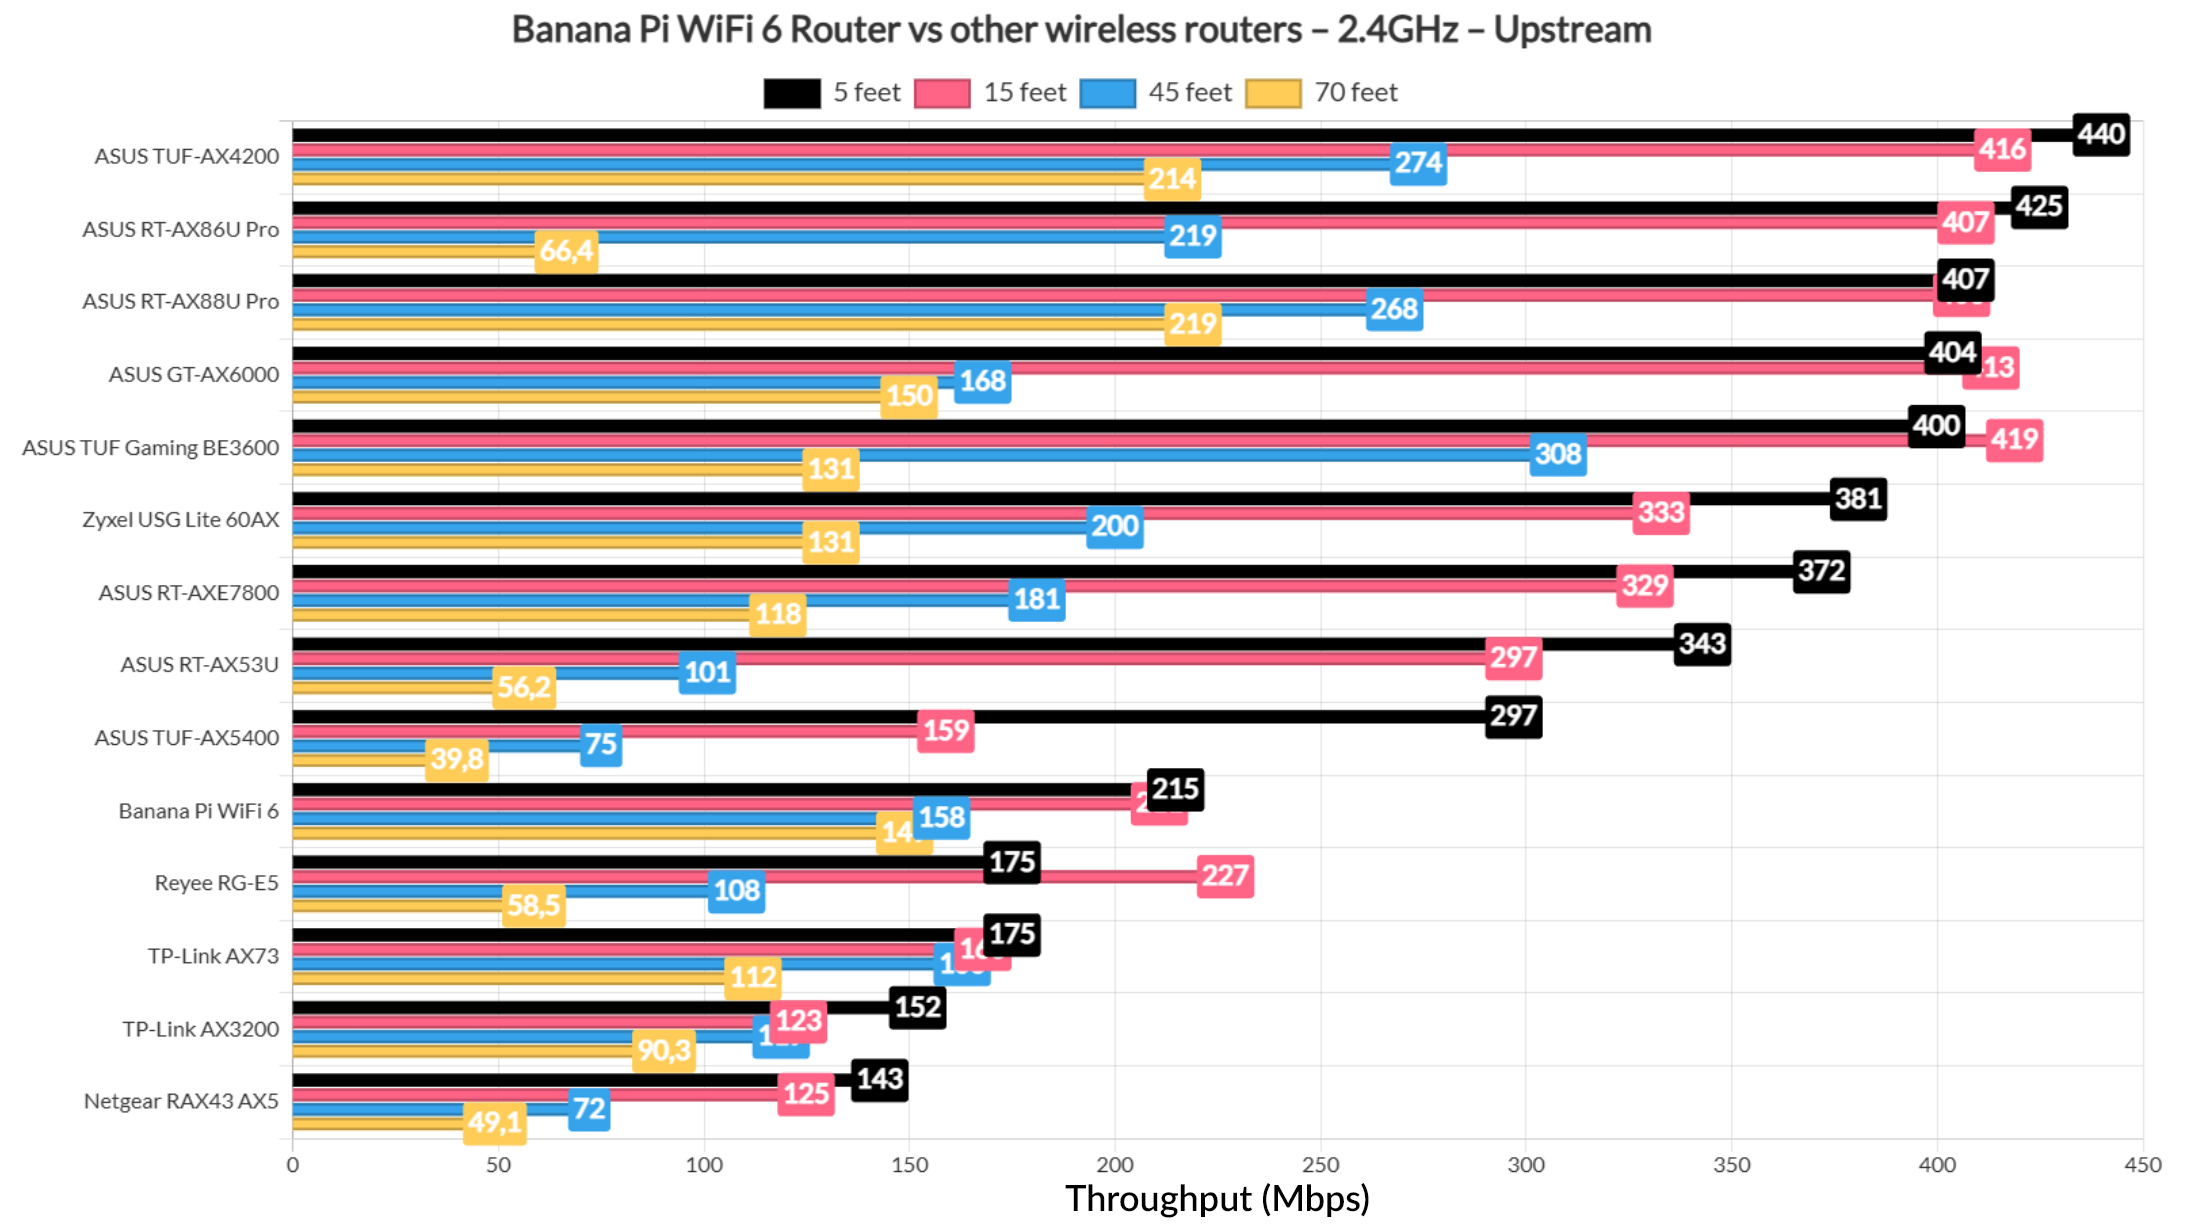
The Wireless Test (2.4GHz)
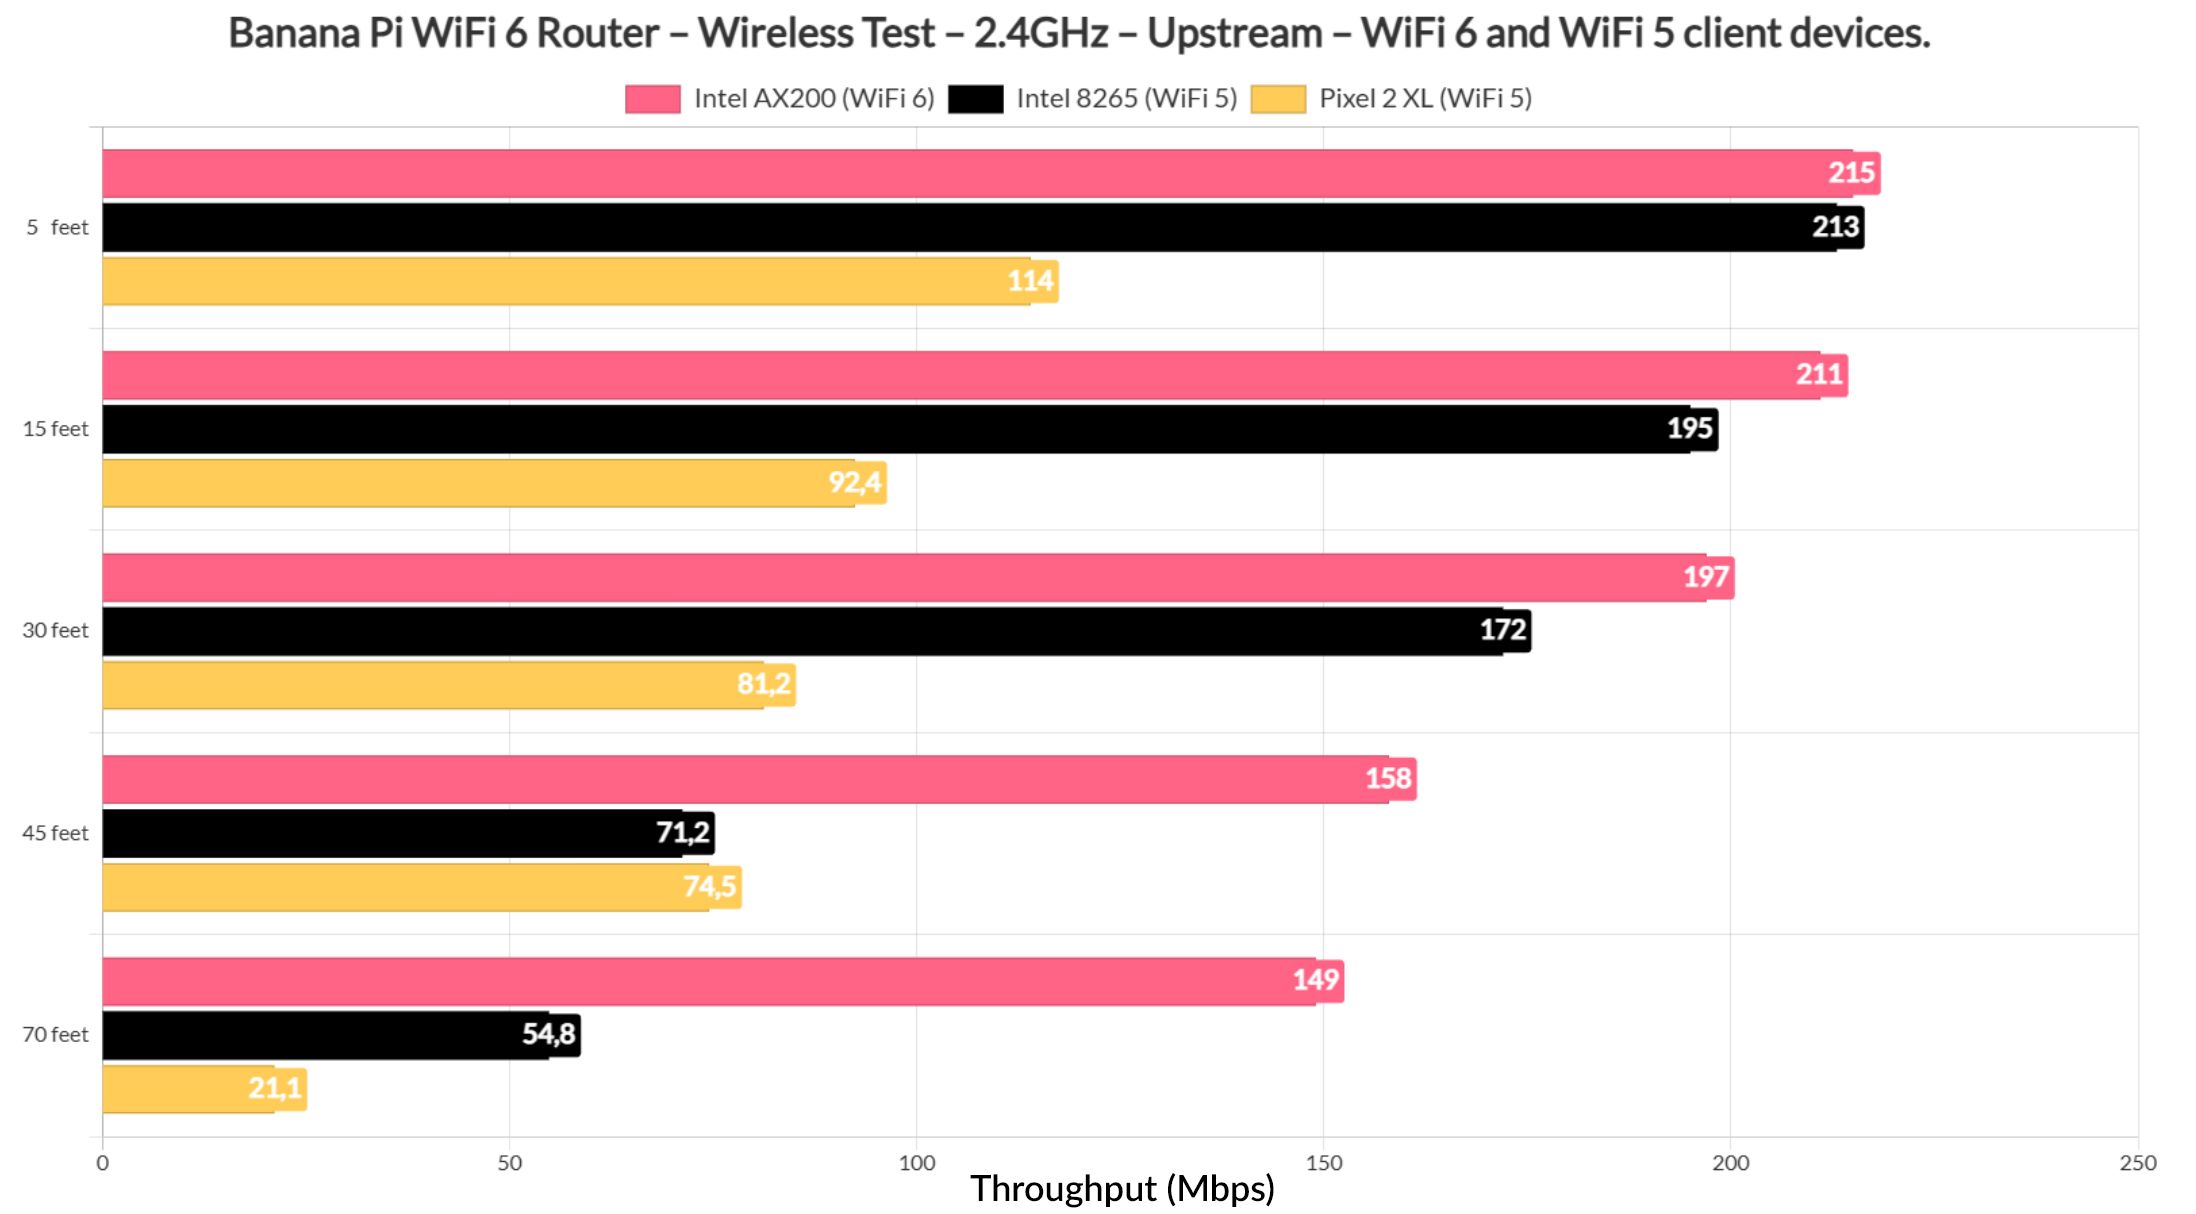
Moving on to the 2.4GHz network, despite setting up the router to use the 40MHz channel bandwidth, the throughput still only slightly went above 200Mbps, but it’s nice to see that it remained fairly strong up until the 70 feet and beyond, which is quite the feat.
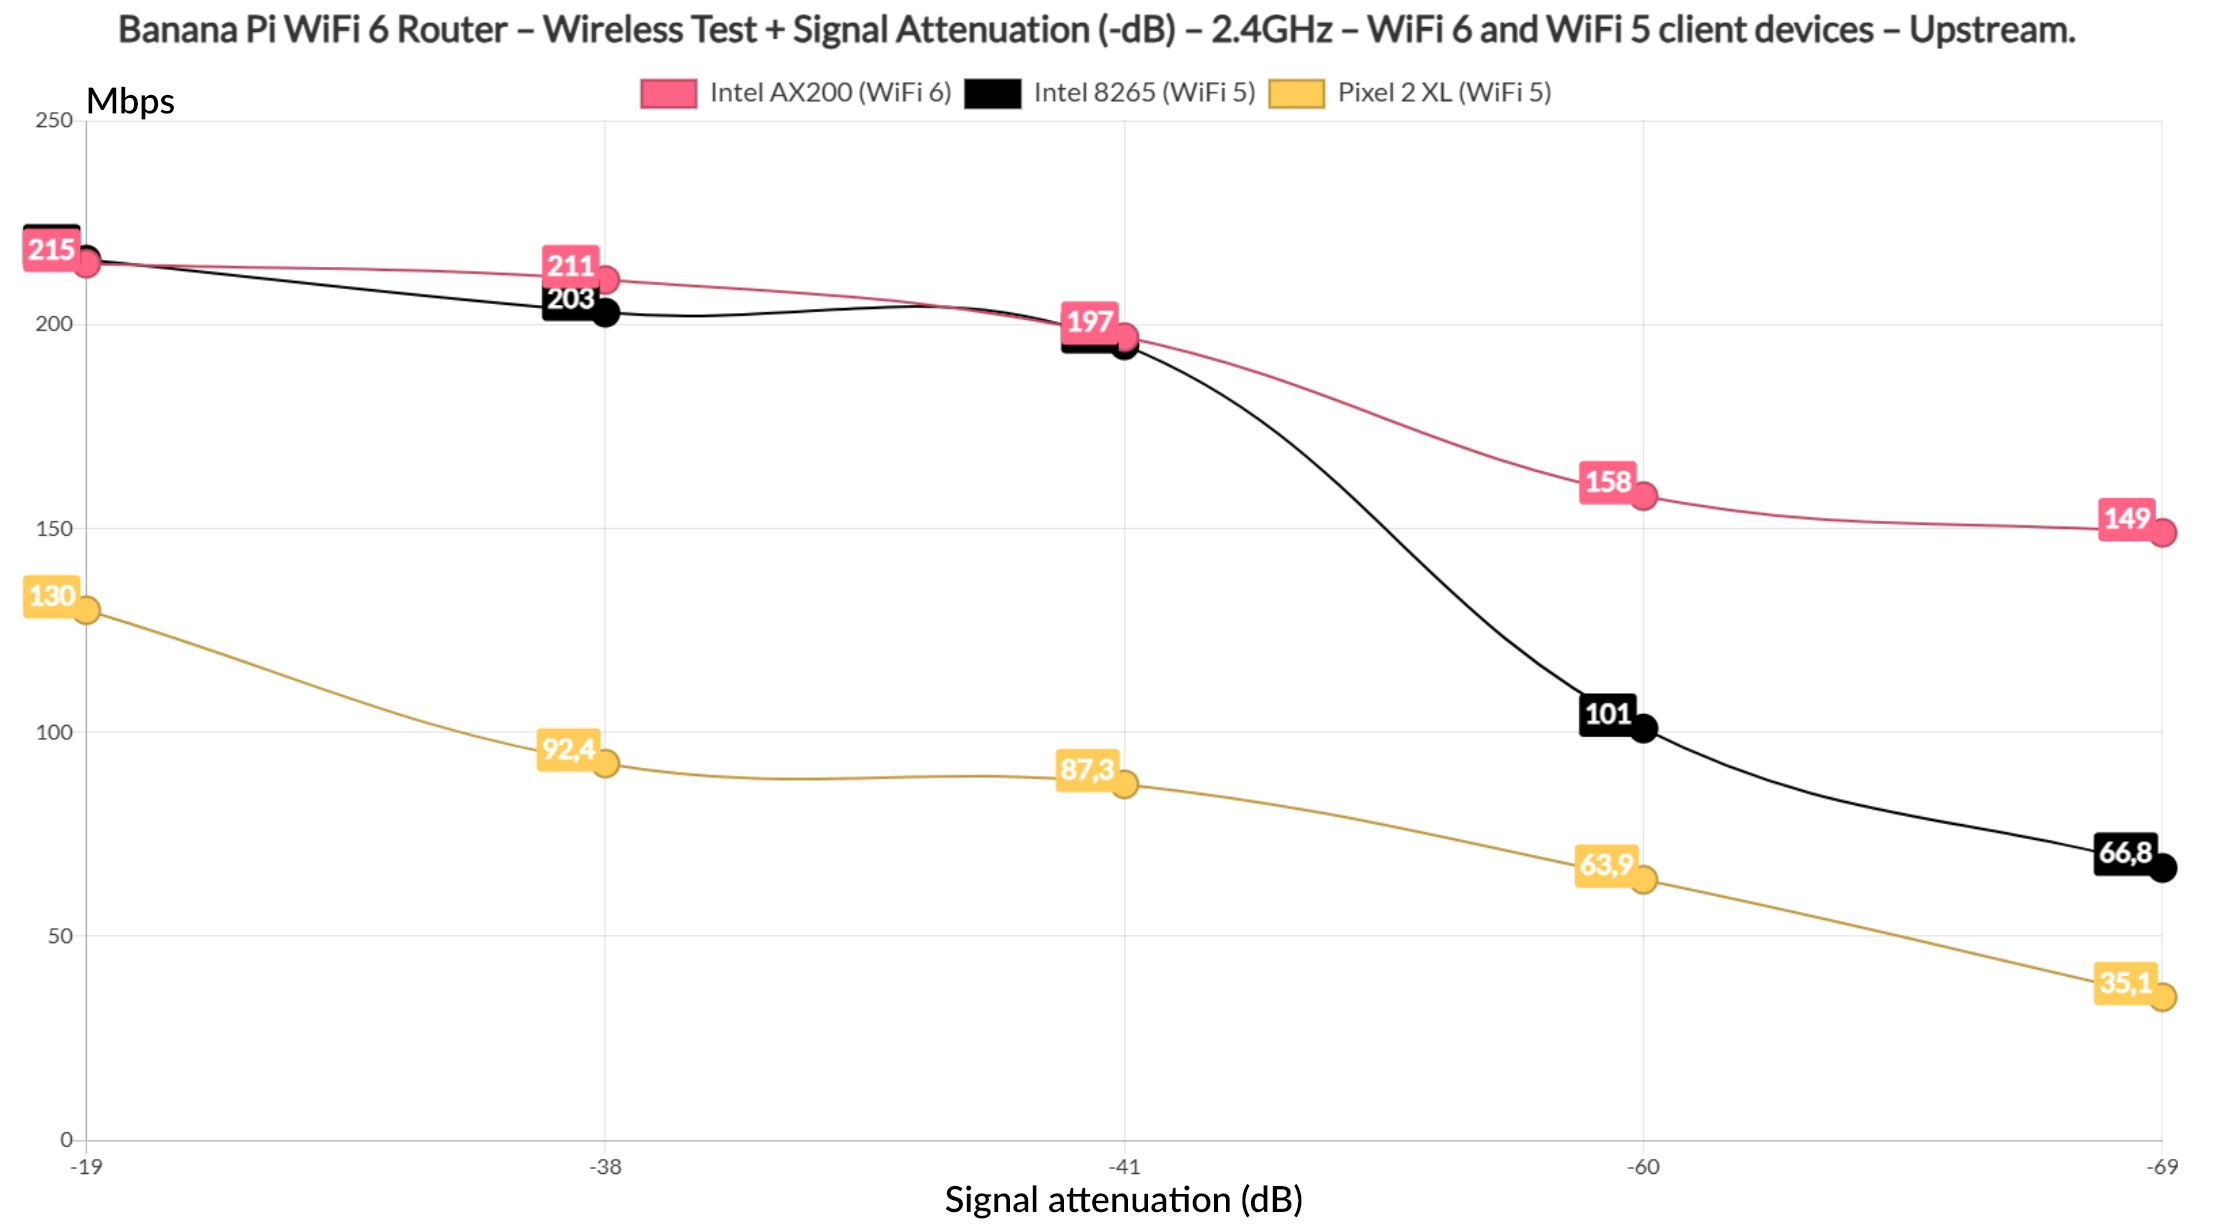
And, as we can see from the graphic, even if the signal attenuation was -69, we still get usable throughput on all three client devices. Everything seems to be great, but I do need to mention that the 2.4GHz radio refused to work at some point and required a router reboot while I was testing it, so there are some occasional stability issues.
When compared to other wireless routers, the Banana Pi is actually above some other devices.
The Multi-Client Tests (5GHz)
OK, now let’s see how the Banana Pi handles multiple client devices running various types of traffic. I used the same devices that I always use and you can also see the signal attenuation that I measured at each client level.
| 2x Lenovo Y520 | Custom PC | MacBook Pro | ZimaBoard 832 SBC | |
| Signal Attenuation | -30dB & -33dB | -30dB | -30dB | -62dB |
I did rely on the same open-source tools developed by Mr Jim Salter which you can get from GitHub. And I started with the simulated 1080p traffic on five client devices. As expected, the only client devices that could sit beneath 100ms for at least 95% of the time are the WiFi 7 and the WiFi 6 clients, while the WiFi 5 immediately shut above that limit.
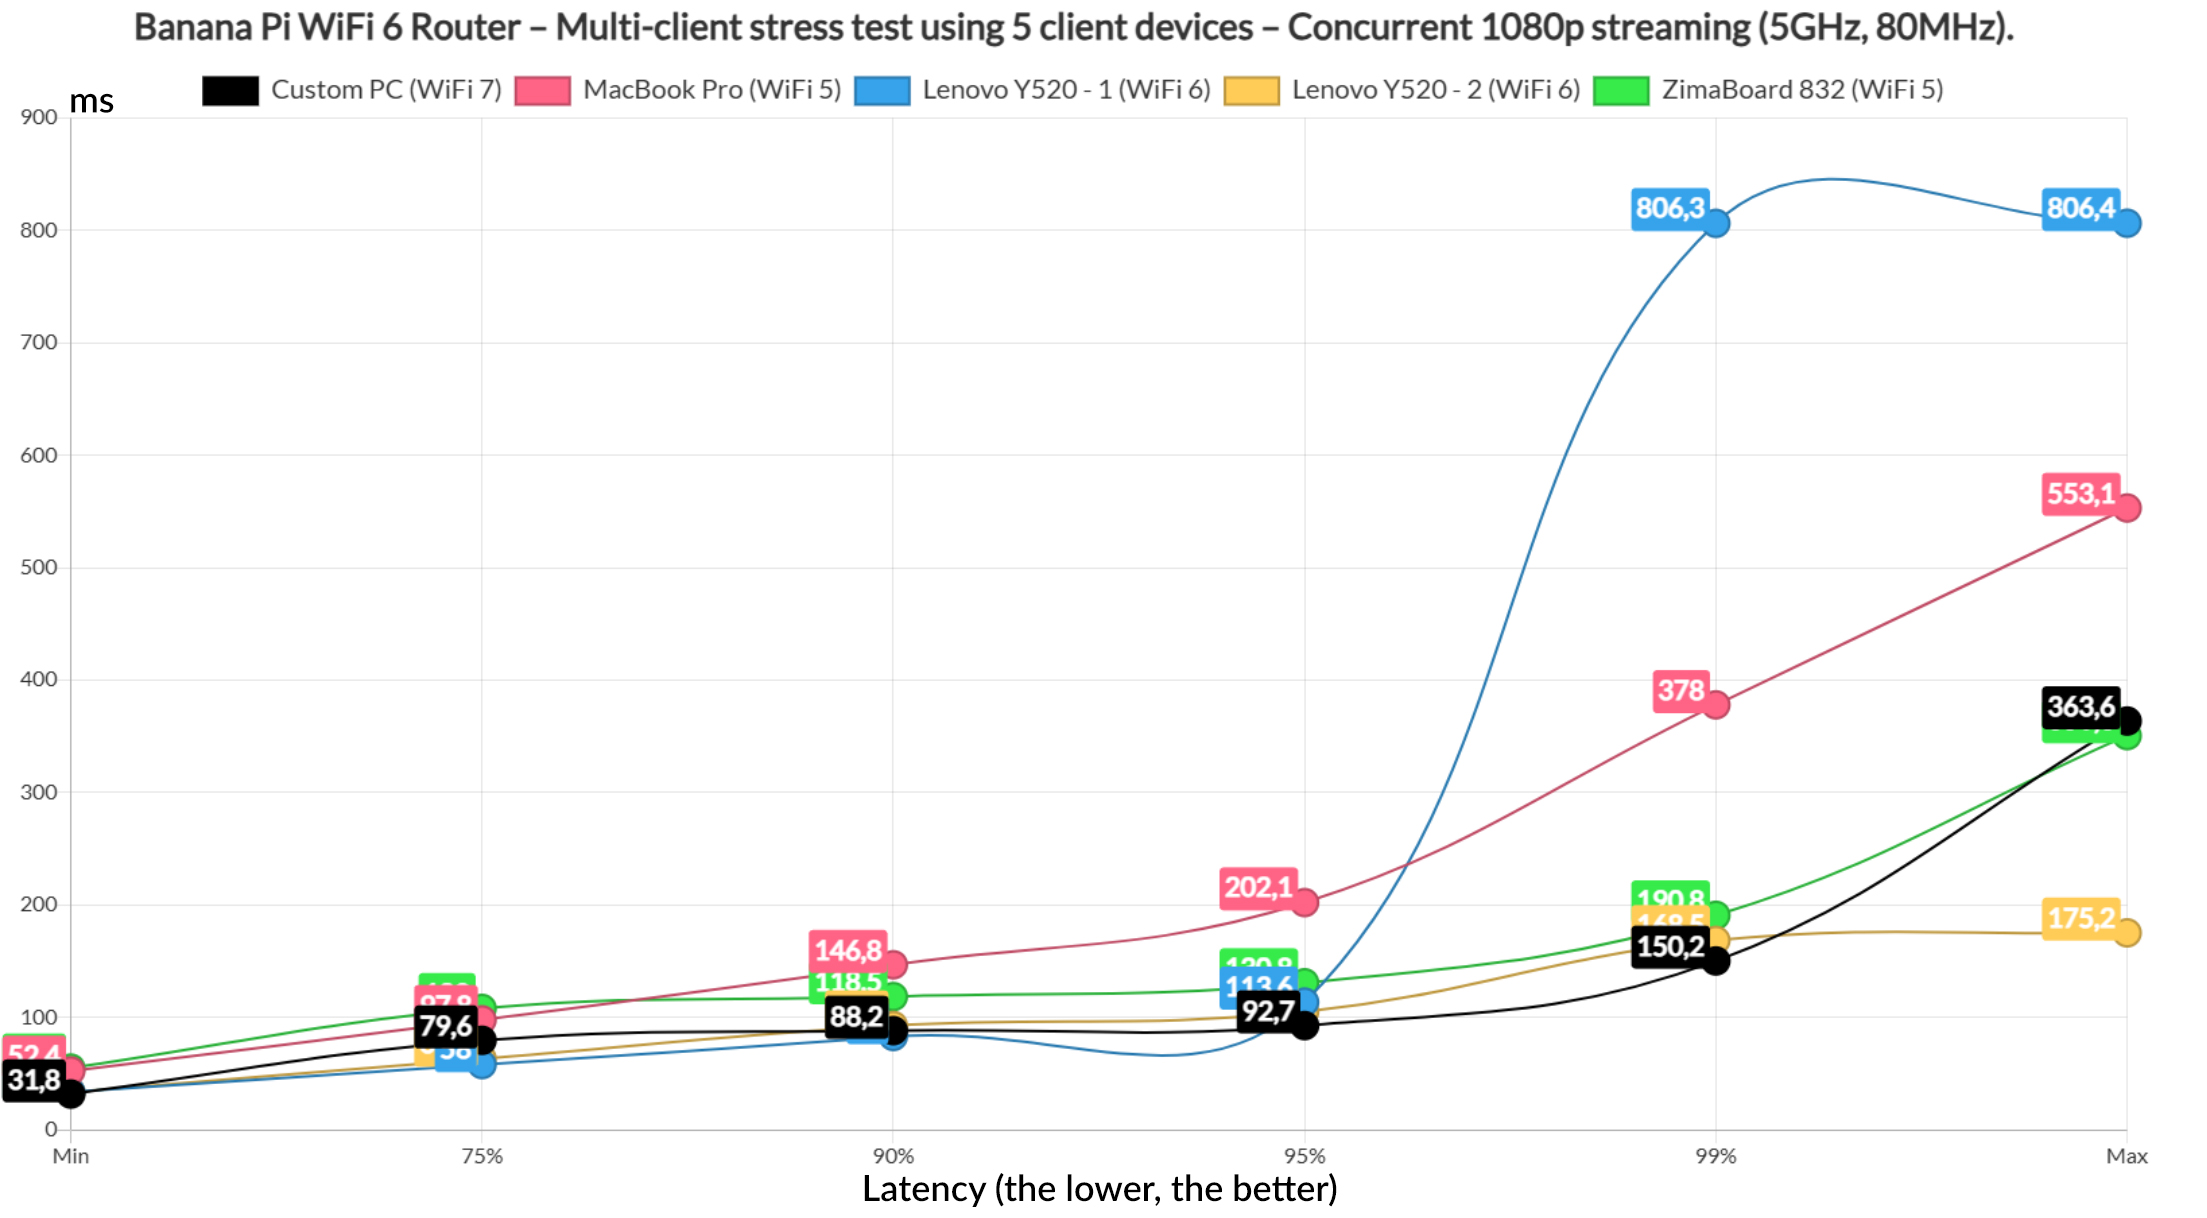
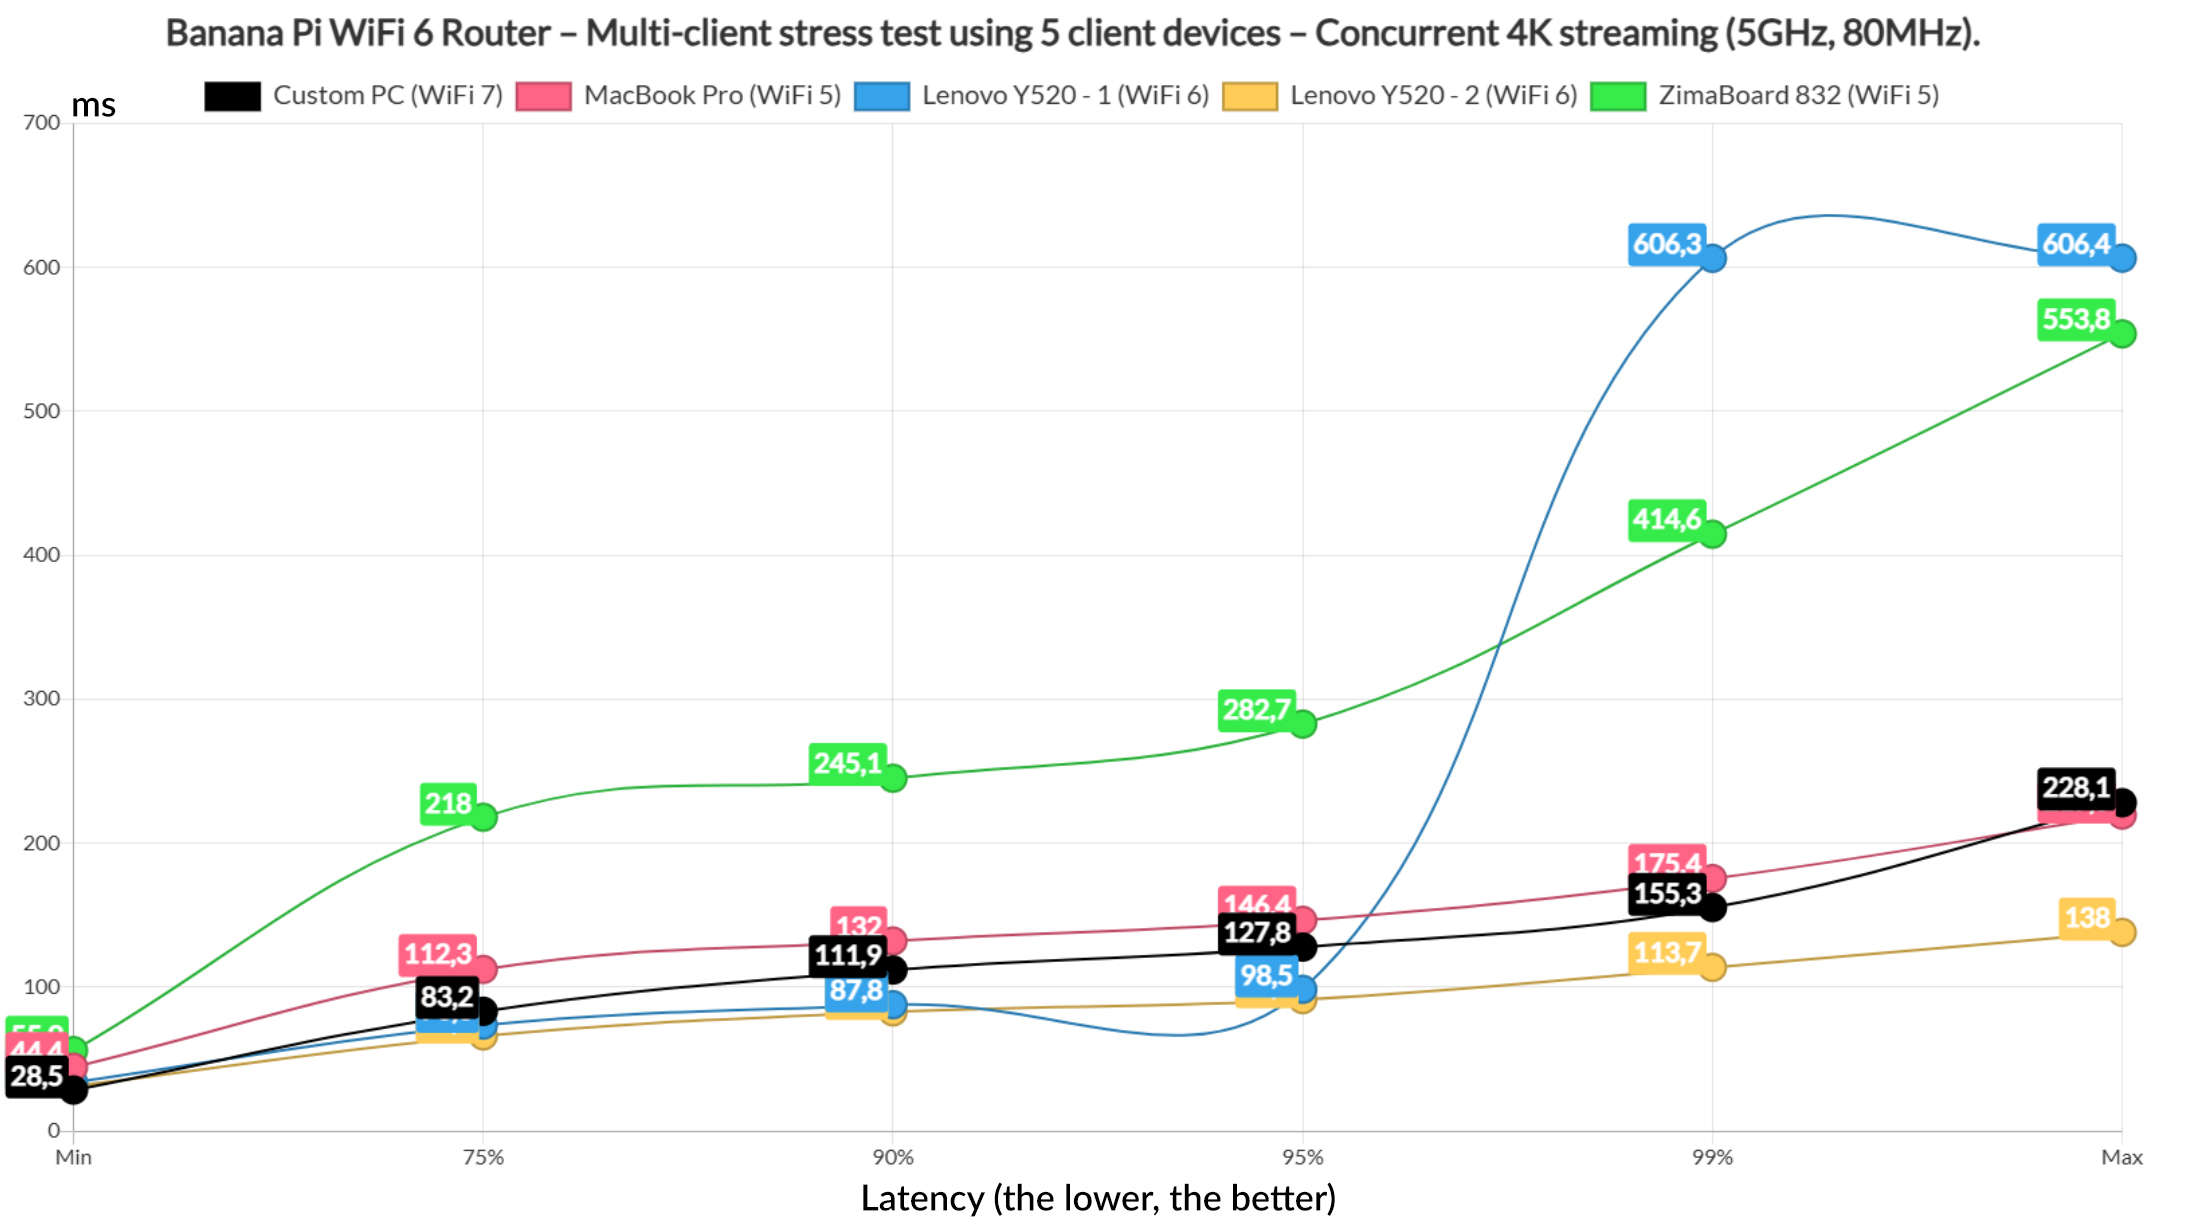
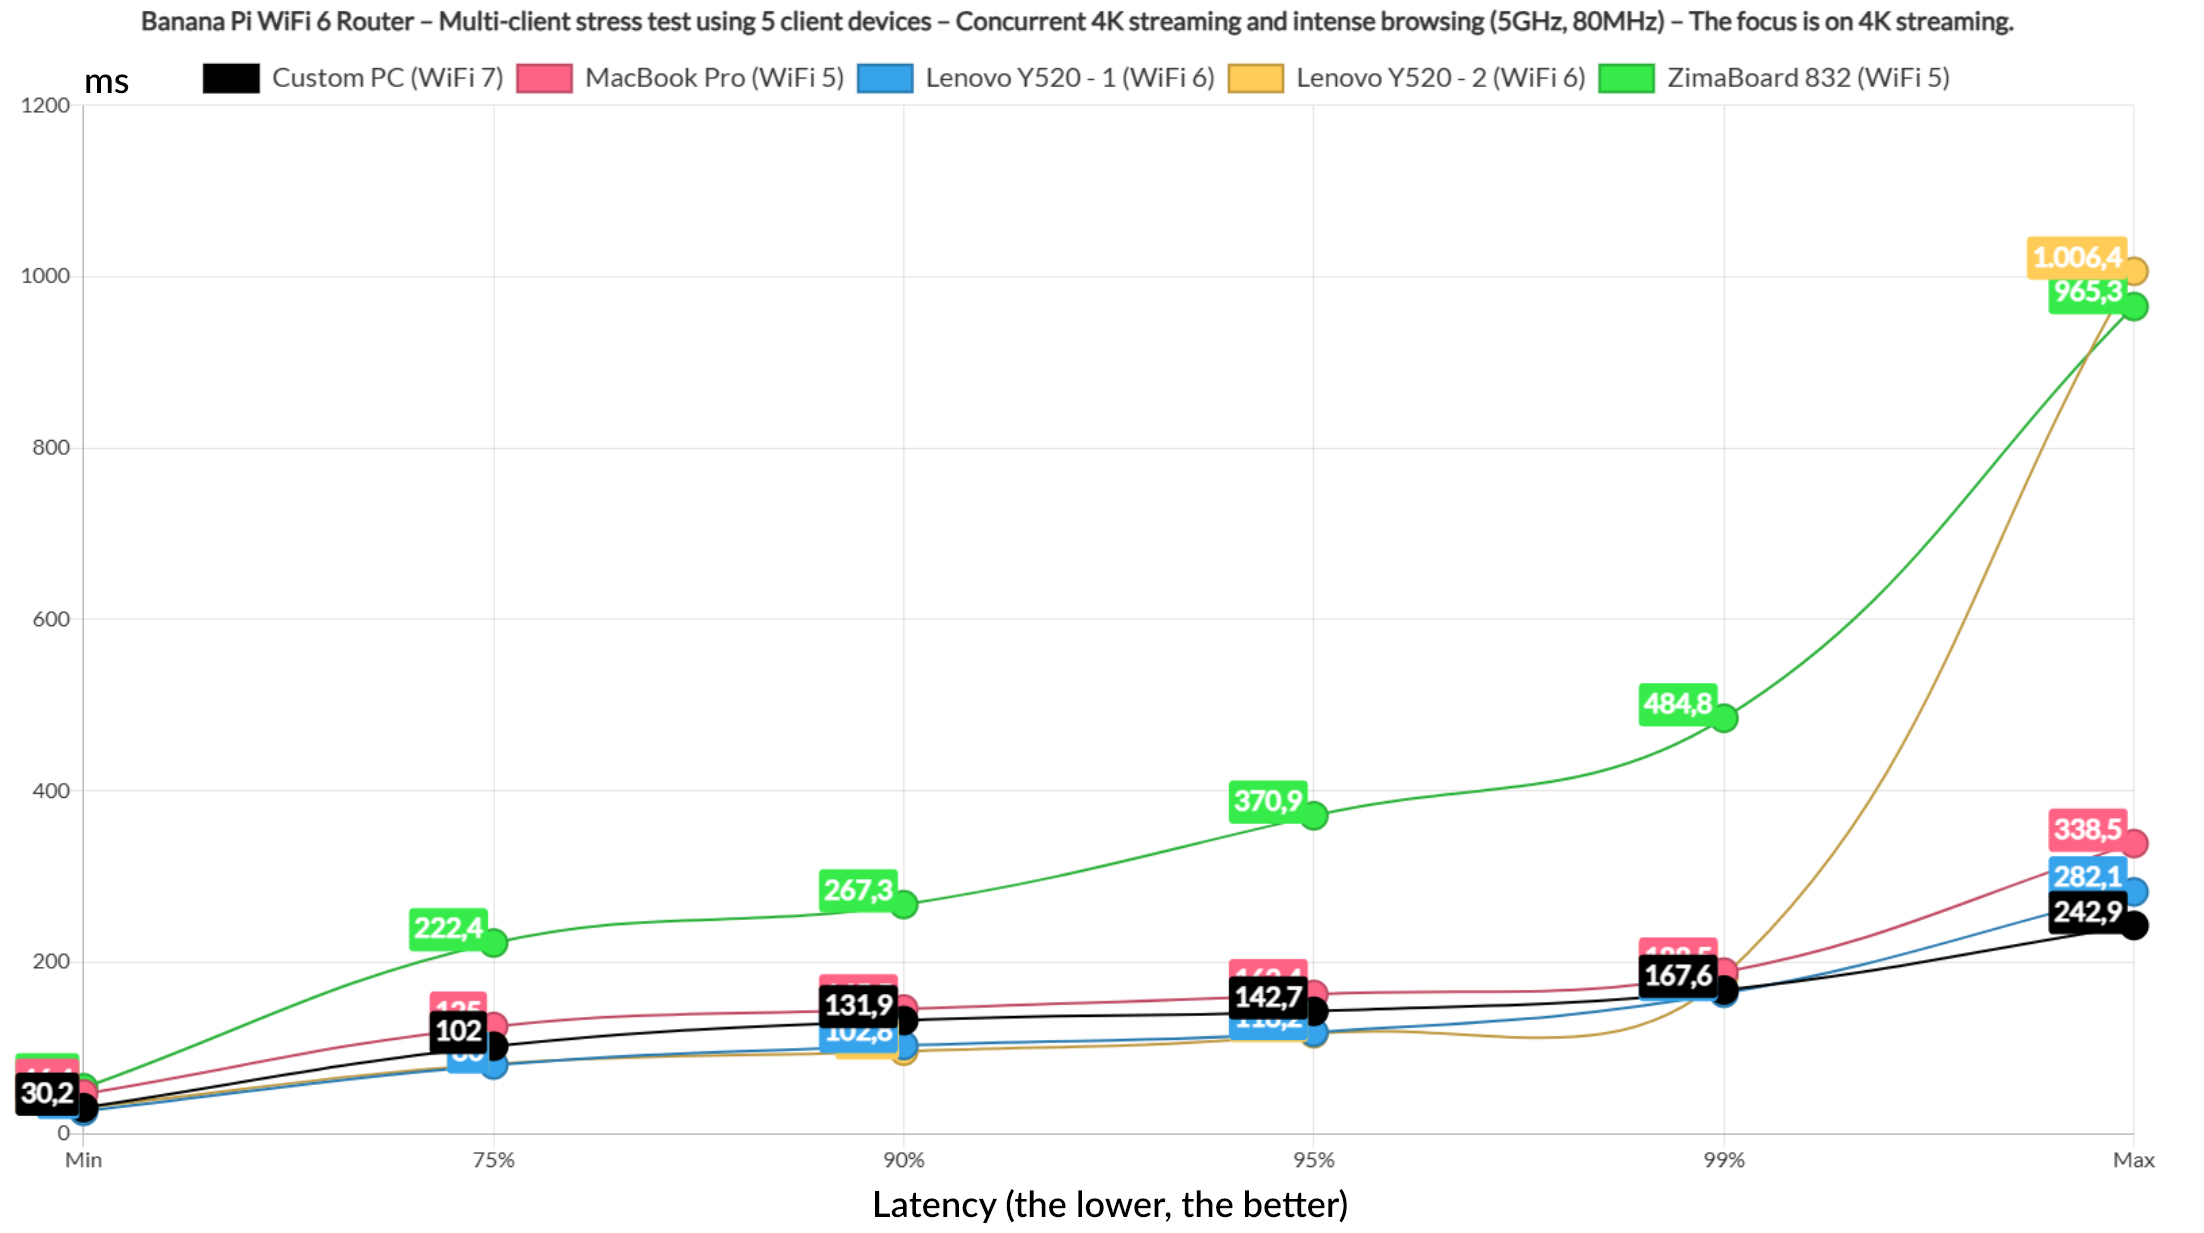
I suppose the only reasonable latency can be seen on the two Lenovo laptops but only for 75% of the time. Let’s move forward and run 4K streaming on the five clients. I am surprised that two clients managed to stay below 100ms for 95% of the time, but all the rest went above it, especially the two Wifi 5 client devices, the ZimaBoard reaching 300ms for at least 5% of the time.
At this point, it’s best to rely on Ethernet cable. I didn’t stop here and I included intense browsing to run alongside 1080p on all five client devices.
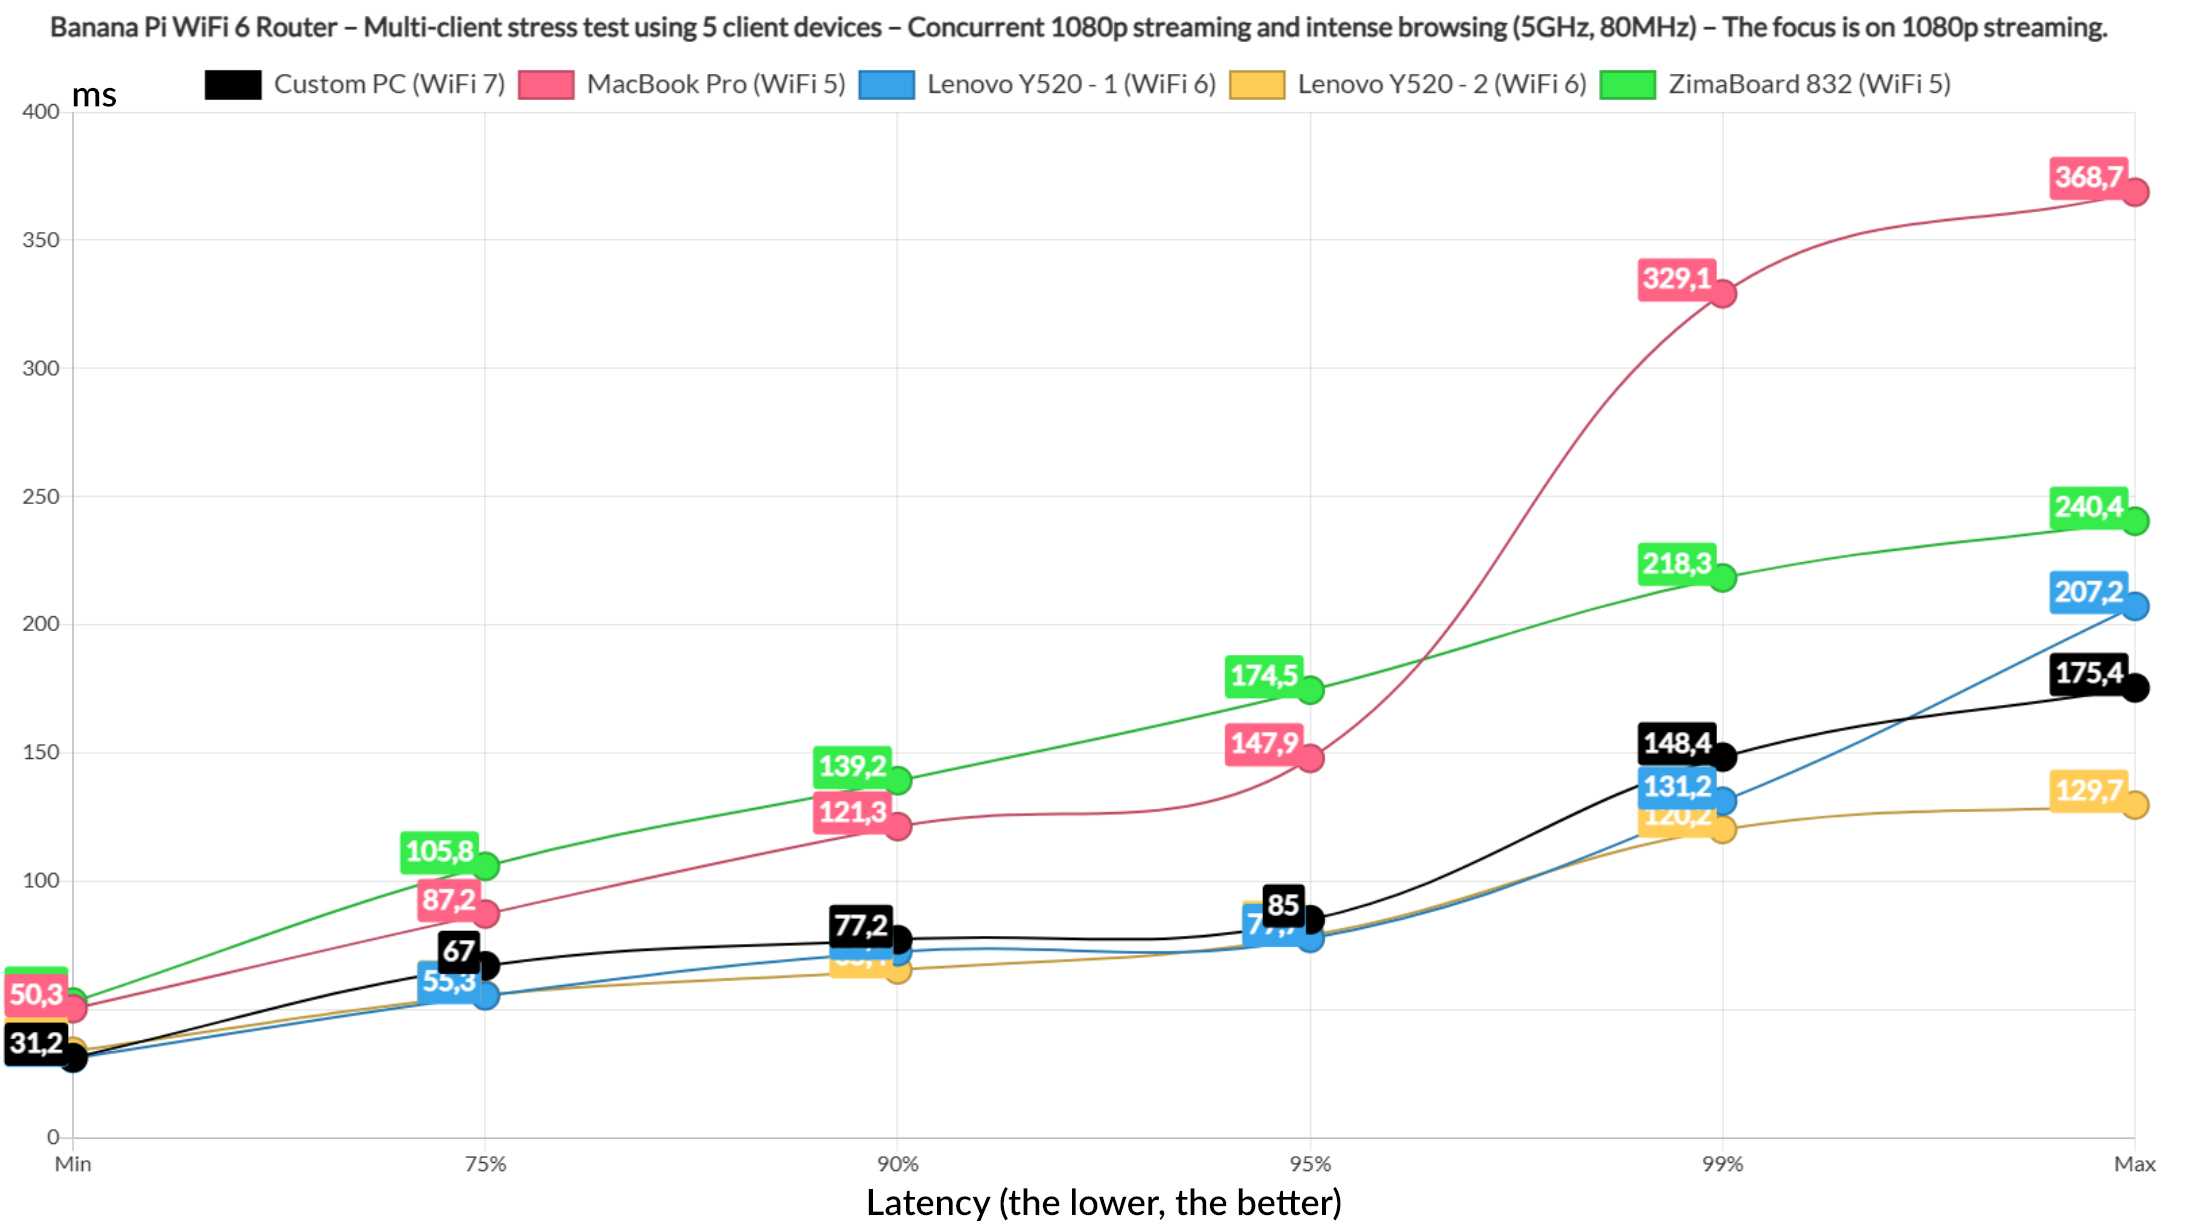
There is an increase in latency, but the WiFi 7 and the WiFi 6 clients did better than expected, up until that last 1%.

The intense browsing graphic shows that the aforementioned clients did display a higher latency than the rest, but it’s still below the 1.5s limit where most people would just refresh the page. So all is fine. Now let’s run the intense browsing traffic alongside the 4K streaming.
And boy, did the two WiFi 6 clients struggle to stay below 100ms, but they only managed to to so for 75% of the time. The rest couldn’t bother and went above 100ms and well beyond for the entire duration of the test. Not good.
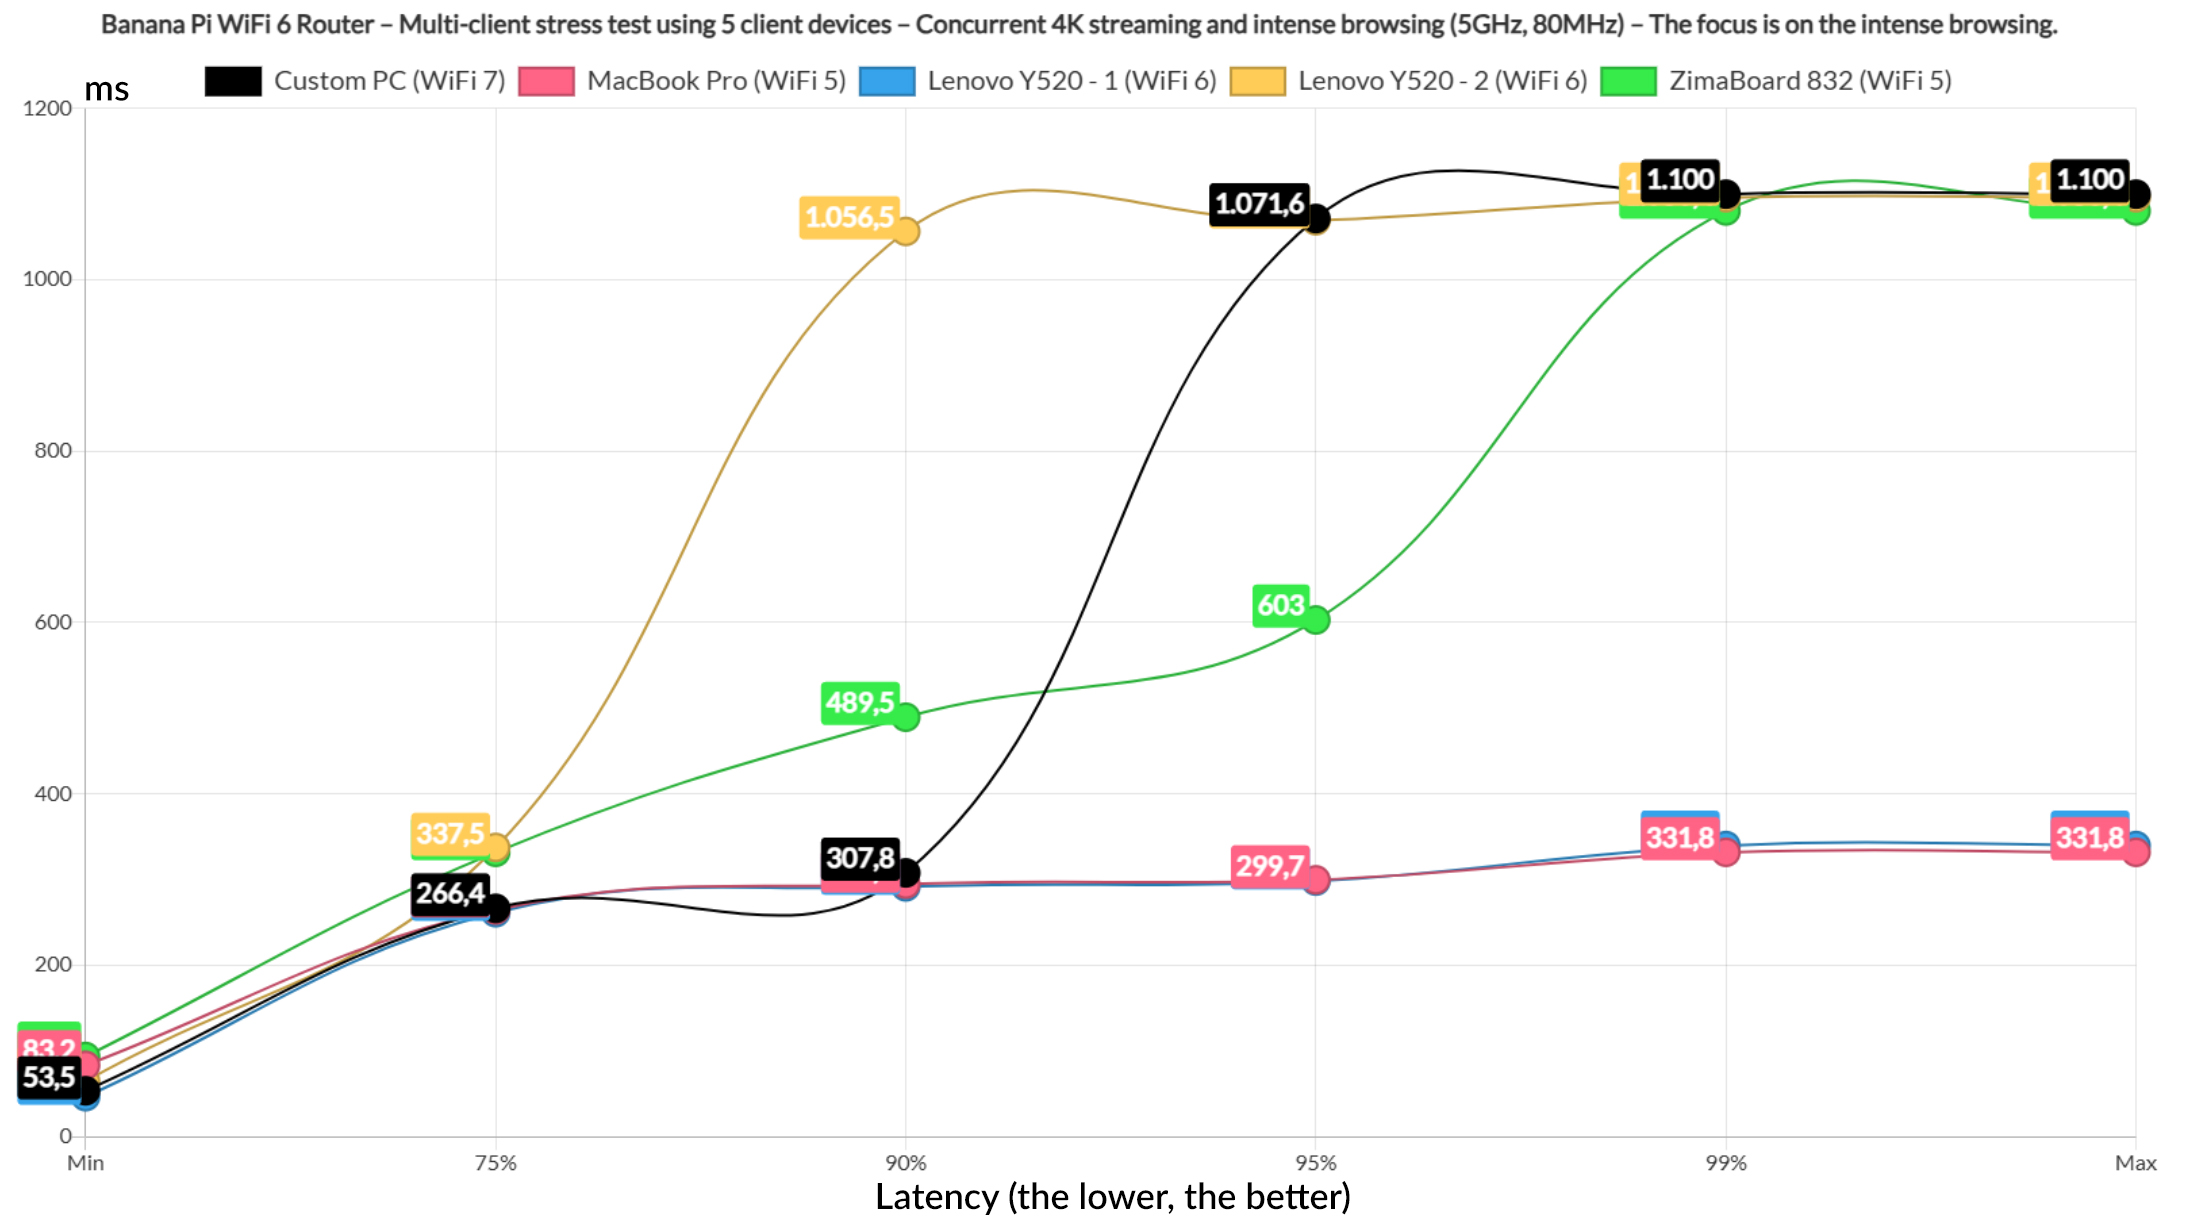
The intense browsing does show some 1s values, but again, anything below 1.5 seconds remains fairly acceptable. Let’s move forward and change things a bit. I ran downloading traffic on two clients where I simulated the continuous download of a 10MB file. Two clients handled the intense browsing and one the 4K streaming.
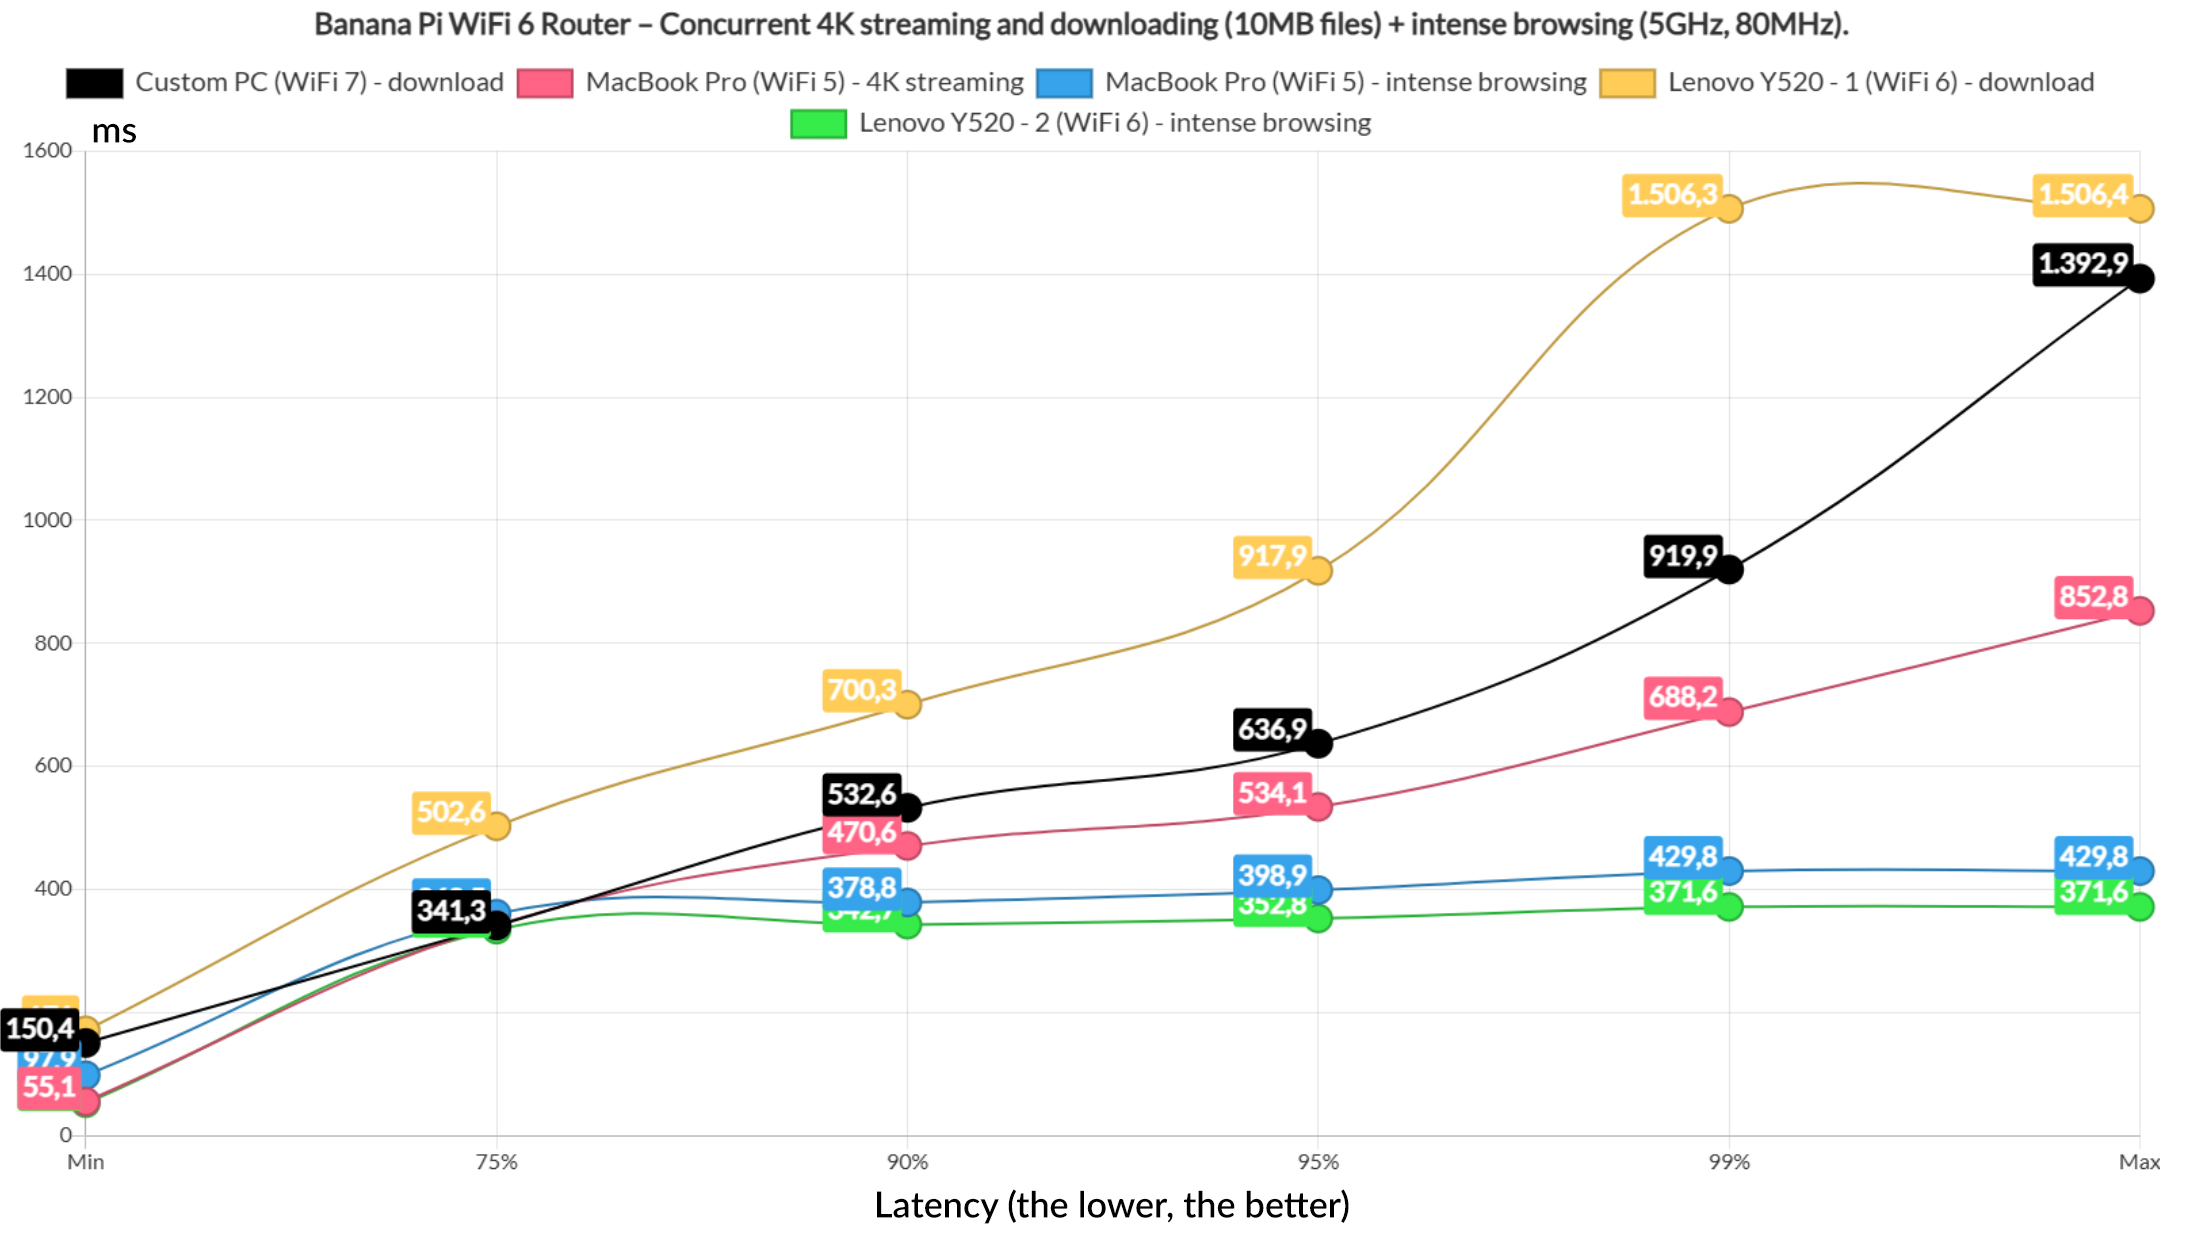
The intense browsing was handled well as always, but the 4K streaming latency renders it unusable. The downloading clients also displayed latency values well above what can be considered reasonable. The total throughput for the downloading clients 402Mbps.
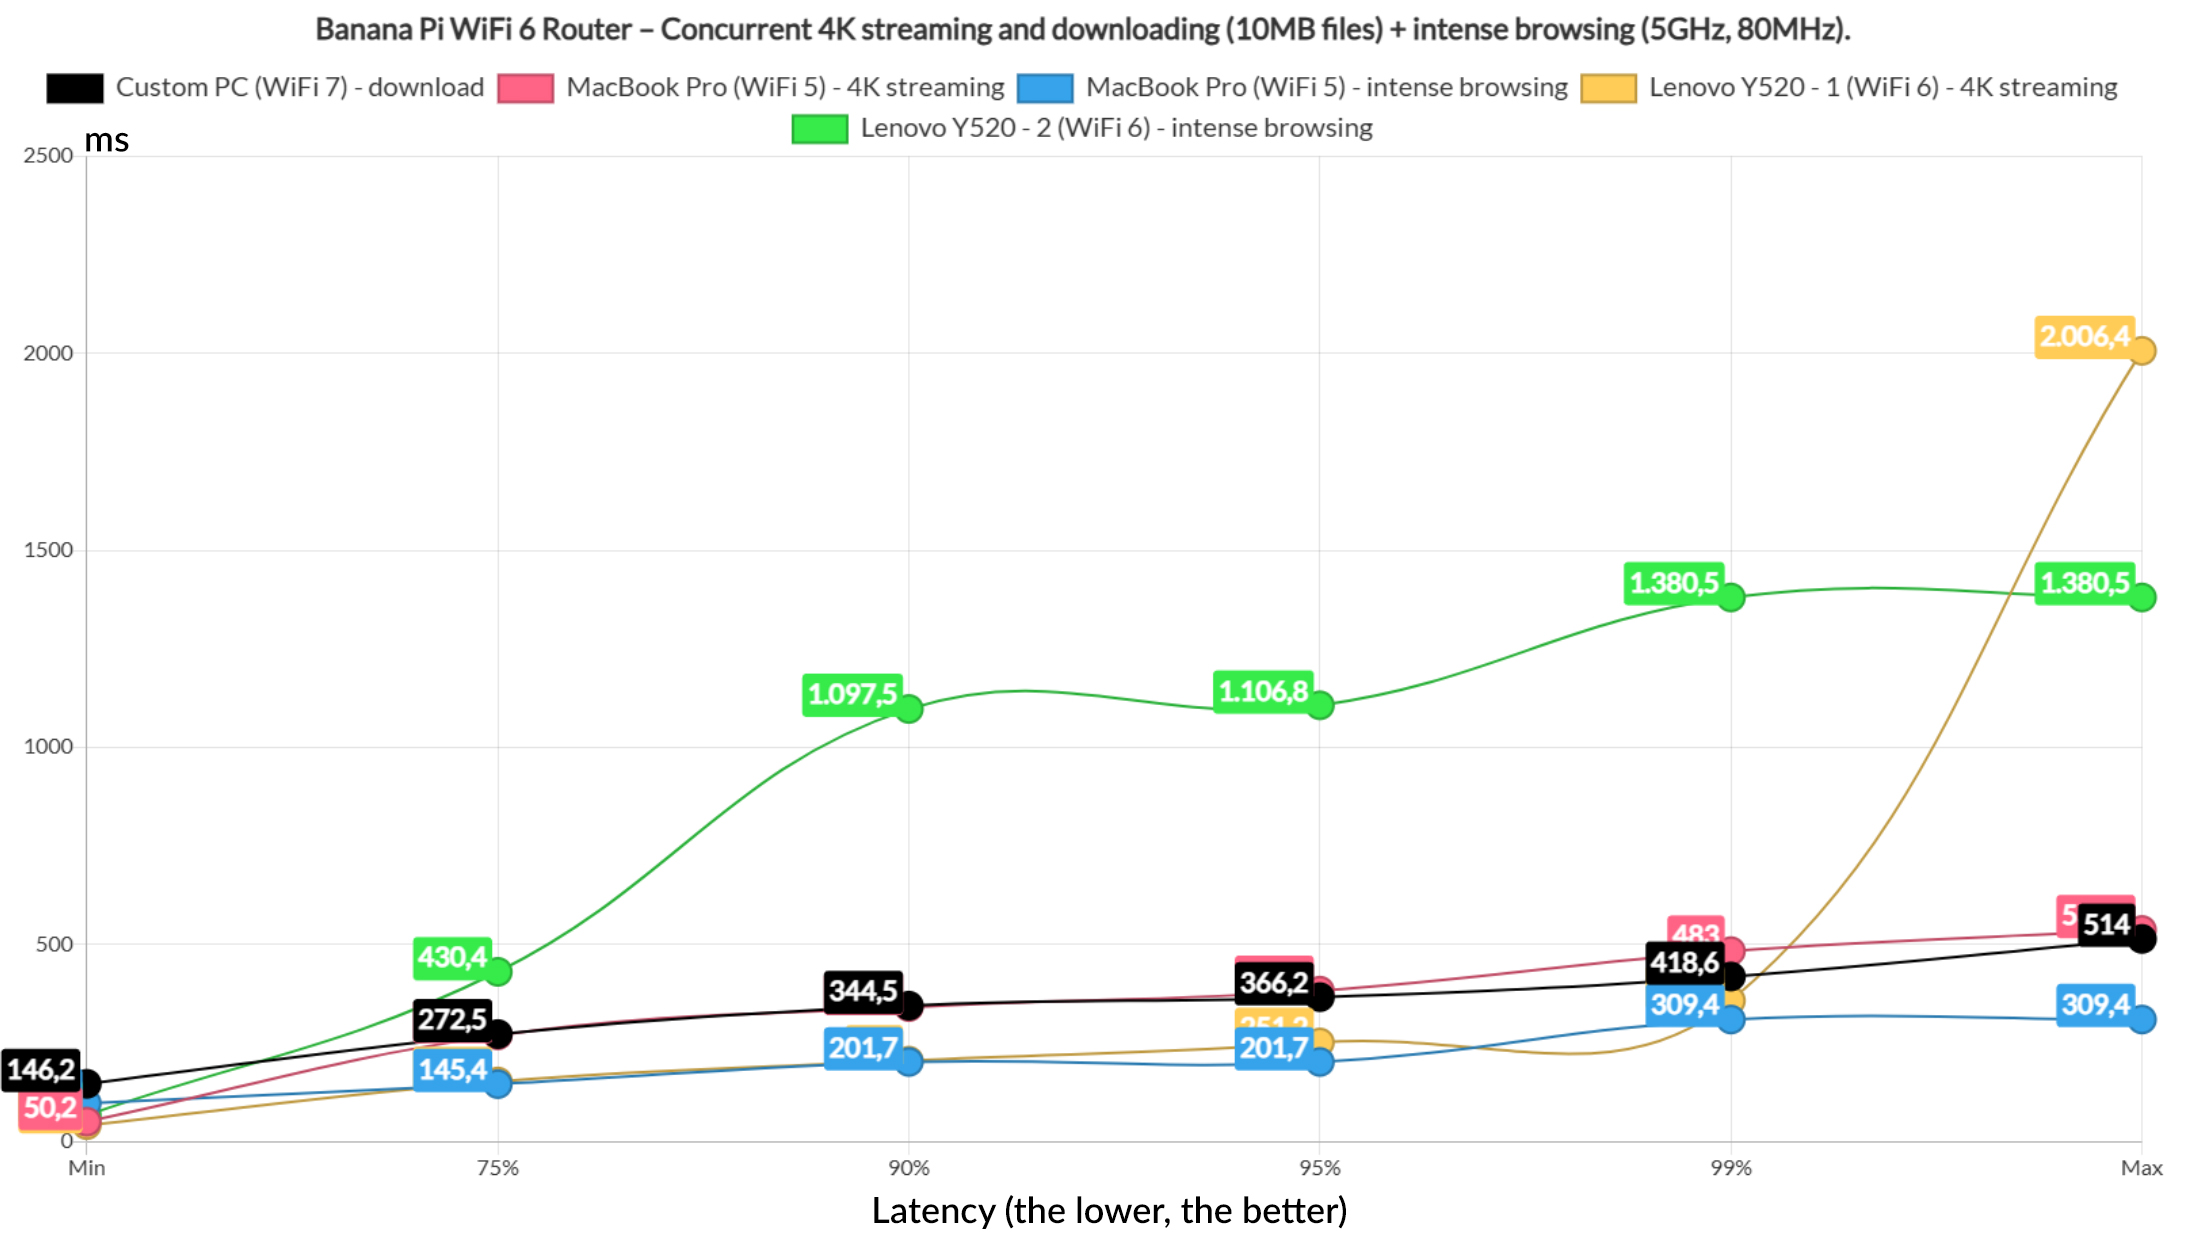
Next, I limited the downloading traffic to one client, the 4K streaming to a couple of client and the intense browsing to the last two. The 4K streaming latency is still too high to be considered reasonable, the intense browsing is handled well and, while the download latency is better than last time, it’s still too high.

So, let’s limit the test two only three clients, one for the download traffic, one for the 4K streaming and the last for the intense browsing. Again, better than before, but still not good enough, so let’s now download a 1MB file, run intense browsing and let the last client handle VoIP.
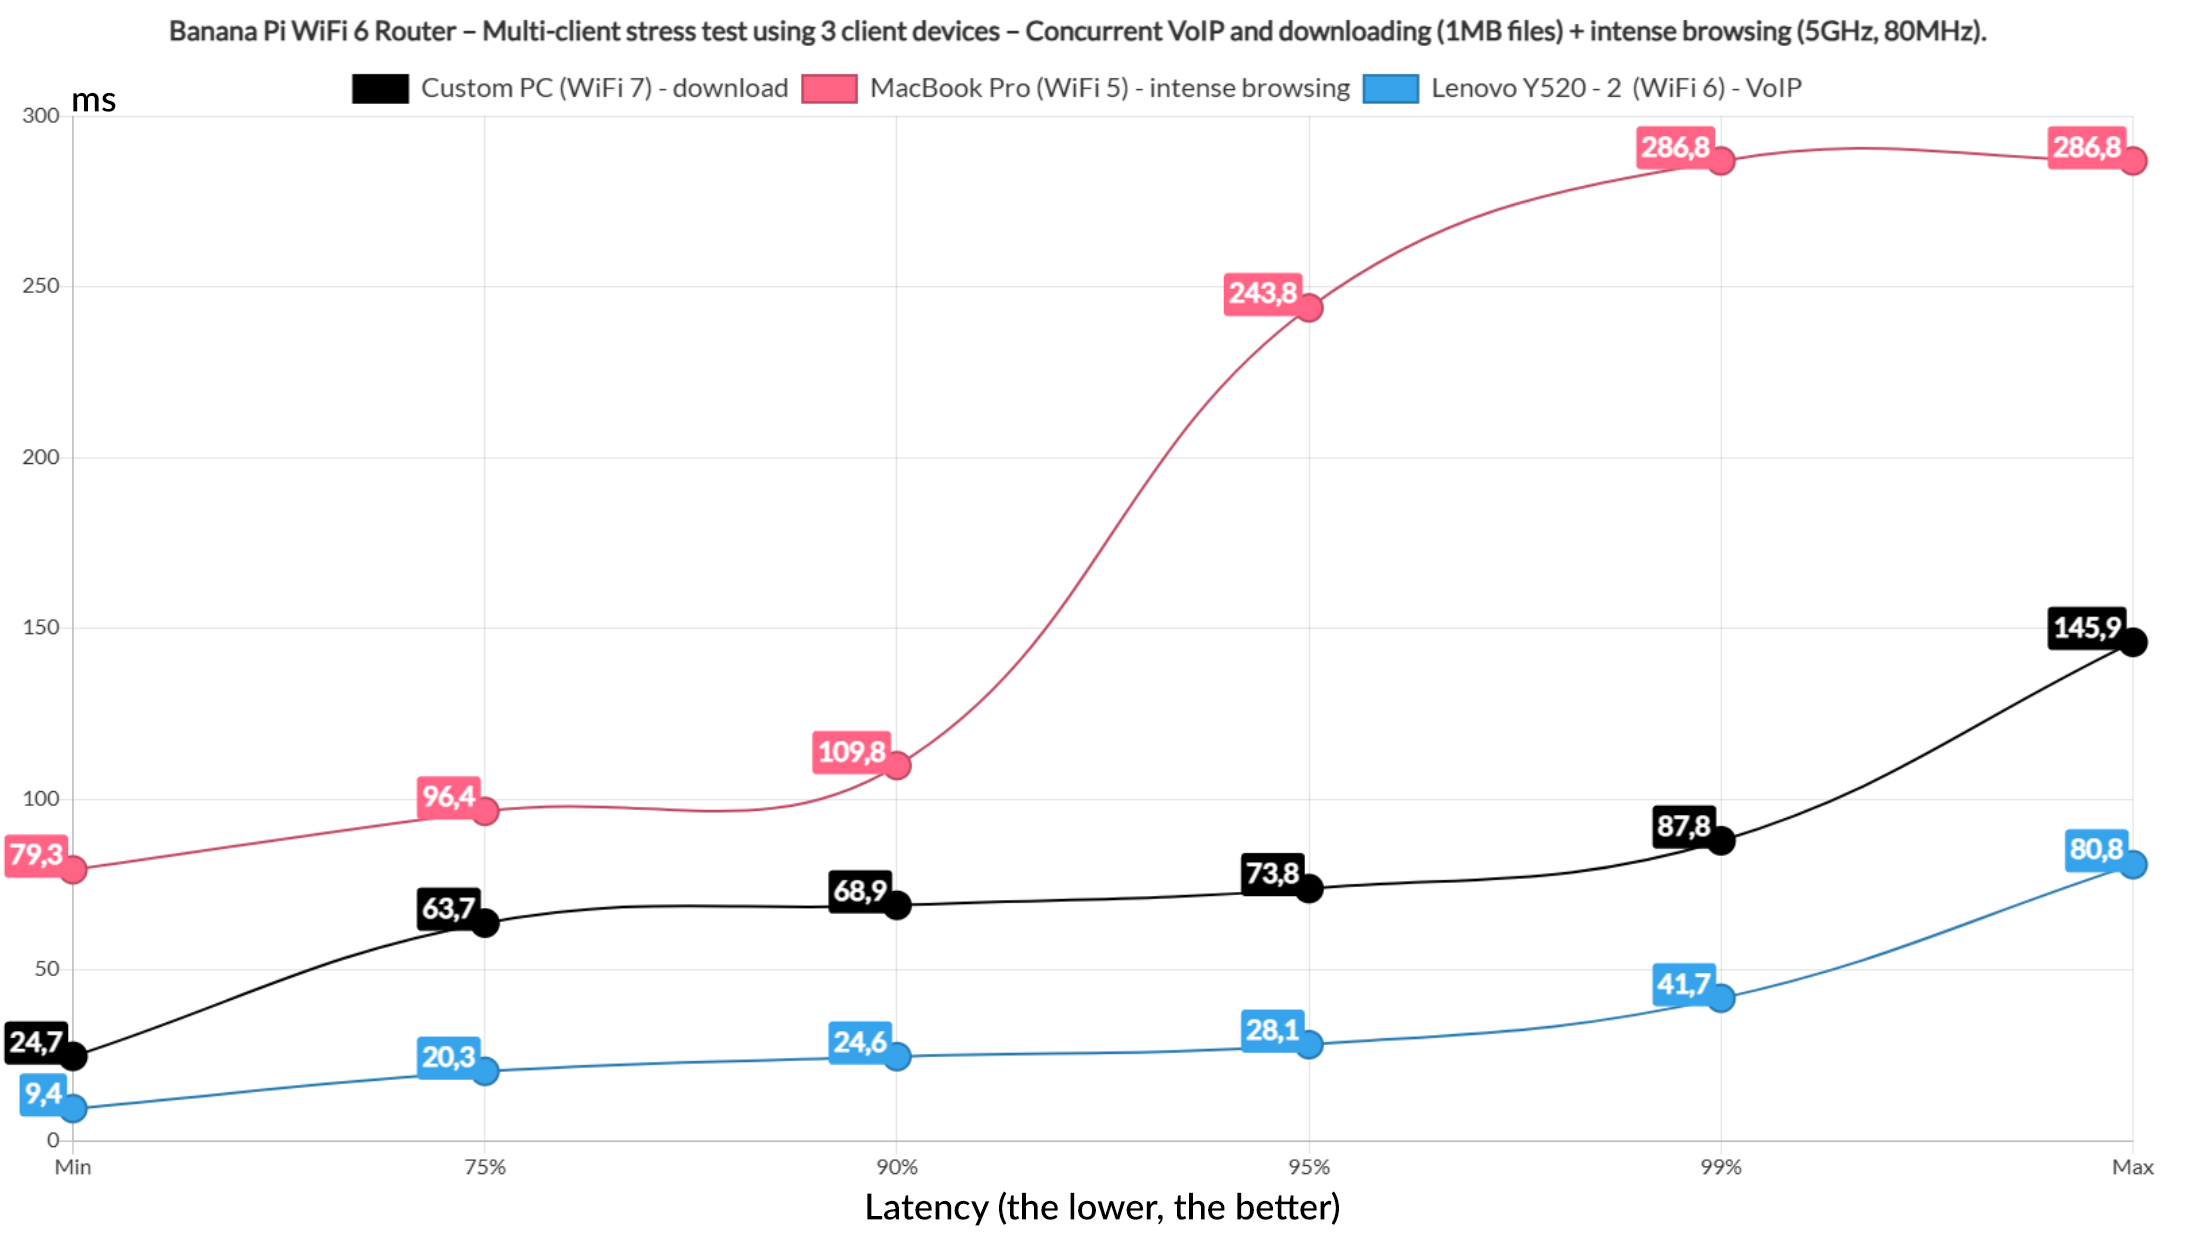
Things got significantly better as it usually happens at this point. We’re not done because I had to run the downloading traffic of a 10MB file on all five client devices at the same time. And you can only imagine the type of latency I got to see. The only good news if you can call it like that is that the Banana Pi did not drop the connection, while some far more expensive devices did while running this test.

The Power Consumption
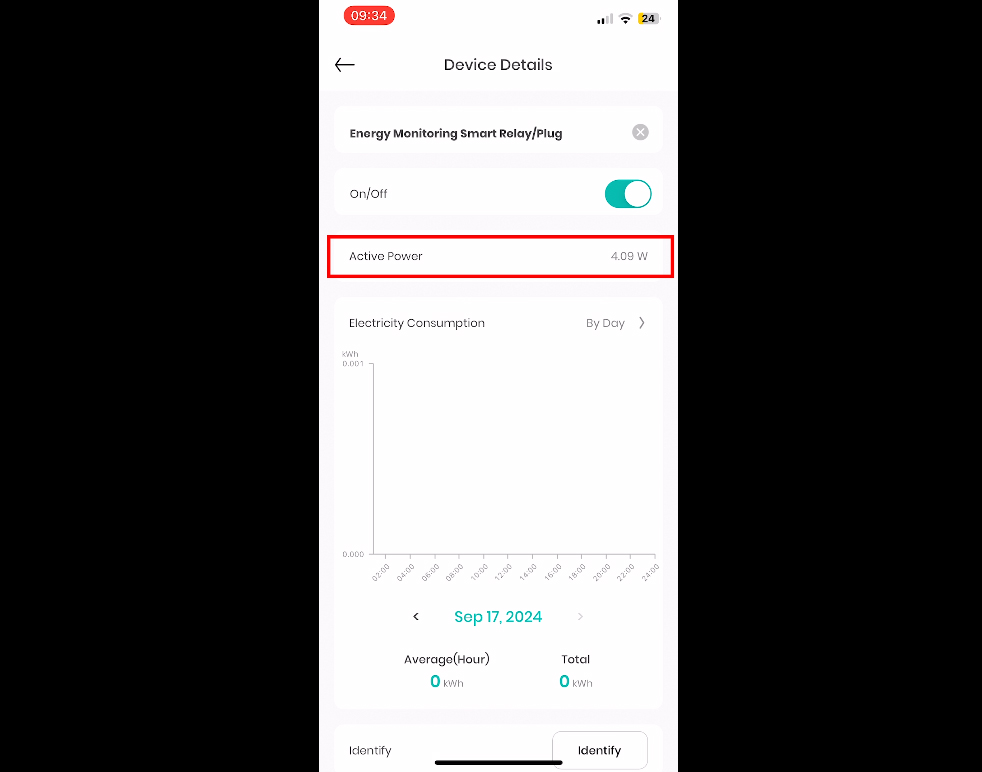
Now let’s talk a bit about the power consumption of the Banana Pi WiFi 6 router. I didn’t expect it to be that high, so I used the same ol smart relay that I always use. And, as you can see from the app, this is what you can expect during normal operation. This is not while I was running the stress tests.
The Web-based Interface
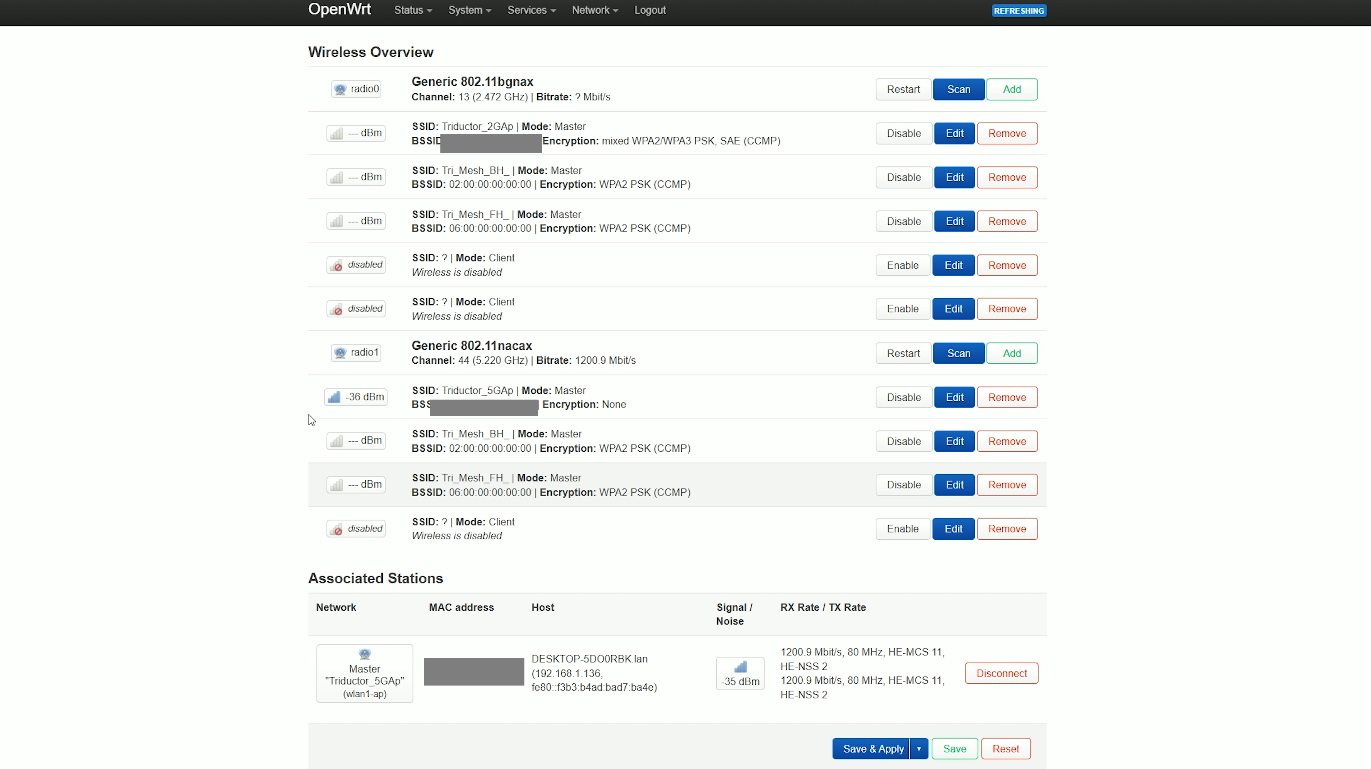
As for the software, it’s OpenWRT. You can run whatever you want on the SBC, but, by default we get an already configured version of OpenWRT, up to a certain point. We do need to create an admin account and the WiFi networks are open, so that needs to change. And the developers included a whole lot of SSIDs to choose from. You can delete all of them and create your own or just edit the existing ones.
I do need to mention that at some point, the router decided that the WiFi networks no longer need a security key, so that was not good. You do need to check if things are in order from time to time. I checked the Software section and it doesn’t seem that there is anything added above the standard packages, so you can add your own, although do be aware of the RAM and CPU limitations. Something like SNORT will not run properly. Adblock and AdGuardHome will work fine though.
There isn’t much else to say, if you’re familiar with OpenWRT, then you should feel at home, otherwise, know that it’s a bit less friendly than some of the OEM software you get out there, such as from ASUS, TP-Link or Netgear. But it’s easy to understand what’s going on and start configuring things the way you want them to work without much limitations.
The Conclusion
I am always excited by open-source projects and the Banana Pi is definitely a step in the right direction considering the all the subscriptions and the Cloud limitations, as well as the data collection. And yes, the 30 dollars will turn a lot of heads, but understand that there are some obvious limitations both in processing power and in the WiFi performance that you get to experience. You can see it from my tests that it did OK considering its expected shortcomings. And, of course there are quite a few, including some occasional bugs, so it’s not the perfect device by any means. But again, you do get a lot of value for the money and hopefully we will see even better hardware in the future.
Mark is a graduate in Computer Science, having gathered valuable experience over the years working in IT as a programmer. Mark is also the main tech writer for MBReviews.com, covering not only his passion, the networking devices, but also other cool electronic gadgets that you may find useful for your every day life.