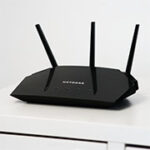
Furthermore, there is support for 1024-QAM, but the channel bandwidth goes only up to 80MHz which is expected considering the price tag of the router. Lastly, there is support for BeamForming which is a good way to keep the inevitable interference to the minimum. These are pretty much the main features that improve the wireless performance and I would have liked to see something similar to the Asus AiMesh, considering that TP-Link has developed a means to create a mesh network (the OneMesh). But I suppose the Orbi system is too valuable to create ‘unnecessary’ competition.
To check out the wireless performance of the RAX10 (R6700AX), I ran the same test as I did with the RT-AX55 (and most other WiFi 6 routers), so I used one computer as the client device (equipped with an AX200 adapter) and another computer as the server (to which I connected the router via an Ethernet cable).
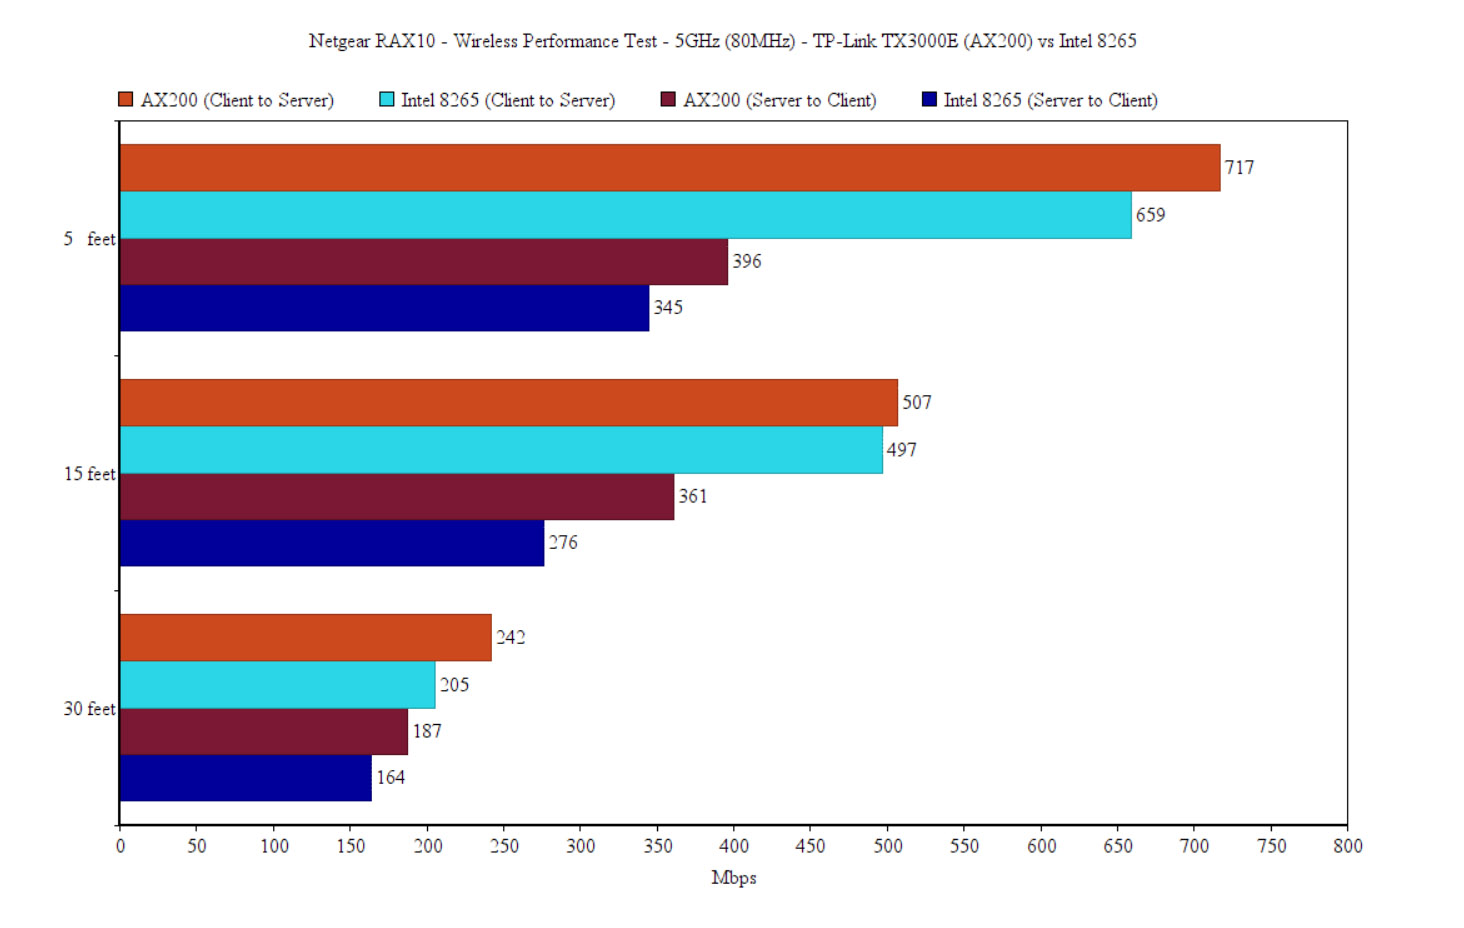
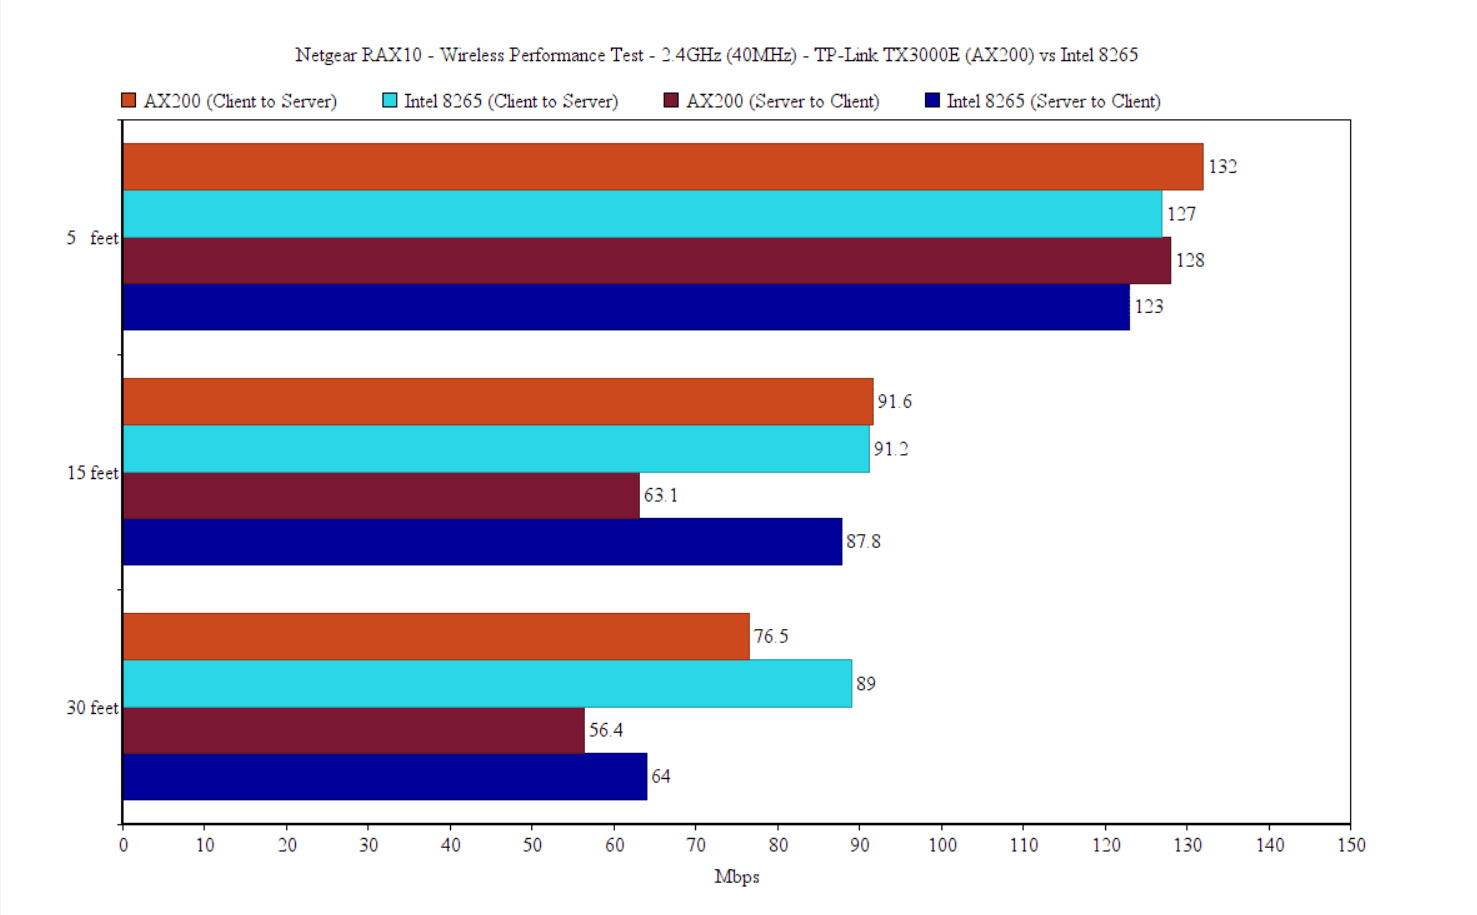
This way, I connected the client device to the 5GHz network (80MHz and OFDMA enabled), I saw an average of 717Mbps at 5 feet (upstream) and an average of 242Mbps at 30 feet. Downstream, I measured an average of 396Mbps at 5 feet and around 187 Mbps at 30 feet. Afterwards, I connected the AX client device to the 2.4GHz network (40MHz – the 20/40MHz coexistence turned off) and, from the client to the server, I measured an average of 132Mbps at 5 feet and an average of 76.5Mbps at 30 feet. Downstream, I saw an average throughput of 128Mbps at 5 feet and an average of 56.4Mbps at 30 feet.
On the next step, I switched the WiFi 6 client with a WiFi 5 one, a laptop equipped with the Intel 8265 adapter. This way, while the client was connected to the 5GHz network, I saw an average of 659Mbps at 5 feet and an average of 205Mbps at 30 feet (both upstream). Downstream, I measured an average of 345Mbps at 5 feet and an average of 164Mbps at 30 feet. Lastly, I connected the WiFi 5 client to the 2.4GHz network and, upstream, I saw an average of 127Mbps at 5 feet and an average of 89Mbps at 30 feet. Downstream, at 5 feet, I measured an average of 123Mbps at 5 feet and an average of 64Mbps at 30 feet. Since it doesn’t have an USB port, I was unable to test the storage performance of the device.
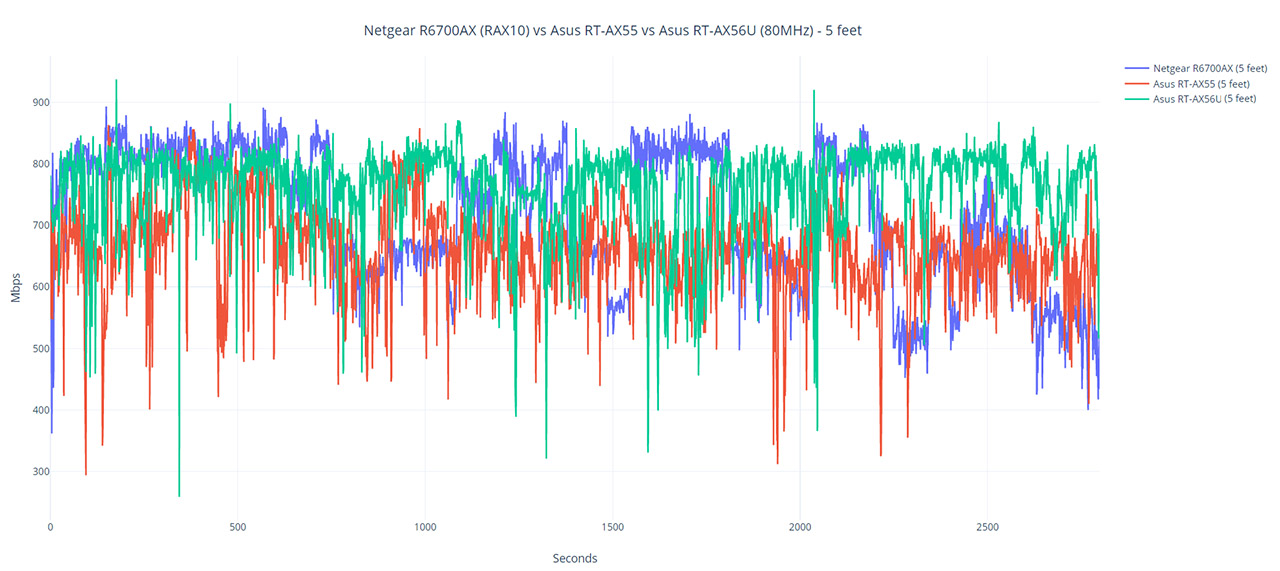
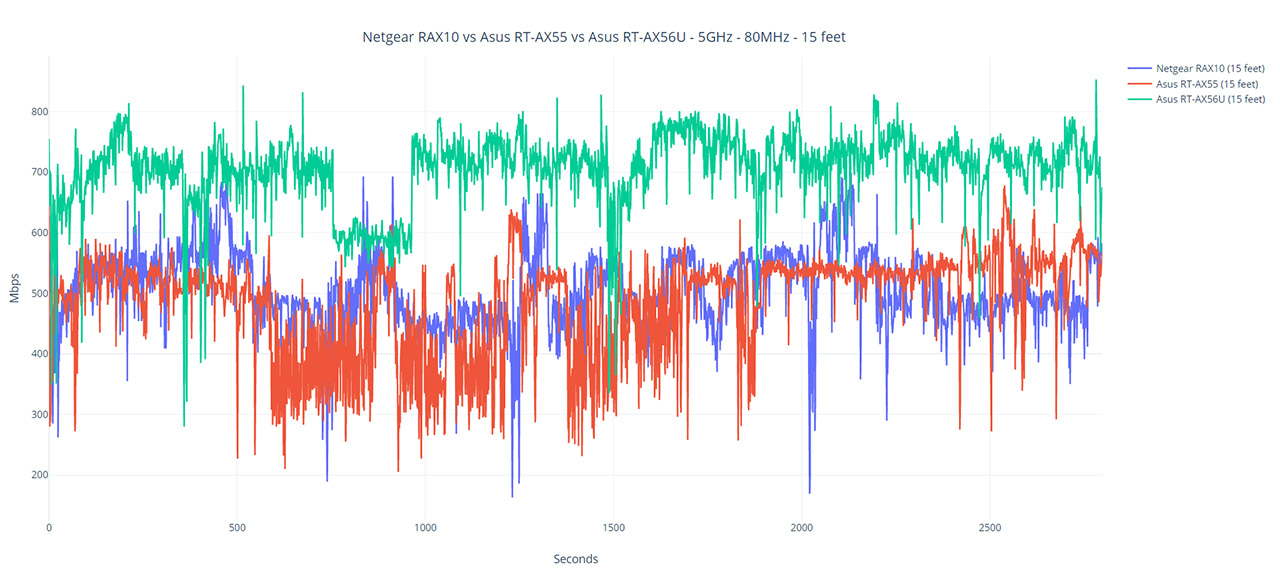
Note: I have added a few graphs to compare the Netgear RAX10 (R6700AX) to other routers.
Installation and Software
When I installed the Nighthawk RAX40, I was disappointed by the huge amount of time it took to finish the initial configuration and by the time it took to apply any settings in the GUI afterwards. Apparently, they have fixed these issues with the RAX40v2, so I was curious whether the RAX10 (that’s also Broadcom-based) will behave properly. As with most newer wireless routers, you get two choices, either run the wizard using the web-based interface or using the mobile application.
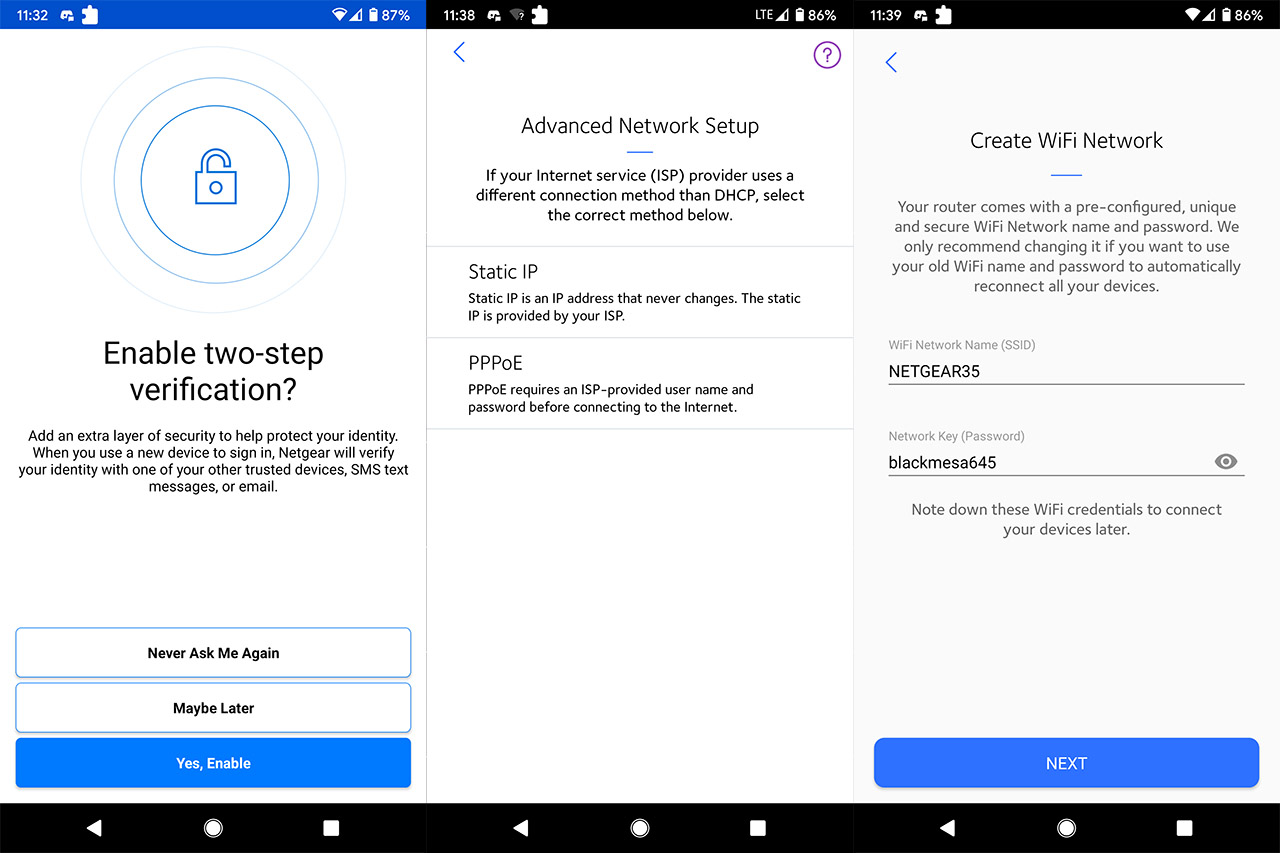
I decided to go with the latter, so I installed the Nighthawk application on my Android phone (it’s also available on the iOS devices) and I had to accept the terms (which includes collecting analytics data), to allow or deny the access to the device’s location (to automatically connect to my network – a bit intrusive considering that my phone already does that without needing additional app access) and to create a new account. I already had an account from when I tested the RAX40, so I simply logged in and I could Enable two-step verification (which is a great security option), the TouchID (useful, if you want to log in with your fingerprint) and then I could finally start installing the R6700AX.
The default option is to scan the QR code, but, since the RAX10 lacks such a code, I had to set up the router manually – I connected the phone to one of the Router’s WiFi networks (the password is written on the label from the bottom of the device – a cute Half Life Easter Egg) and then, after a few seconds, the Router was Detected. At this point, the app will try to check the network connection and it took a lot to realize I had to manually enter the ISP credentials (3-4 minutes). So, after selecting the Advanced Setup, I picked PPPoE and entered the username and password. After that’s done, the router will ‘Personalize your settings’ which includes Creating a WiFi Network (to replace the default one) and Updating the Admin Password (the username remains the same). Lastly, I had to Setup the Security Questions and I had to wait for the Personalizing process to be done. All in all, it took a lot of time, more than 15 minutes which is far above what other routers required – and that’s without updating the firmware.
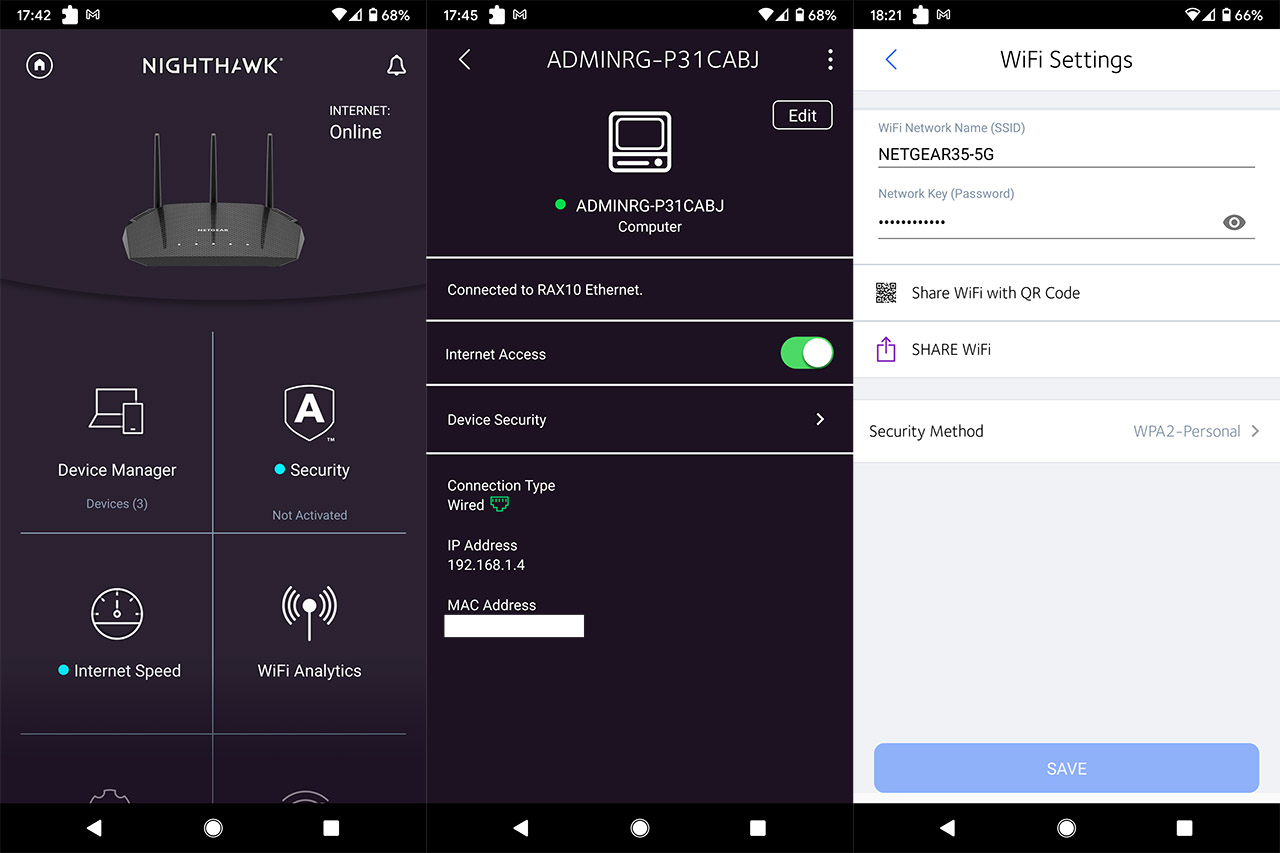
The user interface is similar to what I saw with the Nighthawk RAX40, so there are eight separate sections, the first being the Device Manager, where you can see all your currently connected client devices. If you tap on any of them you can see some more details and you get the option to pause the Internet Access to that specific device. If you’re also subscribed to the Netgear Armor security package, you should have access to quite a few additional features. Unfortunately, I was unable to activate the Armor package (kept on getting Failed to subscribe), but considering that it’s only a trial of 30 days, I am sure most people will avoid it. The next option is Security (the Netgear Armor), followed by the possibility to check the Internet Speed and the WiFi Analytics which checks the Signal Strength from the client to the router.
Further down, there’s the WiFi Settings section where you can enable the Smart Connect (one SSID for both bands) or configure each wireless network. Not that there are that many options since all you can do is change the SSID and passkey, as well as the Security Method. Lastly, there’s the Guest WiFi, the Traffic Meter (which shows some traffic stats) and the Support icon.
Overall, Netgear has seriously reduced the amount of options it allows on the mobile application, even more than on some WiFi mesh systems (think the Google WiFi) which is not that good, especially when you lack some basic options, such as Parental Controls or QoS. Apparently, they removed these features to coerce you to use Circle with Disney.
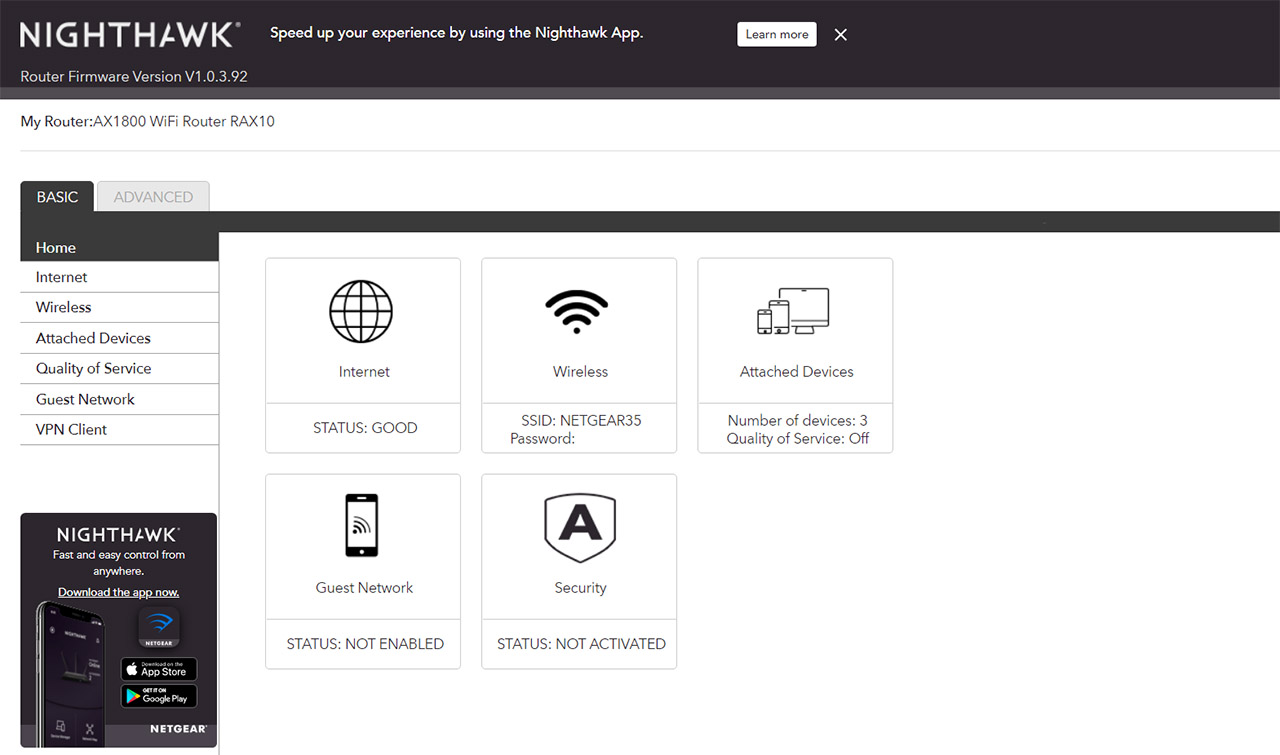
In any case, hopefully the web-based interface will be better: to access it, enter 192.168.1.1 in the URL section of any browser. The UI is divided into two sections, Basic and Advanced. Under Basic, you can see some status info, configure the Internet access, set the DNS Servers and you can also configure the IPv6 connection. The Wireless section has more options, which include enabling OFDMA, the Channel and the Mode (it’s Netgear’s way of making it easier for the user to set the channel bandwidth), but the Attached Devices section doesn’t differ that much from the app. You do get QoS which only offers a way to limit the bandwidth, so no profiles or web filtering. Still under Basic, I saw the VPN Client that will work only if you have a PureVPN paid subscription (great!).
Under Advanced, there is a bit more status info than on Basic and besides running the Setup and WPS wizards, you can Set up a few aspects of the router a bit more in-depth. It’s worth mentioning the WAN Setup which includes DMZ Server, IGMP Proxying and NAT Filtering and there’s also the LAN Setup that allows you to make Address Reservations. Under Security, you get something that seems to be the Parental Controls since you can block the Internet Access to some devices, you can block certain keywords or domain names (websites) and you can set a trusted IP address to visit these blocked sites. You can also Block Services and create Scheduled access for your devices. But there is more since you also get the Advanced Setup which is a bit confusing considering that we’re already under the Advanced section.
In any case, there are even more settings under Wireless (includes MU-MIMO, BeamForming and scheduled access), the option to run the device in AP or Bridge Mode, Port Forwarding and Port Triggering, DDNS, proper VPN configuration (OpenVPN) and Static Routes. Further down, there’s the option to access the router via HTTPS, there’s UPnP, IPv6 and VLAN which was an unexpected, but a welcomed addition (very useful for IoT security).
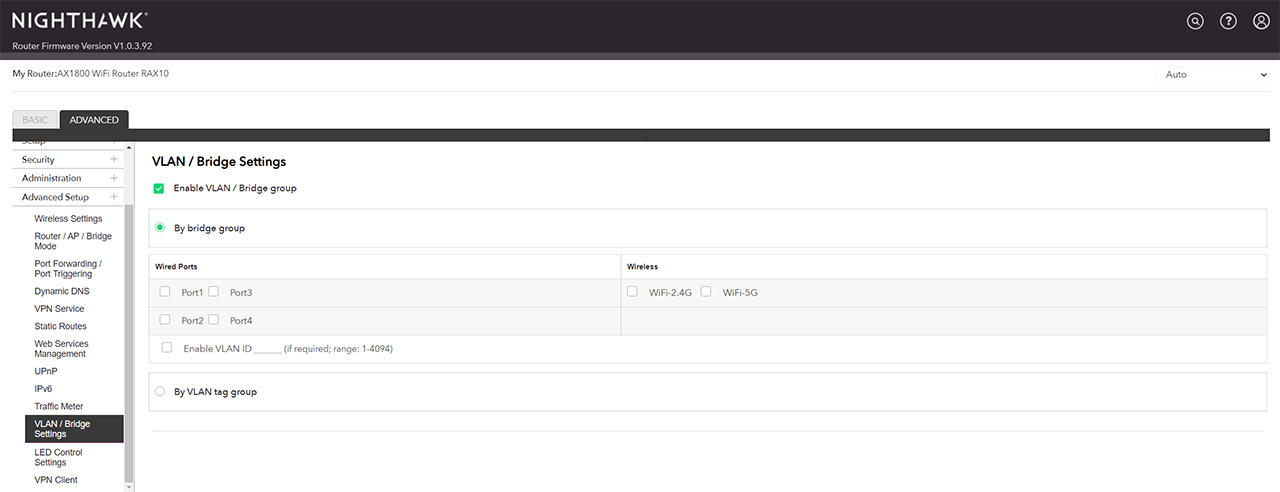
Lastly, Netgear has added a way to either disable the blinking or to completely turn off the LEDs. I did notice that the windows took a few seconds before loading, but the performance is far above what I saw on the RAX40. I noticed that Netgear has added some useful advanced features, but they’re so deep buried that I started to think they were missing – I get that most people won’t use them, but you don’t have to hide them like that.
Conclusion
I remember my enthusiasm when I got my hands on the R7000 and neither the RAX40, nor the RAX10 could reproduce that feeling, not even close. Sure, the wireless performance is acceptable, very similar to its competitors (such as the RT-AX55), so it should work fine with both WiFi 6 and WiFi 5 clients, but the user experience is its weakness. The application is very limited and its reliance on external paid services is annoying (I could not even use the Netgear Armor) and, while the web-based interface does have some expected advanced features, they are needlessly hidden. The similarities with the RAX20 are also weird and overall, I really don’t like the direction currently taken by Netgear in regards to its single-unit WiFi 6 routers.

Mark is a graduate in Computer Science, having gathered valuable experience over the years working in IT as a programmer. Mark is also the main tech writer for MBReviews.com, covering not only his passion, the networking devices, but also other cool electronic gadgets that you may find useful for your every day life.

