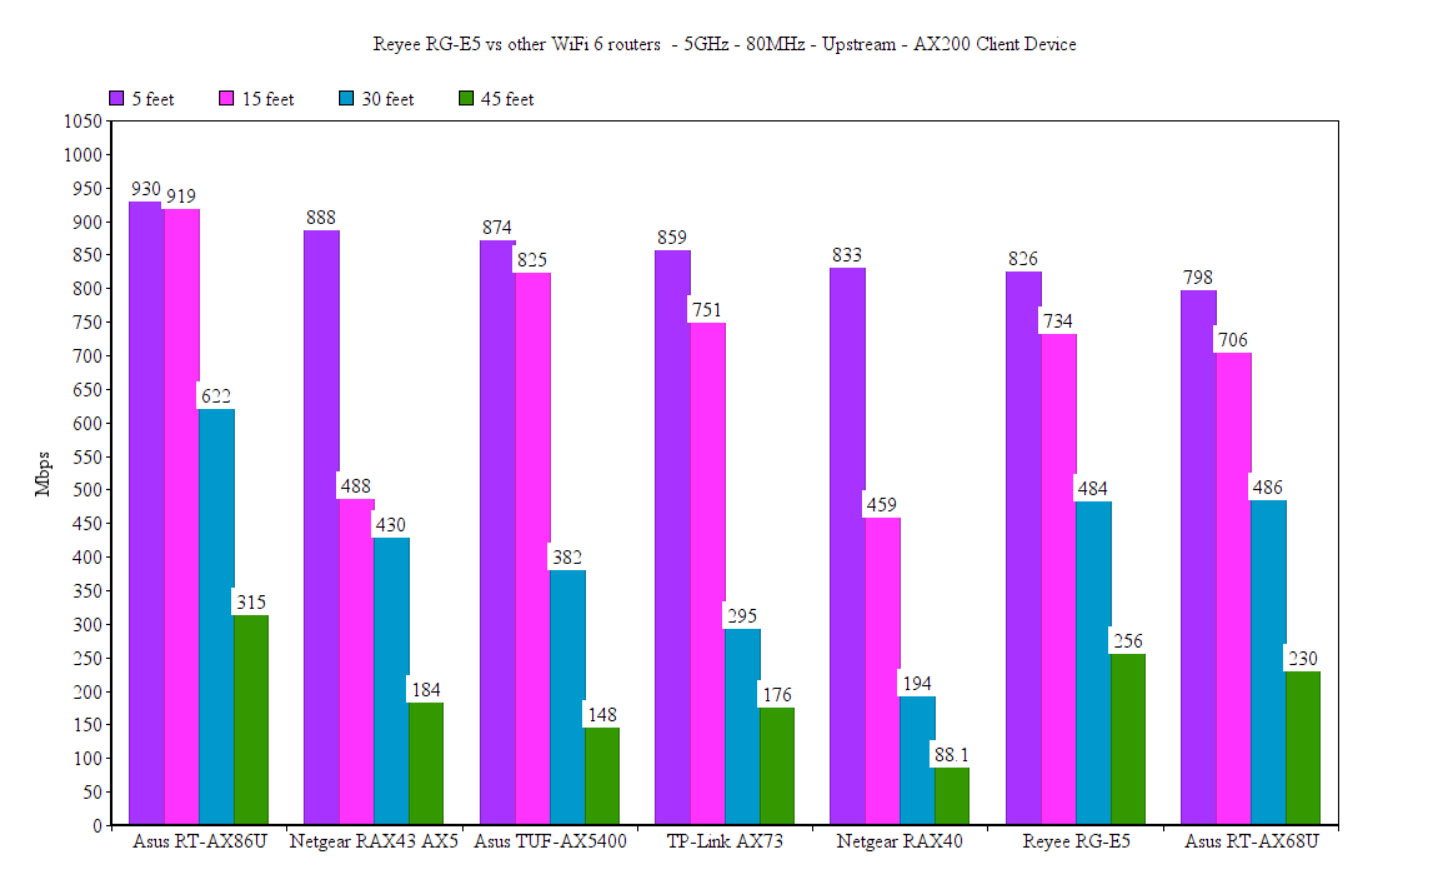
Moving farther way, past 30 feet and up to 45 feet (-63dB attenuation), the throughput remained excellent at 256Mbps up and 154Mbps downstream – it’s actually one of the best performances I saw on a wireless router. At 70 feet, the farthest I usually go while testing a router, there was -81dB attenuation and the throughput was 104Mbps up and 62.4Mbps downstream, so it remains impressive.
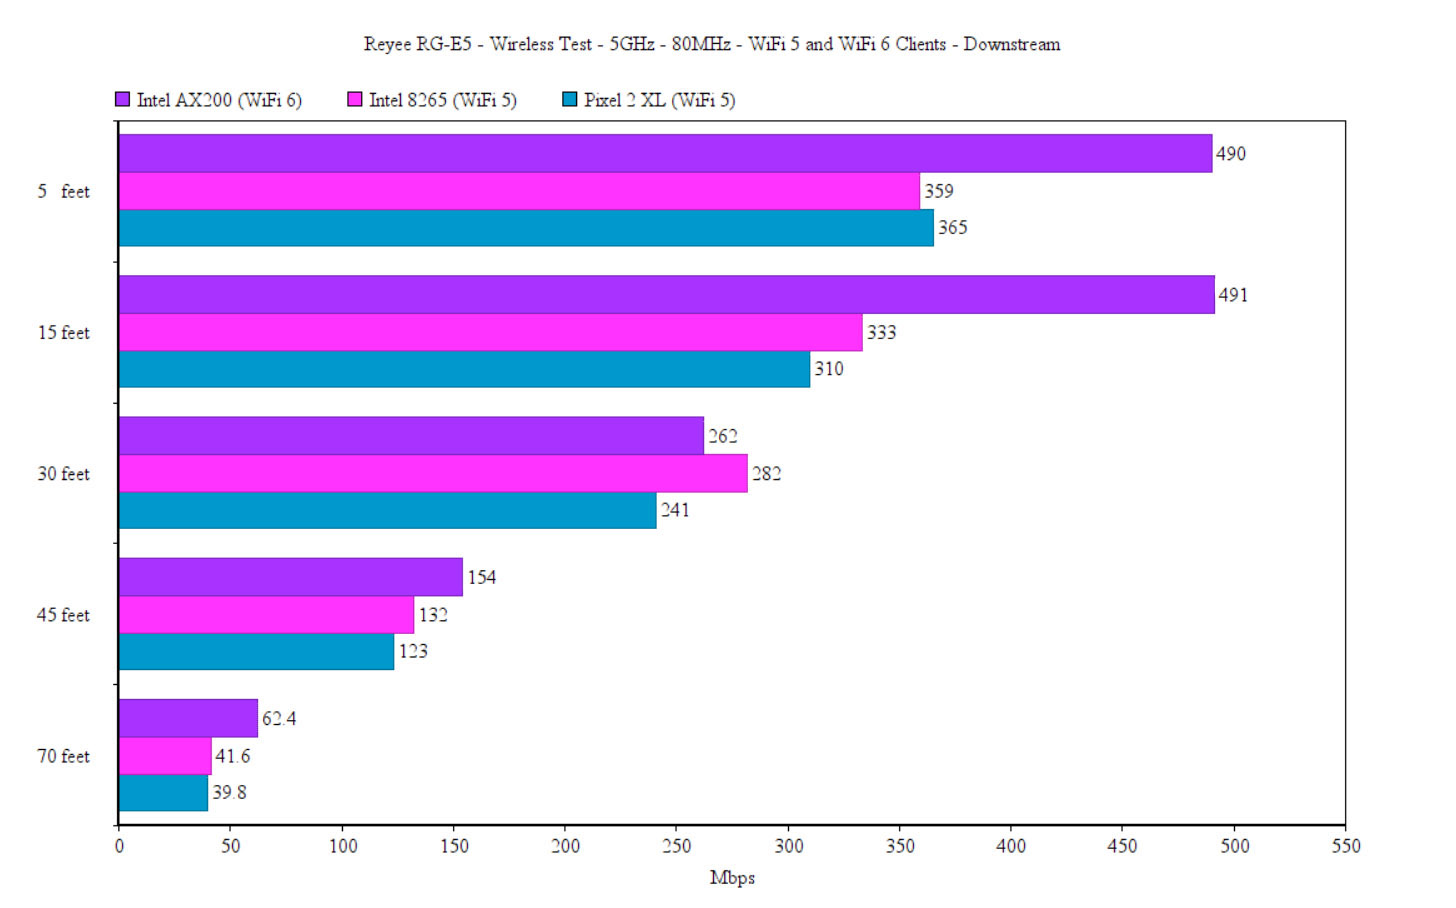
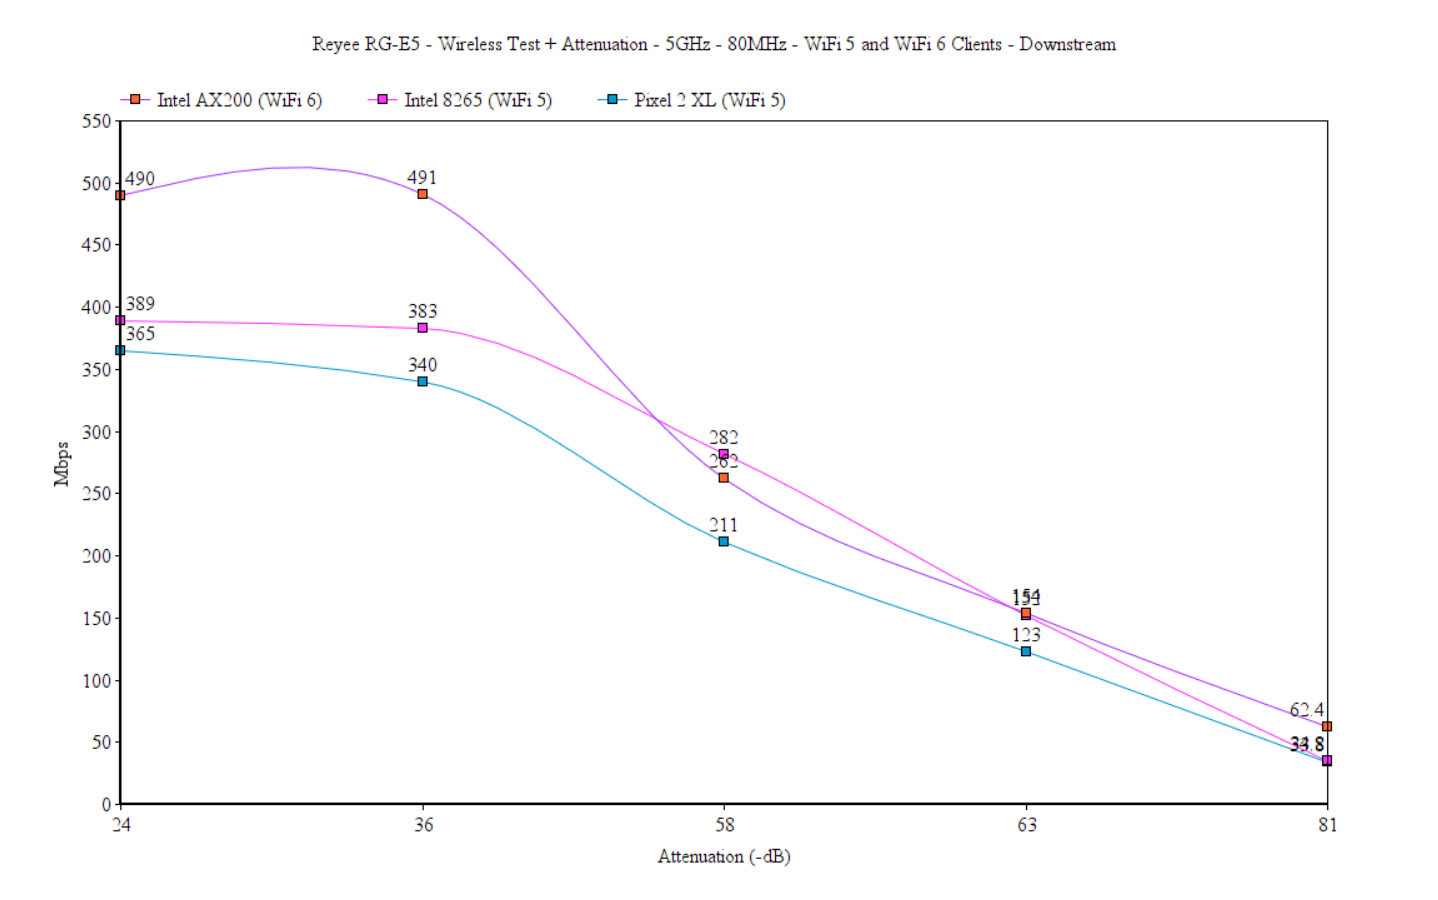
Moving to the first WiFi 5 client device, the laptop equipped with an Intel 8265 WiFi adapter, the throughput was good, although clearly less spectacular than with the WiFi 6 client, at least near the router. At 5 feet (-29dB), I saw an average of 685Mbps up and 359Mbps downstream, but, just like before, the throughput dropped far less the farther I would go.
So, even at 70 feet (-78dB), there were 113Mbps upstream and 41.8Mbps downstream. The second WiFi 5 client device was the Pixel 2 XL that I keep on resurrecting for these types of tests.
And, at 5 feet, it could only go up to 420Mbps up and 365Mbps downstream, but, just like the other two devices, there was a certain resilience which means that even at 70 feet, you still get usable throughput speed.
The Wireless Test (2.4GHz)
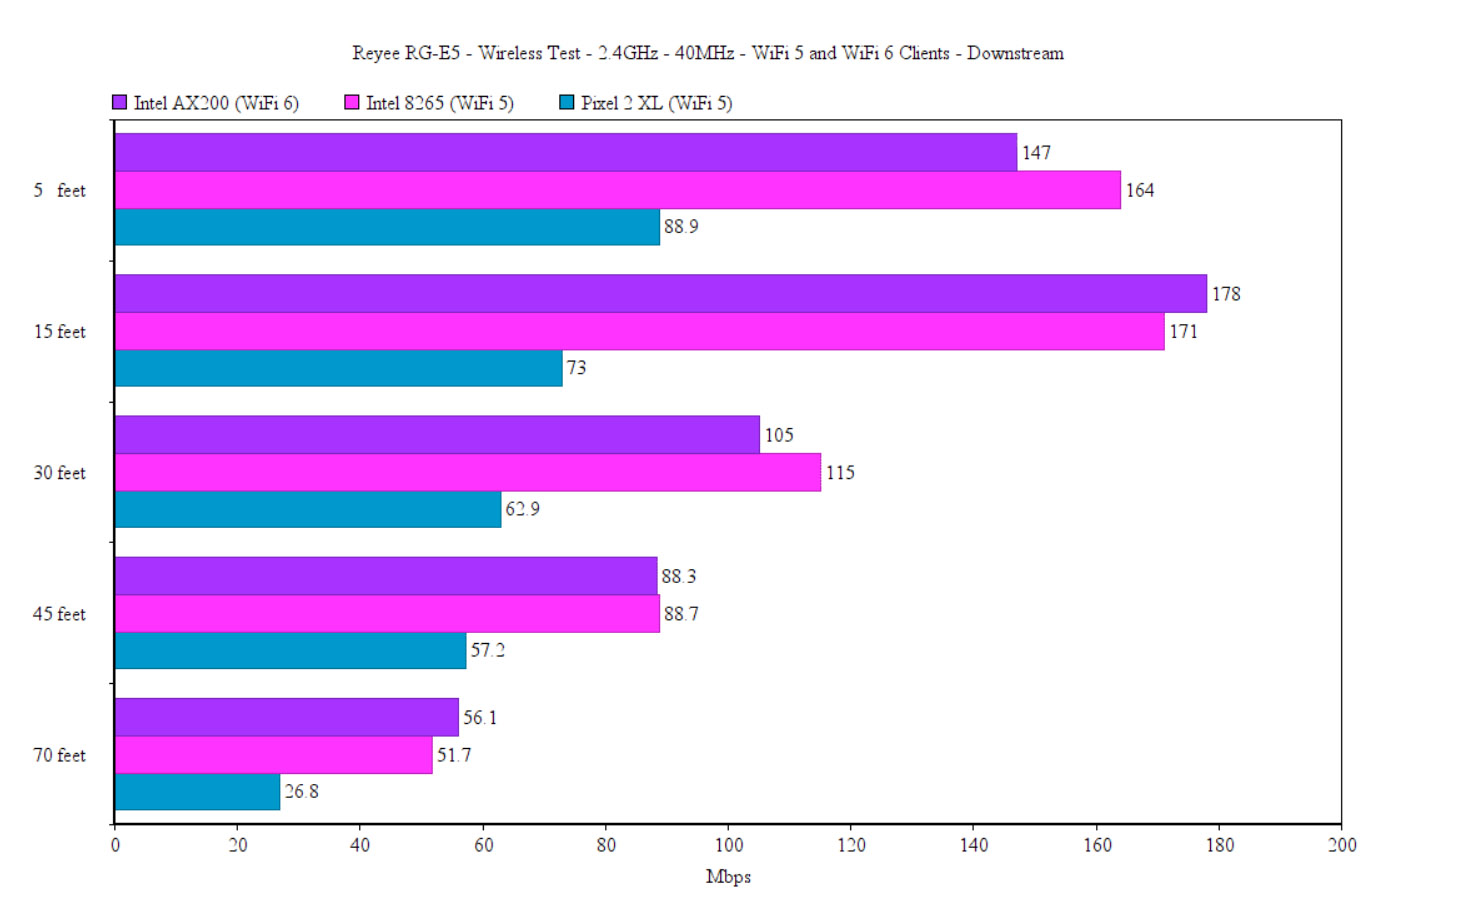
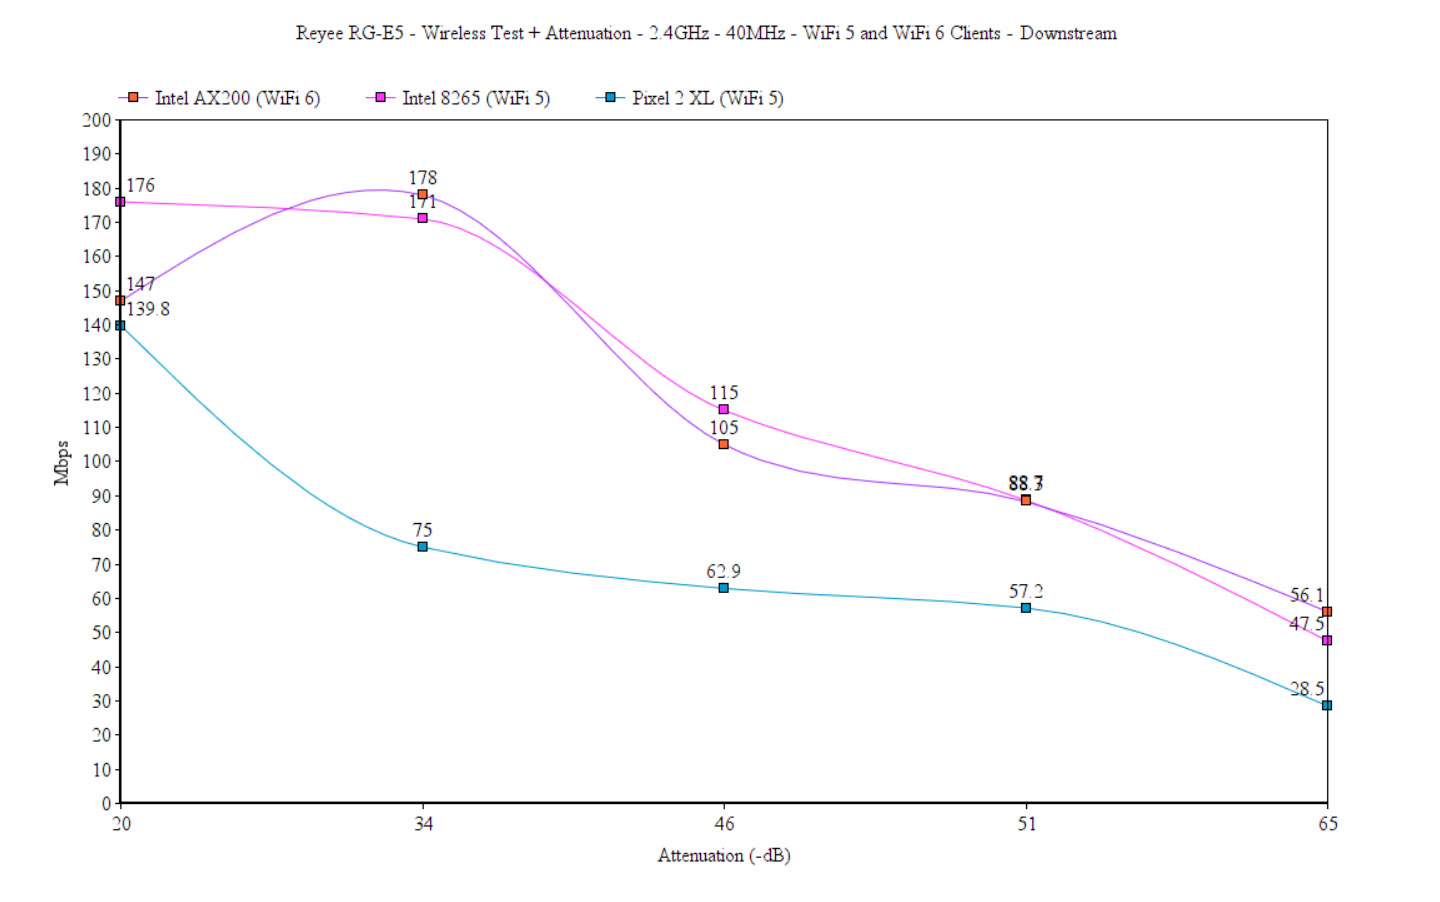
After connecting the WiFi 6 client device to the 2.4GHz network (40MHz), the throughput was good at 5 feet (175Mbps), but it got better at 15 feet. Just like with the 5GHz, the signal remains fairly strong for a bit longer than with other routers, but not as impressive as the 5GHz frequency band.
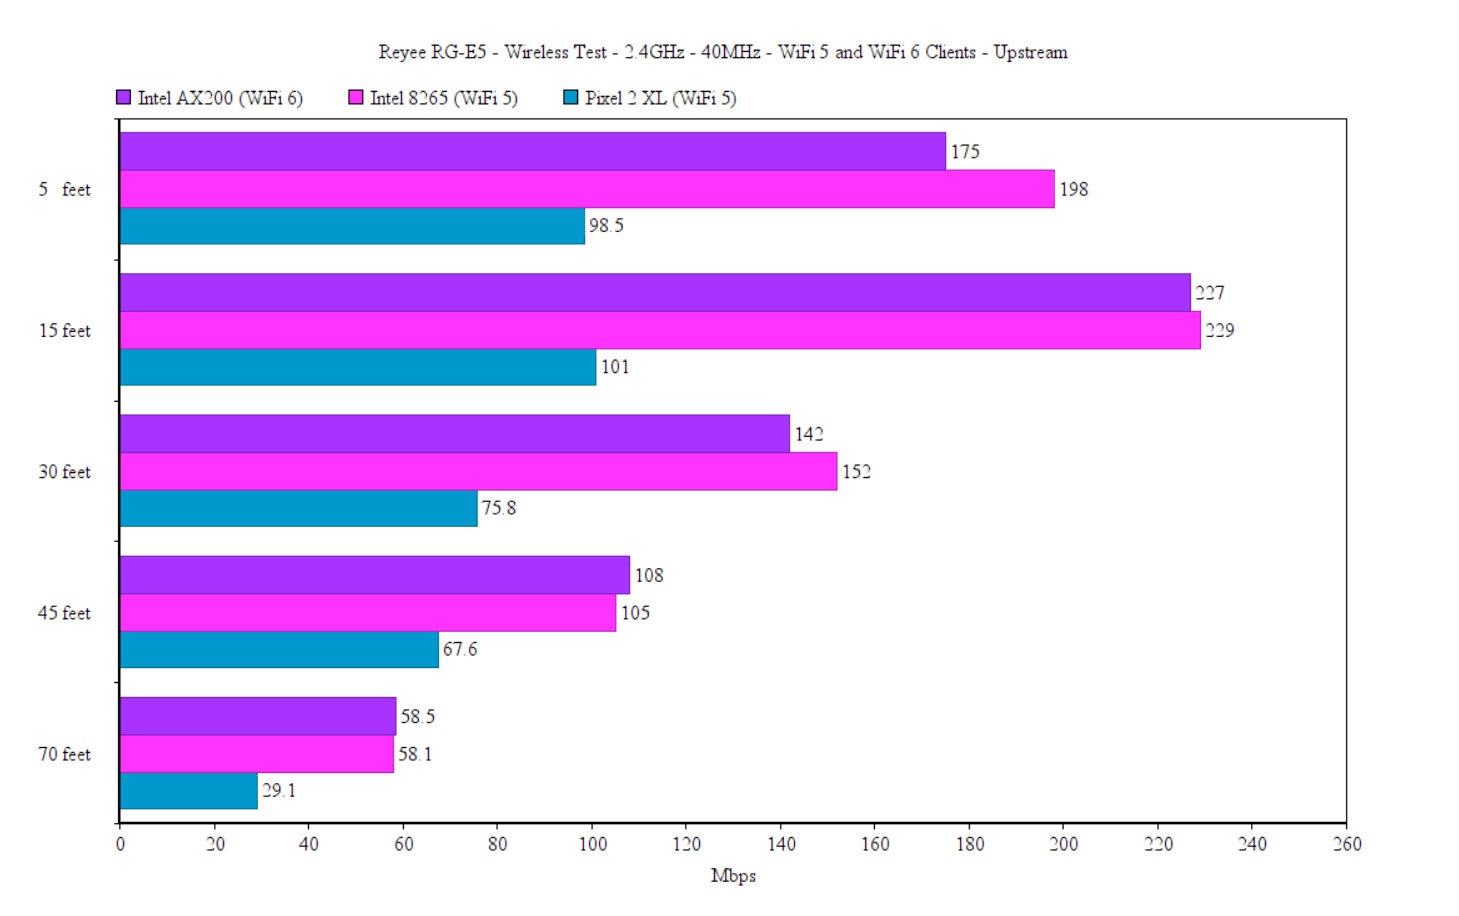
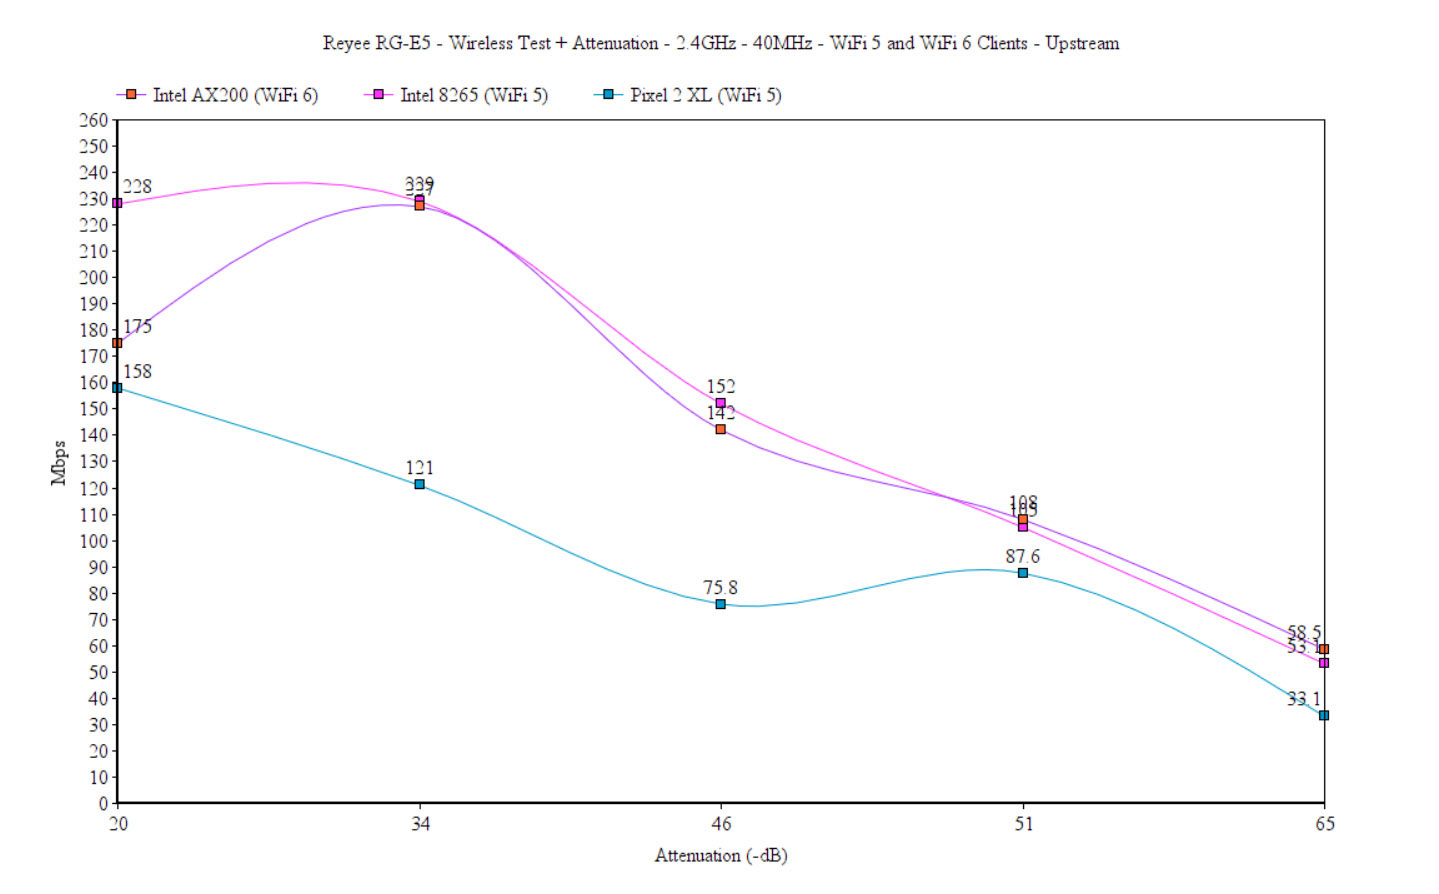
At 70 feet (-65dB), there were 58.5Mbps upstream and 56.1Mbps downstream. The Intel 8265 (Wifi 5) client device seemed a bit better in some places, especially near the router. At 15 feet (-35dB), the average upstream throughput was 229Mbps and 171Mbps downstream. At 70 feet, I measured an average of 58.1Mbps upstream and 51.7Mbps downstream. Switching to the Pixel 2 XL (WiFi 5) client device, the throughput wasn’t as impressive.
At 15 feet (-36dB), I saw an average of 101Mbps up and 73Mbps downstream. Moving farther to 70 feet (-67dB attenuation), I measured an average of 29.1Mbps upstream and 26.8Mbps downstream, which is a bit borderline for a lot of applications, but still fairly usable.
The Installation
The installation process can be fairly straight-forward or incredibly convoluted, depending on the way you want to approach it. If you connect the router to the modem and then use an Ethernet cable to attach a PC to the network, then the browser-based installation process is simple. If you want to go the app-route, let’s just say things are far less stable. Obviously, I chose the latter, so I installed the Reyee Router app to an iPhone which immediately requested that I accept the terms and conditions, as well as any privacy agreement.
Obviously, any piece of info that you provide, will be collected (email, phone number, name), but some data will also be automatically collected. This includes the OS, mobile terminal hardware feature info and so on. But there is also the IP address, the ISP, the referring / exit pages as well as date/time stamps. Overall, the manufacturer says that none of these should be personally identifiable info, but it’s up to you to decide.
After agreeing to everything (otherwise, it’s not possible to move forward), the router requested my location, which I politely refused to disclose and I connected the phone to the broadcasted SSID.
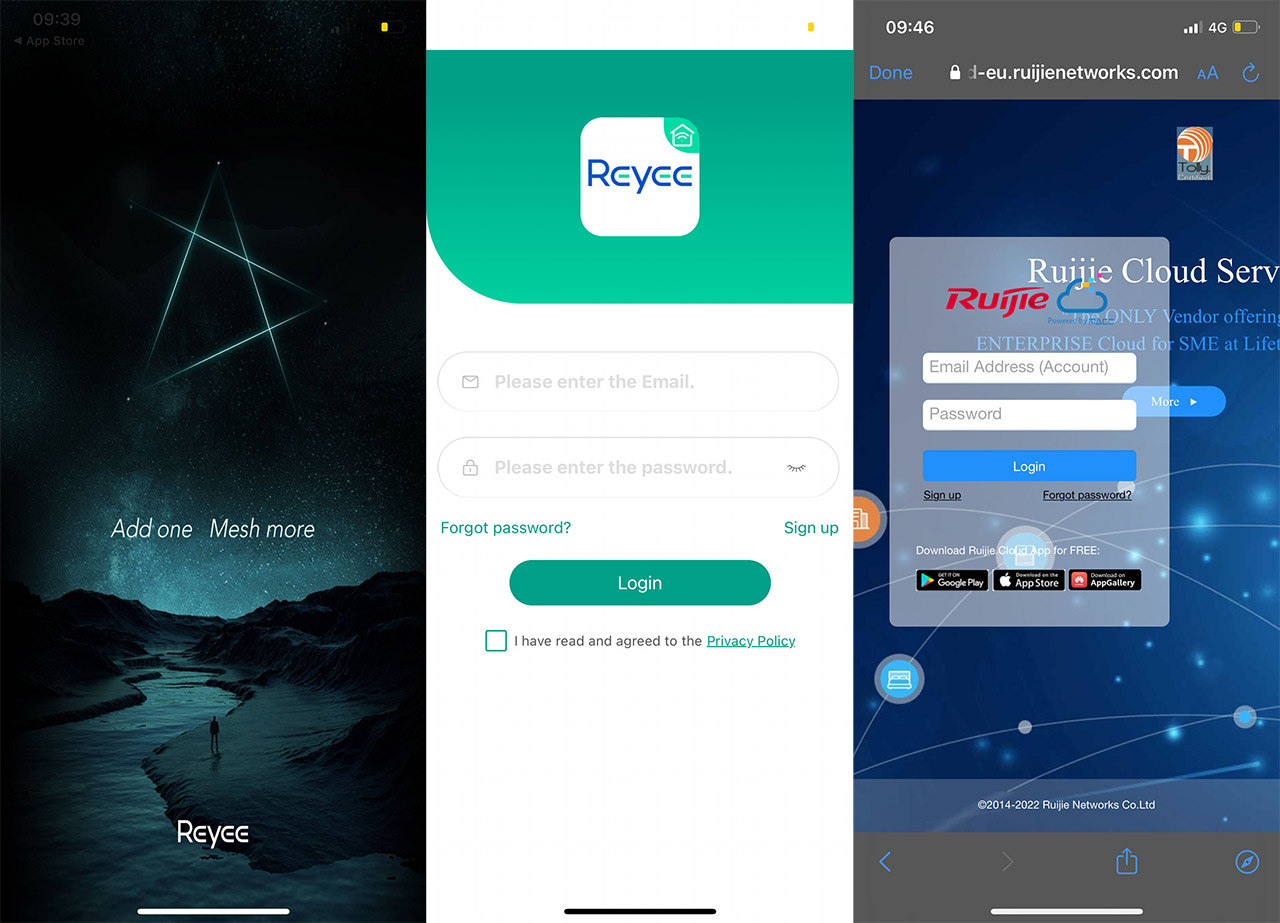
Then, I created an account (email and password), followed by the possibility to create a Ruijie Cloud account or just use the trial. I created a Cloud account which needs a phone number, although it’s not really used to send any code or other type of authentication. I returned to the app and clicked on Added Network, made sure that I was connected to the proper SSID and that’s about as far as I could go. I continuously got network error.
I tried turning off the Mobile Data, enable precise location, always on, nothing worked. So, I relied on the browser installation which went smoothly (I created two SSIDs, an admin password and even upgraded the firmware). I connected the phone to one of the two newly created SSIDs and the app still refused to do anything. After a router restart, multiple app installation, the app finally connected to the router and I was able to bind it. So yes, the installation process using the app needs some attention from the developers.
The App GUI
The layout of the mobile application is simple and easy to follow, so, on the Homepage, you’ll be able to see the status of the network, as well as the Client devices that are currently connected to Reyee RG-E5.
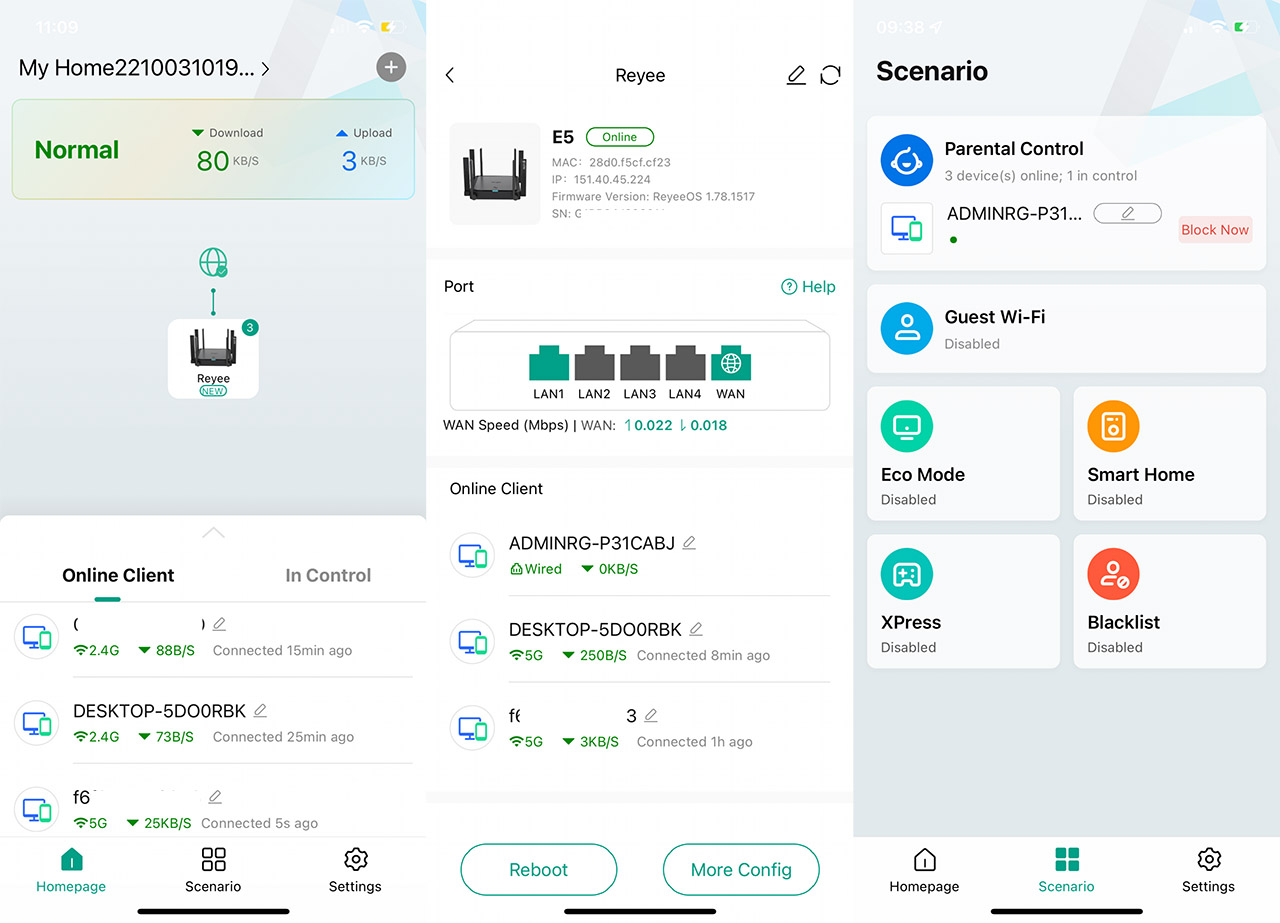
You can also see the devices that are ‘In Control’ which just means that they’re filtered by the Parental Control. If you tap on the router icon, you’ll be taken to a dedicated page where you can see the representation of all the ports (and which are connected) and it’s also possible to adjust the Transmit Power and the Channels for the two frequency bands. There is a More Config tab which simply tells you to go to the web-based GUI.
I do need to mention that it takes a bit of time (sometimes up to 5 seconds) to get the status of the Homepage updated, which is not that great. The next main section is Scenario and the first tab is Parental Controls, a feature that Reyee has highlighted as being very comprehensive. And it has a nice layout, but it doesn’t offer as many features as you may expect. You need to enable it for each client device and the Rule List includes configuring the Allow Time and the Block Time.
Besides that, there’s Sleep Mode for children that prefer to sneak into their bed with the tablet or smartphone. So yes, besides scheduling, there are no website categories that can be blocked for specific devices or at least the means to do some manual content filtering.
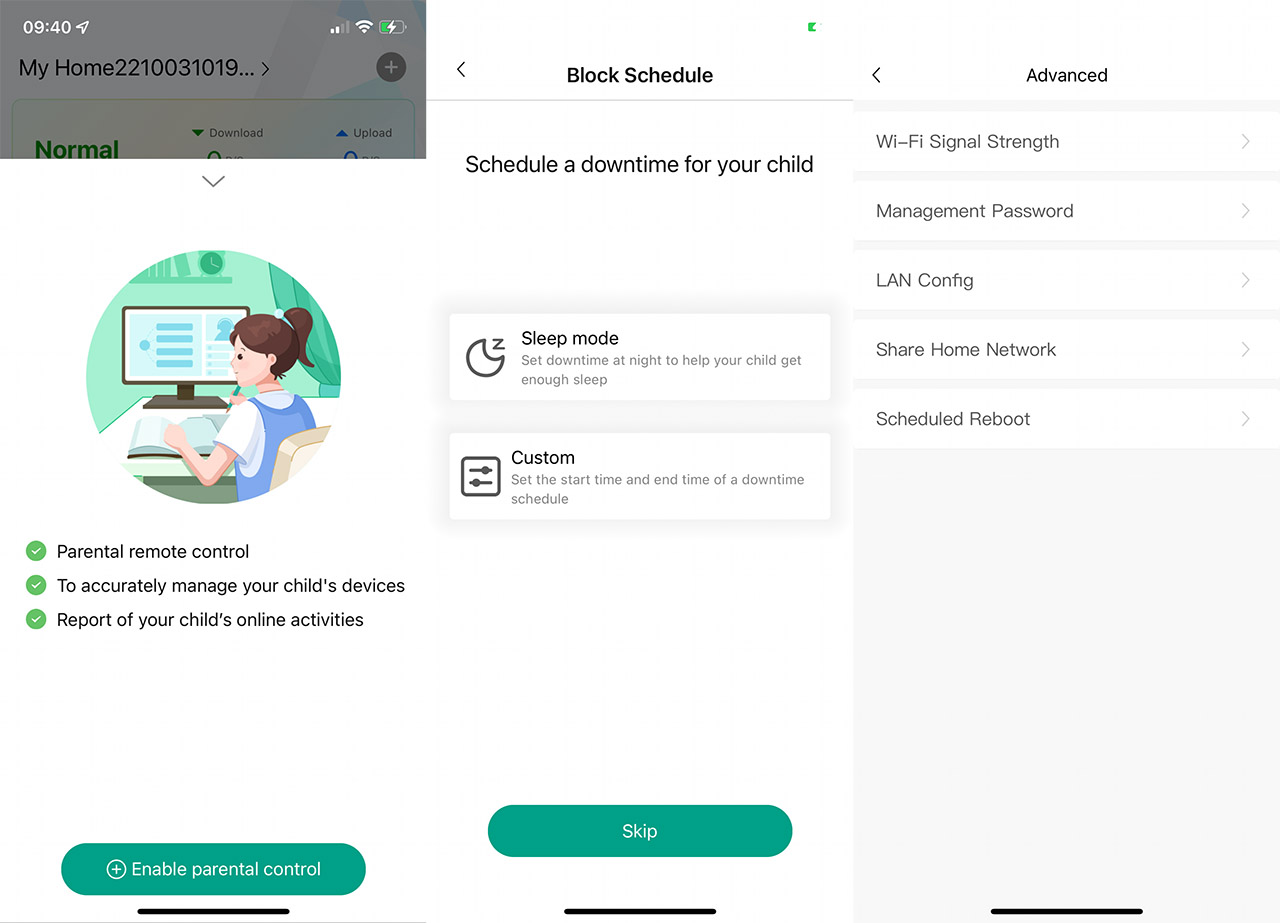
Underneath Parental Controls, there’s the Guest WiFi, the Eco Mode which allows the user to schedule when the WiFi will turn off (useful if you don’t have IoT devices) or if you want to reduce the amount of radiation (it just lowers the transmit power). Then, there’s the Smart Home tab which creates a separate 2.4GHz network just for your IoT devices (VLAN) and I noticed that the Reyee RG-E5 supports XPress. I admit I haven’t heard of XPress for more than a decade (it was a Broadcom-based feature), but the Reyee RG-E5 uses the Mediatek platform, so how does it work?
It seems to select the least crowded channel, but it didn’t change anything after having it enabled on the 2.4GHz radio band. Perhaps my settings were already great, but I am fairly sure that the XPress is not related to the old Broadcom-based technology. The last tab is the Blacklist and now we can move to the Settings.
There are some basic WiFi settings (the more advanced ones can be found on the web-based interface), as well as some Common settings that include running a Speed test, turning off the LED, Diagnosing and Optimizing the network. Further down, there are the Advanced settings which include the transmit power modes (Eco, General and Through-wall) and the LAN configuration.
The Web-based Interface
The layout of the Reyee RG-E5’s web-based GUI favors the non-technical people before anything else, which is laudable, so there’s a Home section that nicely displays all the necessary info and, if you need to check out the Clients, there’s a section for them as well.
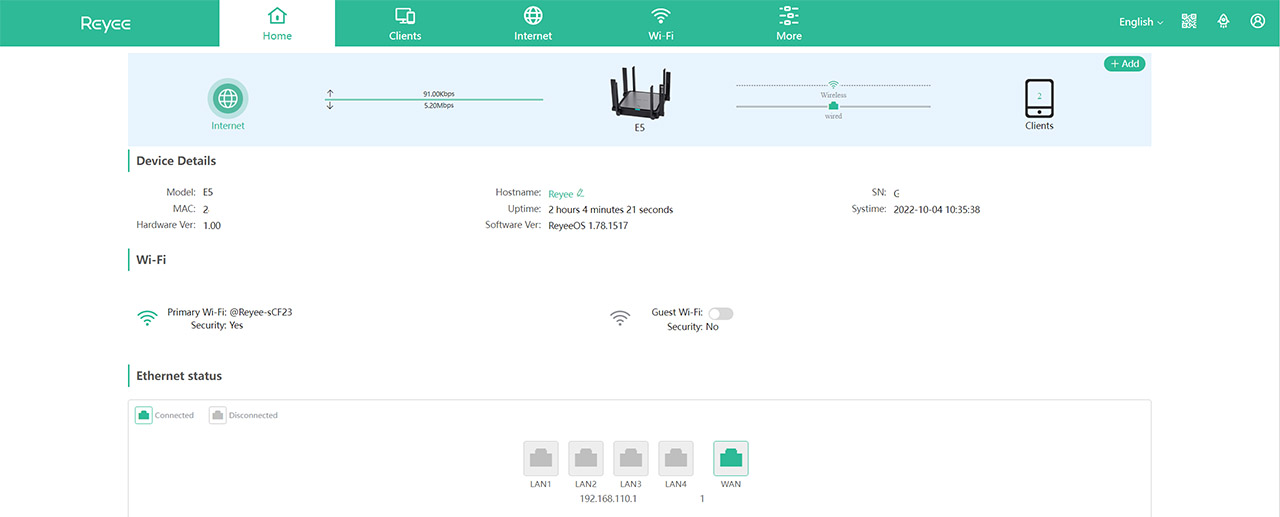
Next, comes the Internet settings and the basic WiFi settings, which are very similar to what the app offers. Clicking on more will take us to an entirely different set of settings, where you can set the IPTV, put the router in Repeater Mode, as well as properly set up the WiFi settings for each band (unfortunately, there is no support for WPA3). Under Security, the Reyee RG-E5 offers ARP Guard and there is also support for PPTP VPN.
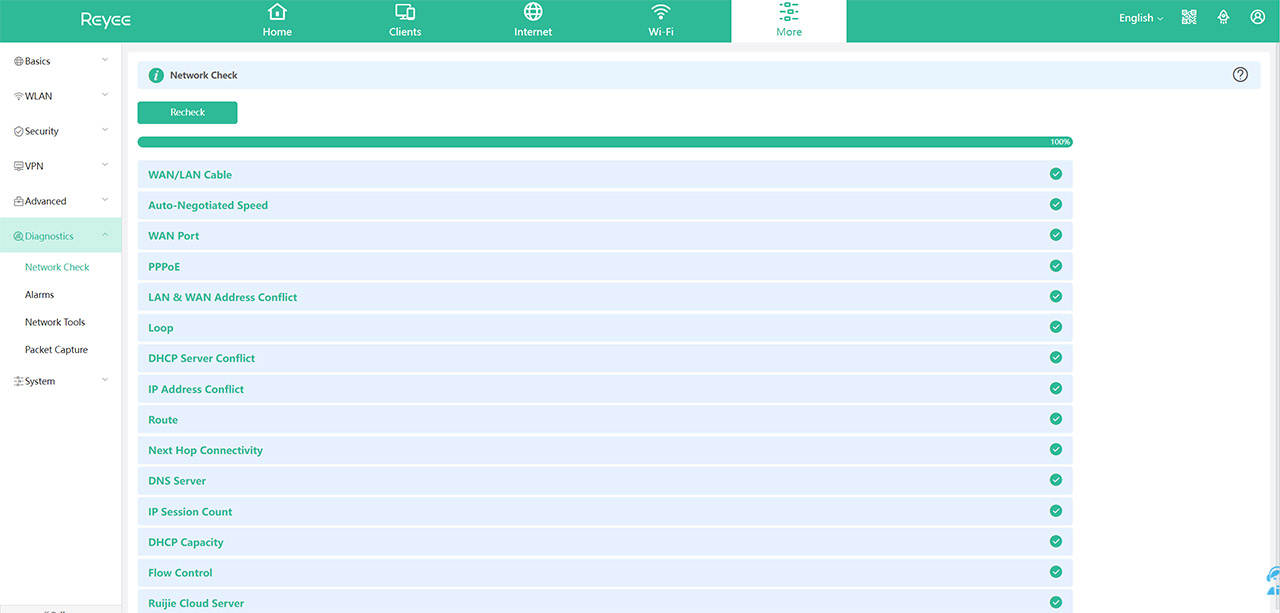
Additionally, the wireless router has a few Advanced settings which include Port Mapping, Flow Control, DDNS (the included free option is Oray NAT), UPnP and Reyee Mesh. I also saw that there is Hardware Acceleration (seems to disable any rate limitations), Port Flow Control and more. Under Diagnostics, I saw that there are some extensive tools to check a lot more aspects of the router than what other brands have to offer (including Packet Capture) and, under System, there are some Management options, as well as the possibility to upgrade the firmware.
The Cloud
Believe it or not, there is a Cloud controller where the Reyee RG-E5 can be adopted and, at the moment, it’s not only free, but it offers some features that rival those of other SMB and enterprise-level hardware manufacturers.
And it doesn’t come as a surprise since the Reyee RG-E5 has a healthy amount of business-level networking devices, but it is unique that the consumer-based wireless routers can become a part of a far larger network. Indeed, the Cloud will allow you to configure multiple devices at the same time, as well as monitor them even if they’re installed in different locations.
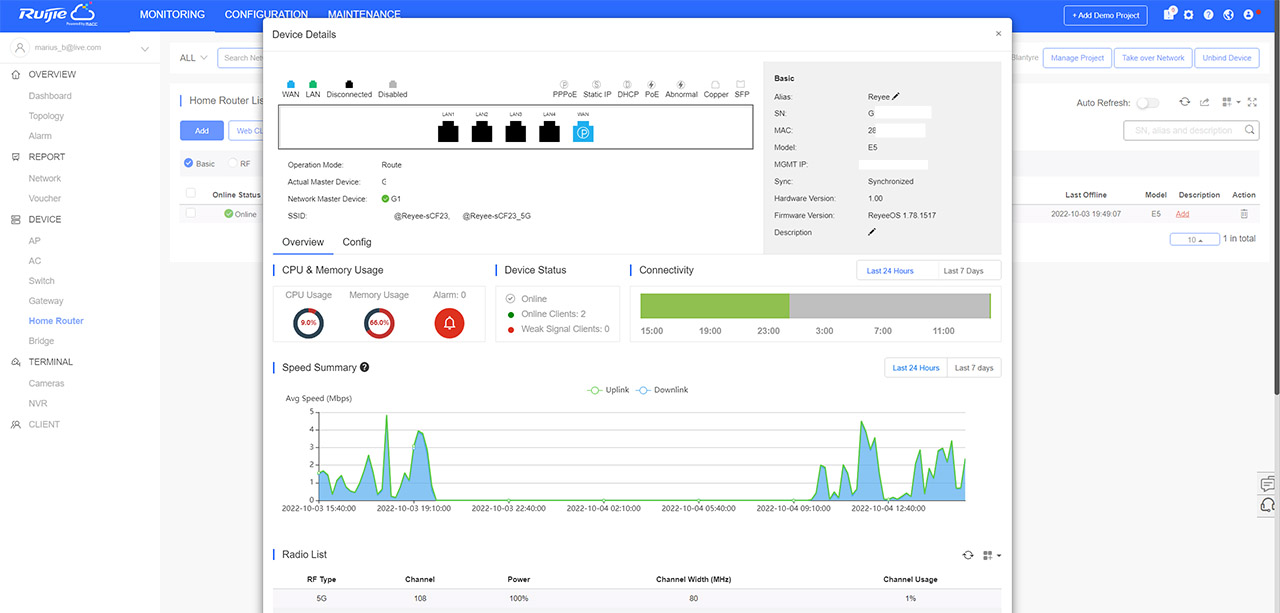
That being said, the settings suitable for the Reyee RG-E5 can be found underneath Device > Home Router, and here, I saw that it’s possible to use Web CLI and eWeb as well. The dedicated window reveals SSH and Tunnel as well. The settings don’t differ from what we get from the web-based GUI, but the layout is different, so the idea of using the controller is, as I said before, to manage and configure more Reyee devices from one platform.
The Conclusion
After testing so many Asus, TP-Link and Netgear routers, it was actually a breath of fresh air to see something different even if the same principles remain. Yes, the Reyee RG-E5 does offer the main WiFi 6 features, there’s also MU-MIMO and even mesh support. The throughput is also very good and I do like the design of the router. The app is fine, as long as you make it through the installation process, but it’s clear that there is a sort of favoritism towards the web-based interface.
And the support for the Cloud controller has really surprised me, in a good way. So, overall, the Reyee RG-E5 is an excellent WiFi 6 router that can rival the other brands and I do think that this new series of routers is here to stay, especially considering the longevity of the parent company.
Reyee RG-E5
-Pros
- Support for Cloud controller (which is free)
- Cool design
- High gain antennas = very good throughput at long distances
- WiFi 6 features, such as OFDMA
- Can be a part of a mesh network
Cons
- No USB port
- One antenna cable was damaged by a screw (the internal layout doesn't seem to be optimal for the antennas)
- The Parental Controls layout is nice, but the options are actually quite basic
- Chaotic app-based installation (just use the web-based interface)

Mark is a graduate in Computer Science, having gathered valuable experience over the years working in IT as a programmer. Mark is also the main tech writer for MBReviews.com, covering not only his passion, the networking devices, but also other cool electronic gadgets that you may find useful for your every day life.

