Still, considering that we’re dealing with a dual-band WiFi system, the backhaul traffic can easily cripple the network (the tri-band WiFi systems sometimes have a dedicated band for the backhaul traffic – Netgear Orbi, Zyxel Multy X and the Linksys Velop), so it’s ideal to ensure that the client doesn’t need to go more than one hop to reach the main unit. To get more bandwidth, you can use the Ethernet backhaul feature which means that you can rely on cables to connect the nodes between each other, but, besides negating the purpose of a WiFi network, you also get limited to only 100Mbps due to the Fast Ethernet ports. To help with the client roaming, Tenda makes use of the IEEE 802.11v and the IEEE 802.11r Fast BSS Transition protocols, but it does need compatible clients to make it work. The MU-MIMO technology also requires compatible clients, but you do get the advantage of having multiple clients served at the same time instead of competing for the bandwidth. There’s also the BeamForming technology which has the role of focusing the signal towards the compatible clients connected via wireless, instead of broadcasting the signal everywhere.
To test the wireless performance of the Tenda Nova MW3, as with the other WiFi mesh systems, I used two computers, one equipped with an Asus PCE-AC88 WiFi adapter (will work as the client), while the other is a laptop equipped with an Intel 8265 2×2 MU-MIMO wireless adapter and will work as the server.
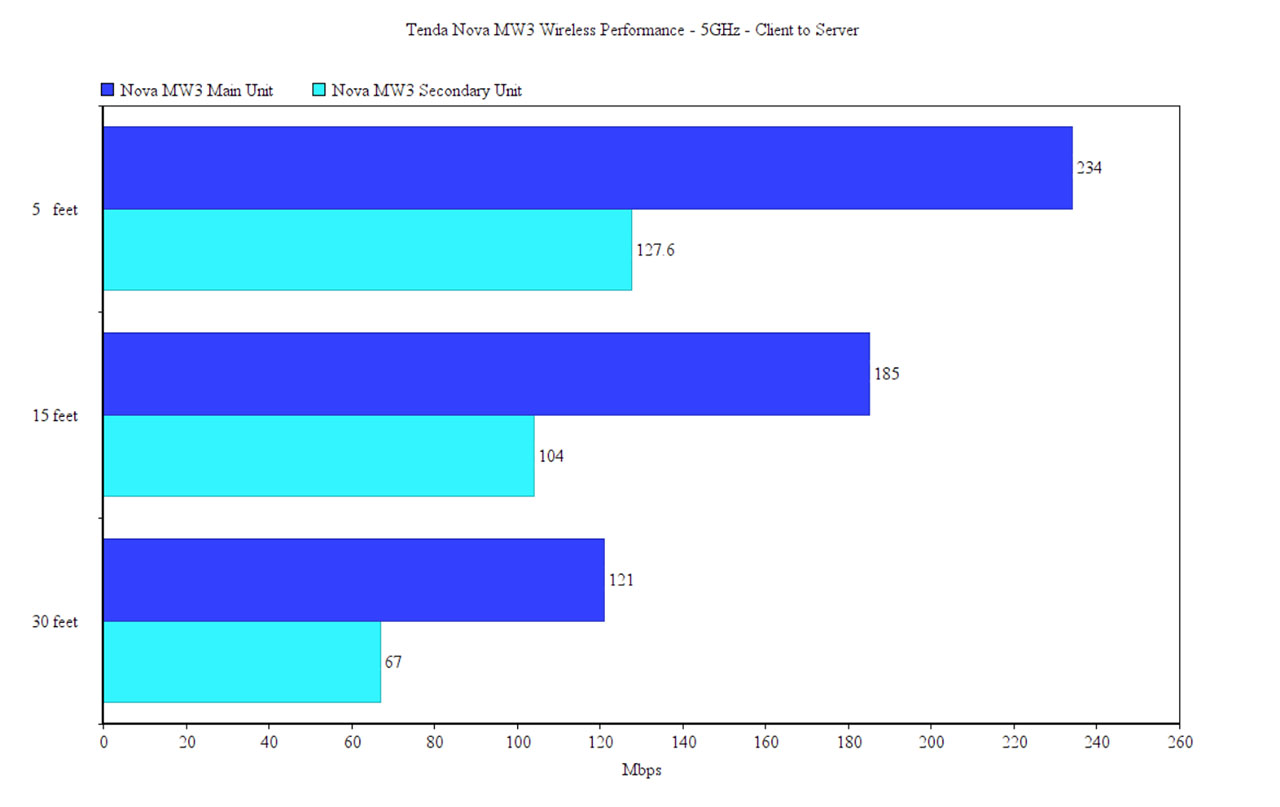
Considering that the ports are Fast Ethernet, I connected both the server and the client to the 5GHz SSID (the server remained close to the main unit) and, using a single Nova router, from the client to the server, at 5 feet, I measured an average of 234 Mbps; at 15 feet, I got an average of 185 Mbps and, at 30 feet, I measured around 121 Mbps. From the server to the client, at 5 feet from the main unit, I measured an average of 148 Mbps and, at 15 feet, I got around 137 Mbps; at 30 feet, I saw an average throughput of 86 Mbps.
Next, I added another Nova MW3 unit (I only have a two-router package) and I positioned it at about 35 feet from the main unit and once again, I connected both the client and the server to the WiFi network. This way, from the client to the server, I saw an average of 127.6 Mbps at 5 feet from the secondary unit and, at 15 feet, I got an average of 104 Mbps; further to 30 feet, I measured an average of 67 Mbps.
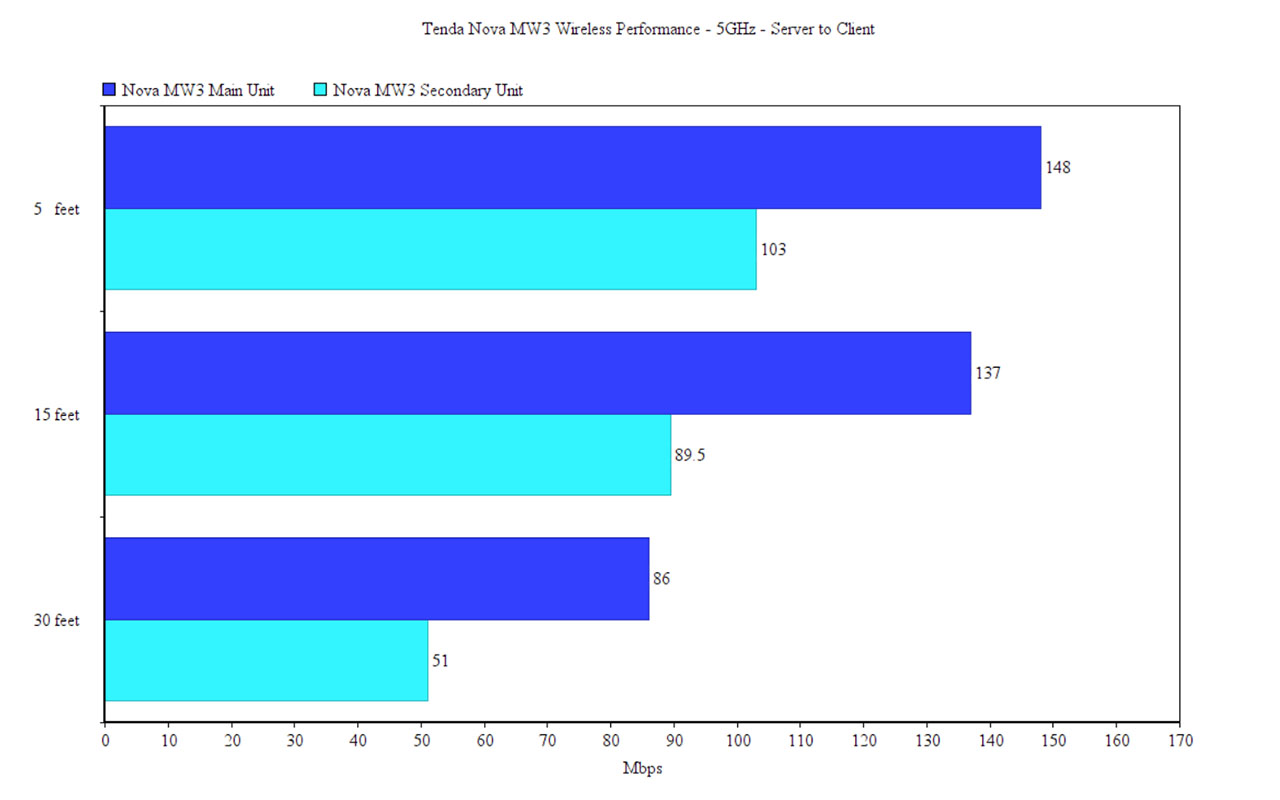
From the server to the client, I measured an average of 103 Mbps, while at 15 feet, I saw around 89.5 Mbps; at 30 feet, the speed went down to an average of 51 Mbps. Bear in mind that this throughput is not what you’re going to get from your Internet connection, it can be achieved only if you wirelessly connect multiple laptops to the local network.
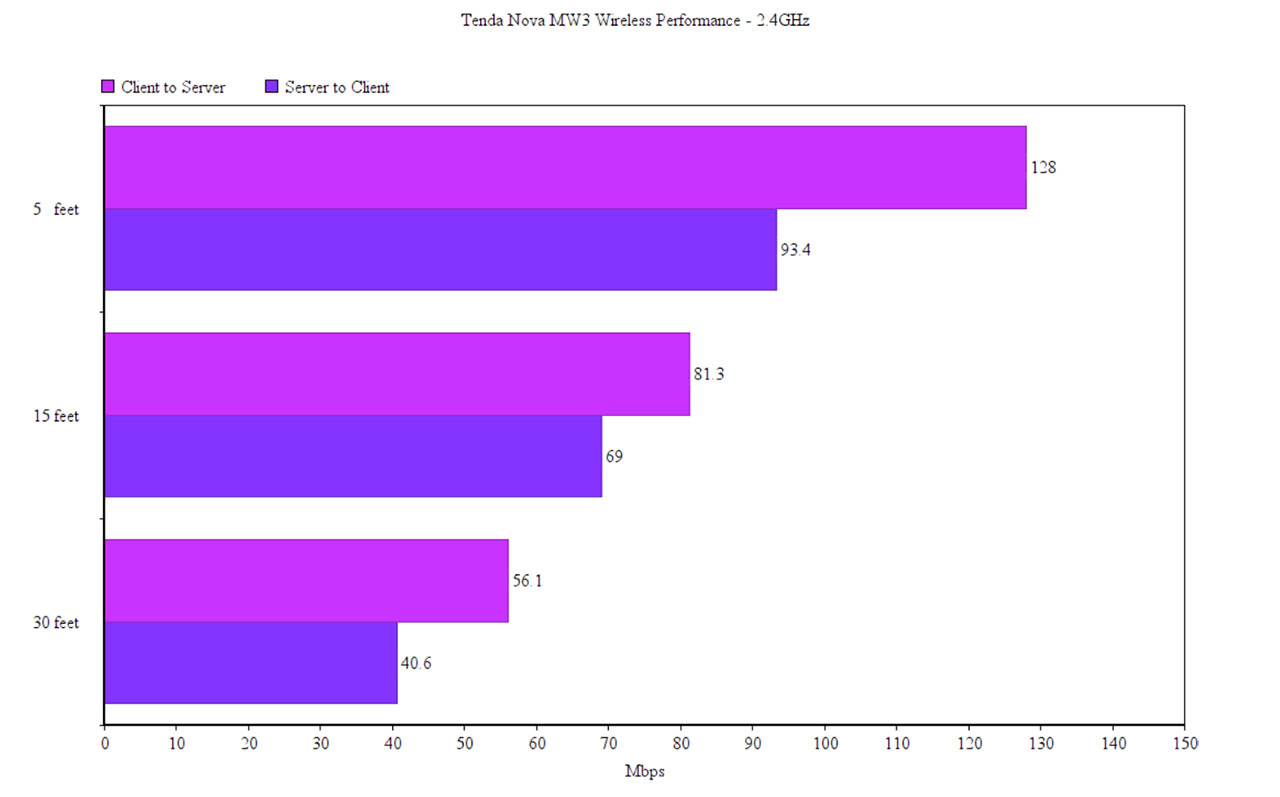
Lastly, I decided to connect a client that supports only the 2.4GHz standard and, this way, from the client to the server, I measured an average of 128 Mbps at 5 feet from the main unit and, at 15 feet, I got around 81.3 Mbps; at 30 feet, the speed decreased to 56.1 Mbps. From the server to the client, I measured an average of 93.4 Mbps, 5 feet away from the main Nova unit and, at 15 feet, I got an average of 69 Mbps; at 30 feet, I measured an average of 40.6 Mbps.
If you do have a 100Mbps Internet plan (or lower) and you wonder how’s the wired performance of the Tenda Nova MW3, I connected two computers to the secondary Nova unit via cable and I managed to measure an average of 95 Mbps from the client to the server and an average of 92.3 Mbps from the server to the client.
Setup and Interface
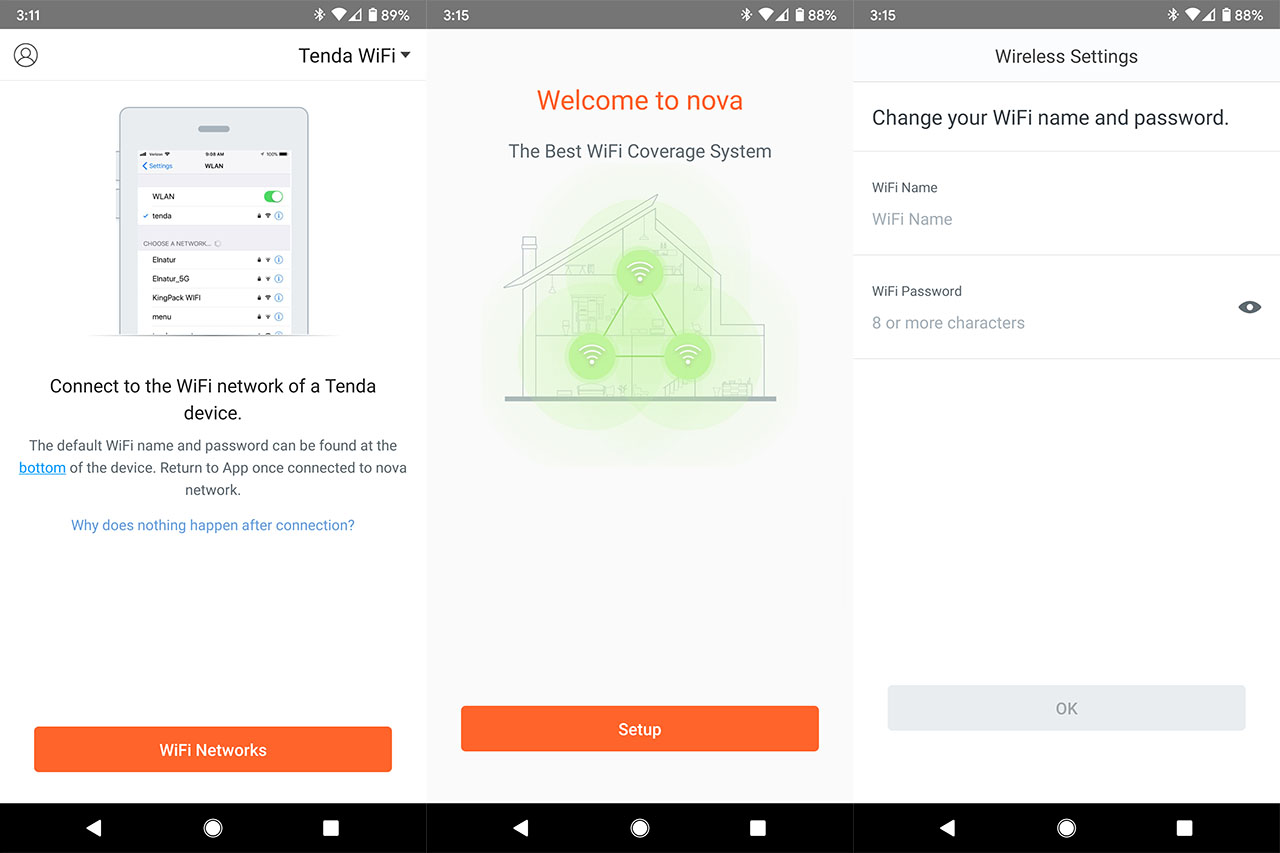
The hardware installation is very similar to the other WiFi systems, so all you have to do is connect the main Nova MW3 unit to the modem via an Ethernet cable using the WAN/ALN port (all units are identical, which means that you can choose whichever you like) and then power on the device using the provided cable. Afterwards, you need to install and run the Tenda WiFi app ona a mobile device (either Android OS or iOS) – unfortunately, there is no web-based interface available, so you will have to rely on the app for both the initial setup process and for the later maintenance and network configuration.
The first thing that the app will ask is to connect the mobile device to the default SSID of the Nova unit (it doesn’t rely on Bluetooth, like the Google WiFi) and, after doing so (the password is written on the bottom of each unit), you can start the Setup process (press the icon on the bottom of the page). The router will attempt to discover the type of connection you have (if it’s not the right one, you can tap on the ‘Choose your connection type manually’) and then, it will ask you to change the WiFi Name (SSID) and the WiFi Password – the 2.4GHz and the 5GHz can’t be separated (not even after the initial setup is done).
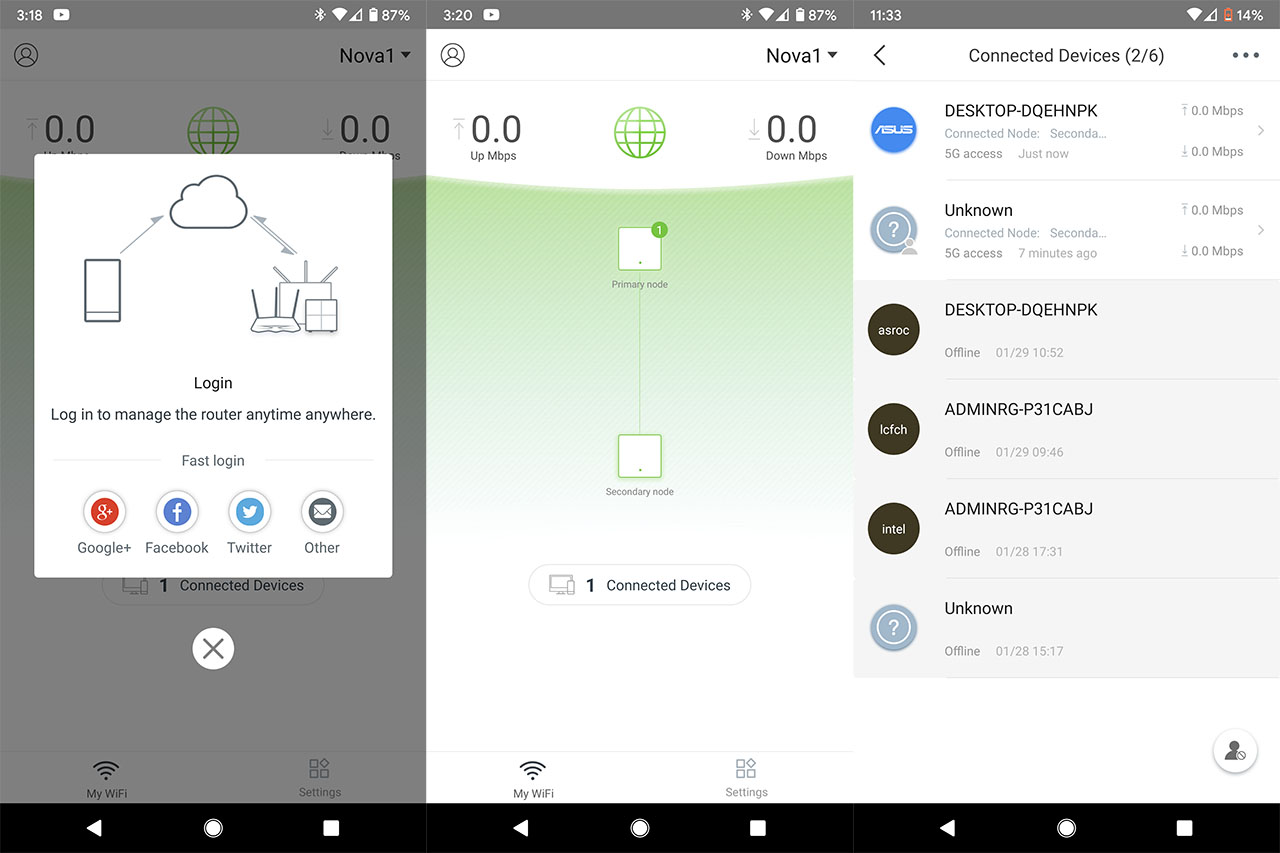
And that’s all for the main unit, but, if you have other Nova units available, they’ll pair automatically to the initial router; obviously, you will have to connect the secondary units to a power socket and pay attention to the LED to become green, which will indicate a good connection to the main device. After you’ve finished adding all the Nova nodes, the app will ask whether you would like to manage the router remotely and, since it sounded good, I went with the email registration (there’s also Google+ (?), Facebook and Twitter).
The mobile app interface is quite simple and minimalist, displaying on the top left and right corners the current Upload and Download rate and in the middle, there’s the Internet icon which, when pressed, will show some connection stats and underneath this icon, there’s a graphical representation of the network: the Primary and the Secondary node icon. Press on either to see the Status of the device, the Connection Quality, the Serial Number, the Location, the LED indicator (can be turned off) and, if you click on More, it will show more info about the router (such as the firmware version, the IP address, the MAC address and more).
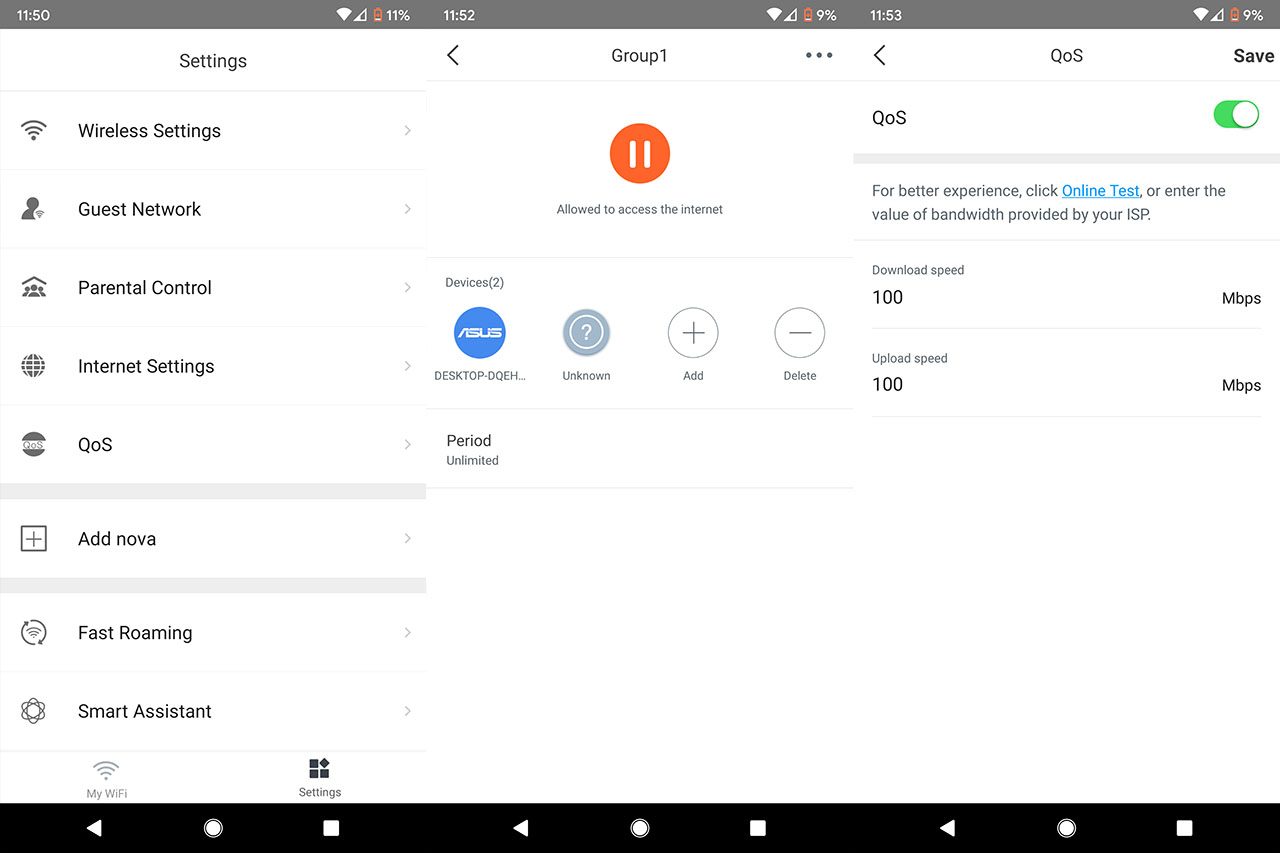
Returning to the main page (My WiFi, from the bottom), you will also be able to see the number of Connected Devices: tap on it to see a list of all current and past connected devices – you can click on each device to see current throughput, the Description, the Group and other Details (you can also block its access to the network). If you return to the main page, you can see that on the bottom right, there’s the Settings section. If you tap on it, you will be able to modify the Wireless Settings (name and password), enable the Guest Network (with a time validity), the Parental Control (you can create Groups of devices to which you can pause the Internet access at any time or set a certain schedule for when the access will be available), change the Internet Settings, enable the QoS (limits the download or upload speed) and Add a new nova device.
There’s also the Fast Roaming (recommended only if you have compatible clients), the Capacity-oriented Mode (useful when you have more than 30 clients connected at the same time), the Smart Assistant (quite useful if you want to add devices that can only connect to the 2.4GHz network), Port Forwarding, UPnP, LAN Settings (change the IP addresses that are assigned to your clients) and DNS; you can also Upgrade the Firmware of the WiFi system, set the Maintenance Schedule and add new members that can manage your home network.
Conclusion
The Tenda Nova MW3 is perhaps the least expensive WiFi mesh systems on the market, but for the wrong reasons since it decided to go with a couple of Fast Ethernet ports that from the start, make the Nova MW3 a severely outdated set of devices. If you are very short on money and you don’t plan on going above 100Mbps anytime soon, then the Nova MW3 is not really that bad, offering a fairly decent wireless performance even after the first hop (considering the price point) and the app is user friendly and reactive, but it does lack a bit in terms of features, something that’s way too common with most WiFi systems (including Eero second gen and Google WiFi).

Mark is a graduate in Computer Science, having gathered valuable experience over the years working in IT as a programmer. Mark is also the main tech writer for MBReviews.com, covering not only his passion, the networking devices, but also other cool electronic gadgets that you may find useful for your every day life.

