The TP-Link EAP245 has been around for almost a year, so it had enough time to find its place among the other AC1750 3×3 wireless access points, such as the widely popular Ubiquiti UAP-AC-PRO or the ambitious Open Mesh A60.
Don’t get me wrong, the EAP series is not really new (and TP-Link has been around for a while and has a lot of experience in the networking department), so, in order to become more established in this overcrowded market, the device comes with a very accessible price tag (something common with TP-Link products) and it also has most of the features that both SMBs and the consumers have come to expect (including a centralised controller for better scalability options).
But, since offering a similarly equipped device as the competition is not going to be enough, the manufacturer has also added some very interesting features that you won’t find on other wireless access points (not in this price range), such as the MU-MIMO technology, the support for Load Balance, Fast Roaming 802.11k/v, the BeamForming tech and QoS (there’s also the support for PoE and the traditional DC power).
Sure enough, there are some shortcomings, such as the lack of dedicated gateways (the Omada controller can only manage Access Points at this moment, which means you won’t be able to create a full Omada environment) or the single Ethernet port, so let’s have a closer look if these elements impact the overall experience or if TP-Link has managed to create a balanced device.
UPDATE 09.25.2018: The first access point was defective so I retested the wireless performance using the new EAP245 unit.
ALSO CHECK OUT: UBIQUITI-UAP-AC-PRO VS OPEN MESH A60
Design
A couple of years ago, TP-Link said that it will focus more towards providing a better experience for the consumer market by improving both the look of their devices and the accessibility of new features and technologies, including a significant step towards the smart market. While that may be the aim of the company, the problem with keeping the cost lower than your competitors is that you have to cut some corners, but, thankfully, the design and look of the TP-Link EAP245 seems to be unaffected, so it features the expected minimalist look and the device is completely covered by a white matte finish.
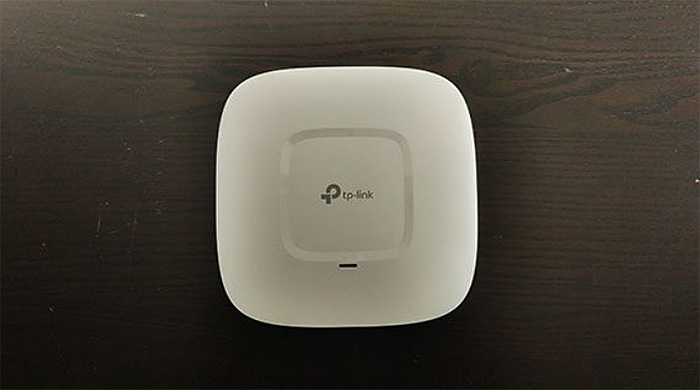
The case of the access point is rectangular, but it went with rounded corners and on the front, there is a small depressed rectangular area surrounded by a glossy white band – unlike the UAP-AC-PRO or the Open Mesh A60, TP-Link decided to not place the LED light underneath this band, but to let it shine from a small, narrow cut-out. Sure enough, it does look less spectacular, but because the LED is quite powerful and there are some cut-out areas on the bottom of the device, it does create a nice aura effect on the wall or ceiling.
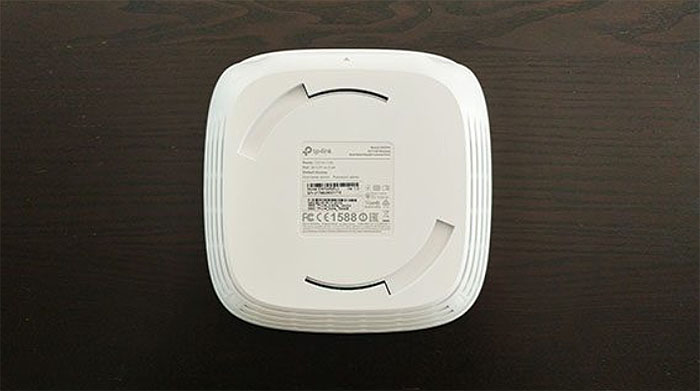
If you put the EAP245 next to other wireless access points, you’ll undoubtedly notice that TP-Link had made its device thick and not just by a bit – it measures 8.1 x 7.1 x 1.5 inches and weighs 1.0 lbs (so it’s also a bit heavier). Despite of the increased size, I noticed that the plastic is hard enough to not allow any flexing if you press on it. If you turn the access point upside down, you’ll be able to see that TP-Link has covered the device with lots of ventilation grills to ensure that it won’t overheat even when put under stress. From my experience, the EAP245 does get warm (especially near the label from the bottom area), but it did not get hot, even when it was under a heavier load. The presence of these ventilation holes indicates that the EAP245 is an indoor-only device and that it won’t survive outdoor conditions (those that do, usually come with lots of silicone seals).
On the bottom area, you’ll also see two cut-out spaces which allow you to fix the access point into position after you’ve mounted the provided plastic plate on either a wall or the ceiling. You’ll also notice that there are no silicone / rubber feet to keep the device from budging, so the TP-Link EAP245 was not designed to be put on a flat surface.
For the sake of simplicity, lots of networking devices have gone past the traditional array of LED lights and adopted the new single LED indicator system. So, to not break the minimalist design of the EAP245, it also has one LED light which shows the status of the device: most of the time, the LED will be solid green and this indicates that the access point is working properly; in case the LED starts flashing yellow, then the EAP245 is upgrading the firmware, so it’s best to not disconnect it from the power source or Internet.
What should worry you is the red flashing LED which indicates that there is either a hardware error or a firmware malfunction. Lastly, if you decide to return the device to factory default settings, then the LED will double-flash red, green and yellow. Sure, the LED system seems to be a bit more simple than the one on other access points, but it still remains more non-intuitive than the traditional multi-LED approach, so the user will have to consult the manual to figure out what’s going on with their device.
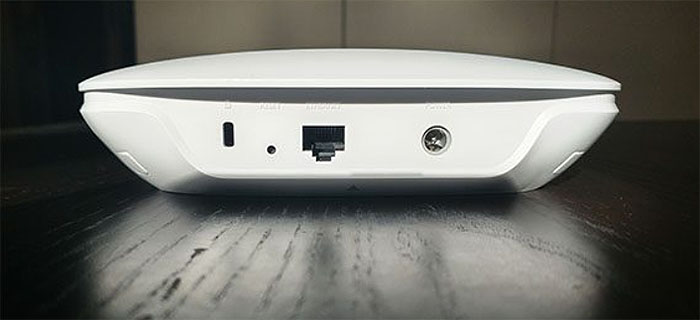
Most wireless access points designed for ceiling mounting have their ports inside a carved-in area, but the TP-Link EAP245 decided to keep them on the top/lateral side: from the left, there’s a Kensington lock, a small recessed Reset button (press it for keep the button pressed for 5 seconds to go back to the factory settings), one Gigabit Ethernet port (supports the 802.3at PoE standard) and a Power port. There are a couple of things that I need to point out. First, one advantage of a carved-in area for the ports is that you either let the cables loose towards the ground or you can easily connect them through the ceiling / wall – the EAP245 lacks this advantage, so you’ll need to improvise in order to keep things as neat as possible. Secondly, one port may make sense for outdoor-type access points, but indoors, there is a high chance that you may want to connect a wired client. If you don’t power up the EAP245 using PoE, you are still constrained to use to for the connection to the router, so you will only be able to connect clients via WiFi.
Hardware
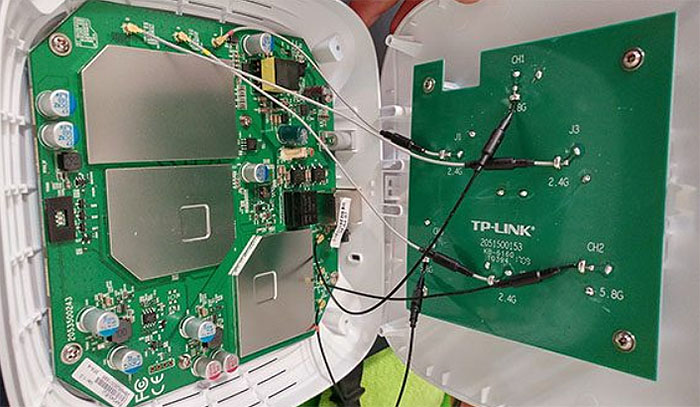
Inside the case, TP-Link has equipped the EAP245 with a Qualcomm Atheros QCA9563 SoC (clocked at 750 MHz), so it’s quite similar to the Ubiquiti UAP-AC-PRO in this respect; there’s also 128Mb SPI NOR Flash (GigaDevice GD25Q128CSIG) and a Qualcomm Atheros AR8033-AL1A NJ72922C Integrated Ethernet Transceiver Chip (I also noticed a Group-Tek HST-24082DR 1000BASE-TX Magnetic Module). Furthermore, the access point uses a Qualcomm Atheros QCA9982 3×3:3 chip for the 5GHz radio and the Qualcomm Atheros QCA9563 b/g/n 3×3:3 chip for the 2.4GHz radio.
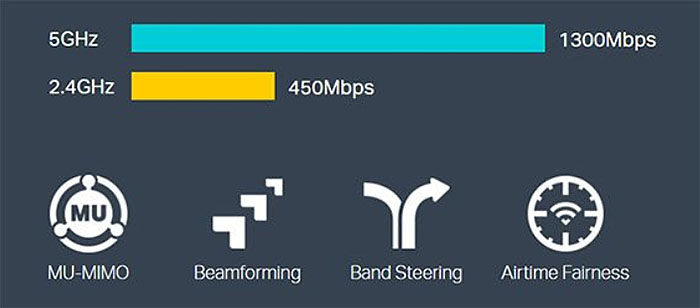
TP-Link has marketed the EAP245 as an AC1750-class device, so it features maximum theoretical data transfer rate of 1,300 Mbps using the 5GHz radio band and a maximum theoretical data transfer rate of 450 Mbps using the 2.4GHz radio band.
Setup and Features
Before initiating the device adoption process (using the controller), you need to choose how you’re going to power up the device: either use the provided Power cable and use the Ethernet port to connect to the router or take advantage of the PoE support and attach the access point to a PoE switch / PoE adapter (which, in turn gets connected to a router). After you have correctly installed the device, it’s time to install the Omada controller on a computer. The controller functions in a similar manner to the UniFi software, so, if you decide to run it locally, you are constrained to always keep an active instance on a computer if you want to quickly access and configure your EAP access points.
Another similarity to Ubiquiti is the ability to monitor or configure the EAP245 in a standalone manner, by simply using the mobile app, where you can find the section ‘Standalone APs’ and, if the access point is not yet adopted by a controller, it will show up here. If you tap on it, you’ll be able to see some status info, enable/disable the LED, change the settings of the Radios, the SSID, view connected/blocked clients, enable the Locate function, Reboot the device or Reset it.
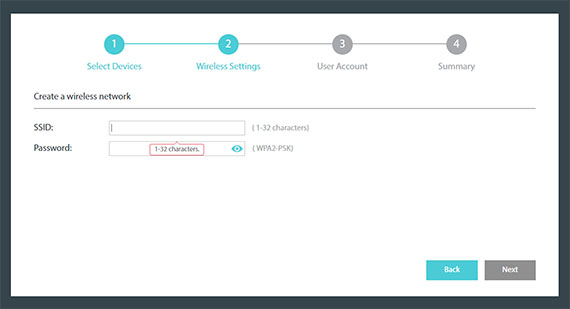
Since the Omada controller is one of the reasons to use the EAP access points, I installed and ran it on a computer and then I tried to adopt the EAP245. Unfortunately, the controller just couldn’t see it. The reason for that was because it didn’t have the latest firmware installed. Using the new unit, the controller immediately detected the access point and I could update the device to the newest firmware right away. TP-Link also allows you to configure the AP using a separate interface (similarly to how the traditional router does) – to access it, connect the AP to the computer and go to https://tplinkeap.net (the default user name and password is admin / admin). Here, you can also load up the latest firmware version, so it can take advantage of all the latest features using Omada. After doing so, I reset the access point to its factory default settings (necessary if you changed the default configuration) and tried adding it to the controller. Unfortunately, it didn’t work and the culprit was the Microsoft Windows 7, so to not waste any time, I opened a Windows 10 laptop and afterwards, the process went smoothly: I could immediately see the EAP245, set a new SSID and passkey, set a user name and password and, as an optional step, a Cloud account.
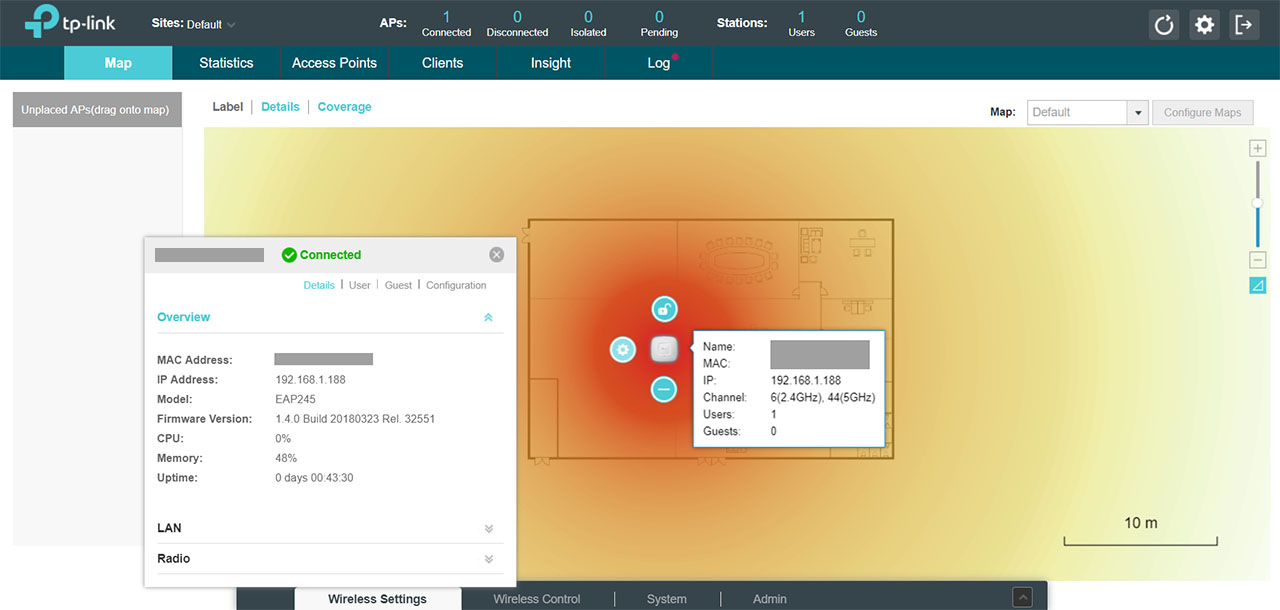
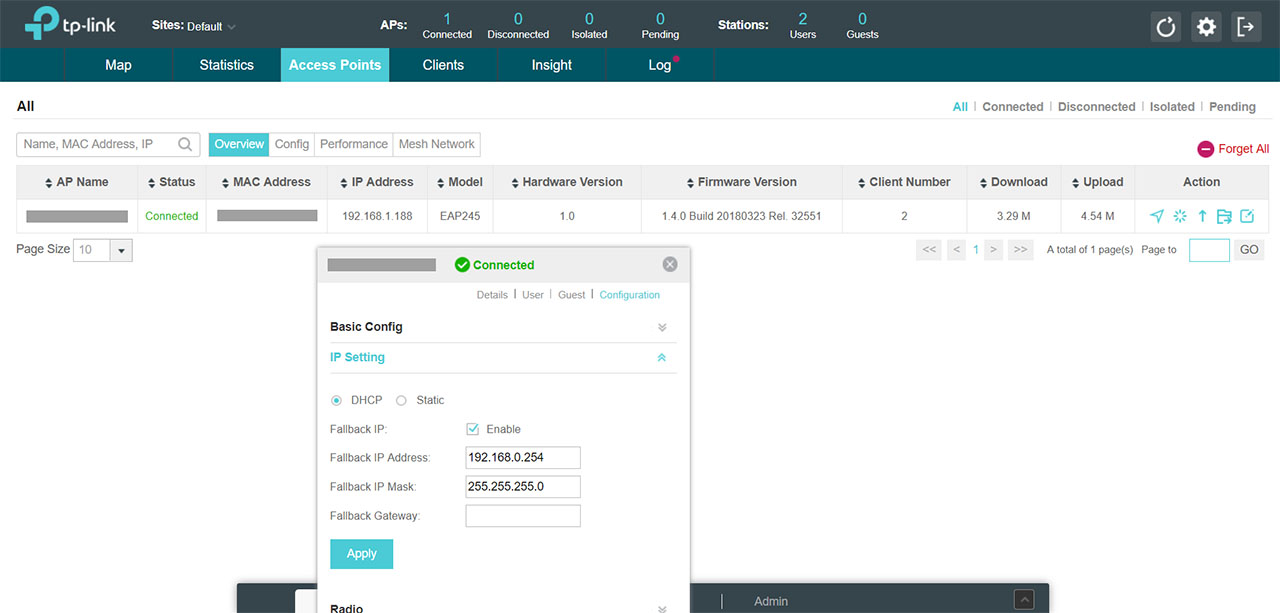
After you’ve adopted the device, you can see it in the Access Points section of the controller. The Omada controller is a bit different than the UniFi or the Cloudtrax: features the main menu horizontally, where you can access the Map, the Statistics, the Access Points, the Clients, the Insights and the Log (on top of the menu, there’s some info about the access points status, as well as the number of Users and Guests). The Map section features a graphical representation of the house (you can upload your own to get an accurate view of your floor’s coverage) and you can place an AP icon which, when clicked, summons three icons: one is for locking/unlocking the device, the second shows the AP Details (Overview, LAN and Radio), the User, the Guest and it allows you to perform a Basic Configuration (DHCP/Static, set up the two Radios, enable Load Balance, which ensures that one an EAP access point won’t be overcrowded, create WLANs, enable Rogue AP detection and Forget this AP), while the third icon has the role of removing the EAP245 from the map. The Statistics section shows the number of Clients on the SSID, the Top APs, the Most Active AP / Client and the Recent Activities. The Access Points section shows all the access points (those adopted, as well as the isolated and pending APs), each with its own tags (includes the MAC/IP addresses, the Hardware and Firmware version, the Download/Upload and more).
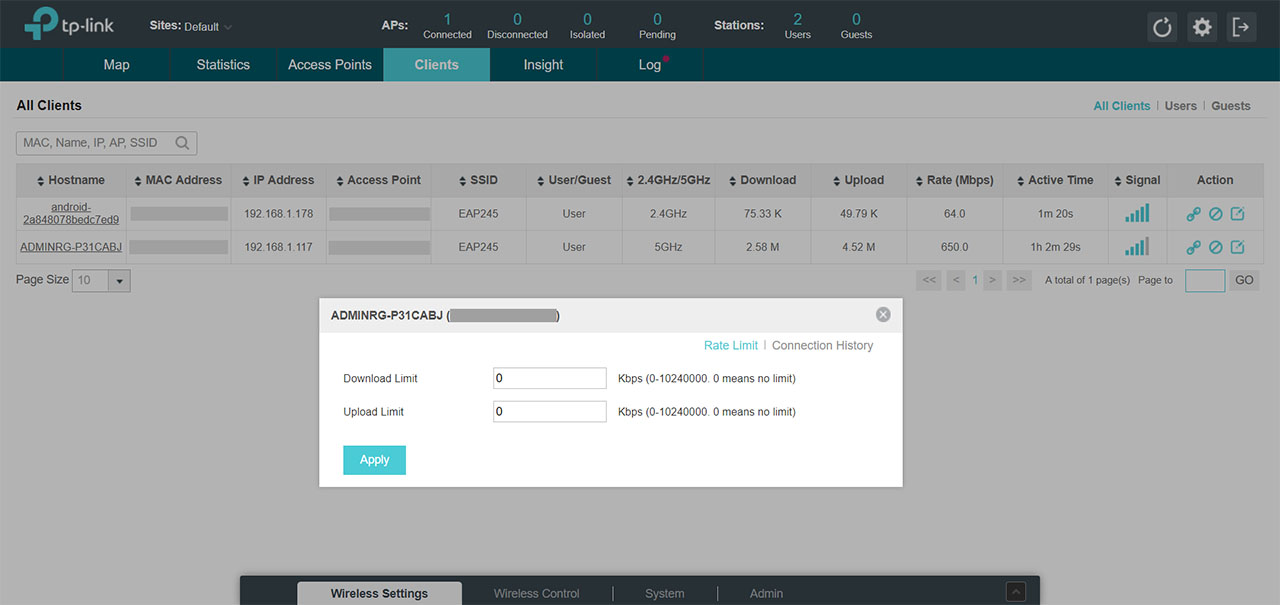
The Clients section displays all the connected clients, each with its own set of tags and, if you click on the Hostname, a small window will pop-up, allowing you to set the Download/Upload limit and view the Connection History. The Insights sections shows info about the clients that connected to the access point during a specified period of time (includes Untrusted/Trusted Rogue APs and Past Guest Authorization), while the Logs section displays everything that happens on the network. One other area of interest is the Setting section which can either be summoned by clicking the small wheel icon on the top right or by pressing on the small menu that hides on the bottom of the page, giving you access to the Wireless Settings, the Wireless Control, the System and the Admin. If you access the Wireless Settings, you can enable Fast Roaming (only 802.11k/v-capable clients can take advantage of this feature), enable Airtime Fairness, set the Fragmentation or the RTS Threshold, the DTM Period and the Beacon Interval; you can also enable the Band Steering feature, the Mesh ability or the Auto FailOver option (it’s a necessary option if you have multiple access points connected in a mesh network because it allows the creation of new paths for the data in case an AP node fails).
On the Wireless Control area, you can view the Access Control (here, you can create rules to Allow or Block certain IPs), the Portal section (which allows you to create customizable guest access – includes setting up Logo Picture, Welcome info, Copyright info, Terms of Service, changing the type of Authentication (can be Simple Password, Local User, Voucher, SMS, FaceBook or external RADIUS or Portal Server), enabling Redirect URL and Advertisements, establishing a time limit for each client and more – it’s worth noting that I could not find any payment option). Furthermore, the Wireless Control also allows the user to add Free Authentication Policies, MAC Filters, create access Schedules or configure the QoS: enable WMMM, No Acknowledgement (checking for TCP errors) and Unscheduled Automatic Power Save Delivery; set EDCA Parameters (set which applications will get the high priority queue and which will get the lowest priority) and set Station EDCA Parameters.
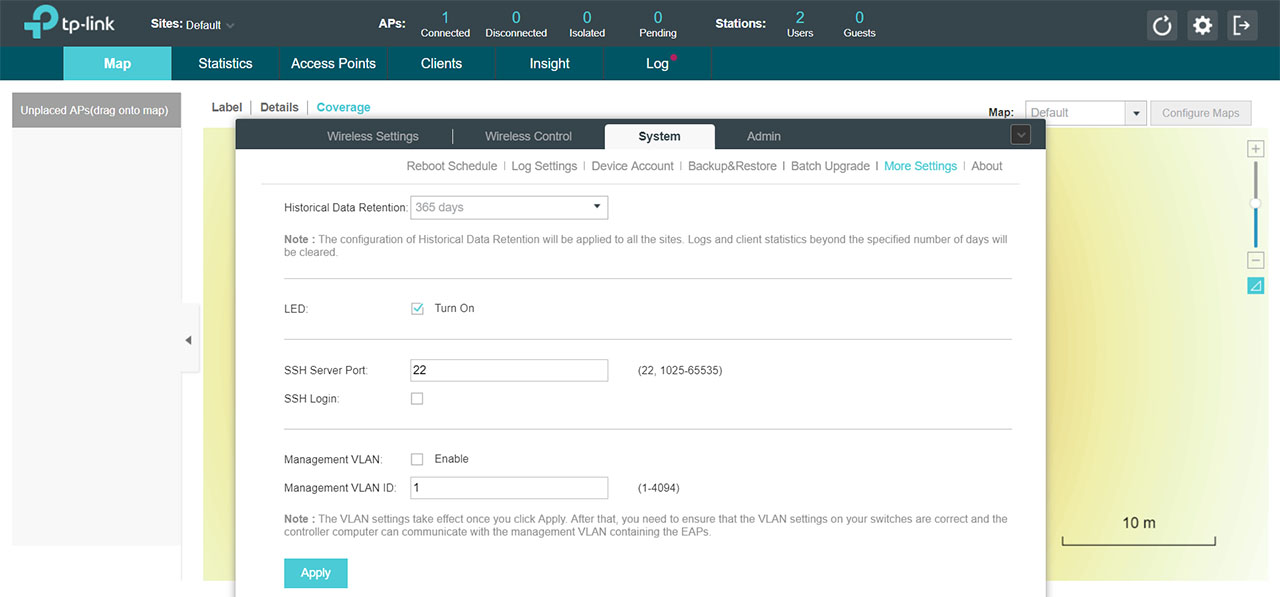
The System section allows you to create Reboot schedules, configure the Log Settings, set up the Device Account, Backup or Restore the configurations, perform a Batch Upgrade on the connected EAPs, set the Data Retention time, set the SSh Server Port or enable Management VLAN. The Admin section allows you to edit the current admin account or create new users; you can also change the controller’s IP address and enable the SMTP server.
Considering that the new WiFi systems pride themselves with their proprietary mesh technology which can help cover a larger area with WiFi using more than one node, the manufacturers have decided to also implement a similar approach on their access points, so, in case you have more than one EAP245 and are constrained to use a multi-hop system, TP-Link does have this option available (the manufacturer also has its own dedicated WiFi systems: the dual-band Deco M5 and the tri-band smart home-focused Deco M9 Plus).
Certainly, you need to take the backhaul traffic into account as well, so a multi-hop solution is less than ideal, especially because it lacks the Ethernet backhaul feature (that has proven to deliver a high degree of relief to the WiFi mesh systems). Some other technologies worth mentioning, implemented on the EAP245, are the MU-MIMO tech, which makes sure that multiple clients can be served at the same time (and not compete for the bandwidth), but you do need compatible adapters and they’re not as widespread as they should be; the second technology is the BeamForming which has the role of focusing the WiFi signal directly towards the wireless clients that are connected to the network.
In order to test the wireless performance of the TP-Link EAP245, I took two computers, one is a laptop which will act as the server and the other is a Desktop PC equipped with the ASUS PCE-AC88 WiFi adapter, but, because the EAP245 only has one Ethernet port, which is necessary for the connection to the router, I had to use a PoE switch for connecting both the client and the access point (I disabled anything that may have an impact over the wireless performance of the EAP245). This way, I was able to see how the AP would perform at various spots inside the home on both the 2.4 and the 5GHz network.
The first time I tested the access point, I noticed that there were problems from the client to the server: using the 5GHz network, the throughput would not exceed 65 Mbps at close range and 45 Mbps at about 30 feet and, if I connected to the 2.4GHz network, the speed would not go above 45 Mbps at 5 feet and 17 Mbps at 30 feet. For this reason, I returned the first unit and got a second EAP245 which, thankfully, has proven to be a better performer.
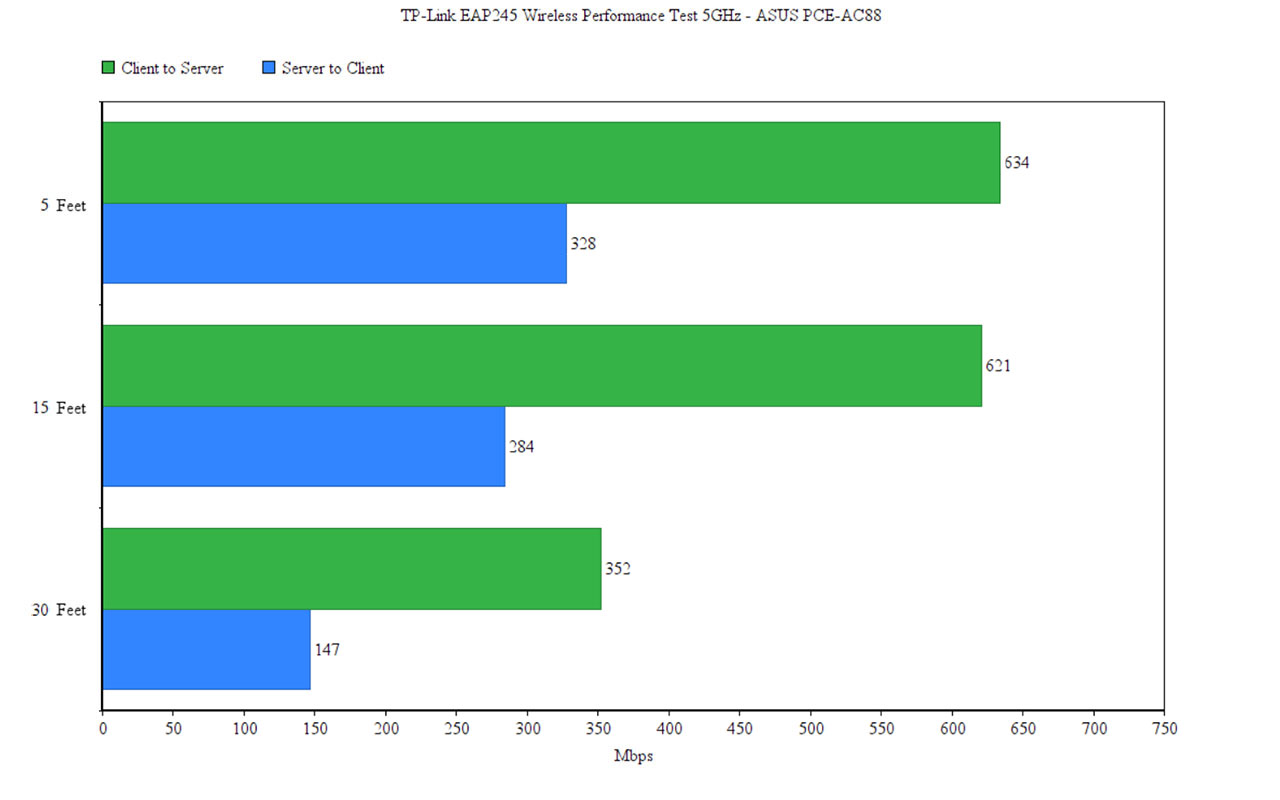
First, I connected the two computers to the access point (one wireless, the other through a PoE switch) and, using the 5GHz band (the channel 40 and the 80MHz channel width), I got the following results from the client to the server: at 5 feet, I was able to measure an average of 634 Mbps, while at 15 feet, the speed remained constant at 621 Mbps and at 30 feet, I measured an average of 352 Mbps. As you can see, the throughput has significantly improved and, so far, the TP-Link EAP245 is one of the best performers in its category. Next, I tested the server to client performance: at 5 feet, I measured an average of 328 Mbps and at 15 feet, I measured 284 Mbps; at 30 feet, the speed went down to 147 Mbps.
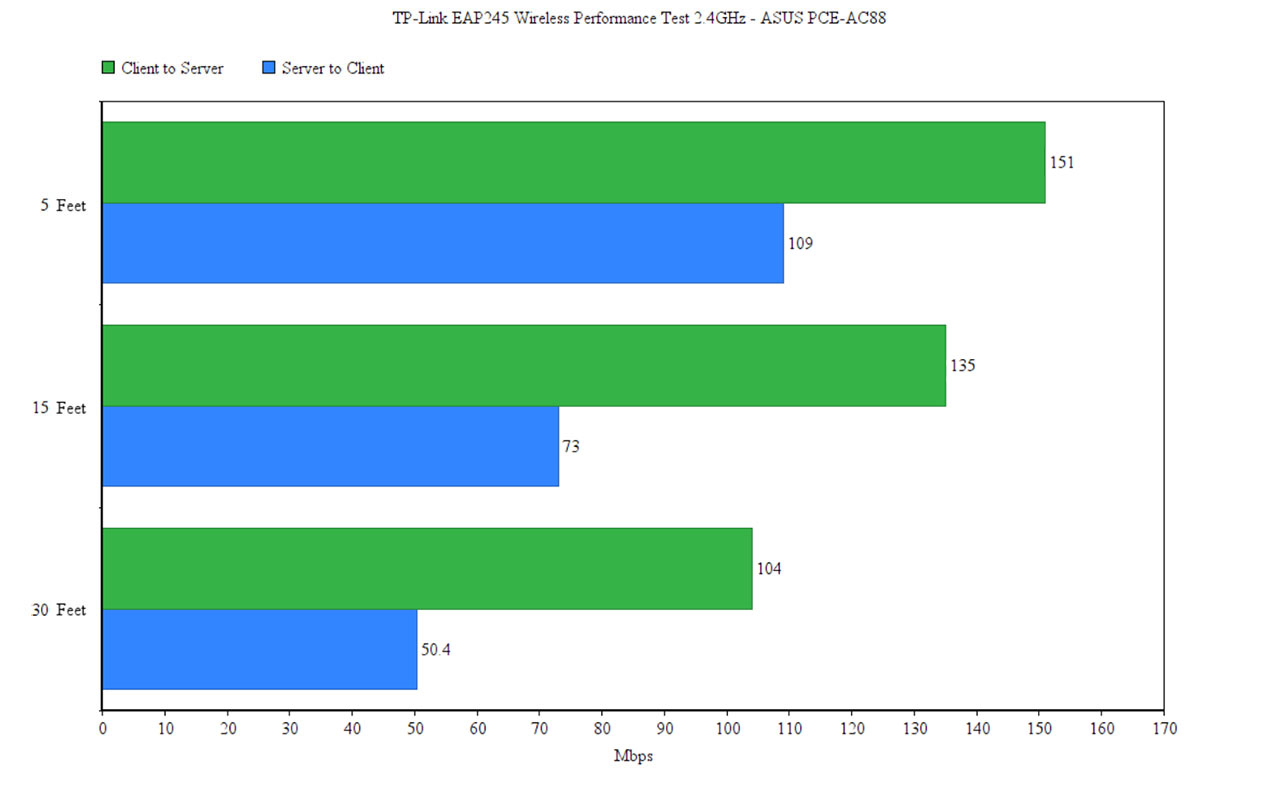
Afterwards, I connected the two computers to the 2.4GHz network and, testing the client to server performance, I got the following results: at 5 feet, I measured an average of 151 Mbps, while at 15 feet, the speed decreased to 135 Mbps and lastly, at 30 feet, I measured an average of 104 Mbps. Once again, I was able to measure a way better throughput than with the first unit. Next, I tested the server to client performance and, once again, it was a lot better: at 5 feet, I measured an average of 109 Mbps and at 15 feet, the speed went slightly higher to 73 Mbps; at 30 feet, I measured an average of 50.4 Mbps.
As you can see, the client to server performance does not look good at all and I tried to pinpoint the reason for it – no feature which may impact the performance was enabled, changing the channels made no difference, the cables all support 1Gbps, the adapter is working fine (I retested the UAP-AC-PRO and everything went smoothly), so ultimately, I do think that I may have gotten a band unit. That’s why I decided to leave the current results as they are and, when the new unit arrives, I’ll retest it and see if there are any improvements.
Conclusion
Second time’s a charm and the TP-Link EAP245 has proven to actually be a great performer in terms of wireless speed (even better than the Ubiquiti UAP-AC-PRO); besides that, the EAP245 has a very good heat management (although, it is thicker than the average ceiling APs), the Omada controller definitely feels less polished than the UniFi controller, but it has time to mature and I hope that TP-Link will add more types of devices under its centralized monitoring system. I’m not really a fan of the single port since usually, I do prefer to connect at least one wired client to the AP, but considering the attractive price tag, I do see lots of people preferring it over other devices from competition.

Mark is a graduate in Computer Science, having gathered valuable experience over the years working in IT as a programmer. Mark is also the main tech writer for MBReviews.com, covering not only his passion, the networking devices, but also other cool electronic gadgets that you may find useful for your every day life.

