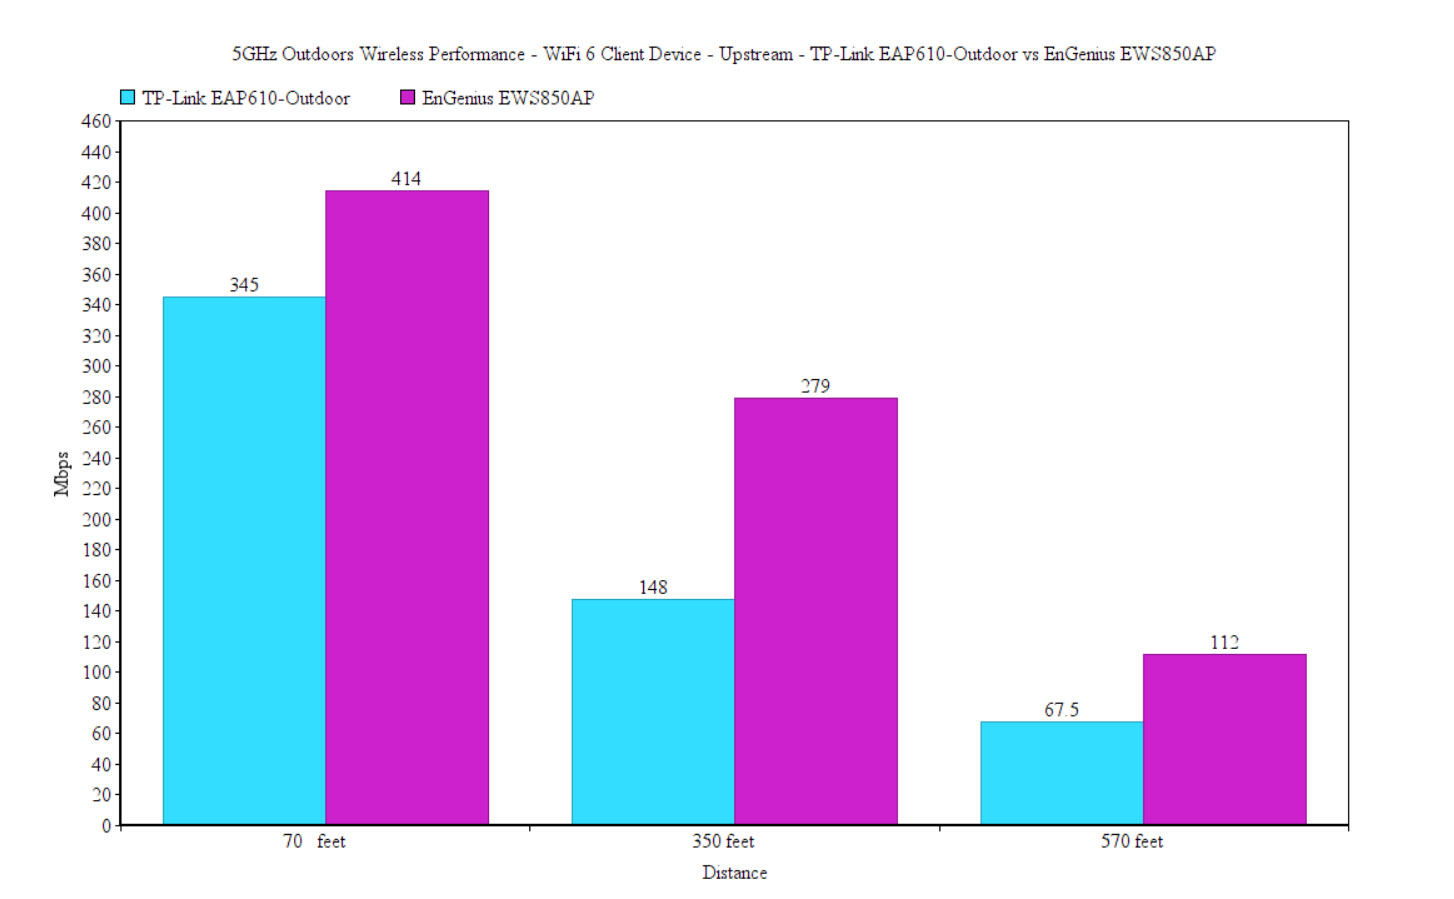
Before, I used to test the outdoor access points in a different location, trying to avoid trees and buildings, so there were two directions (just check the EnGenius EWS850AP and the Mikrotik NetMetal ac2 tests to get an idea about what I am talking about).
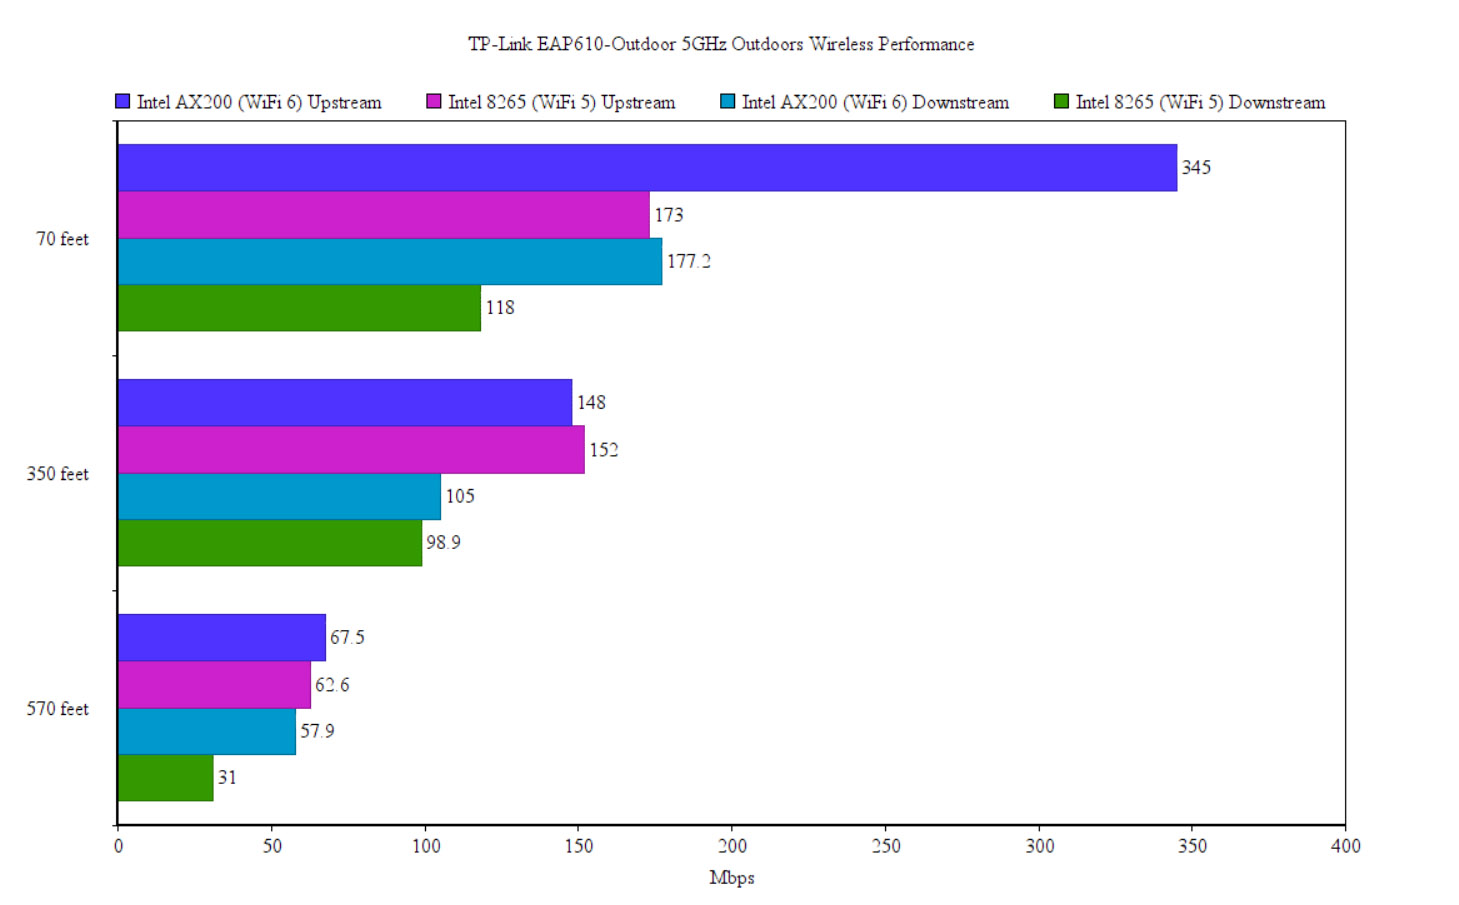
But I moved to a different location, so I decided to keep things a bit more simple. I still maintained line of sight and I checked the throughput at 70 feet, 350 and 570 feet. It should be enough to get an idea on how well performing the access point can be when using regular WiFi 5 and WiFi 6 client devices, not some PtP APs.
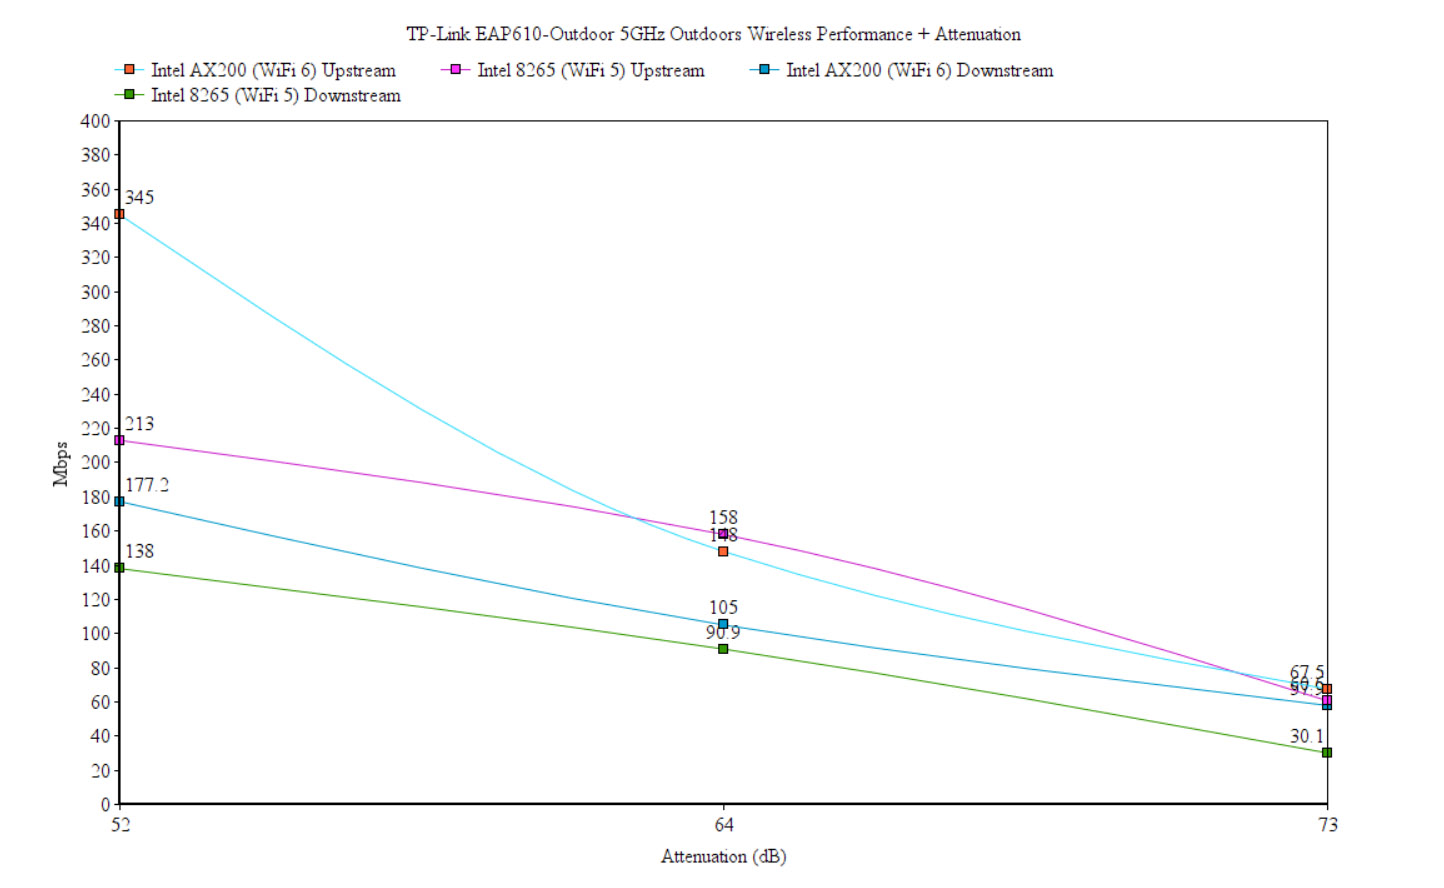
As you can see, when LoS is maintained, even at 70 feet, the attenuation is better (-52dB vs -77dB) when using the WiFi 6 client device, and the throughput is better as well. I was able to measure 345Mbps up and 177.2Mbps downstream. At 350 feet (-64dB), the speed is still good for most applications, scoring 148Mbps up and 105Mbps downstream. At 570 feet, it’s still possible to navigate the web and even run some streaming apps because I saw an average of 67.5Mbps upstream and 57.9Mbps downstream (-73dB, so the signal is still surprisingly potent).
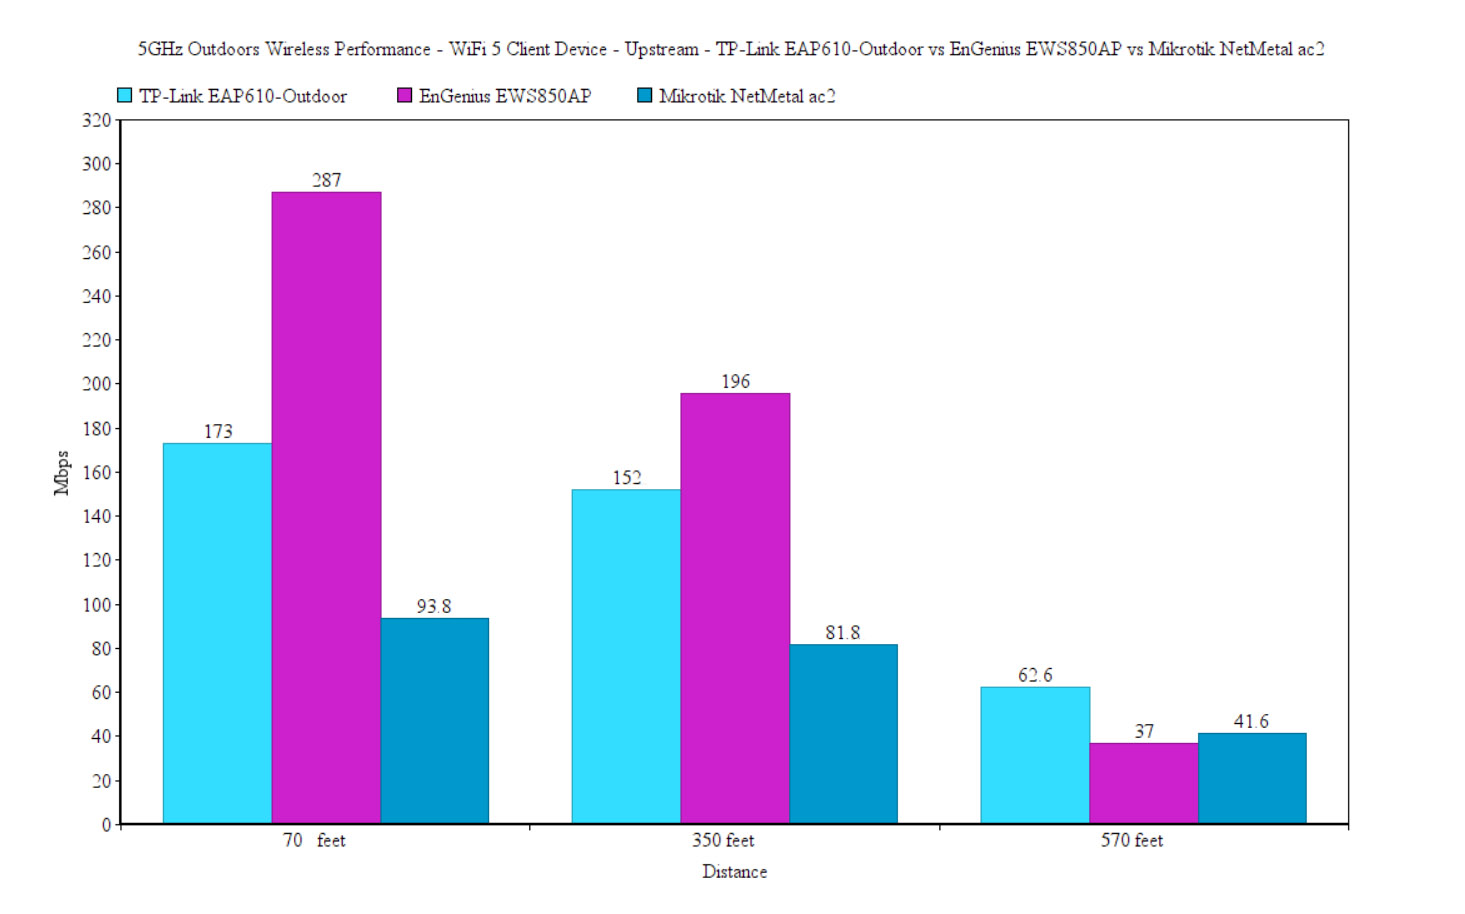
Switching to the WiFi 5 client device, there is a noticeable difference in performance at 70 feet and 350 feet, despite the signal strength being very similar to the WiFi 6 client device. At 570 feet, the throughput gets somewhat similar since I noticed an average of 62.6Mbps up and 31Mbps downstream.
The Wireless Test (2.4GHz)
It was interesting to see that the results between the WiFi 5 and the WiFi 6 client devices are very different, and yes, the latter performed a lot better which shows that you should invest in WiFi 6 and, why not, even WiFi 6E routers or access points only if you have client devices that can make use of all the new technologies.
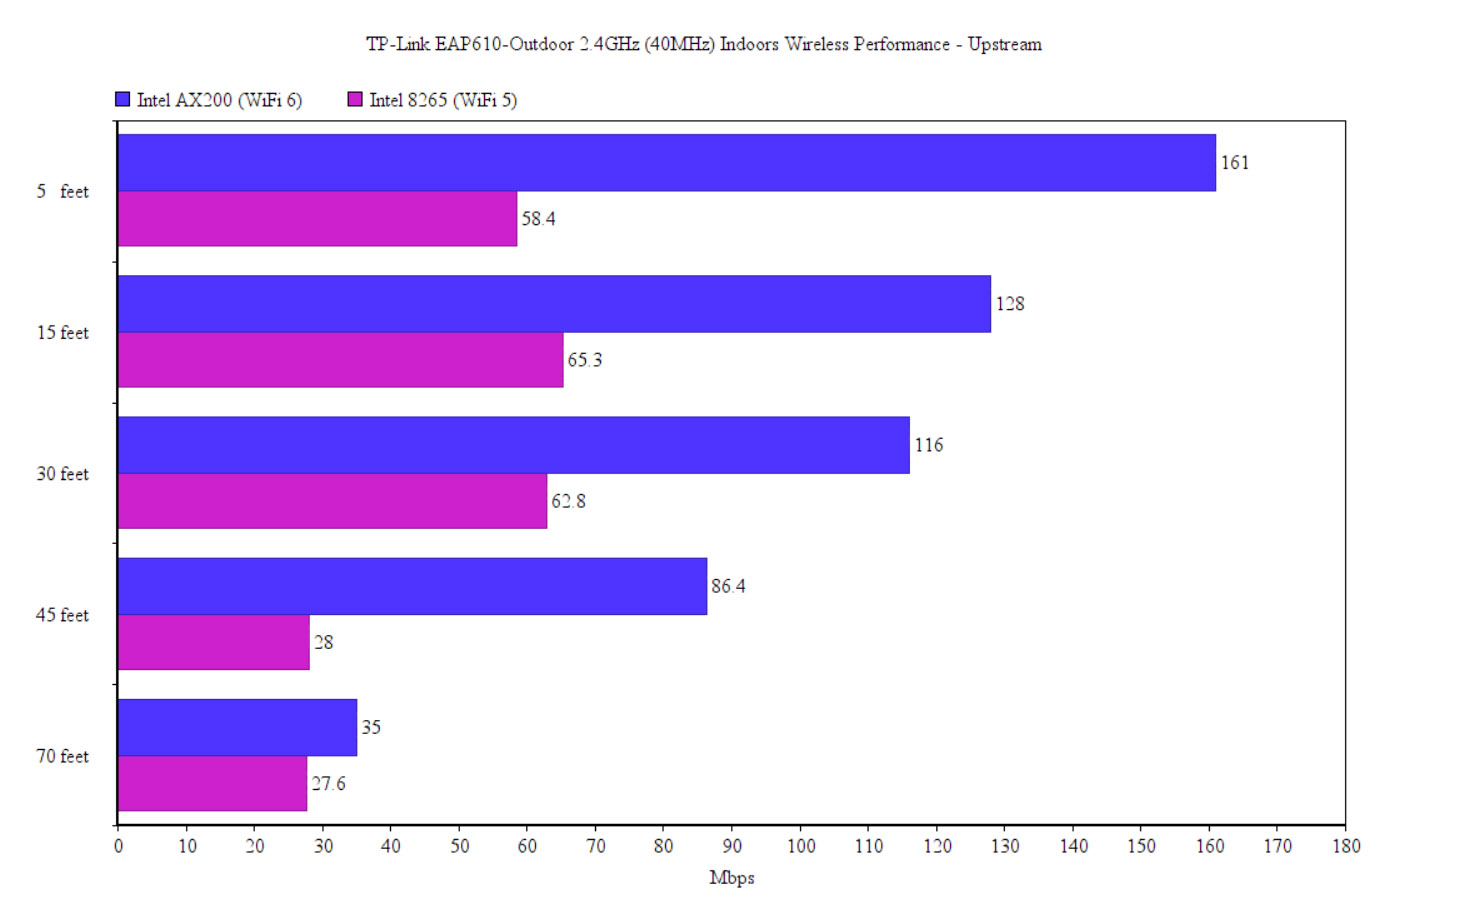
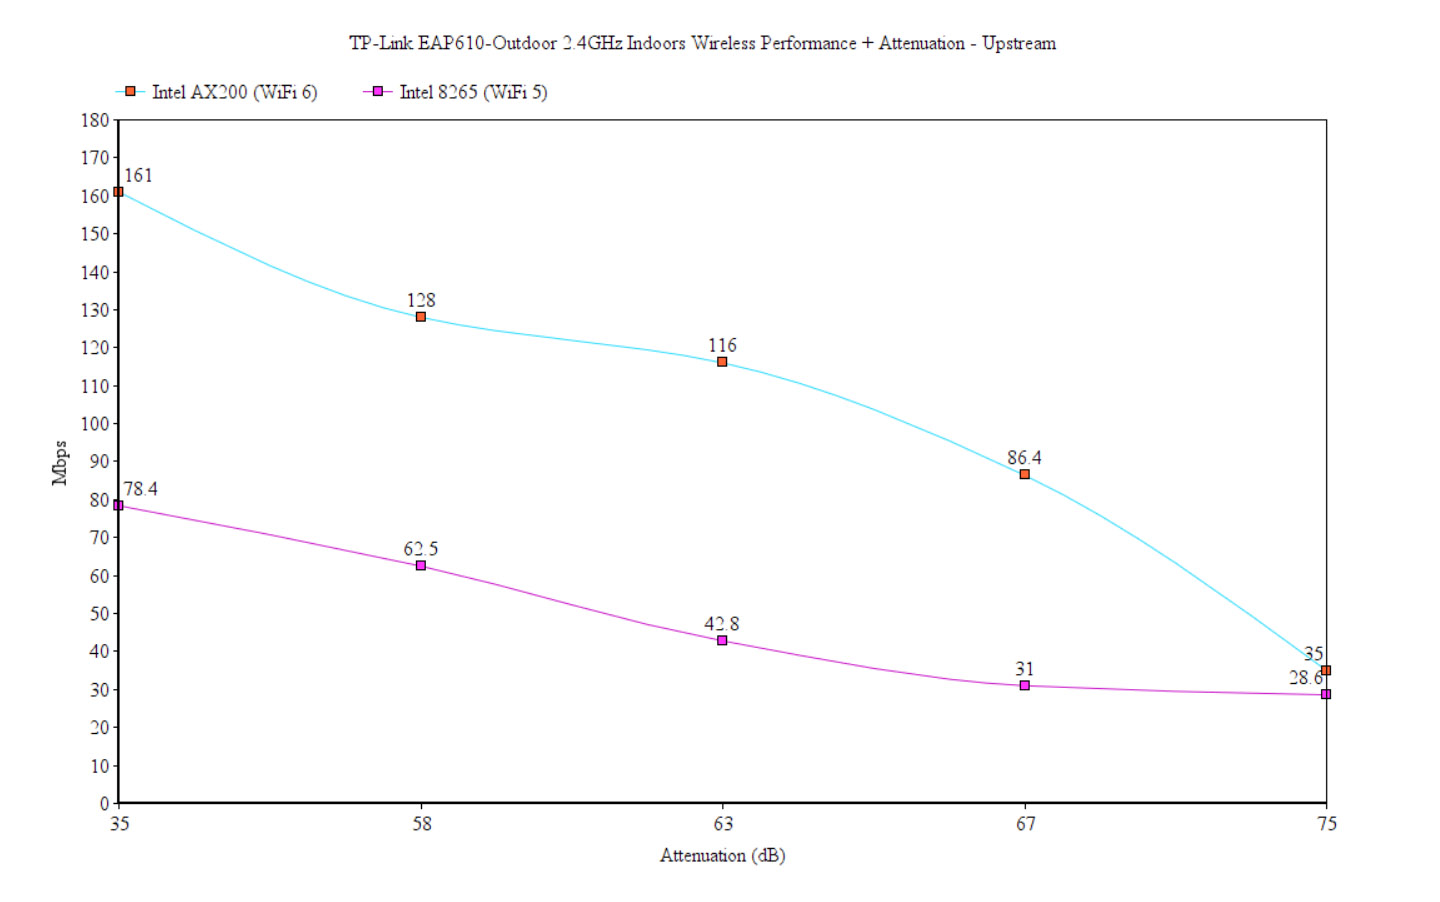
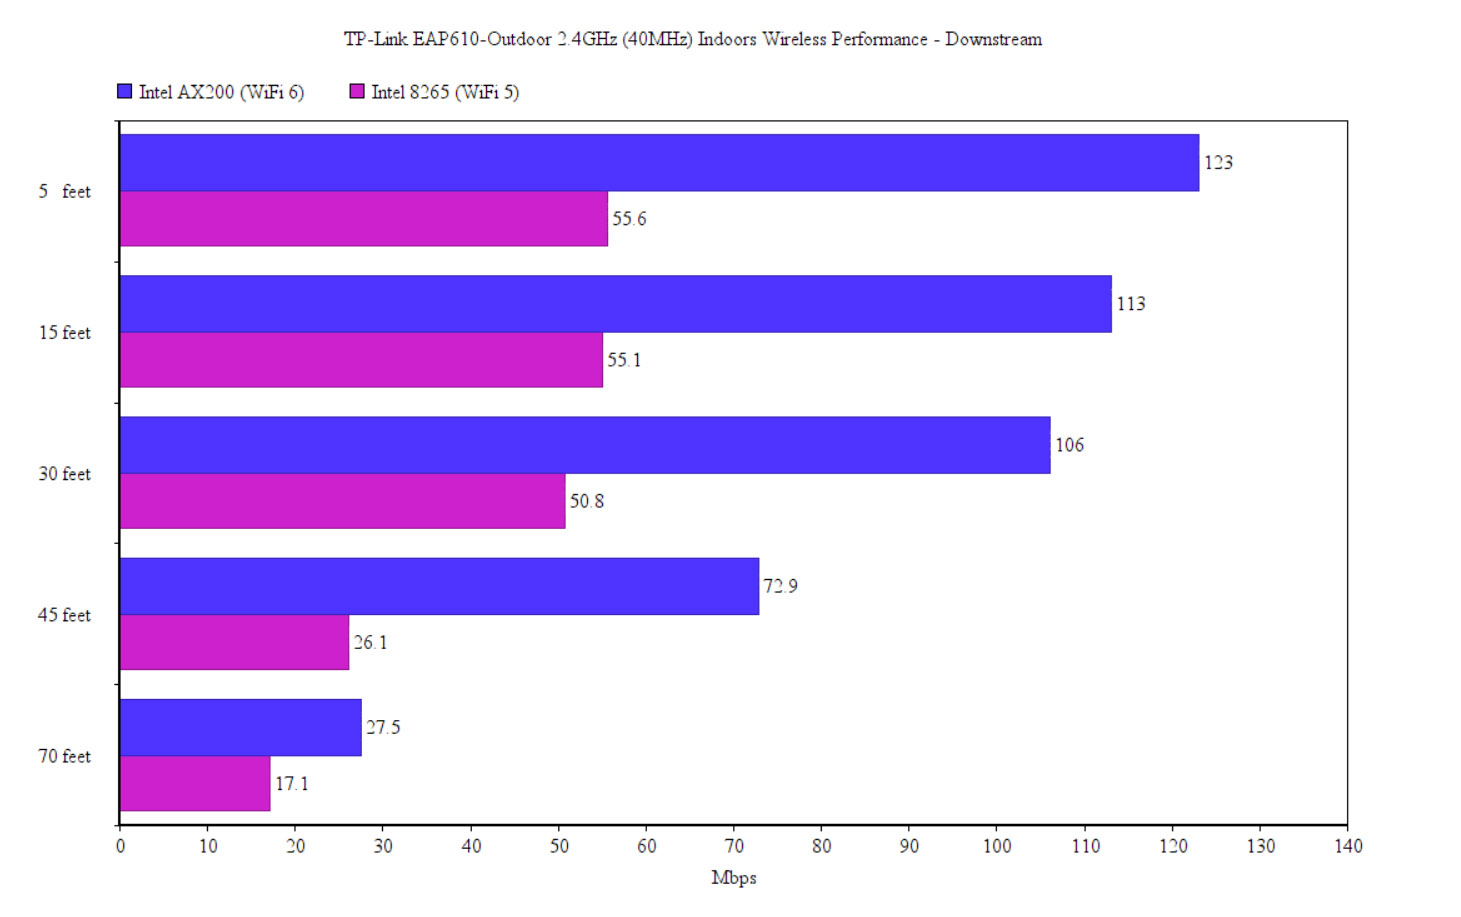
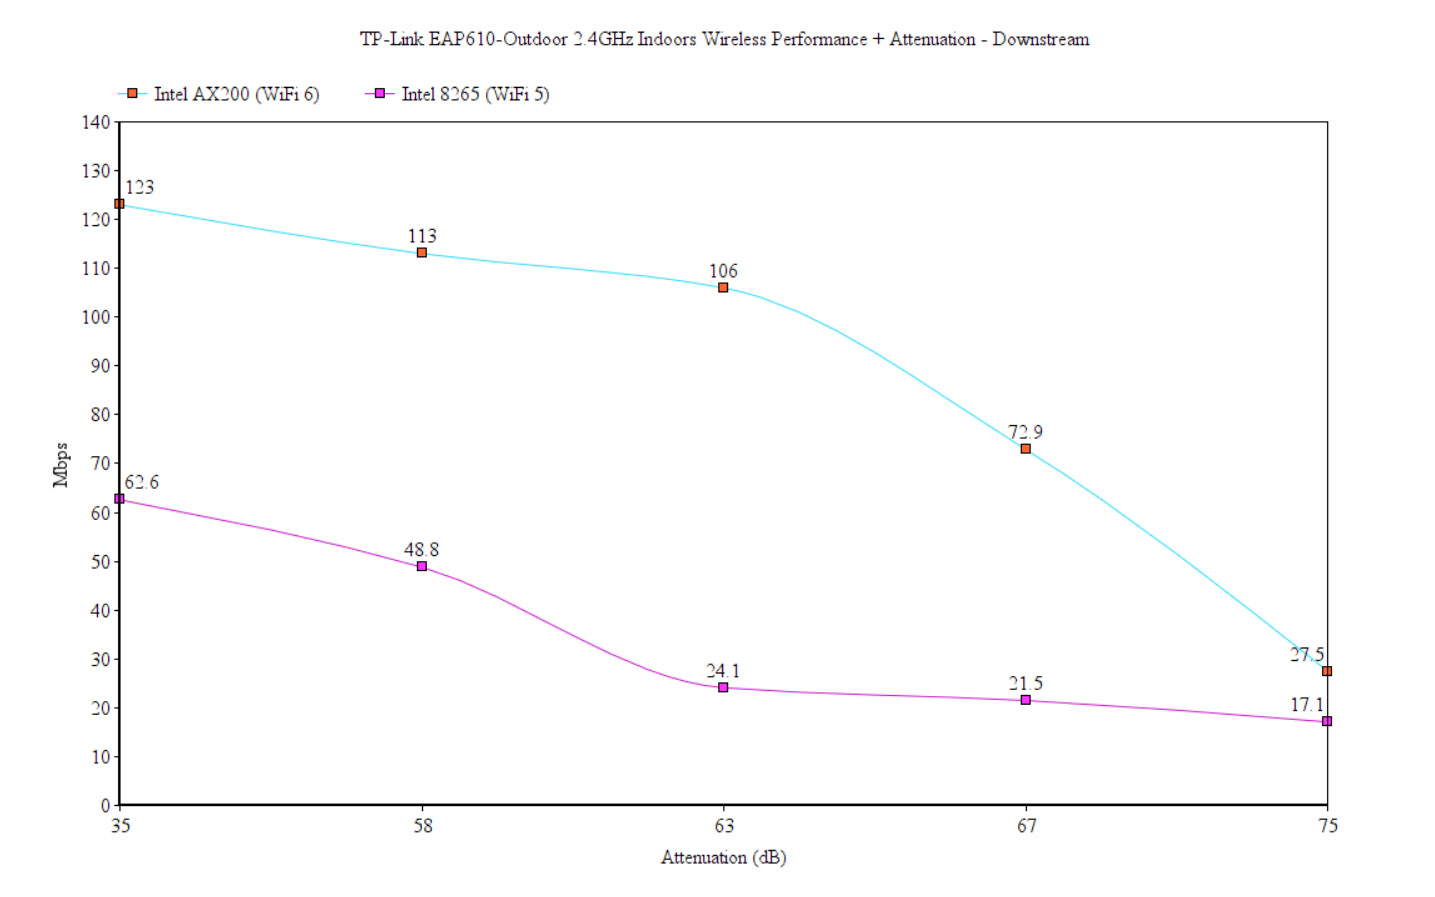
The first batch of tests was indoors and, with the AX200 client, I measured an average of 161Mbps at 5 feet (40MHz channel bandwidth) and, at 45 feet, it went down to 86.5Mbps. The farthest I went (70 feet indoors), the AP delivered 35Mbps, so it’s still a usable throughput (-75dB). Moving to the WiFi 5 client device, we see that at 5 feet, I measured only 58.4Mbps up and 55.6Mbps downstream, but, considering that the speed gets better after I move farther out shows that the WiFi 5 client is overwhelmed by the antenna gain from the TP-Link EAP610-Outdoor.
So, if you intend to stay close to the access point, make sure to lower its power transmit or simply get another device altogether.
Moving outdoors, the signal gets a bit better, but to my surprise, the 5GHz reaches farther than the 2.4GHz. Indeed, as you can see, near the AP, at 70 feet, the throughput was 69.6Mbps upstream and 53.4Mbps downstream (using the WiFi 6 client), but at 570feet, I could not connect to the network no more.
I got closer, at about 500 feet and it worked – saw 31.8Mbps up and 7.9Mbps down. Moving to the WiFi 5 client, I did manage to connect to the network at 570 feet, but I would not recommend it since upstream, the speed was only 16.5Mbps, while downstream I only saw 12.3Kbps – yes, you read right, it’s Kbps.
The Standalone Mode
TP-Link has added a standalone mode for the EAP610-Outdoor and it’s surprisingly feature-rich, offering most of the important features. And to access it, you do need to connect the TP-Link EAP610-Outdoor to a power source – either use the provided PoE adapter or jump straight to a PoE switch – then, connect the switch to a router / gateway. Afterwards, check the received IP address (from the router GUI) and enter it into the URL bar. Insert admin/admin for the username / password combo and, immediately after, you’ll be asked to change them (I liked that I could also change the username).
Next, I was asked if I wanted to set up the SSID/s and passkey/s (optional) and I got access to the interface. The GUI is divided into four main options that can be accessed from the top menu, the first being the Status. You can see some status data about the Device, the Wireless networks and the Client Devices (including Guests). Then, there’s the Wireless section, where you can adjust the settings of the 2.4GHz and the 5GHz radios.
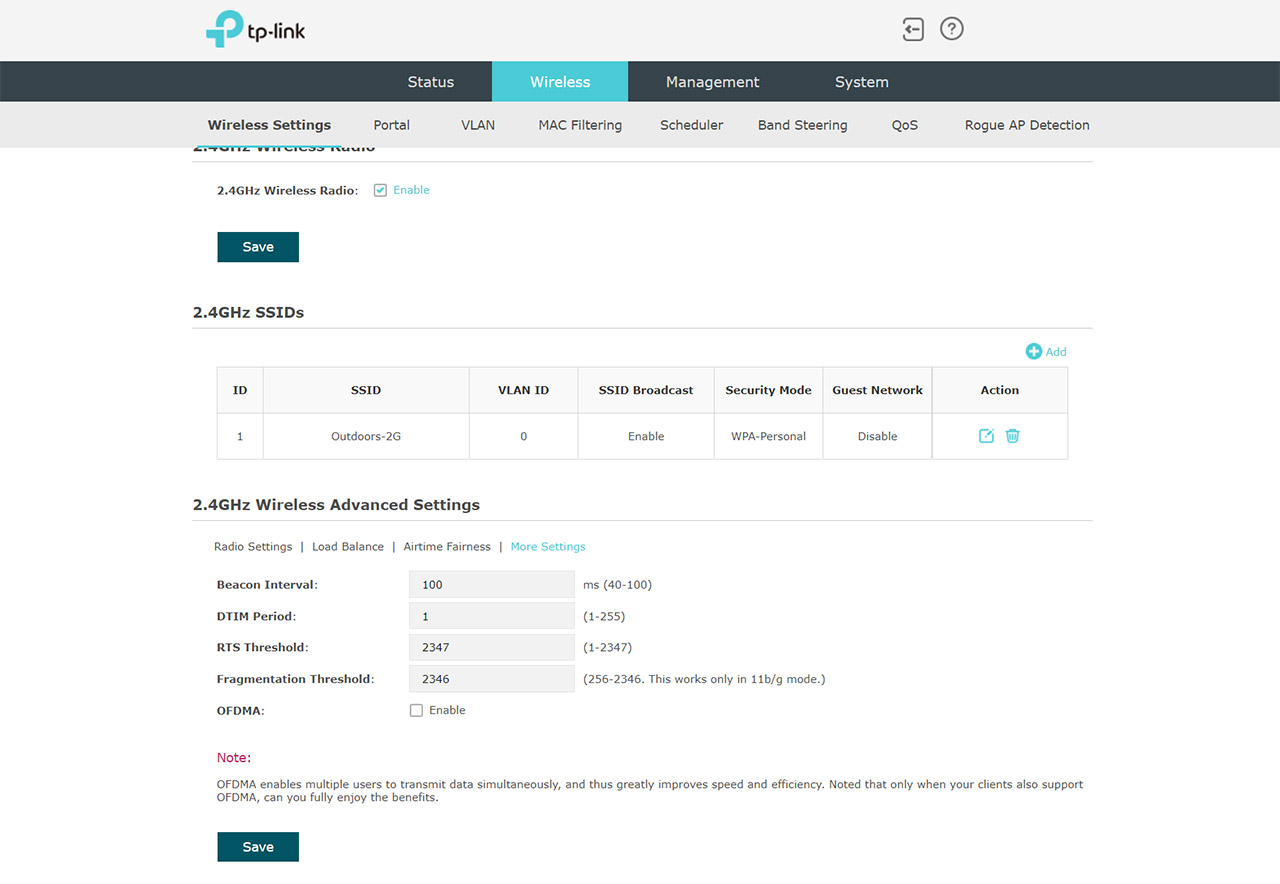
You get the usual Mode, channel width, channel and the power transmit, but there is also the option to enable the Load balancing of the clients between APs, the Airtime Fairness (don’t) and there are some additional settings that include enabling OFDMA on both radio bands. Since the TP-Link EAP610-Outdoor is an access point suitable for businesses, there is the possibility to configure the Portal, check for Rogue APs, QoS, Band Steering and more.
Under Management, you can set a dynamic or static IP address, check the logs, enable L3 accessibility, disable the LED (not that it does matter that much), configure the SSH and the SNMP access. Lastly, there’s the System section where you can create a new account, enable the Cloud-Based Controller Management, update the firmware and more.
Note: It was nice to see that the changes to the WiFi networks were applied almost instantaneously.
The Omada SDN
Even though not many think of adding an outdoor access point to a Cloud platform for easy deployment, management and monitoring, the outdoors WiFi is just as important as indoors, especially on a beach resort or a similar setup.
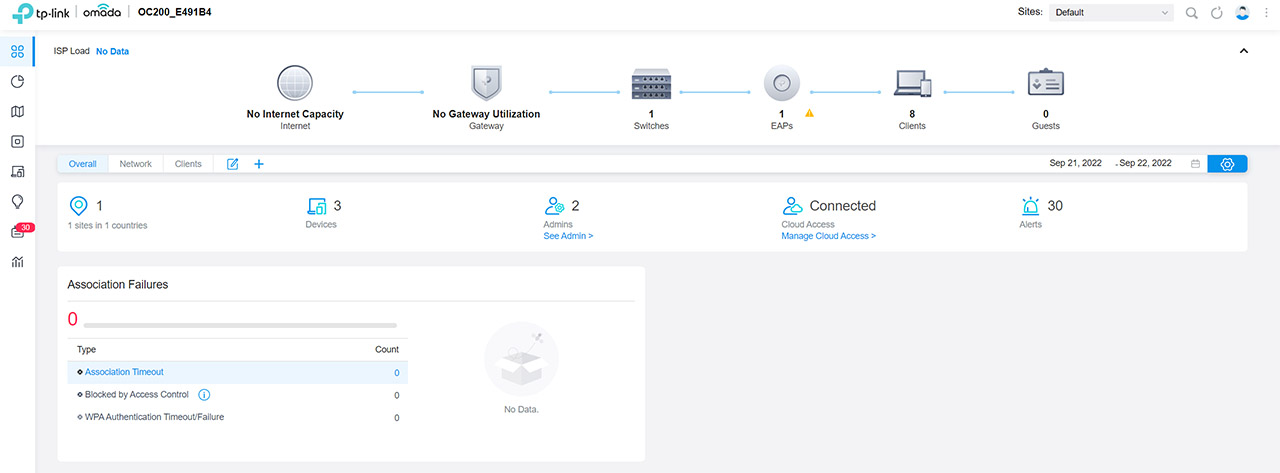
So, to add the TP-Link EAP610-Outdoor to the Cloud SDN, I once again relied on the OC200 hardware controller and the pairing process is ridiculously simple. I logged into the interface and, from the Dashboard, I clicked on the EAPs icon and the access point was already in the lost waiting to be adopted. If the adoption process fails, you just need to insert the correct username and password (if it’s already been set up before for the standalone interface).
It’s going to take a few minutes before the Provisioning process is done and then, the right side window will get populated by all the stats and settings. As with other TP-Link Omada access points (the EAP660 HD), the TP-Link EAP610-Outdoor offers pretty much the same options. You can check the Details of the AP (info about LAN, Uplink, Radios), the Clients that are connected to this particular AP (no longer the list from the router), the Mesh APs (if it works as a mesh node) and there are also some Config options as well.
These include setting up the LED, the IP (DHCP or static + Fallback), some basic Radios settings, the WLANs (set globally or can be adjusted individually for each AP), the VLAN, while the Advanced has some more interesting settings.
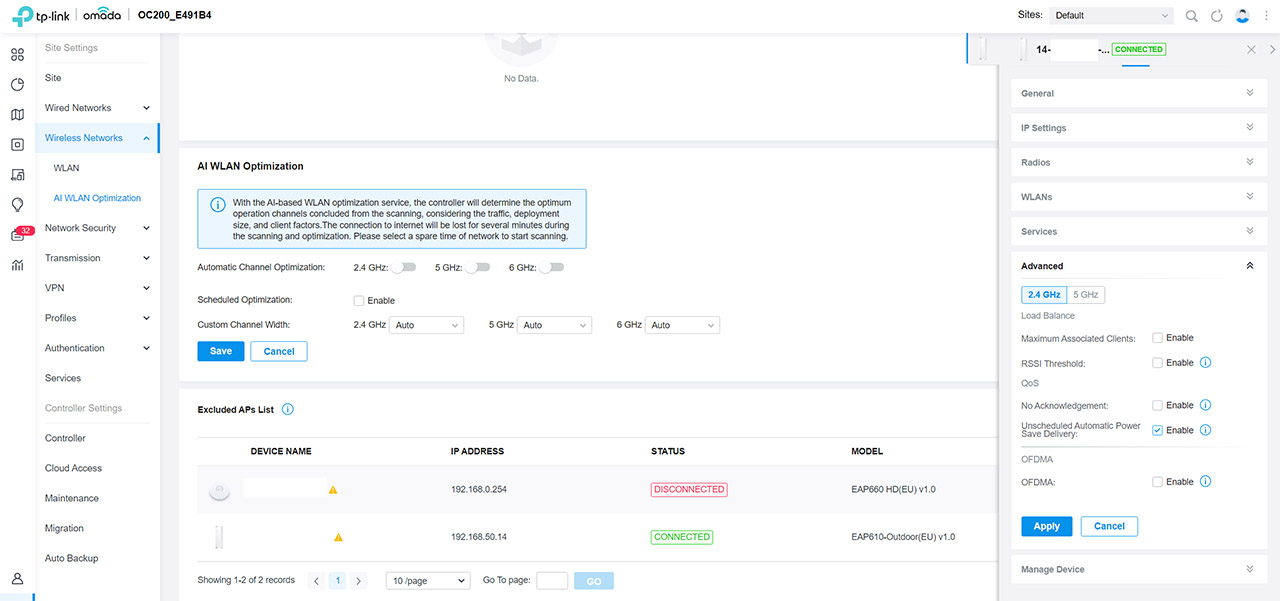
These include the possibility to enable OFDMA, some basic QoS and Load Balancing between APs. Lastly, you get the Tools for scanning the area for all the WiFi networks and the Statistics. An interesting option that’s not really focused just to this particular access point, but for all APs that are adopted to the Omada SDN is the AI WLAN Optimization. It’s a feature that should take the wheel and adjust all the important settings for you, which is far better than the default options that are rarely ideal. Still, I do think that a system administrator will know better what values are best than the ‘AI’.
The Conclusion
The market for the outdoors-suitable access point is a bit weird because on one hand, we got the powerful point-to-point APs that can cover miles of distance and then there’s devices such as the TP-Link EAP610-Outdoor which are designed to cover the immediate area with WiFi.
When I say immediate, I mean at least 500 feet in each direction as proven by my tests. So yes, this device will do great for beaches resorts or any outdoor area where people need WiFi and the signal from the city is lacking. The TP-Link EAP610-Outdoor will survive some harsh weather conditions, the software is excellent (both standalone and Omada), so perhaps the only complaint is that I can’t add more powerful antennas and reach even farther.

Mark is a graduate in Computer Science, having gathered valuable experience over the years working in IT as a programmer. Mark is also the main tech writer for MBReviews.com, covering not only his passion, the networking devices, but also other cool electronic gadgets that you may find useful for your every day life.

