I am sure most of you very interested to see how the Ubiquiti U6-LR handles some WiFi 5 clients, so I connected the laptop with an Intel 8265 adapter to the 5GHz network (80MHz). The signal strength was less impressive all around the house and, at 5 feet, I saw an average of 661Mbps upstream (reminds me of the nanoHD performance) and 222Mbps downstream, which is a significant difference. What’s interesting is that downstream, the throughput remained stable up until going past 30 feet. Afterwards, I decided to check out how well the Ubiquiti U6-LR performs with a mobile phone, namely the Pixel 2 XL, a WiFi 5 client device. Upstream, the throughput was close to 400Mbps up until passing 15 feet, going down to 46.7Mbps at 45 feet.
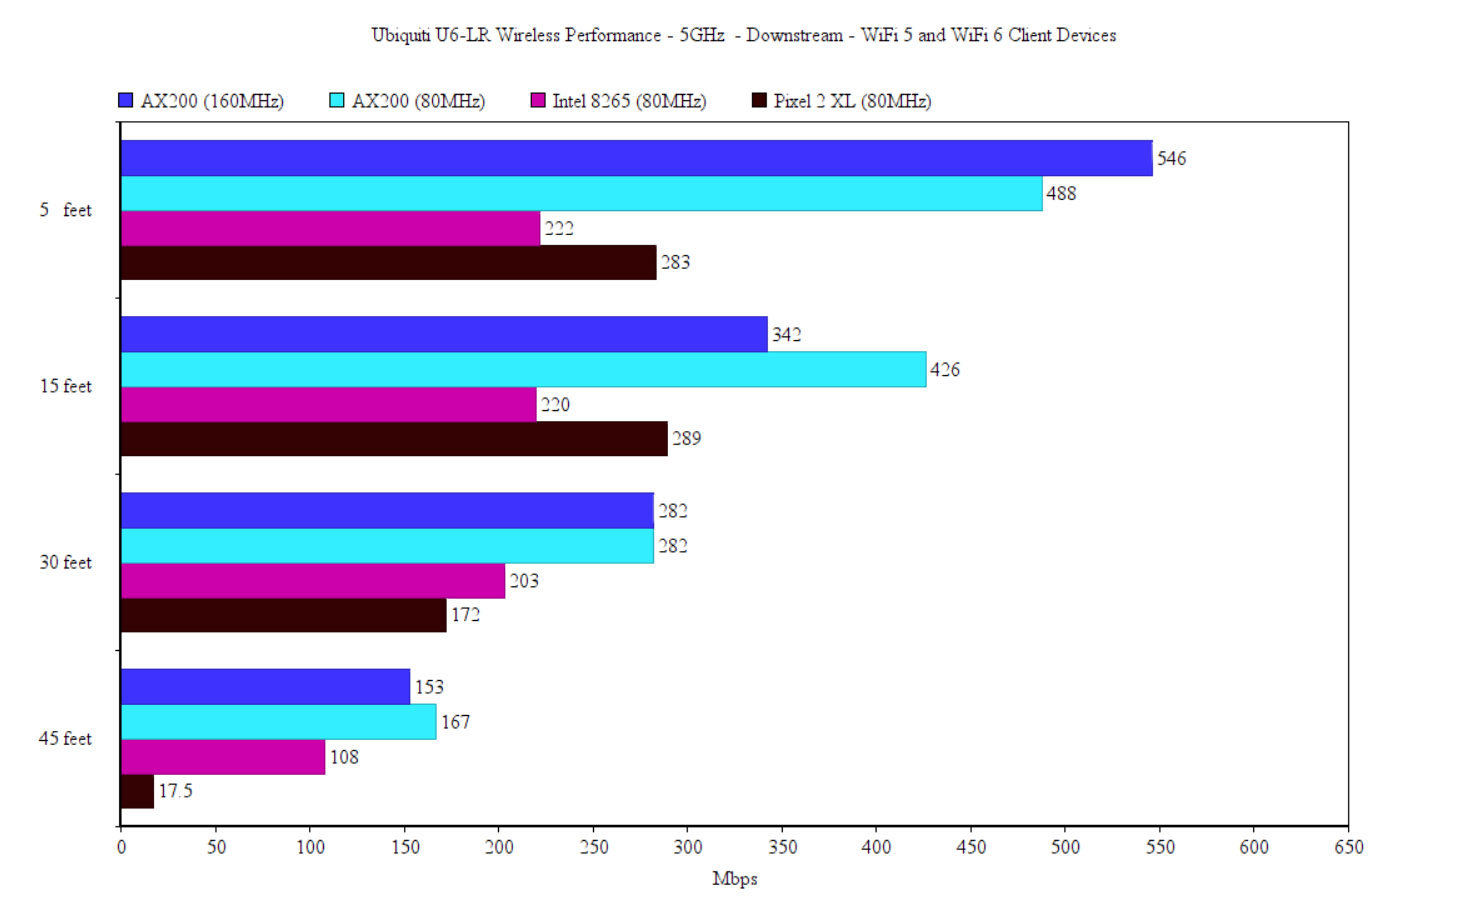
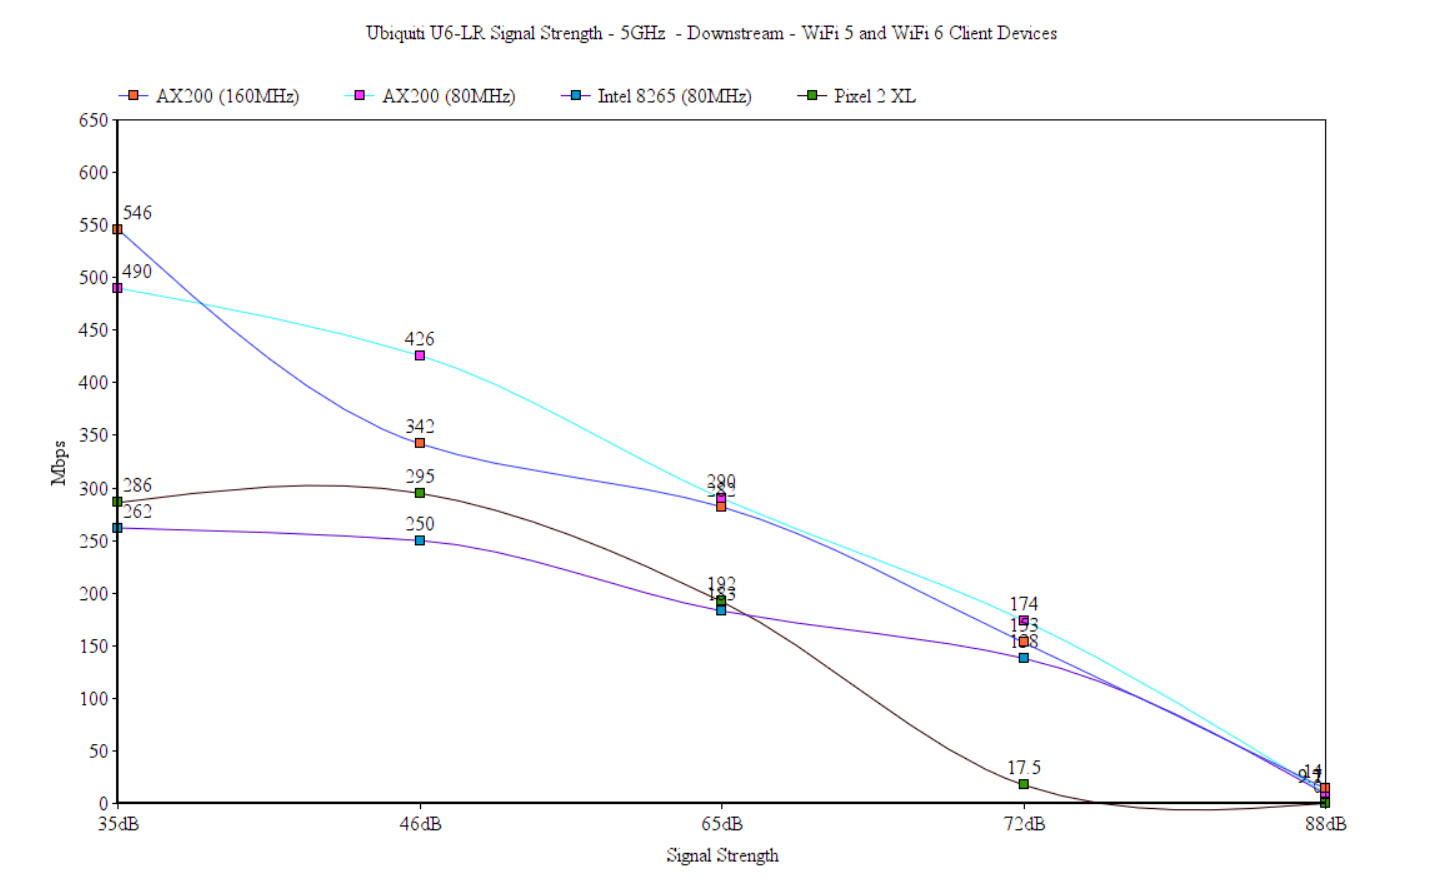
So it’s not really impressive. Neither is the downstream throughput which ends up staying close to 300Mbps up to 15 feet and then dropping to a barely usable 17.5Mbps at 45 feet (-72dB signal strength).
Wireless Test (2.4GHz)
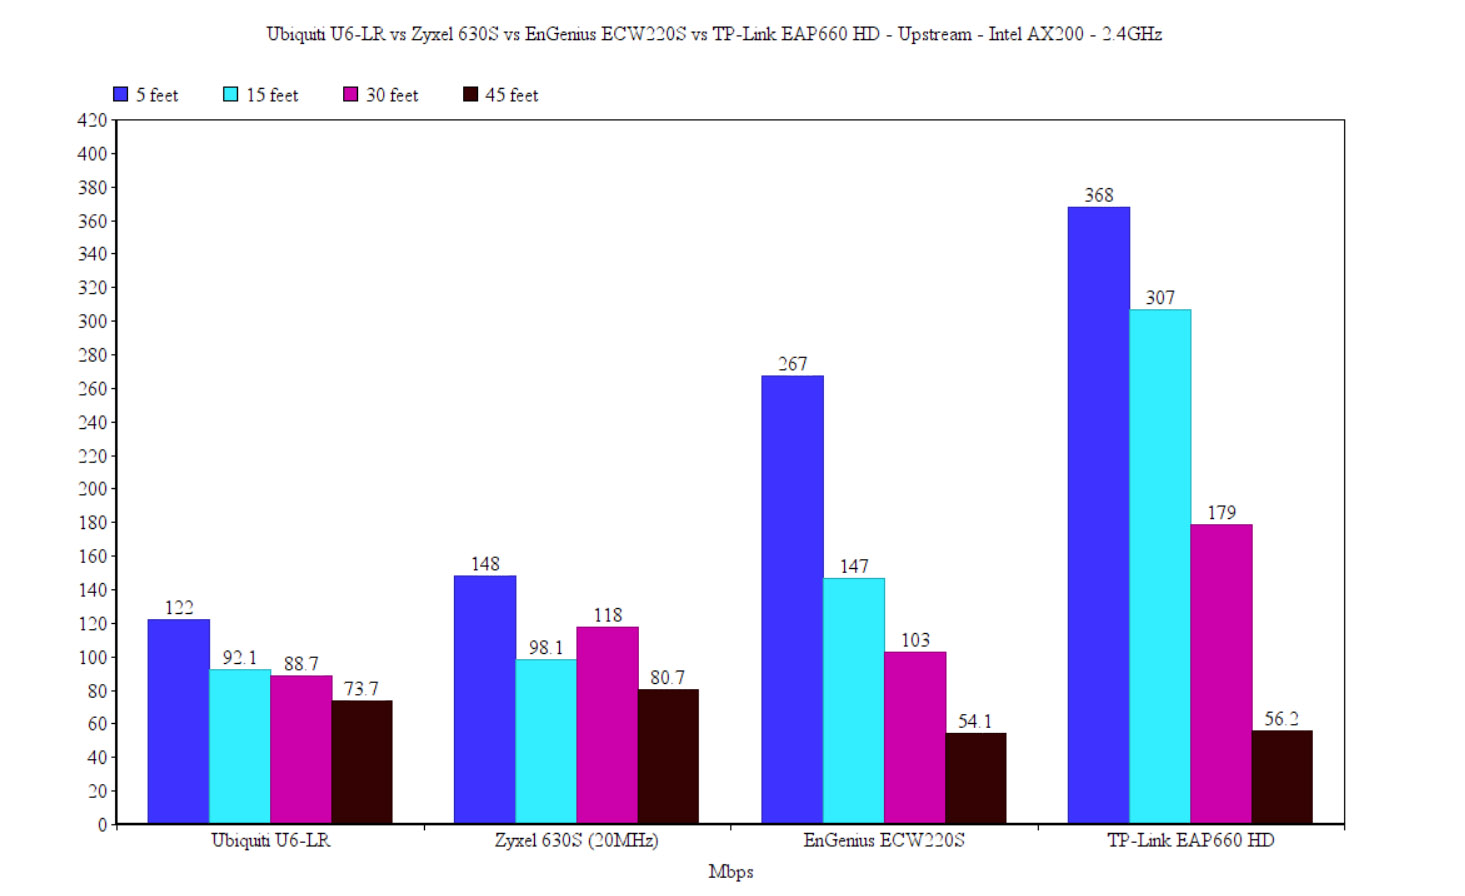
Since the Ubiquiti U6-LR doesn’t make use of OFDMA on the 2.4GHz, the throughput is nothing impressive, but still usable for IoT devices and some older phones that are still stuck on the 2.4GHz band. Using the AX200 client device, the signal was really good especially close to the access point (between 26 to 35dB), but the throughput was 122Mbps at 5 feet and 98.1Mbps at 15 feet (upstream).
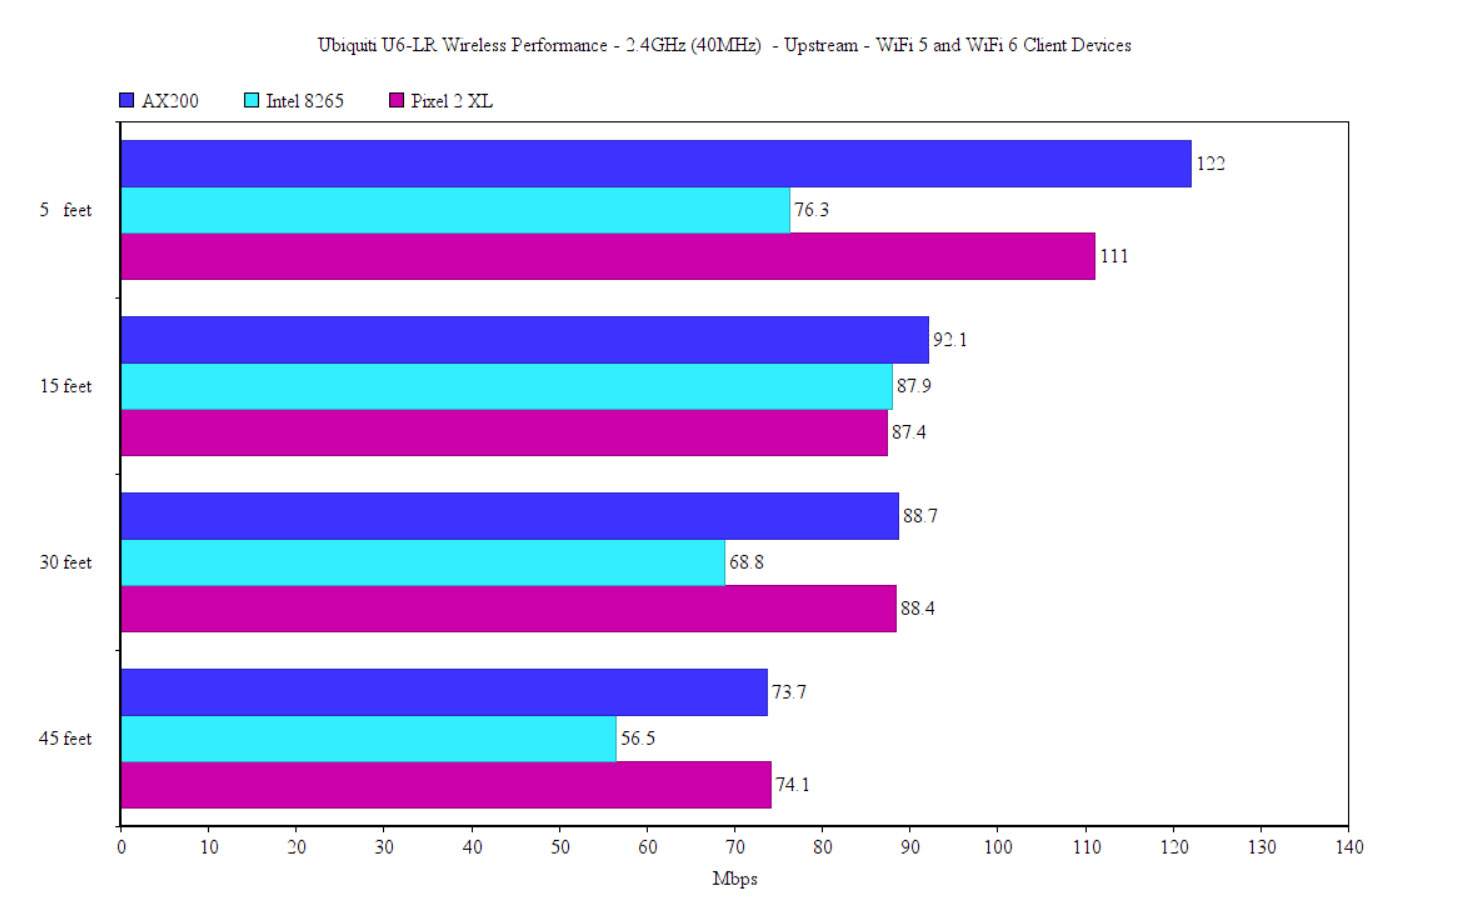
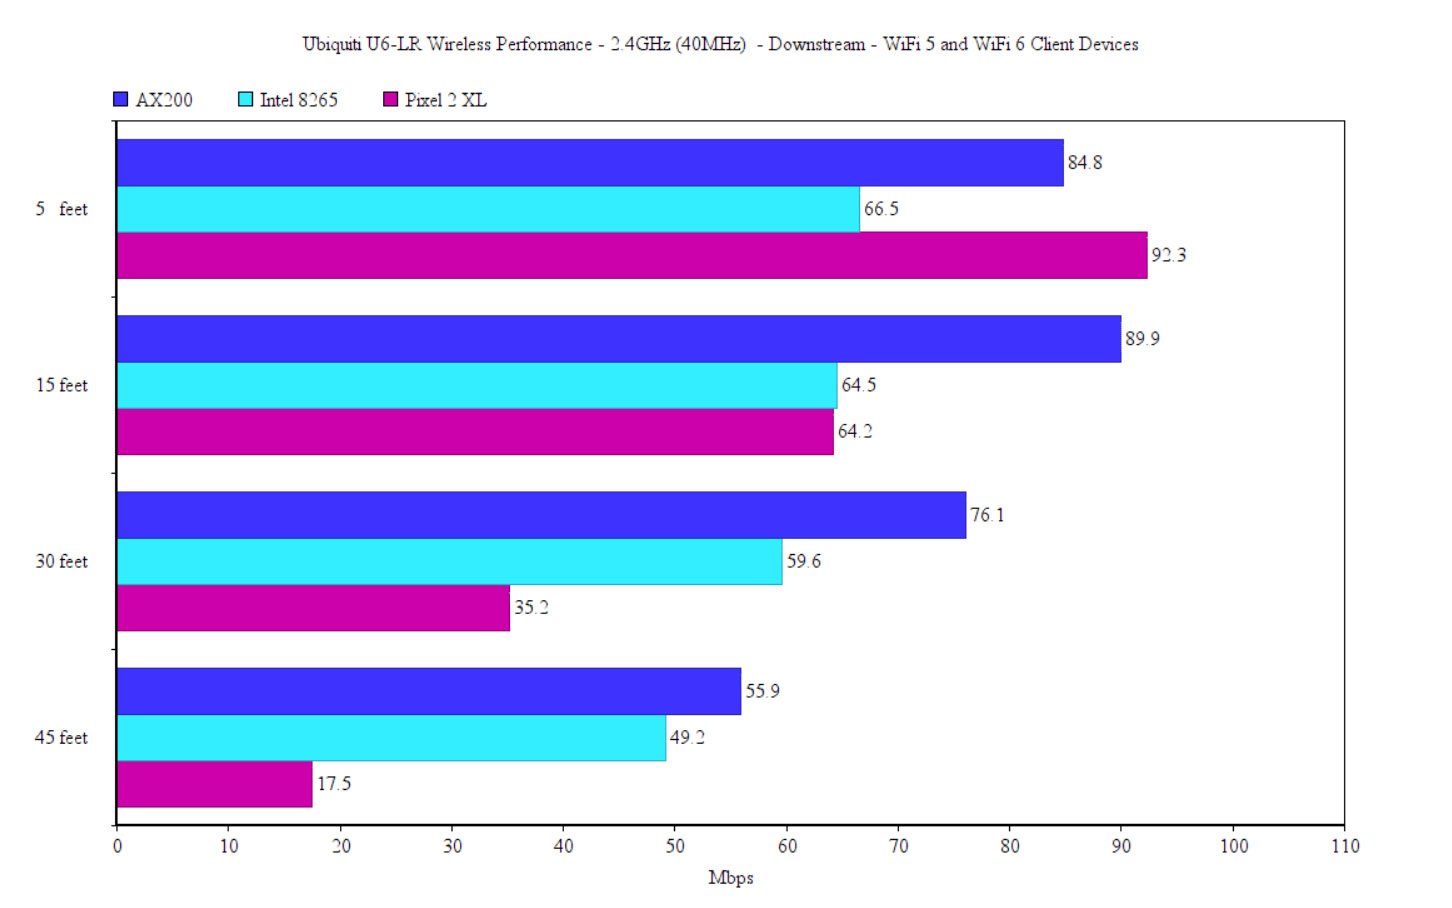
Downstream, I saw an average of 84.8Mbps and the throughput remained relatively strong up to 45 feet (55.9Mbps). Moving to the Intel 8265 WiFi adapter, it didn’t really like the Ubiquiti U6-LR. That’s because it didn’t even get close to 100Mbps regardless of the signal strength or the distance. The good news was that even at -72dB (about 70 feet), I could still use the Internet since there were 23.4Mbps up and 27.2Mbps downstream. The Pixel 2 XL performed a bit better, being a bit closer to the AX200 performance. This means that there were 111Mbps at 5 feet, upstream (92.3Mbps downstream) and 74.1Mbps at 45 feet (17.5Mbps downstream).
Setup and Software
Standalone Mode
The Ubiquiti U6-LR has a stand-alone mode available, but it’s different than what you get on other wireless access points. Instead of entering the IP address received from the router in the URL, you need to use a mobile app. So, go ahead and install the UniFi Network app which, to my surprise, does not require the creation of an account. You can, but you don’t need to. There are a few permissions that can be accepted for simplicity’s sake, such as for Bluetooth access and the means to find and connect to devices on the local network (the former is useful since the Ubiquiti U6-LR does use Bluetooth for this exact reason).
Then, I could see that the U6-LR was ready to be set up. And the AP connected immediately, but there was a warning that the features will be severely limited and that there is no remote management available. Next, I gave the AP a name, set up the WiFi networks and I was given a recovery password. And that’s all, I could now roam the app interface which indeed, it was very limited.
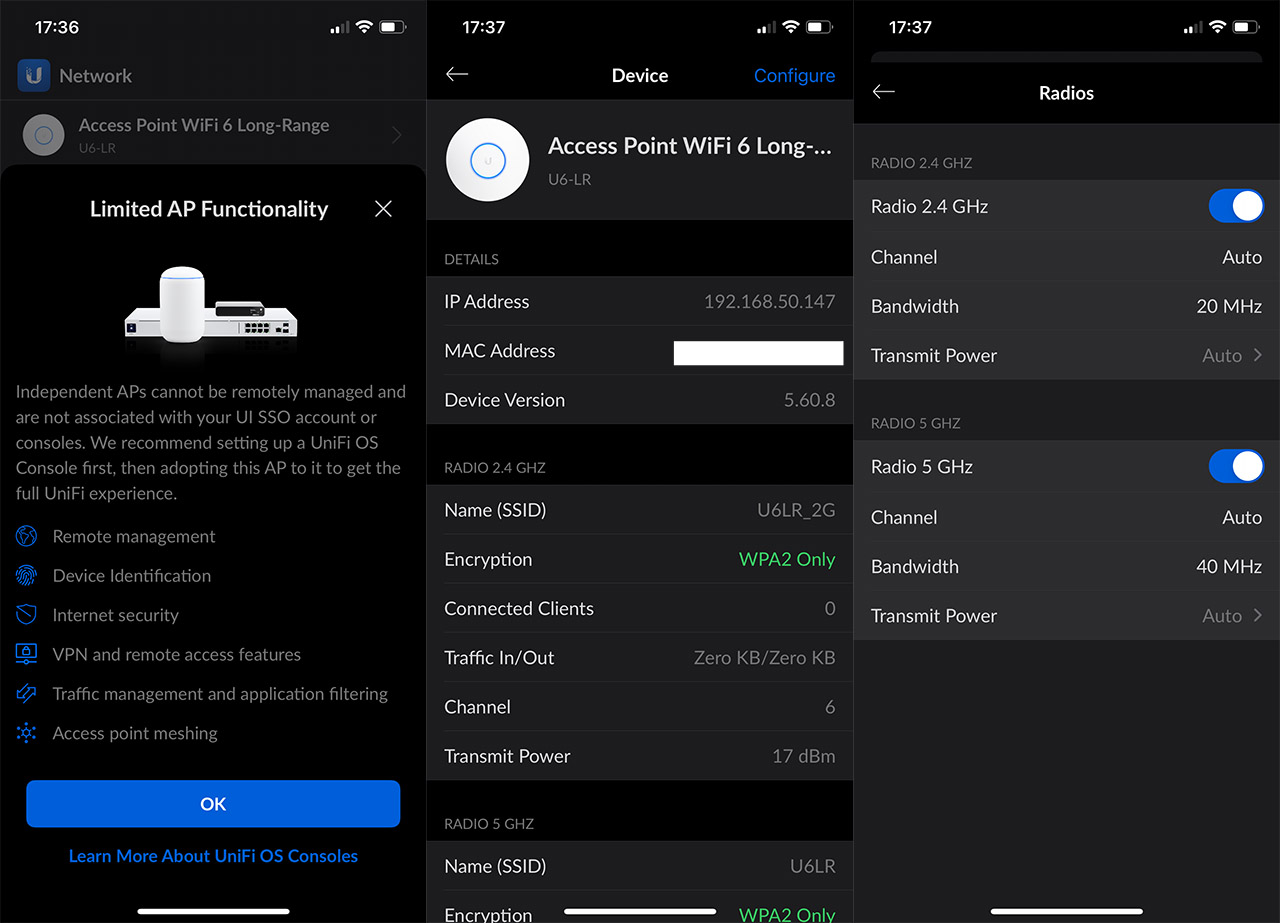
The main window will simply show some detailed status data, at the bottom having the option to Locate the Device or Restart it. If you press on Configure, don’t really expect much because you will be able to turn off the LED, update the firmware and adjust the Radio and the WLANs settings. You can adjust the Channel, the channel Bandwidth and the Transmit Power of each radio, while under WLANs, you can change the name and security key (the encryption is stuck at WPA2). So yes, the Ubiquiti U6-LR needs the UniFi controller to offer the full spectrum of features.
The UniFi Controller
The UniFi controller needs to be installed somewhere in your network and then it needs to run continuously if you want to get accurate data and to configure either only the AP or a larger Ubiquiti-powered network. It’s the same concept as with the TP-Link Omada controller (which is heavily inspired by the UniFi). And yes, Ubiquiti does offer both the hardware to run the controller and the possibility to sync with it from the Cloud (EnGenius and Zyxel’s approach). After starting the UniFi, I saw that it does require Java (which is annoying for regular users and infuriating for businesses, due to those lovely License changes) and the now-mandatory data collection.
Then, I could log into my account (or create a new one) and the U6-LR should appear as being ready to paired if it’s within the network (connected to the router or the gateway via a switch or PoE adapter). If it doesn’t then you probably have been using it in stand-alone mode, so make sure to reset it beforehand. After setting up the WiFi, I could finally access the GUI.
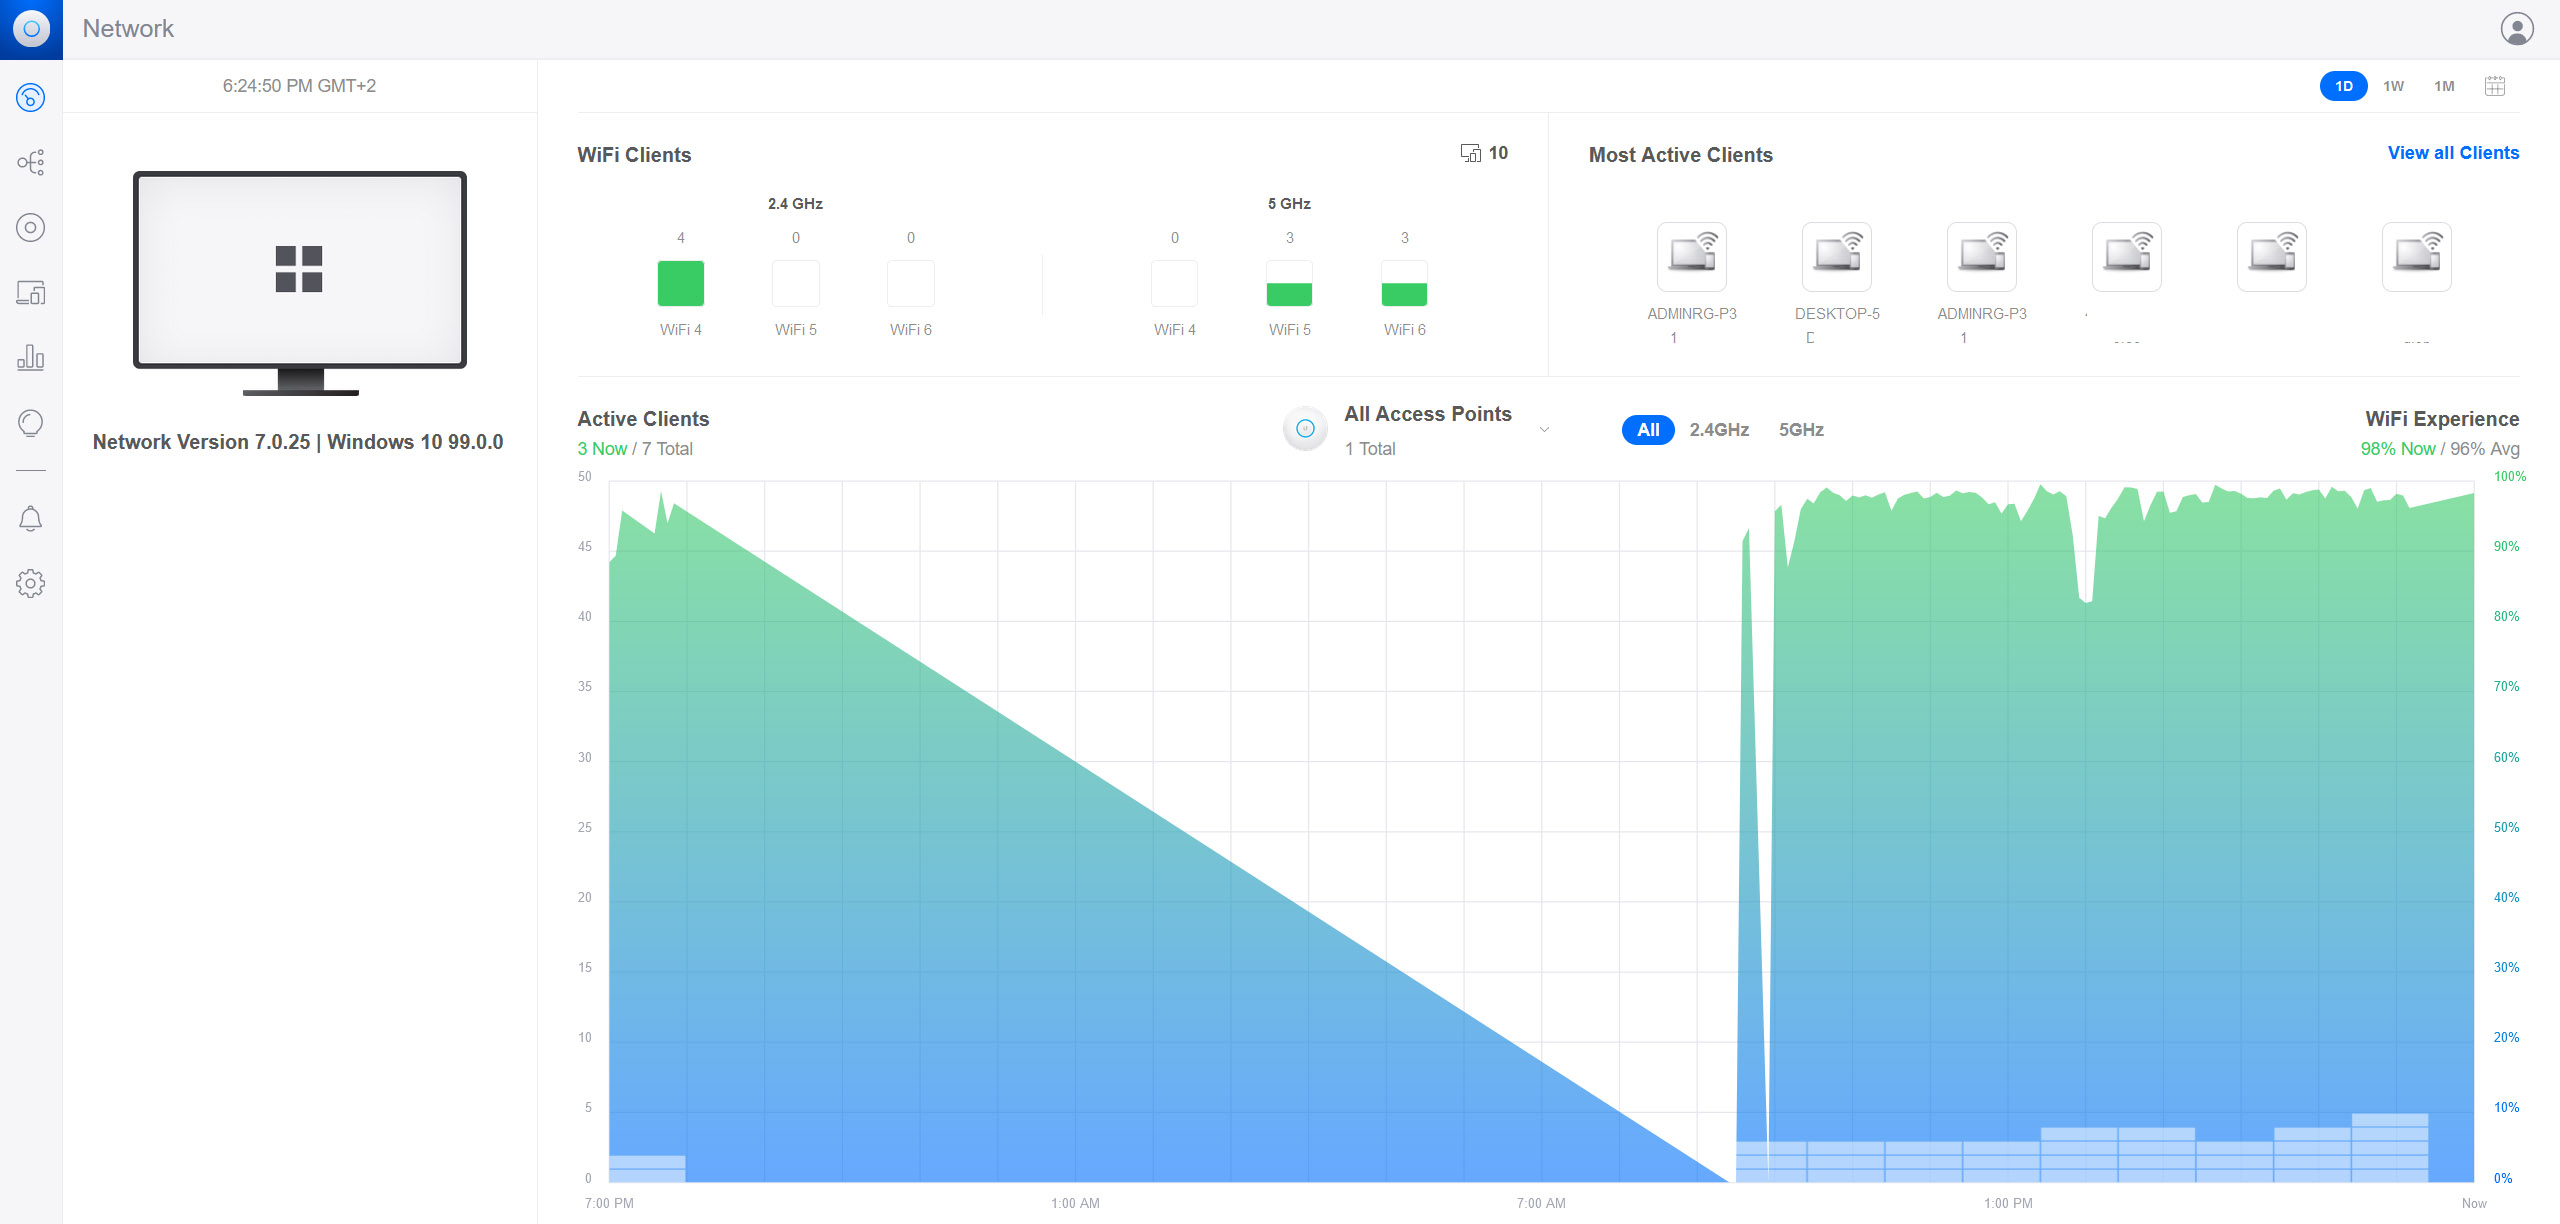
And it’s just as it was years ago: simple layout, where you can easily find everything without getting lost, even if you’re not very tech-savvy. It’s most likely the most mature controller when compared to its competitors. The Dashboard shows the WiFi clients (and they’re divided by standards), the active clients, as well as the total access points.
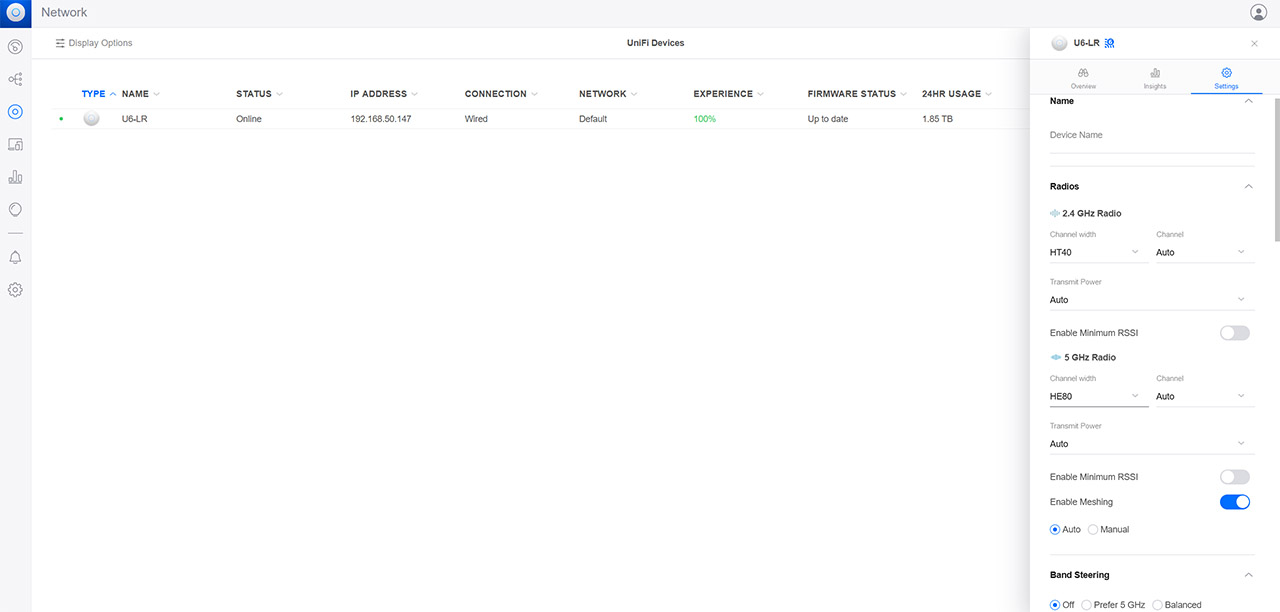
And there’s also the live-view of the traffic (as well as the number of client devices) over 24 hours. The Topology section still has that cool design which gets better as you add more Ubiquiti devices to the network and, under UniFi devices, you’ll be able to find the U6-LR. Click on it to summon the side window where you can check the Overview, the Insights and the Settings tabs. Under Overview, there is huge amount of status data, from connection history to the Air Stats and the connected Clients. The Insights allows you to scan the channels and see which are the most used in your area. So you can avoid them. Then, under Settings, you can adjust the channel, the channel width and the transmit power of the Radios.
You can also enable Meshing, Band Steering (to move clients to the least crowded band) and more. These are all settings that you adjust only for the Ubiquiti U6-LR, but, when adding more than one AP to the network and have them work together, you do need to create some universal settings that will be deployed to all newly added devices. For example, you do need to create at least one SSID and to do so, head over to the Settings section (from the menu on the left), choose WiFi and from the top, create new WiFi networks (you can combine 5GHz with 2.4GHz or keep them separate for each SSID).
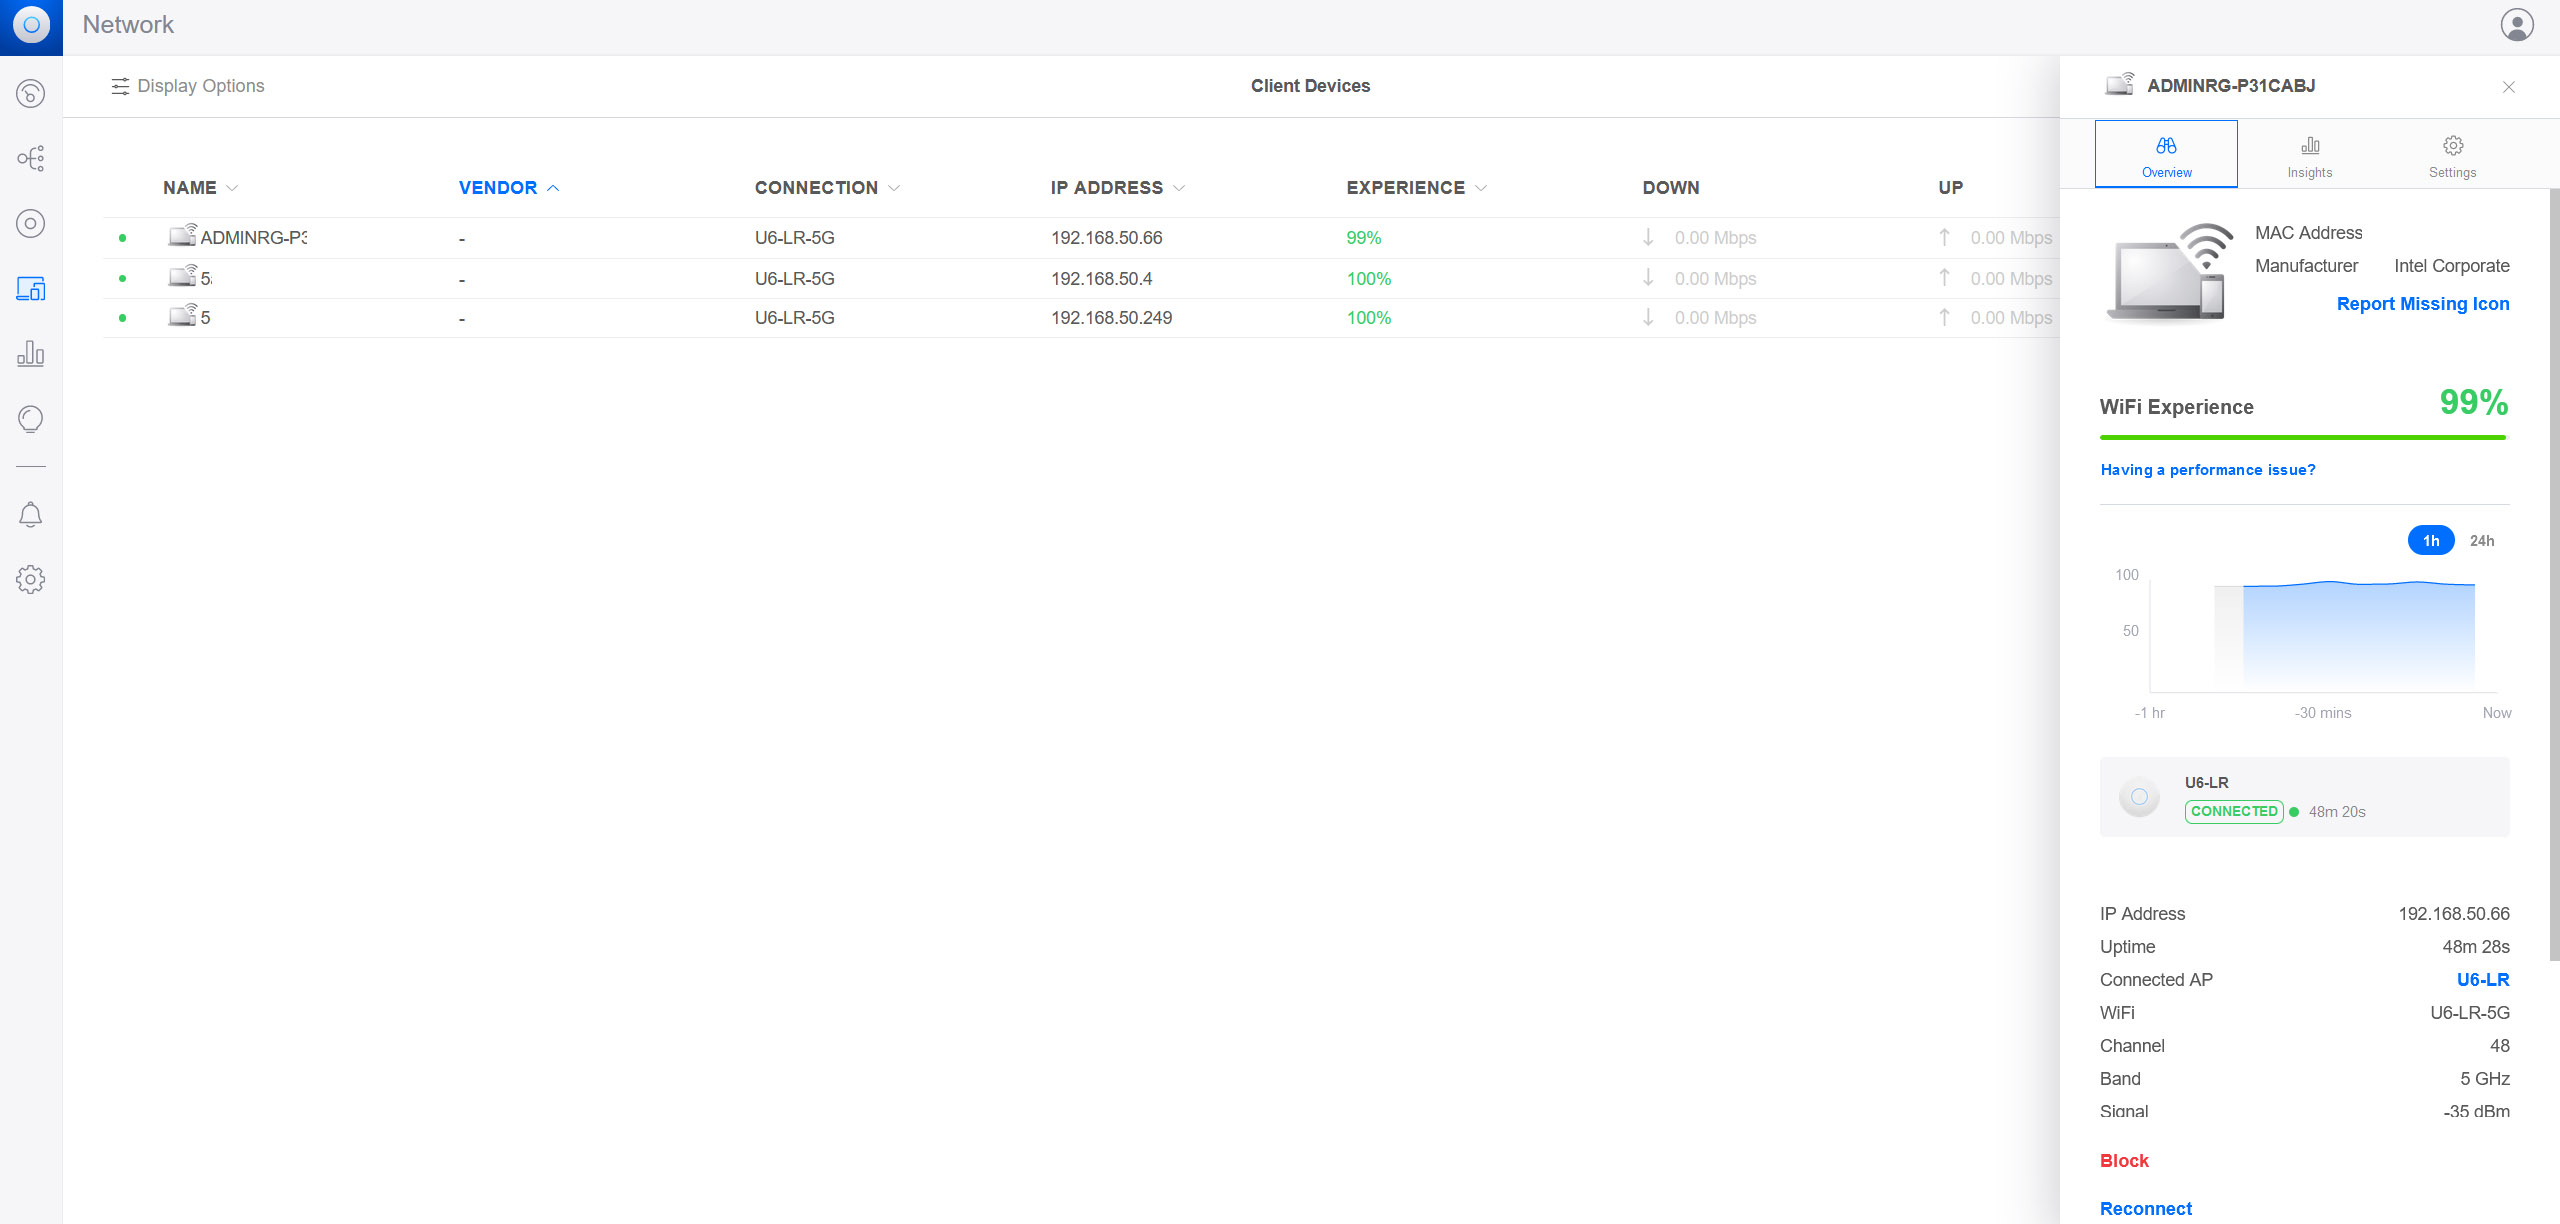
Underneath the WiFi networks, you’ll see the Global AP Settings that you need to adjust for a specific group of access points (or all of them). Under Settings, there’s also the option to set up the VPN, create Static Routes or adjust the Firewall and Security options (obviously in a limited fashion because we do need a gateway for the full experience). I also need to mention the Client Devices section because if you click on any of them from the list, it’s going to open a dedicated window on the side.
And you can see some very important info here, such as the signal strength and the Rx/Tx rate. You can also block the client device, see its past behavior, as well locking it to a specific AP or set it to use a fixed IP address. I also liked the WiFi Scan tool which shows every WiFi network in the vicinity along with a myriad of info that should help with choosing the right settings when managing the Ubiquiti U6-LR.
The Conclusion
I know that there is usually a lot of hype around the Ubiquiti hardware, so was the U6-LR able to raise to the expectations? I would say yes even though the wireless performance didn’t really blow me away. Then again, Ubiquiti APs were never about raw speed, but about stability and the awesome UniFi controller. And even if there have been some questionable practices from the manufacturer (such as the latest downplaying of a data breach – you don’t do that), it seems that it hasn’t really gotten out of the good graces of the public. So, if you do have some WiFi 6 client devices that can actually make use of the new features, then the Ubiquiti U6-LR does make sense. Otherwise, I think that the Ubiquiti nanoHD is still a very valid solution.
Ubiquiti U6-LR
-Pros
- Good wireless performance on the 5GHz radio band
- WiFi 6 features, such as OFDMA
- The device does not get hot to the touch
- Can be adopted into the UniFi controller
- Supports PoE
Cons
- No OFDMA on the 2.4GHz band
- The controller needs Java
- No option to connect a power cable (it can only use PoE)
- The standalone mode is very limited

Mark is a graduate in Computer Science, having gathered valuable experience over the years working in IT as a programmer. Mark is also the main tech writer for MBReviews.com, covering not only his passion, the networking devices, but also other cool electronic gadgets that you may find useful for your every day life.

