There’s also the Queuing Method (here, you can configure the Strictly Priority Queuing, The Weighted Fair Queuing and the Weighted Round Robin Queuing to reduce any performance degradation due to network congestion), Multicast (MVR, IPv4 and IPv6 Multicast), AAA (RADIUS Server, TACACS + Server and ‘Authentication, Authorization and Accounting’ Setup), IPv4 Source Guard (filters unauthorized DHCP and ARP packets from your network – IPSG, Static Binding, DHCP Snooping and ARP Inspection), Loop Guard (guard your switch from loops on the edge of the network), Layer 2 Protocol Tunnel, PPPoE (includes using an intermediate Agent between the server and the PPPoE clients in order to help the PPPoE termination server to identify and authenticate a PPPoE client), Errdisable (set a rate limit for the control packets on specific ports and set a specific action that the switch can take in case it detects a pre-configured error), Private LAN (port isolation within a VLAN), Green Ethernet (802.3az EEE, Auto Power Down when the link is down and the Short Reach which adjusts the transmit power of each port depending on the cable length), LLDP and OAM (monitors the network connection using OAM PDUs and Protocol Data Units).
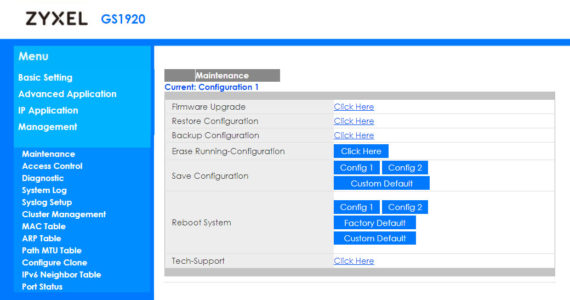
Underneath the Advanced Application, there’s the IP Application (Static Routing, DiffServ, DHCP and ARP Setup) and the Management section (Upgrade the Firmware, Restore, Back-Up, Erase or Save the Configuration, set Remote Management, run Diagnostic tests, view the System Log, view the Port Status and more). As you can see, the level of customization is very high in stand-alone mode, so let’s have a look at how the switch behaves as part of the Nebula Cloud (if you switch from the Nebula managed mode to the stand-alone mode, it will reset the switch to its factory default settings; if you switch from the stand-alone mode to the Nebula managed mode, it will override the configuration settings with those configured in Nebula controller).
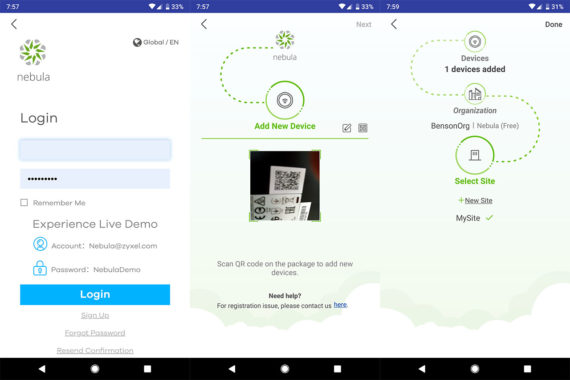
In order to register the Zyxel GS1920-8HP to the Nebula Control Center, you can Log-out of the stand-alone mode (you can also access it from the Cloud Management section) or using the dedicated mobile application. I chose to register the Ethernet switch from the web browser: to do so, I had to create a new account for the Nebula Control Center and create an organization, as well as a new site for my network (I already had a site from when I tested the ZyXel NWA1123-AC HD).
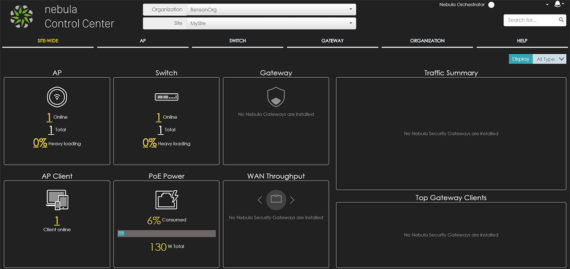
Afterwards, I could see the Nebula Control Center user interface (black background with white characters), the first window being the Site-Wide Dashboard, displaying the number of Access Points (total number of APs, the online Access Points and the Heavy loading percent), the installed Switches, the installed Gateways, the Traffic Summary of any Nebula Security Gateways, the AP Clients, the PoE Power used by the clients connected to the switch, the WAN throughput and the Top Gateway Clients (available if you have a Nebula Security Gateway Installed).
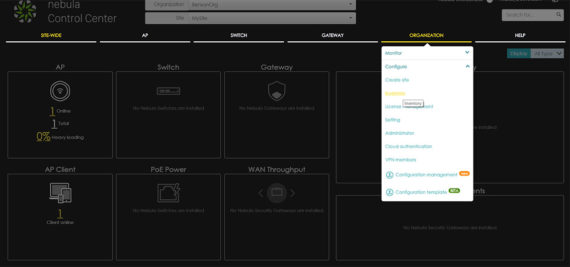
To install the GS1920-8HP v2, you need to go to the Organization tab which, when clicked, will summon a small menu where you have to click on Configure and select Inventory. Here, you’ll be able to see all the installed devices and, to add the switch, click on the Register button: this will open a new window, where you will have to enter the MAC address and the Serial Number; once the device is added to the Inventory, click the small box next to it and press Add to > select your Site Name. The process is even easier if you use the Nebula mobile device where all you have to do is log into your account and select Add New Device to your Site (when prompted, scan the QR code from the bottom of the switch).
When you return to the Dashboard, you’ll be able to see that the Switch and the PoE Power sections are now populated. If you click on the Switch icon, it will take you to the Switch – Summary report section where you can view a live representation of the Current PoE consumption, the switch with the Top power consumption, the one with the Peak power, the Top uplink port, the Top port and the Location (these stats can be set by day, week or custom).
If you click on the Switch tab from the horizontal menu, you can go to other areas from the Monitor group, such as the Switch, which displays a list of all connected Ethernet switches (with various custom tags – if you click on the name of any switch, it will take you to a new window where you will be able to configure some basic elements, view the status of the switch, as well as the position on the map; you can also view a graphical representation of all the ports and which is in use – press on any to view detailed info, to run Cable Diagnostics or Display real-time SFP transceiver info and operating parameters), the Event log and the Client list (each with its own MAC address, the switch that it is connected to, the occupied port and the VLAN) – click on any client to view some Basic info and the Network MAC address.
Selecting the Configure group of options, will allow you to view all the Switch ports (with the connected devices, the sent / received bytes and if the PoE is enabled) and, if you click on any port, you’ll be able to change the General Settings (such as enabling the RSTP, the LLDP, PoE, Loop, Guard, Storm control, the Port Isolation, changing the Link type, selecting the Allowed VLANs and more – I noticed that the Bandwidth control is an option solely available for the PRO users) or configure the IPTV setting (only for PRO users).
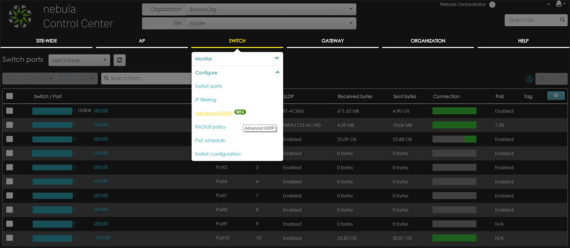
Furthermore, under the Configure section, there’s also the IP filtering (here you can create filtering rules), the Advanced IGMP (IGMP snooping – currently, it’s in Beta stage), RADIUS Policy (Password for MAC-based Authentication), PoE Schedule and the Switch configuration (includes VLAN configuration, STP config, QoS, Port mirroring, Authentication servers, Voice VLAN and DHCP Server Guard). Other areas of interest are the Map and Floor Plan under the Site-Wide section (you can see on the map where your devices are installed – you can quickly access the switches by clicking on their name), the General setting, where you can perform a firmware update (or schedule it), set Switch alerts under the Alert settings and view the status of firmware for every registered device under Firmware Management. The Nebula application (available for both iOS and Android OS) has a similar look and feel to the Desktop UI, but it does have less options available – it still can offer a basic configuration, but for the full experience you need to use the web-based Nebula user interface.
The main difference between the stand-alone configuration and the Nebula Control Center is the fact that despite having similar settings and options, the latter allows you to quickly configure multiple switches remotely along with other compatible types of devices (access points or gateways), while the standalone option is suitable for a single Ethernet switch and nothing more. When I tested the ZyXel NWA1123-AC HD, I noticed that the Nebula Control Center was a bit less consumer friendly than some solutions from TP-Link (Omada controller) or from Linksys (the Cloud controller) and it still feels a bit more enterprise, but there are some new options to explore and, while I haven’t tested the UniFi controller with the Ubiquiti switches, I don’t doubt that the Nebula Control Center is a worthy contender in every aspect.
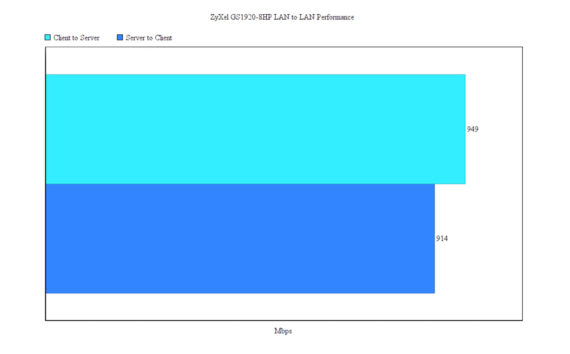
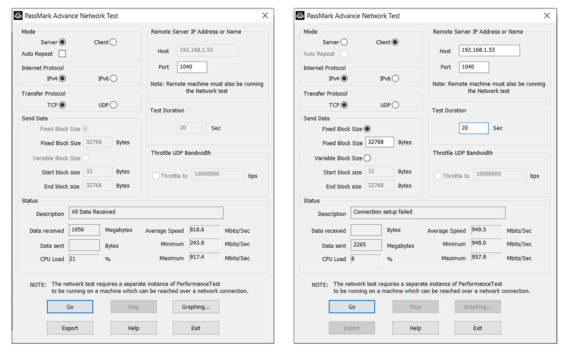
Since this is a networking device, I decided to run a couple of tests using two computers which I connected using CAT6 cables, one set as the server and the other as the client. Using a basic iperf3 test, I managed to measure an average of 949 Mbps from the client to the server and an average of 914 Mbps from the server to the client. Next, I ran the PassMark test (for Networking) and, from the client to the server, I got a similar performance (approximately 949 Mbps), but from the server to the client, things stood a bit less impressive with an average of 818 Mbps, but I did notice some unusual CPU spikes on my computer during the test.
Conclusion
Zyxel has recently developed a purely Cloud-based Switches series, but the GS1920-8HP v2 is built to be an alternative to the these devices, offering a stand-alone configuration option (mostly suitable for home users and for some smaller SMBs), as well as the possibility to be monitored and configured alongside other Zyxel devices using the Nebula Cloud Management Platform which has matured quite a bit since last year (adding more and more options). The switch itself is robust and reasonably compact, but I did notice that it runs a bit hot, so an additional fan maybe wouldn’t have been such a bad idea after all. That being said, being completely silent is a bonus and, considering that it does come with a huge amount of options (along with the mostly-free Cloud controller), the GS1920-8HP can still be considered one of the best smart managed compact PoE switches on the market.
Zyxel GS1920-8HP
Pros
- Fanless design = completely silent
- Eight PoE Ports (130W)
- Offers standalone and Cloud Management
- Lots of advanced, enterprise-type features
- Has a button to load a previously saved configuration
Cons
- The device runs a bit hot
- Lacks a Power On/Off button
- The UI is still not really consumer-friendly

Mark is a graduate in Computer Science, having gathered valuable experience over the years working in IT as a programmer. Mark is also the main tech writer for MBReviews.com, covering not only his passion, the networking devices, but also other cool electronic gadgets that you may find useful for your every day life.

