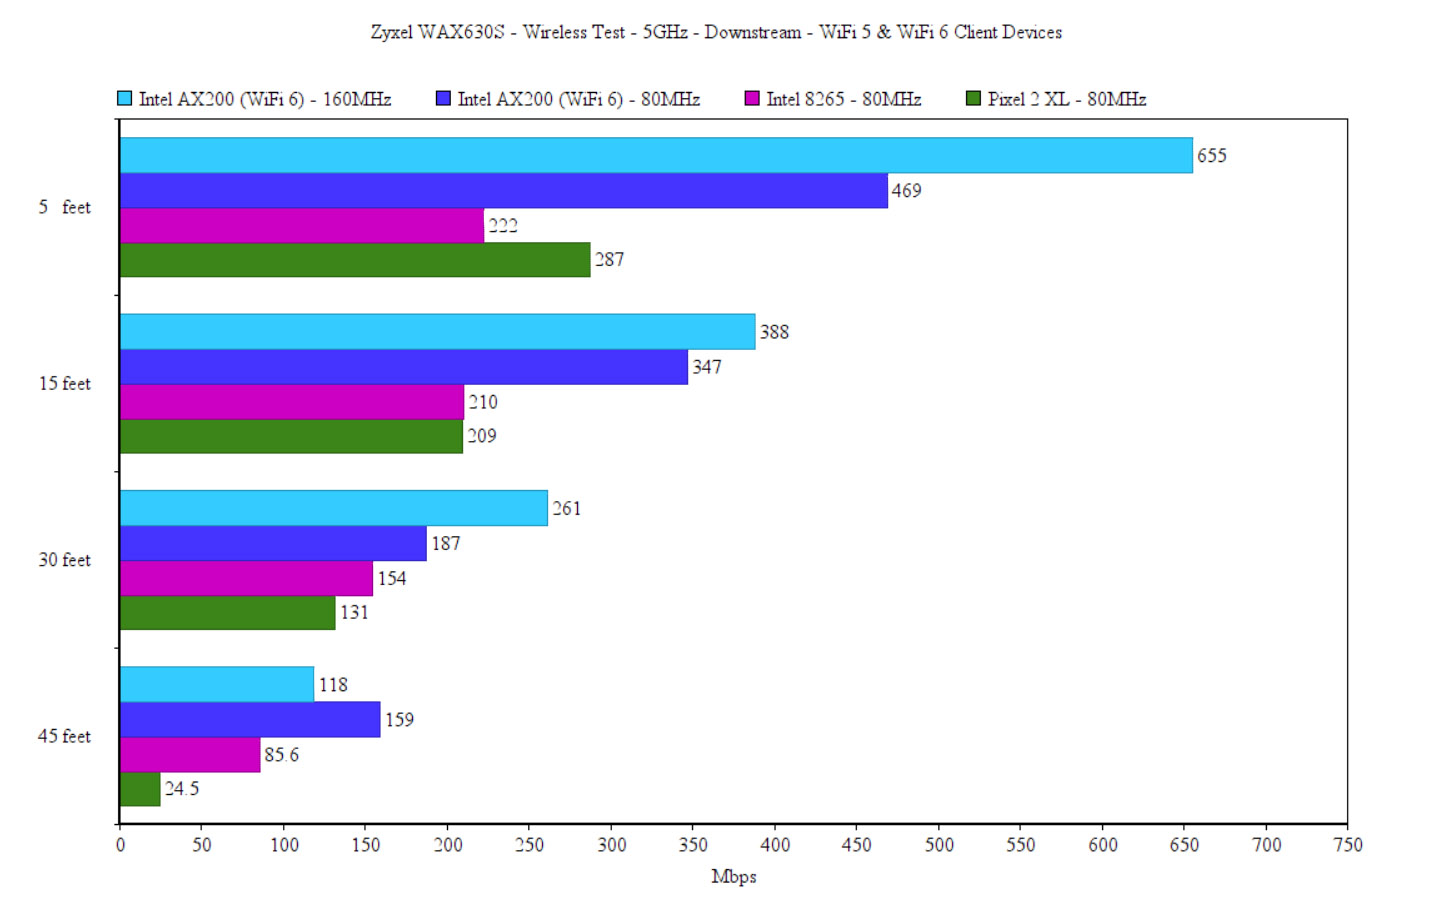
So, at 45 feet, the signal was about -72dB and the throughput was 176Mbps upstream and at -80dB, it immediately dropped to unusable, averaging at 15.8Mbps. Downstream, the speed ranges between 655Mbps to 261Mbps from 5 to 30 feet and then it goes to 118Mbps at 45 feet. Again, at -80dB (about 65 feet), it’s unusable, averaging close to 10Mbps.
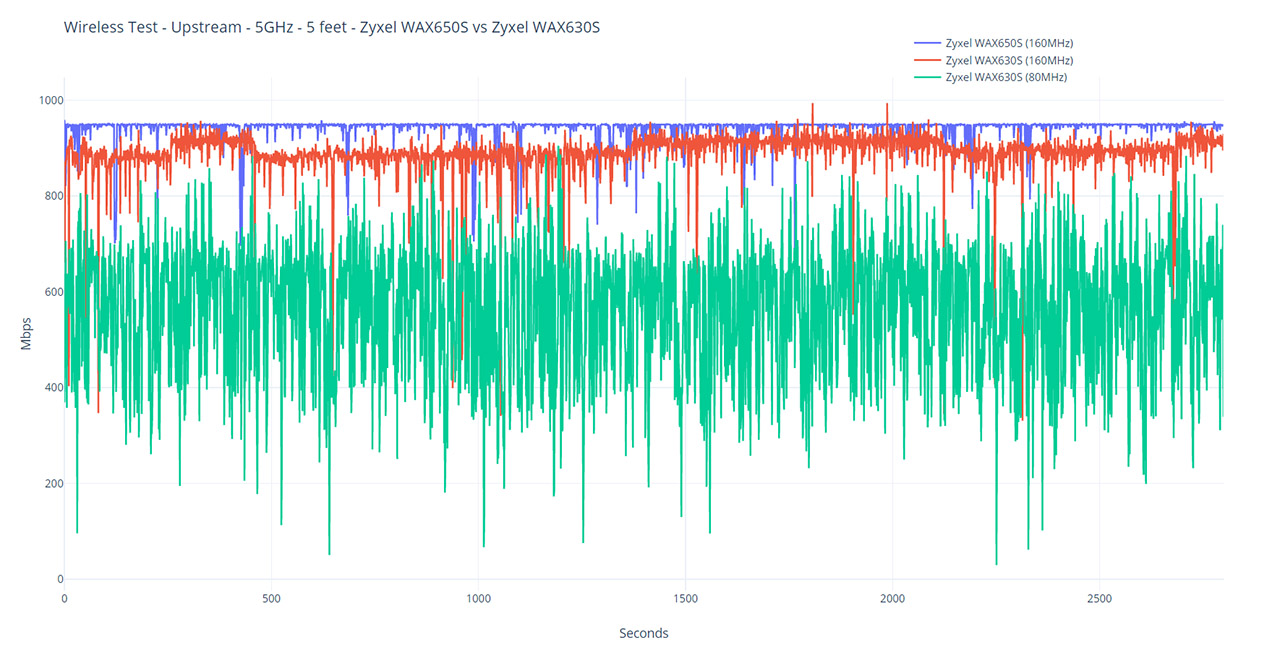
Moving to the 80MHz channel bandwidth, but keeping the same WiFi 6 client device (Intel AX200), the performance is very different from the WAX650S. Upstream, I saw 605Mbps at 5 feet, while at 45 feet, the throughput was a bit better than while I was using the wider 160MHz channel bandwidth, reaching an average of 198Mbps (-74dB). What’s interesting is that at about 65 feet, the signal reached -83dB and the speed became pretty much unusable, averaging at 9.8Mbps. Afterwards, I decided to check how some WiFi 5 client devices would fare, especially with the smart antenna algorithm promising such an excellent performance.
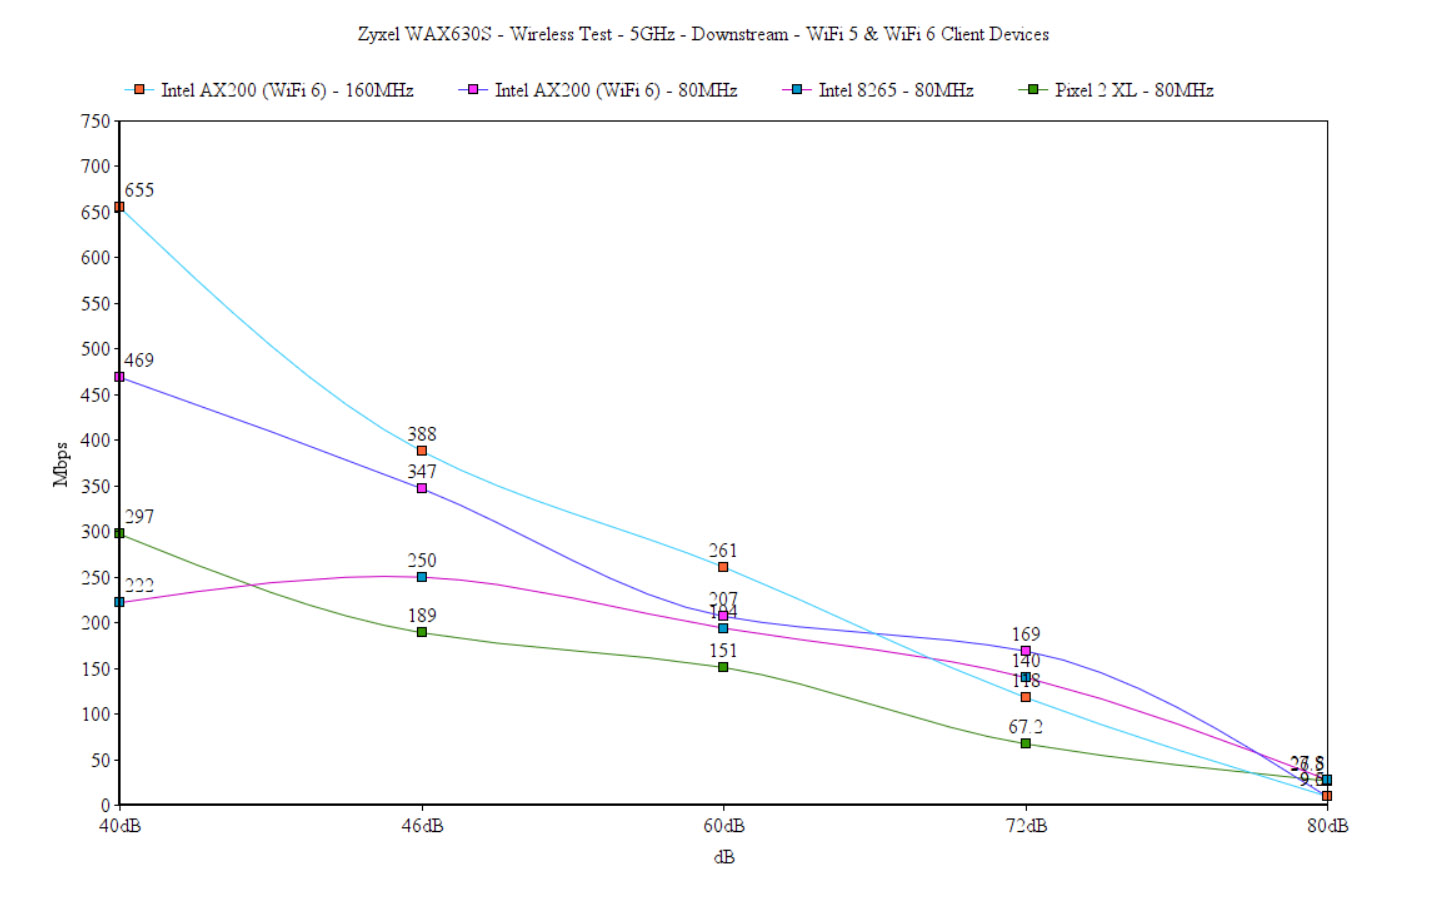
The first client device was a laptop with an Intel 8265 WiFi 5 adapter and upstream, at 5 feet, it only reached 451Mbps. And it was interesting considering that the signal was -40dB, while at 15 feet, it was -55dB, but the throughput was about 435Mbps. So, I assume that the smart antenna doesn’t seem to like it that much when I stay too close to the access point, below 10 feet – which is easy to achieve when the AP is on the ceiling. And it’s only happening with WiFi 5 clients.
I say that because the second WiFi 5 client device is a Pixel 2 XL and it has a similar behavior, where it would reach 401Mbps at 5 feet (-41dB) and 379Mbps at 15 feet (-44dB). But that’s where the similarities end because while the Intel 8265 client device did relatively well going to 45 feet and a bit beyond (with a decent speed), the Pixel 2 XL showed a signal of -83dB at 45 feet, averaging 53.2Mbps upstream and 24.5 downstream. Going farther would have meant an unstable connection.
Wireless Test (2.4GHz)
Moving on, I also needed to see the performance that I could get using the WiFi 6 and WiFi 5 client devices. And the first thing that I did was to set the channel width to 40MHz (to see how high the speed can get) and I connected the AX200 WiFi client to the 2.4GHz network.
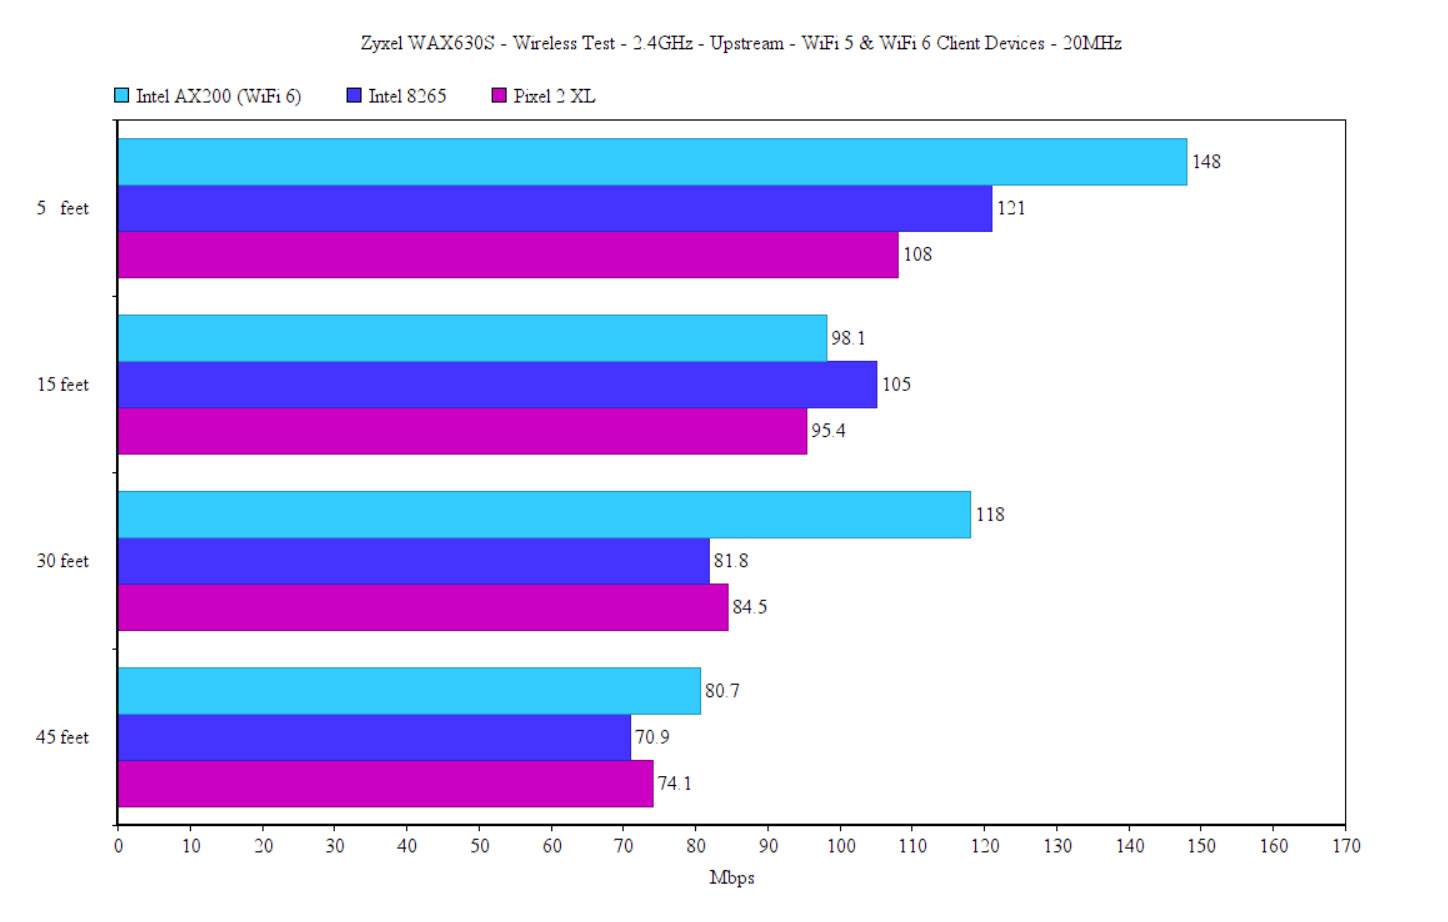
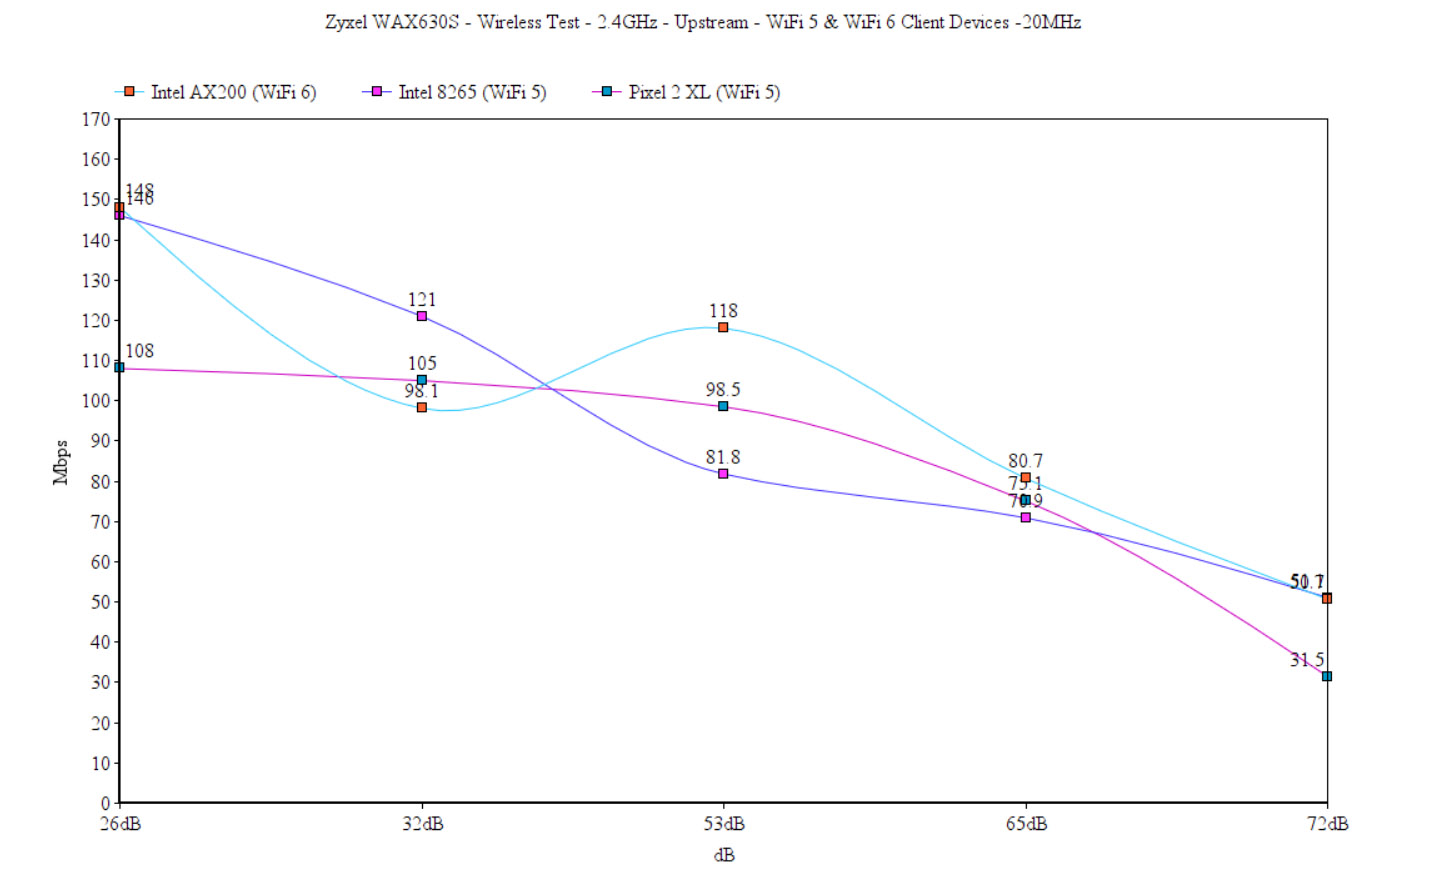
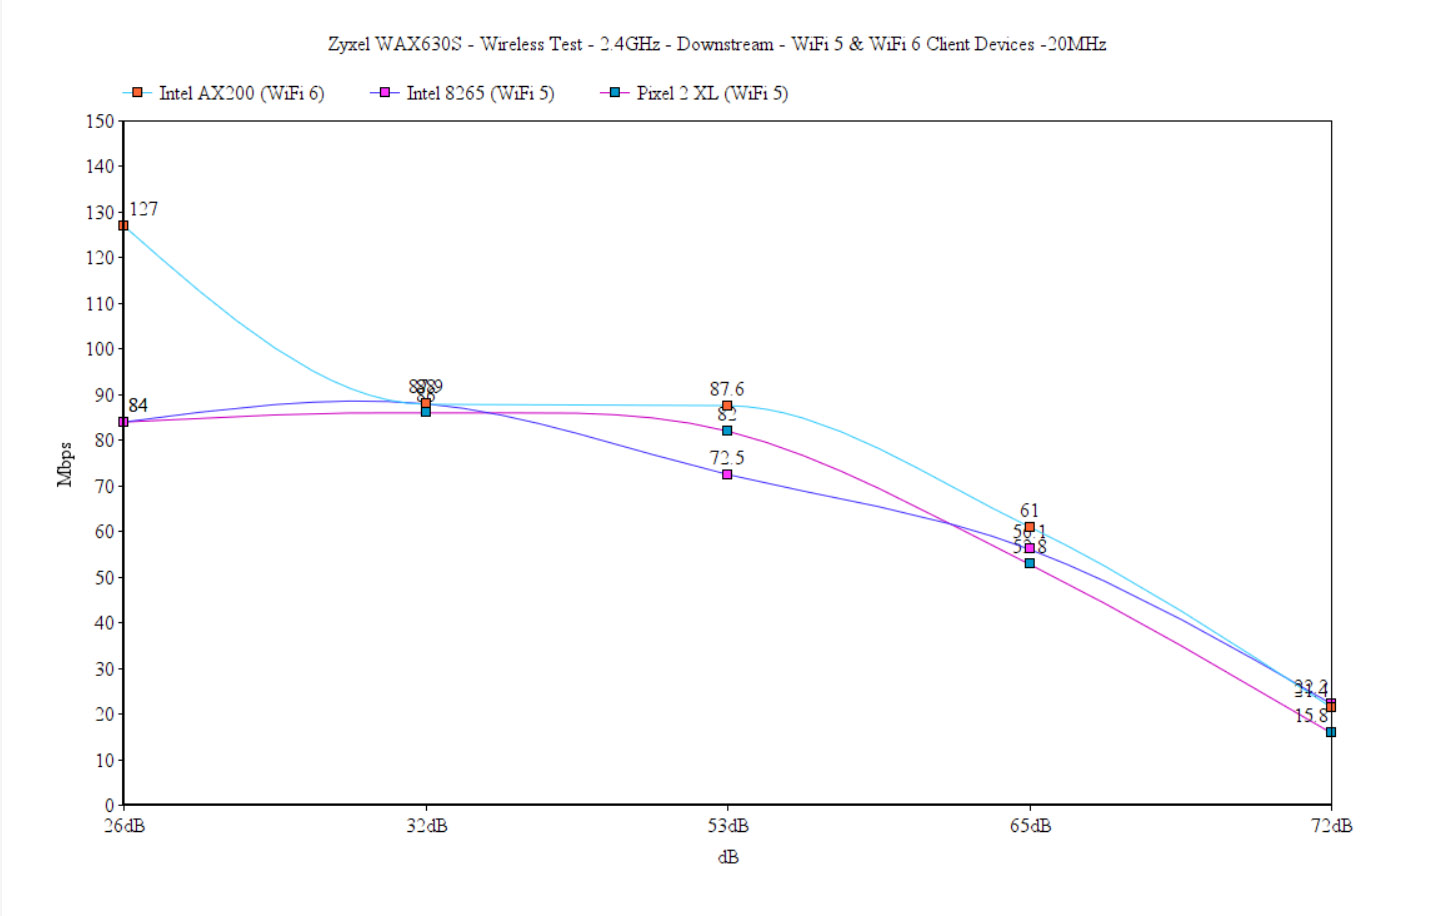
Upstream, at 5 feet, it was 148Mbps, which sort of remained consistent, slowly dropping to 50.7Mbps at about 65-70 feet (-72dB) away from the Zyxel WAx630s. The downstream throughput wasn’t that much different (a few percentages lower), but the overall performance was lacking. So I once again investigated what’s going on. Turns out, even if I did set the channel bandwidth to 40MHz, the access point would be like, NO! It’s 20MHz and there’s nothing you can do to change my mind (cue dramatic music). Despite setting it in the Cloud at specifically 40MHz only, it remained on 20MHz. And I also tried it before in the stand-alone interface and there was the option to select 20/40MHz and it still sat at 20MHz. So, yeah, this is the performance on the 2.4GHz radio, 20MHz channel bandwidth.
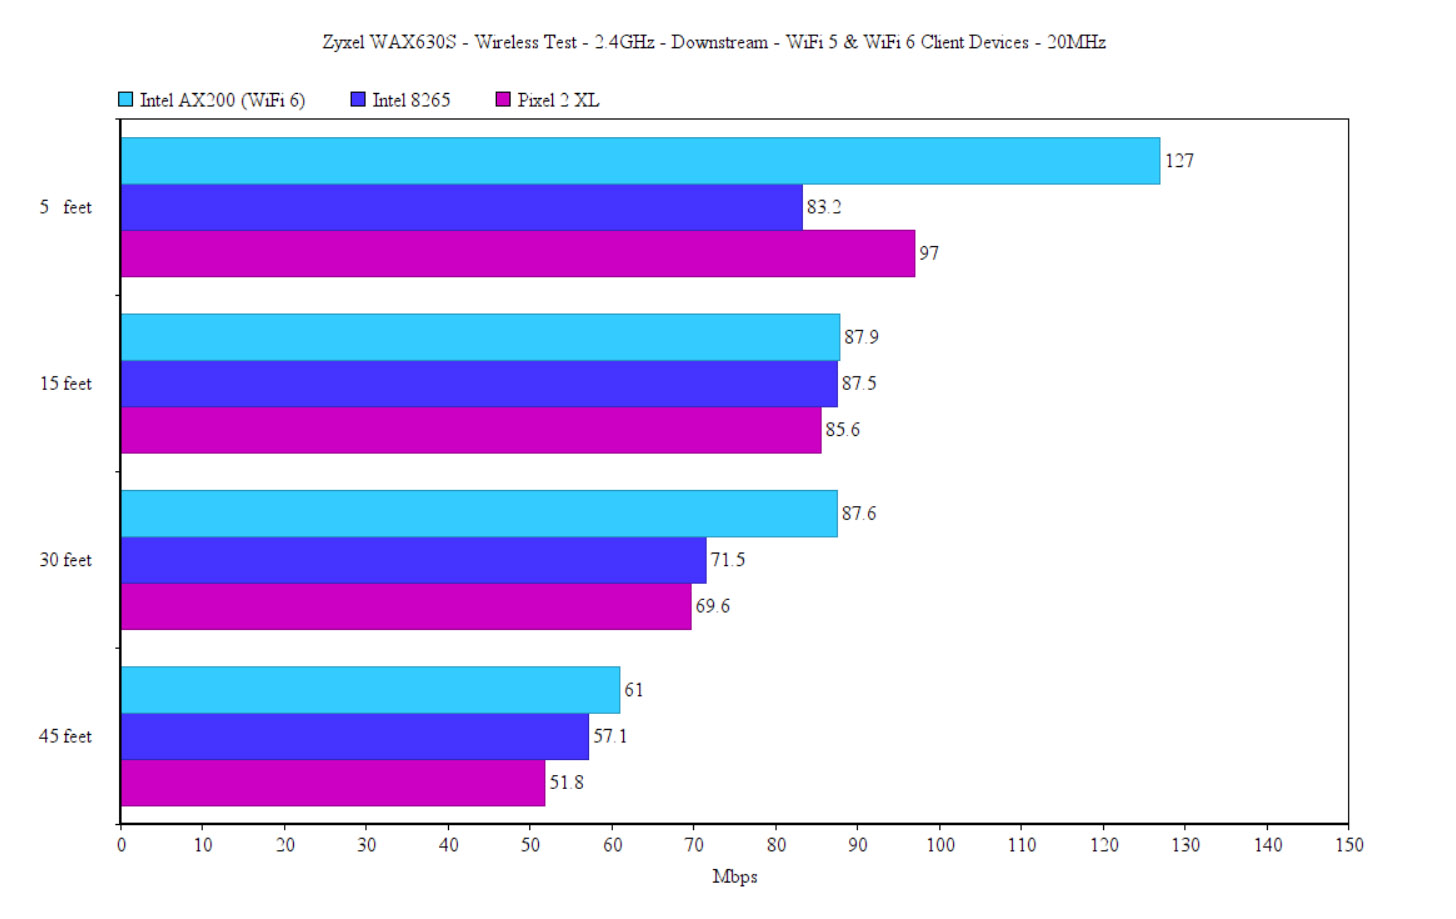
After switching to the first WiFi 5 client device (Intel 8265), I saw an average of 121Mbps at 5 feet (upstream) and 70.9Mbps at 45 feet. Even at about 65 feet (-72dB), I could still use the Internet up to a certain point (51.1Mbps up and 22.2Mbps downstream). Lastly, I moved to the Pixel 2 XL (WiFi 5) and the performance was somewhat similar to the Intel 8265, as you can see in the graph.
Setup and Software
Standalone Mode
I know that a lot of people are uneasy investing in Cloud-only hardware, so I do appreciate that Zyxel has included a stand-alone interface to allow the use of the WAX630S without relying on the Cloud controller. To access it, enter the IP address that it was given by the router into a browser URL and then you will be asked to insert the username and password. The default credentials are admin/1234. Then, the Setup Wizard will start, where you can adjust the Time Settings, change the password (but not the username), select the Uplink Connection and change the radio settings (the 5GHz seems to be limited to 80MHz channel bandwidth only).
The Security Mode is limited to WPA2-Personal, but don’t worry, all the settings, including 160MHz and WPA3 are available in the interface after the initial setup process is done. And to change it, go to Configuration (the cogwheel icon from the main menu) > Wireless > AP Management. Here, identify the Radio Profile (5GHz) and click on the edit icon – change the Channel Bandwidth to 160MHz.
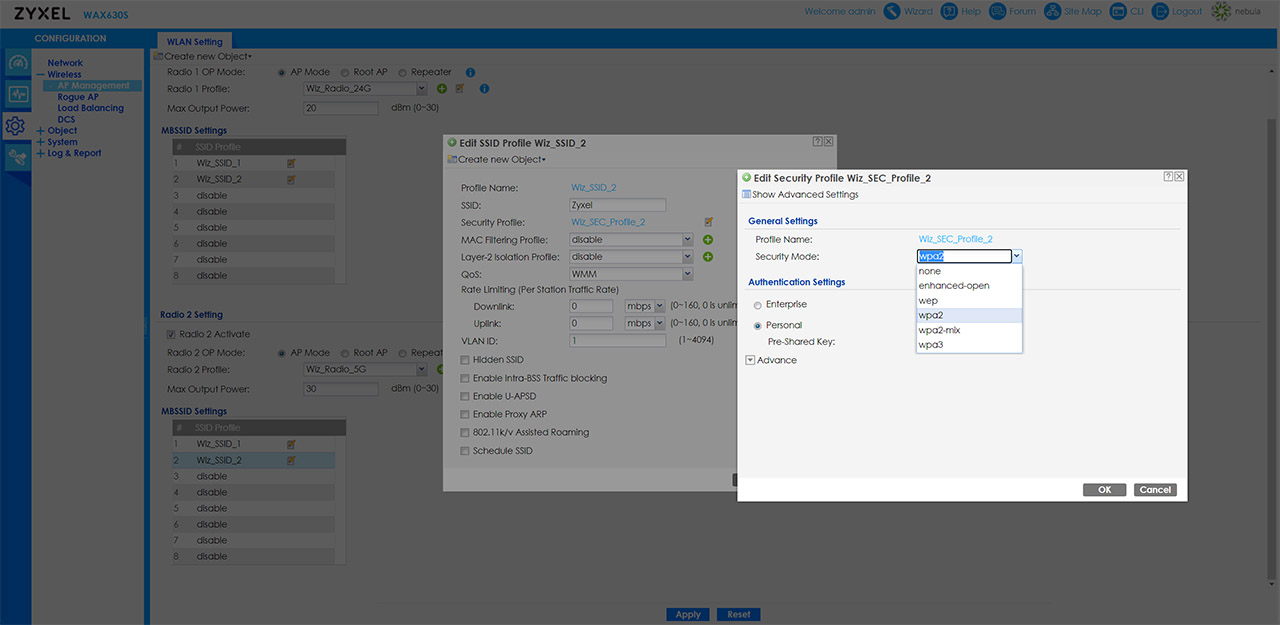
Then, identify the MBSSID Settings and choose the SSID that you want, click on the edit icon and check out the Security Profile. Click on the edit icon and select WPA3 from the Security Mode. Returning to the main page, not much has changed since I tested the WAX650S. The Dashboard is rich in status information (including the System Resources in real-time) and the AP Information which detects Rogue APs, Unclassified APs, as well as Friendly IPs. The Monitor tab will also show a myriad of info, allowing you to verify the way the ports behave, as well as check more in-depth info about the wireless clients and WLAN. The Configuration tab is incredibly comprehensive, so the feature list in huge.
So, I would only like to mention the possibility to set a VLAN on the AP’s ports, to enable Storm Control, to detect Rogue APs and the Load Balancing (by Station Number, Traffic Level or Smart Classroom). Also, under Configuration > System, you can change the Power Mode (to max), enable SSH, TELNET, FTP, HTTPS and SNMP.
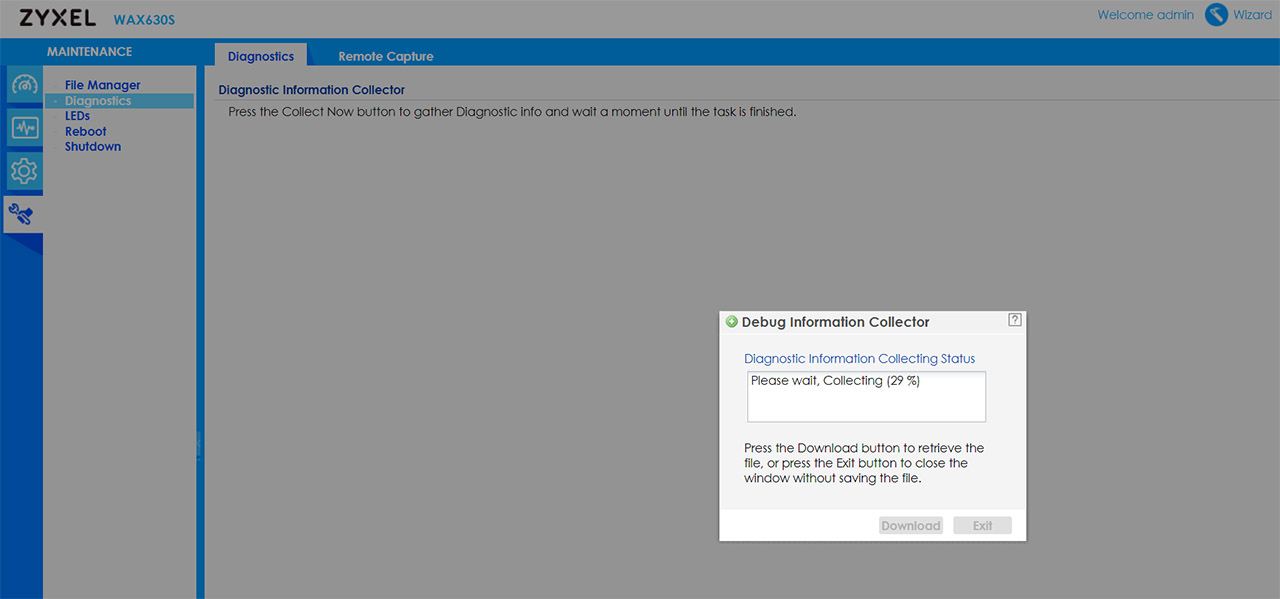
Under Maintenance, you can gather Diagnostics data (even remotely), turn on or off the LED, Reboot or Shutdown the wireless access point.
Working with Nebula Control Center
The NCC went through several layout changes over the years, but nothing too radical, so the interface looks pretty much the same as when I tested the Zyxel WAX650S. And, to add the Zyxel WAX630S, I had to log into nebula.zyxel.comm, click on Site-Wide > Add devices and enter the Serial Number, as well as the MAC address. That’s it.
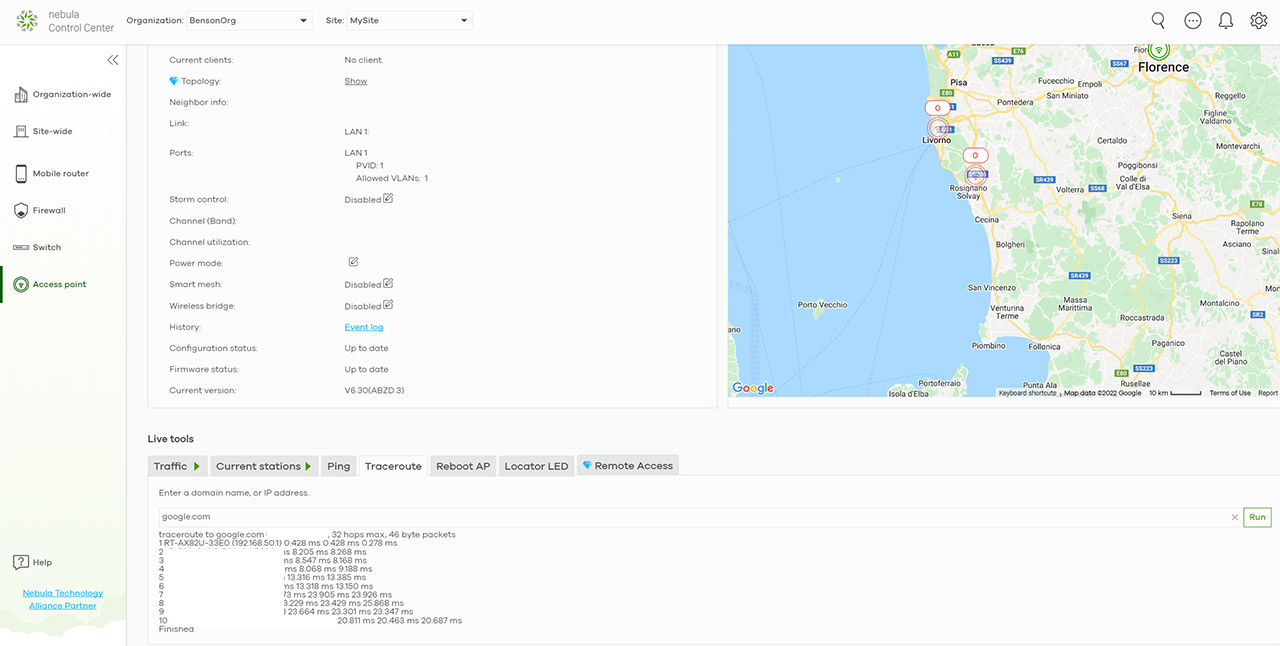
The products is immediately registered (they cut down some of the steps, which is neat). In case you have a license, you can add it by going to Organization-wide > License & Inventory and select Devices. That’s how I enabled the 1-month free Connect & Protect Plus feature that we’ll analyze a bit deeper in a minute. To monitor and configure the Zyxel WAX630S, you need to click on the Access Point tab from the menu and the Monitor section will not only show comprehensive status info, it will also provide some Live Tools. These include Ping, Traceroute and Remote Access.
The Client section was unpopulated despite having multiple devices connected to both the Ethernet switch and the access point, so that was a bit disconcerting. Another weird thing was under Switches because when I wanted to see the status of the ports, the NCC thought that every port was offline. And I had 5 client devices connected, plus the Uplink, so no idea what happened, but Zyxel needs to patch some of these issue which weren’t present a few months ago. That being said, let’s return to the Access Points area and this time, under Configure, you get everything you need to set up multiple SSIDs, to change the way the Radios will behave, the Security protocols, enable Traffic Shaping (part of the Plus or Pro Pack License) and adjust the way the port will work.
There is also the Captive Portal which is useful for hotels (or similar resorts), so yes, as usual, Zyxel offers all the expected features and more to easy adjust the way the access points function in your network.
Let’s talk about the Collaborative Detection and Response
The license is free for one month which is enough to give you an idea on whether you need this type of feature to run on your networks. As its name suggests, the Collaborative Detection and Response (CDR) relies on the firewall of the Zyxel devices creating the network to detect a threat and, when it does, to put the entire infrastructure under alert. This way, a potential infection that could have moved from one device to the other is immediately contained at the edge of the network (the client is quarantined).
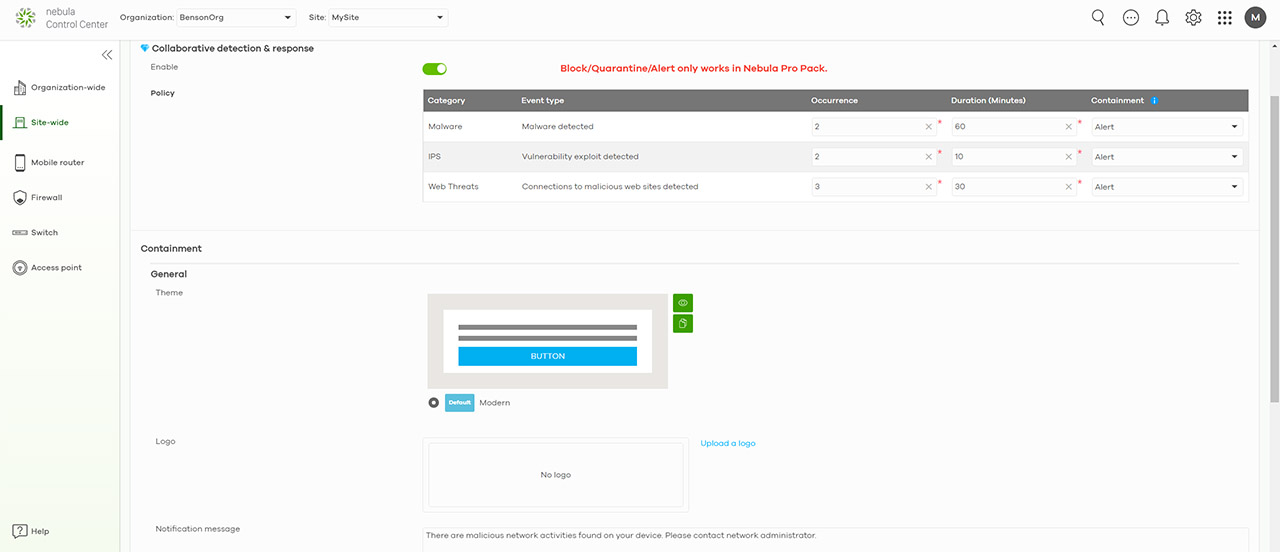
The firewalls are using Anti-Malware, URL threat filter and IDP to detect any potential intrusion and, as expected, the idea is to use USG firewall hardware. So, it will work in a very limited manner on the Zyxel WAX630S along with a XS1930-12HP switch. Still, I did check out the dedicated page and saw that it’s possible to set the Policy (the conditions that need to be met) and the Containment (what the user will see if the device they’re using has been compromised). Additionally, it’s possible to block the wireless client, set a Quarantine VLAN (which can be an interesting way to check for intentional intrusions) and to create an Exemption list (MAC or IP).
The Conclusion
I admit I expected a smaller scale version of the WAX650S, but the Zyxel WAX630S is a completely different device. Well, not really completely because the smart antenna is still there, although slightly different, there’s good heating management and the NCC support + very comprehensive standalone mode remains a part of the access point. The WiFi performance is good when using WiFi 6 client devices and not that impressive with WiFi 5 clients on the 5GHz network. The 2.4GHz has been a bit weird and perhaps it’s a software issue that can be patched, but I couldn’t change the channel bandwidth. There are some other weird software occurrences that have happened which weren’t there before when I tested other Zyxel APs, so perhaps it’s in relation to the current international events or I just simply caught a bad server week, but hopefully things will return to normal soon.
Zyxel WAX630S
-Pros
- Good wireless performance with WiFi 6 clients on the 5GHz radio band
- Solid construction + compact case
- WiFi 6 features
- 2.5GbE port
- Comprehensive standalone interface + support for Nebula Control Center
Cons
- The Client section was unpopulated on the NCC and other strange behaviors (such as the Switches area)
- The 2.4GHz radio band would not switch to the 40MHz channel bandwidth
- The wireless performance with WiFi 5 client devices was alright, but I expected more

Mark is a graduate in Computer Science, having gathered valuable experience over the years working in IT as a programmer. Mark is also the main tech writer for MBReviews.com, covering not only his passion, the networking devices, but also other cool electronic gadgets that you may find useful for your every day life.

